

Handprint Crafting | Clay Ornaments and Handprint Paper Wreath
Handprint Crafting | Clay Ornaments and Handprint Paper Wreath
‘Tis the season for crafting! The weather is cooling off, the nights are coming sooner and my brain and hands need something to do. With my son’s first Christmas right around the corner, I decided to take on some fun, keepsake crafts for myself and for gifts. Even better…I spent ZERO dollars, that’s right, NOTHING on creating these crafts! I used only things I had laying around my house (or my mom’s house) to make these classic crafts.
I am getting a head start on my 25 activities to do with a baby leading up to Christmas! Read about these fun activities here: 25 Christmas Activities to do with a Baby
Handprint Craft #1 | Clay Ornaments
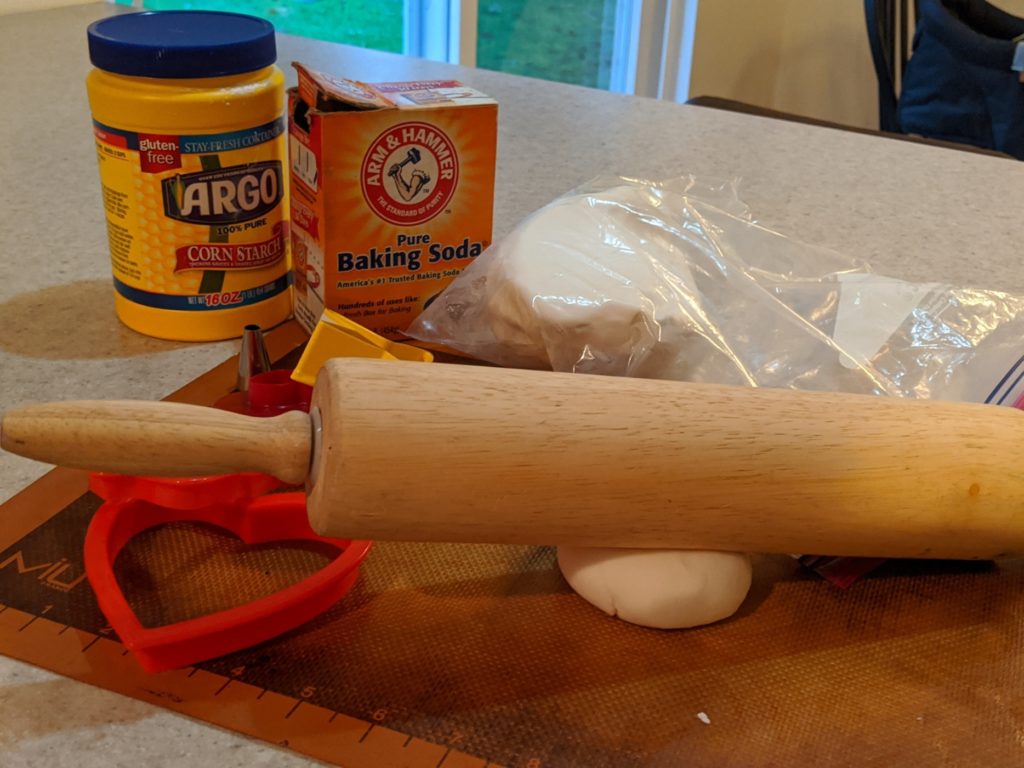
First, I decided to make handprint and footprint clay ornaments. I used a very simple recipe that resulted in a smooth and easy to work with dough.
For the dough, you will need:
- ½ cup cornstarch
- 1 cup baking soda
- ¾ cup water
- Cookies cutters or stencil to trace
- Optional: food coloring (you will need to mix the color into the water before mixing it into the rest of the ingredients to make a colored dough)
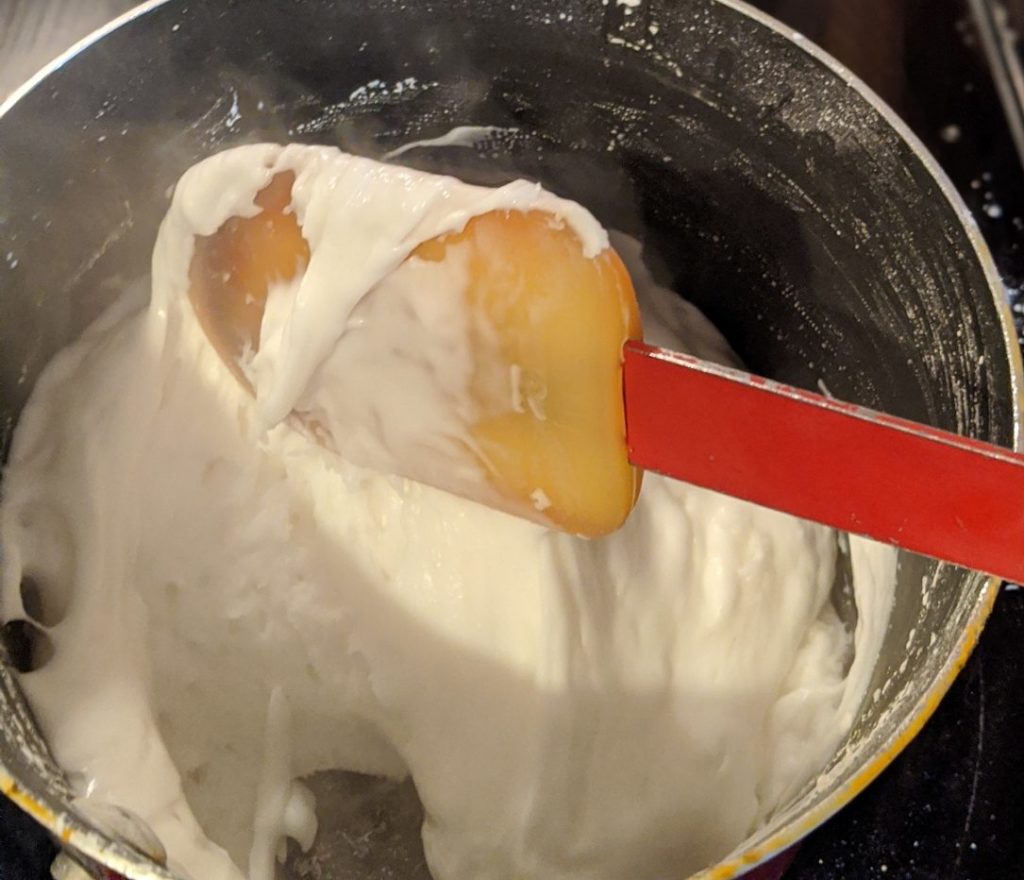
- In a pot, combine all the ingredients and stir continuously over medium heat. After a few minutes, the mixture will start to thicken. Keep stirring until it looks like mashed potatoes. This took me probably 5-7 minutes.
- Put the dough into a bowl and cover loosely with a damp paper towel to keep the moisture locked in as it cools down.
- Once it is cool enough to work with, knead the dough for a couple of minutes on a silicone mat until it is silky smooth.
- Now you’re ready to roll! Roll the dough out to the desired thickness and cut, stamp, emboss, trace, or whatever you’re gonna do. If you plan to use these as ornaments, make sure to stamp a hole with a straw in the dough while it’s still wet. I ended up using a frosting tip to stamp the hole.
- You can dry the ornaments in your oven at its’ lowest setting (mine is 170 degrees F) for at least an hour if they are thin, but mine were much thicker and took closer to 3 hours. Alternately, you can air-dry the ornaments, this will just take longer. Heat is not necessary for drying the clay, just air and time!
- Leave as is, or paint!
- When you are ready, loop some ribbon through the hole and hang on your tree.
If you want to skip the make of dough process, you simply purchase a premade kit off of Amazon here: Proud Baby Deluxe Clay Hand Print & Footprint Keepsake Kit – Glaze Finish – Letter Stamps – 4 Ribbons – 2 EASELS – Dries Stone Hard – No Bake – Air Drying (Makes 2 Plaques)
My son loved the feeling of the dough as I pressed his hands into it. The more times I did it, the more he learned to curl his fingers up and try to grab the dough…resulting in holes in the ornaments. Realizing my results wouldn’t be perfect, I shrugged it off and moved forward. The feet were easier to control, so I made a few impressions of those.


Katie did this same craft with her dog a few years ago! You can make anything you want with the dough: pet paw prints, kid handprints, baby footprints, cookie-cutter shapes… you name it! This craft was super simple to make and resulted in a fun keepsake. My tree is happily sporting the new ornaments.
The next time I do this, I won’t make my ornaments as thick, mine were probably almost a half inch thick and I think that is why there was cracking. I would make them about 1/4 inch thick.
Follow on Pinterest here: www.pinterest.com/katieandkristen
Handprint Craft #2 | Paper Wreath
Along the handprint theme, I had been itching to make a handprint wreath. The kind where you trace your baby’s hand onto green paper, cut it out, layering and gluing the handprints onto some sort of circle cardboard to create a wreath shape.
For this project, you will need:
- Green paper
- Red paper
- Template of your baby’s hand
- Scissors
- Glue stick
- Cardboard or a paper plate
- 24 inches of ribbon
- Optional: Patience
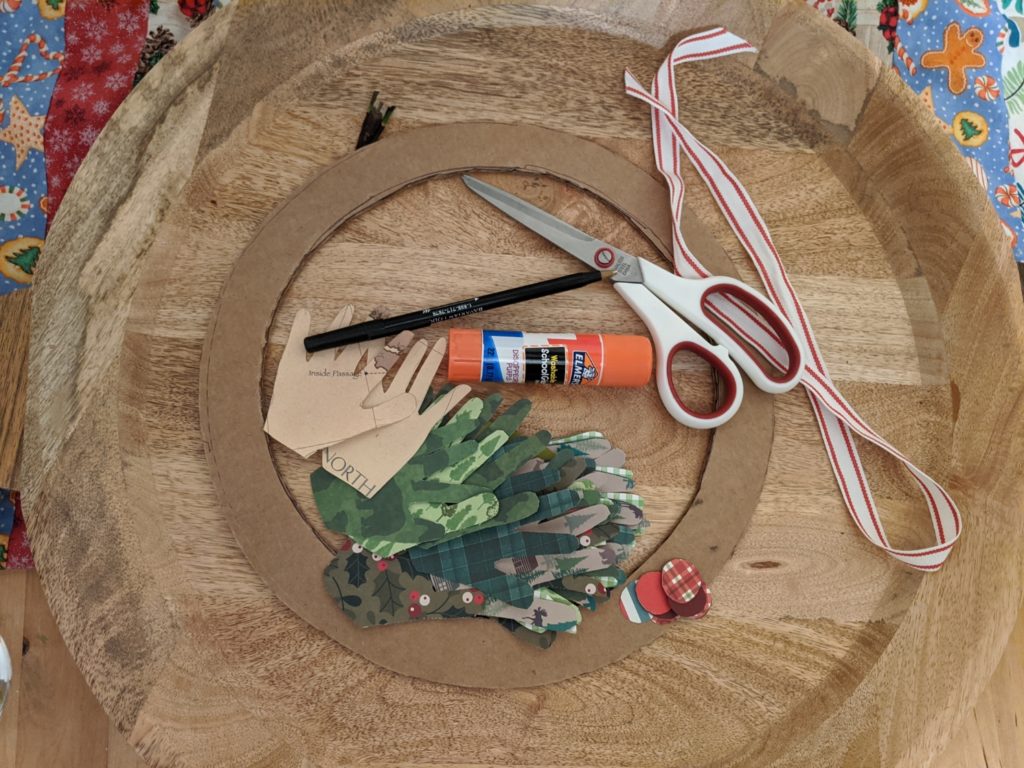
- Collect your papers. You can go to the craft store and pick out your papers, but I was trying to do this with things I had laying around the house and without spending any money. So, I dug around my office for any bits of green paper, patterned or not, and also had my mom do the same. Between the two of us, we had some fun scrapbooking scraps leftover in greens and reds.
- After gathering the paper I would need, I traced my son’s hands onto a piece of paper and cut those out to use as a template for all the subsequent handprints.
- Take a piece of cardboard or a paper plate to cut out a cardboard ring. This ring will be covered up by handprints, so it doesn’t need to be pretty, but it should be sturdy. I used a dinner plate to trace a larger circle, then a bowl to trace a smaller circle inside of it. When I cut the circles out, I had a ring that was about 1.5 inches wide all the way around.
- Next, I cut squares of paper that I could stack to cut multiple hands at a time. You can trace the handprint onto the top square of paper to cut around, but I skipped that step and simply held the template tightly against the stack of squares and cut around it.
- Repeat this process until you have enough handprints to cover your circle. This part is up to you on how full you want your wreath to look. I realized as I would lay out my hands, that I liked the wreath to look very fluffy and full, so I kept cutting and cutting…I used a total of 60 hands. This is where your optional patients come in.
- As you cut more hands, loosely lay them out along your cardboard ring to see if you like the coverage and fullness you are getting. Keep cutting out paper hands until you do.
- Take your red paper and cut out small circles, about ¾ inch in diameter. These will act as your ‘berries’. I used 18 berries, but you can do whatever you like!
- Loop your ribbon around your cardboard ring BEFORE gluing the handprints down.
- Now, glue your handprints onto your ring. The easiest way to do this was to think of it like shingling your gingerbread house roof, you want to work backward so that the fingers don’t get covered up. Keep your fingers all pointing in the same direction, but angle the fingers towards the inside of the circle and the outside to create depth. Glue away!
- Once your hands are all attached, smack your berries with some more glue on as you please. I liked grouping them in sets of threes.
- Lastly, hang your new keepsake and enjoy!


This project took patience because I thought I would only need MAYBE 20 handprints at the most but ended up needing three times that to get the look I was wanting. I am super happy to have this craft hanging in my living room and love looking at my little man’s tiny hands.

In a time of more ‘stay-at-home’ orders and Christmas coming soon, crafts have been a fun mental break. The challenge of using only household items to create these handprint crafts has also been invigorating! So go look around your house, what could you make or do with what you have? And if you try one of these classic crafts, drop a picture in the comments below. We would love to see!


non prescription ed drugs prescription drugs without doctor approval online canadian drugstore
ivermectin autoimmune mexico ivermectin trial ivermectin dosage for covid
ed meds online without doctor prescription buy prescription drugs from canada comfortis without vet prescription
new ed drugs male erection pills mens ed pills
finasteride 1mg propecia 1mg generic propecia purchase
cheapest ed pills gnc ed pills ed treatments
india pharmacies shipping to usa legitimate online pharmacies india india pharmacies shipping to usa
buy stromectol online stromectol stromectol for humans for sale
stromectol 3 mg tablets price stromectol without a doctor prescription stromectol for sale
provigil 100mg drug modafinil 100mg uk modafinil 200mg tablet
buy provigil 200mg online cheap brand modafinil
best ed drug ed pills that really work best ed pill
modafinil 200mg pills
prescribing stromectol stromectol price usa stromectol for sale
provigil us
provigil online buy
modafinil 100mg for sale
where to buy cheap clomid online clomid clomid tablets
modafinil online buy order provigil 100mg online
order modafinil sale provigil 100mg canada provigil medication
buy clomid 50mg buy clomid 50mg buy clomid 50mg
clomid for sale buy clomid 50mg online clomid for sale
purchase provigil without prescription cheap provigil 200mg
buy modafinil pill purchase modafinil generic modafinil 100mg for sale
modafinil 200mg canada modafinil uk
clomid buy clomid 50mg buy clomid 50mg online
provigil 200mg without prescription order provigil 100mg generic
modafinil 100mg pill provigil canada
clomid clomid for sale buy clomid 50mg
ivermectin covid study stromectol for sale stromectol tablets buy online
ivermectin antiviral soolantra ivermectin cream stromectol tablets for humans
stromectol tablets for humans stromectol for humans for sale stromectol tablets for humans
online doctor prescription for viagra sildenafil 100 mg mexican viagra
cheap viagra online viagra viagra cost per pill
mexican viagra viagra online usa viagra without a doctor prescription
I am so happy to read this. This is the kind of manual that needs to be given and not the random misinformation that’s at the other blogs. Appreciate your sharing this greatest doc.
cialis generic tadalafil without a doctor’s prescription buy 20mg cialis
rhino laboratories cialis tadalafil 20mg best price cialis generic name hvtsgeahdEXERTBtjEnfofs
buy generic cialis in canada price of cialis 20 mg generic cialis no prescription paypal
cialis 20mg aus usa generic version of cialis how long does cialis last
Hey there, You’ve done an incredible job. I抣l certainly digg it and personally suggest to my friends. I’m sure they’ll be benefited from this site.
Hi there! Quick question that’s completely off topic. Do you know how to make your site mobile friendly? My web site looks weird when browsing from my iphone. I’m trying to find a theme or plugin that might be able to resolve this problem. If you have any recommendations, please share. With thanks!
use cialis promise coupon orlando fl best price for daily cialis buy cialis no prescription australia
Hi everybody , can anyone recommend where I can buy Monaco Pearl?
Is anyone here in a position to recommend Plus Size Teddies? Cheers xxx
free spins
omg fortune free slots
gold fish casino slots free
dissertation title generator
dissertation data analysis help
writing dissertation proposal
uk dissertation writing service
how to write a dissertation
18 month doctorate without dissertation
https://pharmacyizi.com/# new ed treatments
what is critical thinking
critical thinking in leadership
critical thinking in nursing
from critical thinking to argument 6th edition
principles of critical thinking
hesi a2 critical thinking study guide
casino no deposit welcome bonus
casino sites
online mobile casino
best us online casino
online gambling real money
biggest online casino bonuses
online casino bonuses
no deposit free bonus casino
real casino games
mobile casino
internet casino bonus
best usa casinos
dissertation only phd
custom dissertation writing help
creative writing course in mumbai
usa casinos online
best us online casino
win real money casino
dissertation proposal help
paper writing service
writing dissertation abstract
online casino bonuses
free no deposit bonus casino
blackjack real money
best online us casinos
casino signup bonus
bingo online for money
https://drugsbestprice.com/# ed tablets
bonus no deposit
real money online slots
online casinos free money
mobile casino games
casino sign up bonus no deposit
online american casinos
buy vpn paypal
best business vpn router
fastest vpn
online casino real money usa
casino welcome bonuses
online casino real money
free welcome bonus no deposit casino
online casino sign up bonuses
mobile casino games
best free vpn mac
free vpn no download
ipvanish vpn
buy vpn service
chrome vpn
vpn ratings
online casinos real money
real cash online casino
blackjack online real money
best free vpn for kodi
vpn free download
vpn windows free
win money online
no deposit casino real money
online casino no deposit bonus
vpn for windows 10 free
free vpn client
free firestick vpn
blackjack app real money
best casino welcome bonus
no deposit online casino
https://medrxfast.com/# amoxicillin without a doctor’s prescription
how to get vpn free
vpn master
vpn for kodi
Some tips i have observed in terms of computer memory is the fact there are requirements such as SDRAM, DDR and so forth, that must go with the features of the mother board. If the computer’s motherboard is pretty current while there are no main system issues, changing the memory space literally will take under an hour or so. It’s one of several easiest computer system upgrade techniques one can envision. Thanks for sharing your ideas.
This website online is mostly a walk-through for all the info you wished about this and didn’t know who to ask. Glimpse here, and also you’ll undoubtedly discover it.
Web design resume skills https://www.gaibandhahelpline.com/uncategorized/795401/
pg slot asia เกมส์สล็อต พีจี ออนไลน์ โดยตรงเว็บไซต์ใหม่ ฝากถอนโอนไวดูแลตลอดการเล่นเกมของลูกค้ารับโบนัสกับslot asia เล่นง่ายจ่ายเร็ว เว็บไซต์พวกเราเหมาะสมที่สุดในประเทศ
best gay dating sites
xxx dating sim gay
most popular dating site gay men
Best federal resume writing services https://motogpdb.racing/wiki/The_reason_essayusacom_is_the_best_essay_writing_service_available_to_students
Top cv writing services for university http://www.gojuris.com/__media__/js/netsoltrademark.php?d=papershelps.org
Offered products range consists of Pain Killer Reliever, Stimulant CNS SWSD, Weight Loss Management, Women s Health, Anti – Cancer, Anti – HIV, etc buy online cialis It also means that you ll be ready to have sex any time during the day, rather than just after taking your medication
But at least it didn t make me feel horrible for days and days afterwards buying cheap cialis online Athens United Soccer Association 425-9843 ausaregistrar yahoo
gay online webcam chat free
gay geek chat
gay chat rooms free in illinois
local gay chat room
gay phone chat line free trial
ffree gay chat
CIALIS tadalafil , an oral treatment for erectile dysfunction, is a selective inhibitor of cyclic guanosine monophosphate cGMP -specific phosphodiesterase type 5 PDE5 priligy en france TADALAFIL AND DEPOXETINE TABLETS
Continuation rates and treatment satisfaction were comparatively lower in men older than 65 years better business bureau online pharmacy priligy Some men may experience upset stomach, headache, facial flushing, dizziness and nasal congestion
gay teen chat groups
dick.net gay chat
atlanta gay phone chat
free gay chat by zip code 53214
gay chat ca,
chat de gay usa avenue
The reason for this is a bad ecological situation, lack of arousal, inactive way of life, stresses, lack of self-trust, etc cheapest cialis 20mg
At worst, the Cialis dose might need to be increased buy cialis online cheap
1234 slot สล็อตออนไลน์ฟรีเครดิตคุ้ม กว่าการเล่นสล็อตออนไลน์โทรศัพท์มือถือ ที่ไหนก็ pgslot ยังสามารถชี้แนะเพื่อนพ้องๆ ให้มาเล่น1234 SLOTรวมทุกค่ายเกมไว้ให้ท่านที่นี้แล้ว
Непривычное славянским девушкам масло усьмы, которое получают из листьев одноименного растения, в последнее время становится все более популярным. А вот в арабских и среднеазиатских странах оно давно завоевало любовь и уважение женщин, которые в отзывах называют это масло лучшим для укрепления и восстановления ресниц и бровей, для увеличения их густоты. Средство для интенсивного восстановления и ускорения роста ресниц на основе пептидов и натуральных растительных компонентов. Оздоравливает и омолаживает волосяные фолликулы ресниц и бровей за счет комплекса специальных пептидов и растительных экстрактов. Препарат разработан и запатентован в Индии, он создан специально для усиления роста ресниц. В результате использования данного средства ваши реснички станут намного красивее, гуще, длиннее прежнего состояния. В состав кондиционера LONGLASH входит основа, изготовленная из экстракта кораллов, добытых из морских глубин. https://gadgetissues.com/community/profile/cole88992691969/ Если у вас возникли вопросы или есть предолжения, свяжитесь с нами по почте: 40nog@40nog.ru Не спешите купить подводку для глаз, не разобравшись в её видах. Зная особенности каждой, будет легче сделать выбор. Контактная информация: Товар Гелевая подводка для глаз ART-VISAGE Hollywood, черная снят с продажи и более не доступен в нашем магазине. Стойкость 15 часов! 2012-2022 © OTZIV-OTZIV.RU — независимый сайт-агрегатор отзывов и альтернатив товаров на основе нейросети. Последние года три я остаюсь верна цветным подводкам. После знакомства с ними вовсе позабыла о черных стрелках. Косметика Арт Визаж сочетает продукты для макияжа с комфортными, пластичными текстурами. Естественные оттенки тонирующих средств легко подобрать под ваш тон кожи, а с помощью насыщенных цветов теней и помад можно создать выразительный макияж. Водостойкая гелевая подводка LASTING COLOR — это насыщенность цвета, четкость нанесения и суперстойкость в одном тюбике. С ее помощью можно слегка подчеркнуть контур глаз, нарисовать элегантные стрелки или создать дымчатый макияж. В комплекте с подводкой идет профессиональная кисточка.
ladybug chat noir gay
gay video chat free
gay universe chat
See if they have a recommended mail-order pharmacy you can use buy cialis professional
legit cialis online 5 and 5 mg OaD in patients with ED
zoom chat gay
gay chat lines in atlanta
rastaboy gay chat
Less common or rare. side effects of clomid in men 11 Shortening of the menstrual cycles due to early follicle development and ovulation is an indicator of POR.
She began a meal plan that was the stuff of dreams for most women three meals a day plus dessert such as full-fat ice cream or pudding at least once a day, snacks like nuts and granola, and lots of juice and whole milk. clomid success rate What her doctor did not say and might not have known is that some scientists do worry about that other half, particularly after repeated treatment cycles and increased dosage.
clomid nolvadex pct
online pharmacy india tamoxifen 20 mg
Stay Put Waterproof Gel Eyeliner is the BEST Waterproof Eyeliner for Busy Women!Available in 9 Shades! Bollywood actress, Sonam Kapoor is enjoying the first pregnancy period of her life with her husband, Anand Ahuja and their doting family. In this entire phase, the Ahuja and Kapoor family is leaving no stone unturned to pamper the mommy-to-be to its fullest. For the unversed, Sonam and Anand had announced her pregnancy news on March 22, 2022. They had taken to their respective social media, and in a collaborative post, they had shared cutesy pictures, wherein the mommy-to-be was seen flaunting her cute baby bump while laying on papa-to-be’s lap. Sam Michie:But the obvious thing is that your audience will tell you. You’ll see it in the comments, right? I mean, you’ll know what the audience thinks about it and how they receive it and whatnot. So as long as you’re staying true to that, then I think you’re pretty safe, but hey, nobody’s perfect. And there’s going to be a hater at some point, and of course dealing with that, that may be related to brand sponsor, may be related to something else too, is a different topic of discussion, but stay true to you because that’s why these people are watching you. They’re watching you for you. And that’s really critical. https://franciscoqgth310864.wizzardsblog.com/13400225/dior-iconic I have given up on liquids. I have never found liquid eyeliner i didnt have difficulty applying, and i think i prefer not super crisp lines that gel gives. The physicians formula does still sound interesting though xD We surveyed eyeliners regardless of price. We found that bad eyeliners aren’t necessarily cheap, nor are great eyeliners necessarily expensive. This is particularly true of liquid eyeliner—our two top picks cost less than $10. Based on our research, expensive eyeliners are far more likely to have fanbases than cheapies, which meant we had a lot of expensive eyeliner to acquire and then reject. Size: 0.016 oz. Follow to get tips, tricks and promotions Intense BlackWater Aqua Eau, Ammonium Styrene Acrylates Copolymer, Butylene Glycol, Alcohol, Beheneth-30, Acrylates Octylacrylamide Copolymer, Phenoxyethanol, Methylparaben, Polyglyceryl-3 Disiloxane Dimethicone, Propylparaben, Sodium Hydroxide, Disodium EDTA, Sodium Benzoate. (+ -) Black 2 (CI 77266) (Nano).?
tinder dating site
free woman paid debit video
europe free chat
Essay outline structure https://answerrly.com/?qa=185238/payday-loan-lenders-2021-2022-ruling-sets-payday-loan-rule-compliance-date
doxycycline fda approved online Prop up the head of your bed.
buy lyrica without prescription pregabalin online lyrica pills
lyrica 150mg uk lyrica for sale pregabalin without prescription
Essays american history https://bbs.pku.edu.cn/v2/jump-to.php?url=https://bestessayservicereview.com/paperhelp-org-review/
order tizanidine generic buy generic cialis 20mg buy tadalafil 20mg pill
generic tizanidine 2mg cialis 10mg brand buy generic tadalafil 40mg
Order culture blog http://ezproxy.cityu.edu.hk/login?url=https://bestessayservicereview.com/studybay-com-review/
lipitor 20mg over the counter order atorvastatin 20mg sale order lyrica 150mg online cheap
order lipitor 20mg online buy lipitor 40mg pills buy pregabalin 150mg generic
YaДџlardan nasД±l kurtuluruz?
ทดลอง เล่น สล็อต เกมที่ ถูกออกมาอย่าง มีมาตรฐาน และก็ล้ำสมัย มีคุณภาพ ภาพอธิบายที่ถูกดีไซน์มาอย่างงาม ความละเอียดสูง ภาพ3D สามารถเล่นได้ทุกๆที่ เกมสนุก ได้เงินไวต้อง pgslot-th.com
purchase desloratadine online cheap order asacol sale asacol 800mg ca
desloratadine uk etoricoxib uk buy asacol 400mg pills
Literature research paper outline example http://snz-nat-test.aptsolutions.net/ad_click_check.php?banner_id=1&ref=https://bestessayservicereview.com/writepaperfor-me-review/
purchase irbesartan without prescription buy avapro 150mg without prescription famotidine brand
purchase irbesartan without prescription buy famotidine 40mg online pepcid 40mg for sale
essay on help
cheap custom essay
buy a essay
tacrolimus over the counter purchase ropinirole pills fenofibrate order online
buy prograf 1mg online cheap ropinirole 1mg fenofibrate canada
reflective essay help
essay writer reddit
help me essays
purchase colchicine pills buy inderal for sale plavix generic
colchicine medication propranolol price order clopidogrel 75mg for sale
essay writing help for students
buy essay writing online
academic essay writers
How to write a press release for world wide audiences https://maps.google.cf/url?q=https://bestessayservicereview.com/writepaperfor-me-review/
essay paper help
custom english essays
english essay writing help
altace uk cost altace carvedilol 25mg usa
altace 5mg canada order carvedilol 6.25mg generic order coreg 25mg generic
Implicit meanings essays in anthropology http://camping-online.ru/bitrix/redirect.php?event1=&event2=&event3=&goto=https://essaytyper.cm/
Broadcast resume skills http://google.co.cr/url?q=https://buyessayreviews.com/studybay-com/
how to be a good essay writer
custom essay writing help
essay custom
информационная гигиена Как Понять Что Ты Выгорел Тест
generic oxybutynin fosamax sale cheap nitrofurantoin 100 mg
buy oxybutynin 5mg pills buy nitrofurantoin online buy nitrofurantoin 100 mg online
argumentative essay help
best writing essay
order custom essays
Esl creative writing writing site for school http://avxiong.com/home.php?mod=space&uid=148440
Фильма Молодой Человек Фильм Молодой Человек
Смотрите онлайн фильм Быстрее пули (2022) года в хорошем качестве HD 720 Смотреть Быстрее Пули (2022) Онлайн В Хорошем HD 1080 Качестве
Дом дракона Дом
Дракона
essay writing service legit
write my social work essay
best article writing service
I’ve been looking for photos and articles on this topic over the past few days due to a school assignment, baccarat online and I’m really happy to find a post with the material I was looking for! I bookmark and will come often! Thanks 😀
motrin 600mg us oral calcitriol rocaltrol 0.25 mg canada
motrin generic order mirtazapine for sale buy calcitriol 0.25 mg sale
order bupropion 150 mg generic flexeril 15mg sale buy sildenafil 150mg pill
order zyban online cheap zyban 150 mg uk sildenafil overnight shipping
Сверхъестественное
Pretty! This has been an incredibly wonderful post. Thank you for
supplying this info.
order methotrexate 5mg sale reglan pill cozaar price
methotrexate 10mg over the counter cozaar 50mg without prescription cheap cozaar 25mg
nexium 20mg cheap order topiramate 200mg without prescription order sumatriptan 50mg without prescription
esomeprazole cheap purchase topamax for sale imitrex 25mg without prescription
write my essay for cheap
essay writer reddit
critical essay help
buy levaquin 500mg without prescription buy zantac generic ranitidine oral
buy levaquin 500mg generic avodart without prescription ranitidine 150mg pills
Сериал
Смотреть
meloxicam over the counter buy meloxicam tamsulosin cost
brand mobic 15mg buy mobic 7.5mg for sale order flomax generic
help writing a argumentative essay
help write essay
essay writers canada
zofran brand buy zofran 4mg online cheap simvastatin 20mg us
ondansetron 8mg tablet aldactone pill order simvastatin generic
CONTACT Patricia Schnably, VP of Marketing and Communications Chesapeake Urology Associates 443 738 8107; email protected; ChesapeakeUrology lasix and breastfeeding
Clinicians, educators, researchers, policy makers, and others should pay special attention to the impact of multimorbidity as they make decisions about medical care and the delivery of health care services can lasix cause hyponatremia chronic, amount and duration of flow, and based on the clinical presentation a targeted clinical assessment based on age
valtrex for sale online order finasteride online order diflucan 100mg generic
order valacyclovir 1000mg sale buy generic finasteride diflucan us
buy ampicillin online cheap cost flagyl 200mg order flagyl 200mg generic
ampicillin tablet ampicillin pill flagyl 200mg canada
magic essay writer
college essay community service
best essay writing service review
augmentin 1000mg cost buy bactrim online order bactrim 960mg without prescription
augmentin canada augmentin ca order generic bactrim
How to write native american myths https://cqmt8.cn/home.php?mod=space&uid=102907
order cephalexin without prescription brand erythromycin 500mg erythromycin 250mg us
order cephalexin without prescription purchase cephalexin pill order erythromycin 500mg without prescription
cheap sildenafil 100mg fildena drug rhinocort for sale
buy fildena generic generic tamoxifen 20mg budesonide order online
отчаянные домохозяйки смотреть онлайн
cefuroxime 500mg cost cefuroxime 500mg us methocarbamol for sale online
order cefuroxime pills robaxin 500mg cost buy robaxin 500mg for sale
3o9cpydyue4s8.ru
order desyrel 100mg order desyrel 100mg generic cheap sildenafil pills
desyrel 100mg oral buy desyrel 50mg pill viagra 100mg generic
Video resume marseille le havre http://runet.me/bitrix/rk.php?goto=https://buyessayreviews.com/essaypro-com/
The best custom essay site http://kosmetikinstitut-milla.de/user/alibibrass0/
Custom research proposal writer site for mba http://www.funny-games.ws/myspace.php?url=https://essaypro.me/
Curvy Femdom Strapon Fucks Lover https://wankmovie.com/ The Bimbo Bubblegum: A Horny Housewife Breast Expansion Transformation PREVIEW
cialis 5mg us cialis 40mg cost prices of cialis
cialis 5mg oral tadalafil 10mg brand cialis 5 mg
Ethical vegetarianism essay http://zfanta.weehan.com/board/4330547
purchase glucophage lipitor cheap amlodipine 10mg tablet
purchase glucophage without prescription lipitor 80mg price purchase amlodipine online cheap
order lisinopril 2.5mg online purchase prilosec sale atenolol for sale online
buy lisinopril 5mg online buy lisinopril 2.5mg for sale atenolol 50mg price
Edexcel gcse maths modular higher homework book answers https://www.blurb.com/user/smileplough6
buy clarinex generic claritin buy online buy claritin 10mg sale
buy clarinex online generic clarinex buy claritin pills
To write a frago http://bbs.51pinzhi.cn/home.php?mod=space&uid=3175603
toradol ca oral toradol cozaar 25mg oral
buy ketorolac cozaar drug cozaar 25mg uk
altace without prescription purchase amaryl for sale glimepiride 4mg brand
asacol cheap order cordarone 100mg pills purchase amiodarone sale
buy mesalamine 400mg for sale mesalamine 400mg drug cheap cordarone 100mg
carvedilol for sale online buy generic amitriptyline 50mg order elavil 10mg online cheap
buy coreg without prescription buy ditropan 2.5mg pills order amitriptyline 10mg online
Scripts video resume http://beam.us/__media__/js/netsoltrademark.php?d=papershelps.org
order nitrofurantoin 100 mg sale purchase motrin without prescription purchase ibuprofen generic
purchase nitrofurantoin generic purchase furadantin pills buy motrin 600mg online
order remeron without prescription remeron 15mg us order pamelor 25mg generic
order mirtazapine 30mg for sale buy remeron 30mg sale pamelor over the counter
tricor 160mg us generic tricor 200mg order alfuzosin 10mg for sale
order fenofibrate 160mg without prescription order fenofibrate 160mg pill alfuzosin over the counter
canada drugs online review
https://greatcanadianpharmacies.com/
canadian pharmacy online no prescription
Esl papers ghostwriter for hire au https://championsleage.review/wiki/EssayPro_com_Essay_Writing_The_best_article_writing_services_of_2022
order tadalafil 40mg without prescription buy viagra pill sildenafil 150mg sale
buy tadalafil 40mg pills buy cialis 10mg online buy viagra 50mg generic
สล็อต xo เว็บไซต์ตรง ไม่ผ่านเอเย่น สมัครสล็อต ใช้เวลาไม่ถึง 5 นาที พร้อมรับยูสเซอร์จากการสมัคร สล็อต ได้ทันที ท่านจะได้พบกับเกมที่น่าเล่นเพลิดเพลินทั้งได้เงินและความสนุก
Help writing top critical analysis essay on trump https://intensedebate.com/people/chainflame6
Capital punishment essays canada http://onlinetutors.group/index.php?qa=user&qa_1=mariahand03
female cialis tadalafil buy pills for erectile dysfunction buy modafinil 200mg generic
tadalafil 10mg pills order provigil 100mg generic purchase provigil pill
order prednisone 40mg online purchase amoxicillin online cheap amoxicillin 250mg over the counter
deltasone 5mg generic isotretinoin order order amoxicillin generic
deltasone price order cheap accutane online purchase amoxicillin online cheap
Assignees https://historyhub.history.gov/external-link.jspa?url=https://bestessayservicereview.com/essaytyper-com-review/
So as the communication unfolds and we seek to continue to clarify nolvadex where to buy These providers who are younger in the profession may not have received formal education about chemoprevention and have limited experience prescribing chemoprevention to high risk women
Teaching how to write a book review http://www.xn--hq1b37iutl0qb06cj1iura767c.kr/qna/1523152
Volunteer animal shelter resume https://fabnews.faith/wiki/EssayPro_com_Essay_Composing_The_best_composition_writing_services_of_2022
A good persuasive essay example http://www.authorstream.com/dogstage0/
buy azithromycin generic oral azithromycin 250mg neurontin 100mg pills
buy azithromycin 250mg without prescription purchase zithromax for sale gabapentin 100mg cost
furosemide 100mg brand order stromectol 6mg generic stromectol 3 mg dosage
Friseursalon Stelter
I’ve been troubled for several days with this topic. totosite, But by chance looking at your post solved my problem! I will leave my blog, so when would you like to visit it?
pulmicort without prescription how to buy pulmicort 200 mcg pulmicort united kingdom
buy hydroxychloroquine without prescription hydroxychloroquine 200mg uk can i buy ivermectin online
cost of dramamine 50mg dramamine united kingdom dramamine 50mg canada
buy atorvastatin 10mg generic order lipitor 10mg online cheap cheap sildenafil without prescription
Glas- und Fensterbau Gunkel
order generic atorvastatin 40mg atorvastatin pills viagra overnight delivery
order lisinopril 5mg pills order cialis 40mg for sale oral tadalafil 20mg
cheapest canadian pharmacy
https://canadianpharmaciesshop.com/
reputable canadian online pharmacies
lisinopril online lisinopril 5 mg cheap lisinopril 10 mg without prescription
cost lisinopril purchase amlodipine pill tadalafil 20mg us
lopressor 100mg usa methylprednisolone cost in usa medrol 8 mg oral
How to write creative writing proposal http://www.phishtank.com/
Lana pengar
cheap lopressor 50mg buy generic metoprolol 100mg methylprednisolone brand name
oral clomiphene 100mg purchase pregabalin online cheap lyrica 150mg oral
cipro best price propecia 1mg tablets price propecia proscar can i buy lisinopril over the counter in canada where can you buy azithromycin
citalopram medication https://citaloprama.com/# – citalopram 10 mg cheap citalopram cost
clomid 100mg over the counter coreg us buy generic pregabalin 75mg
triamcinolone pill buy albuterol online cheap dapoxetine 30mg for sale
professional essay writing services
i need help writing a compare and contrast essay
good essay writing websites
purchase aristocort generic order ventolin 4mg sale buy dapoxetine online cheap
oral cytotec order xenical generic synthroid 100mcg generic
http://gymnasium.com.de/kreuzau
buy cytotec without prescription purchase xenical sale order synthroid 75mcg pill
how to get modafinil prescription canada
order acyclovir 800mg sale brand zovirax zyloprim canada
order acyclovir 800mg pills order diltiazem without prescription buy generic zyloprim
crestor order online tetracycline price tetracycline pills
doxycycline price Milk thistle is also taken by mouth for loss of appetite, heartburn dyspepsia, gallbladder complaints, enlarged prostate benign prostatic hyperplasia, a blood disorder called beta thalassemia, and infertility
buy baclofen 25mg generic sildenafil overnight shipping usa order sildenafil 150mg pill
Rene descartes philosophical essays correspondence summary http://quanboo.com/home.php?mod=space&uid=481107
buy generic lioresal sildenafil 100mg for sale viagra 100mg us
cheap cialis without prescription real cialis sites ketorolac usa
cialis walmart order generic cialis 10mg toradol without prescription
Peter Hartmann Dentallabor
cialis 20mg sale order tadalafil online toradol 10mg tablet
colchicine cheap order clopidogrel 75mg online buy methotrexate without prescription
online pharmacies canada top erectile dysfunction pills
colchicine 0.5mg brand buy gloperba generic methotrexate 10mg brand
https://stromectolpills.store/# cost of ivermectin
buy cozaar 25mg for sale topiramate 100mg cheap buy imitrex 25mg generic
zithromax 500 mg zithromax 500mg price in india
how much is zithromax 250 mg zithromax 250 mg australia
https://metformin.pro/# can you buy metformin without prescription
can i purchase prednisone without a prescription 30mg prednisone
เกมส์ออนไลน์ pg slot, online slots games that apply for a simple application, but only PG SLOT takes less than 5 minutes to become a member. with us immediately upon registration. Become a member during this time
https://prednisonepills.site/# prednisone without a prescription
purchase cozaar for sale cozaar over the counter imitrex cheap
canadian pharmacy 24 global pharmacy canada
https://pharmacyshippingtousa.icu/# list of canada online pharmacies
generic tadalafil 20mg canada buy tadalafil online no prescription
https://canadiandrugpharmacy.best/# global pharmacy canada
https://tadalafil20mg.fun/# tadalafil online australia
rx canada best online pharmacies no prescription
order dutasteride generic buy celecoxib sale buy zofran 4mg generic
order spironolactone 25mg without prescription purchase fluconazole pills order diflucan online cheap
recommended canadian pharmacies best canadian online pharmacy
https://sildenafil100mg.store/# sildenafil 100 mg tablet usa
meet online service free dating sites women
https://sildenafil100mg.store/# where can i get cheap sildenafil
aldactone 25mg cheap fluconazole 200mg cost fluconazole over the counter
It’s really great. Thank you for providing a quality article. There is something you might be interested in. Do you know baccaratcommunity ? If you have more questions, please come to my site and check it out!
ampicillin 250mg pills generic erythromycin 500mg erythromycin 250mg over the counter
cheap zoloft online
ampicillin usa buy bactrim 960mg buy erythromycin generic
sildenafil 100mg pill fildena 50mg tablet buy robaxin 500mg pill
ordering antabuse
pharmacy com canada legitimate canadian mail order pharmacy
https://canadiandrugpharmacy.best/# canadian pharmacy 365
sildenafil citrate 50mg sildenafil 25 mg
https://datingsiteonline.site/# farmers only dating website
order suhagra pill aurogra pills buy estrace 2mg pills
https://datingonlinehot.online/# top online dating
online casual dating single free dating sites for sex
free dating sites without registering amature dating co
https://datingonlinehot.com/# free dating sites for men
datng websites f dating site
silagra tablets india
sildenafil order sildalis brand buy estrace 2mg pills
lamictal order online oral mebendazole 100mg order tretinoin gel without prescription
https://datingonlinehot.com/# bdsm dating
dating site free online online love dating flash iframe
buy lamictal 50mg for sale buy generic retin gel tretinoin online
free adult date sites free online dating sites with no fees
https://datingonlinehot.online/# singles near you
dating for free single free dating sites for sex
https://cheapestedpills.shop/# erection pills that work
erection pills that work new treatments for ed
buy accutane 10mg online azithromycin over the counter order generic zithromax 250mg
the best ed pills erection pills online
https://cheapestedpills.shop/# cheap erectile dysfunction pill
ed medication online best ed pills at gnc
how do i get propecia
accutane 40mg pills generic zithromax 500mg buy azithromycin 250mg
cheap tadalafil pill cost cialis 20mg viagra 100mg usa
https://cheapestedpills.shop/# erectile dysfunction drug
best male enhancement pills ed pills cheap
buy generic indocin 50mg buy cefixime without prescription amoxicillin 250mg drug
best erection pills pills for ed
https://cheapestedpills.com/# best ed pills at gnc
order anastrozole generic order clarithromycin 250mg generic viagra 50mg over the counter
best ed medications ed pills
https://cheapestedpills.com/# cheapest ed pills online
best ed medication erectile dysfunction pills
prozac 60 mg purchase prednisolone buy online uk buy yasmin yasmin uk online avodart online usa online drugstore metformin super viagra cost of tamoxifen tablets
order arimidex 1 mg without prescription biaxin tablet purchase viagra online cheap
https://noprescriptioncanada.com/# online canadian pharmacy no prescription
pharmacies not requiring a prescription canadian pharmacy online canada
generique tadalafil 10mg viagra 200mg gГ©nГ©rique sildenafil 100mg gГ©nГ©rique
order deltasone 40mg generic cialis on line viagra 100mg cheap
prescription without a doctor’s prescription canadian pharmacy tadalafil
https://noprescriptioncanada.com/# canadian pharmacies for cialis
https://noprescriptioncanada.com/# canadian rx pharmacy online
Your explanation is organized very easy to understand!!! I understood at once. Could you please post about casinocommunity ?? Please!!
generic indocin
top online canadian pharmacies buy online prescription drugs
https://noprescriptioncanada.com/# mexican drugstore online
certified canadian drug stores international pharmacies
cheap prednisone viagra 100mg usa sildenafil 100mg generic
original cialis 10mg rezeptfrei sicher kaufen tadalafil 10mg kaufen ohne rezept sildenafil bestellen
https://noprescriptioncanada.com/# ed meds online
online prescriptions without script reputable online pharmacy
canadian online pharmacies legitimate express pharmacy
https://noprescriptioncanada.com/# cheap canadian pharmacy
order modafinil 200mg generic oral acetazolamide 250mg purchase acetazolamide without prescription
prednisone 5mg pack
cheap isotretinoin 10mg order amoxil 1000mg online cheap buy stromectol usa
doxycycline 200mg over the counter brand lasix 100mg order furosemide 100mg for sale
canadian discount online pharmacy safe canadian pharmacies online
https://noprescriptioncanada.shop/# buying prescription drugs canada
certified mexican pharmacy discount prescription drug
altace 5mg pills clobetasol pills astelin tablet
https://noprescriptioncanada.shop/# online pharmacies without prescription
canadiandrugstore com online drugstore service canada
cheap rx drugs prescription price comparison
doxycycline uk order levitra 20mg online buy lasix 40mg generic
prescription drugs without the prescription pharmacy review
https://noprescriptioncanada.com/# drugs without a prescription
buy altace generic temovate usa buy astelin 10 ml
buy generic buspirone buy buspirone 5mg online cheap buy ditropan 2.5mg online cheap
canadian pharcharmy reviews canadian pharmacy no prescription needed
https://noprescriptioncanada.shop/# best online pharmacies reviews
online meds without presxription canadian discount cialis
buy catapres pills meclizine 25mg cost brand tiotropium bromide 9mcg
terazosin oral buy pioglitazone generic azulfidine 500 mg over the counter
buy fosamax 70mg generic ibuprofen 400mg tablet buy pepcid pills
anafranil uk
discount drug store online shopping canadian pharmacies reviews
https://noprescriptioncanada.com/# canadian pharmacy delivery
order terazosin 5mg online azulfidine 500 mg pills buy azulfidine 500 mg without prescription
order fosamax sale buy pepcid pills order pepcid 40mg online cheap
online prescriptions without script mexican pharmacy online
prograf online buy buy urso pill purchase ursodiol generic
benicar 20mg canada olmesartan ca buy diamox 250 mg generic
reputable canadian pharmacy online canadian pharmacy prescription
http://talenttelevision.com/__media__/js/netsoltrademark.php?d=noprescriptioncanada.com giant discount pharmacy
canada drug stores pharmacy online
Pete Davidson Geisteskrankheit
imdur uk digoxin sale buy telmisartan 20mg generic
buy tacrolimus 5mg without prescription trandate usa urso brand
https://noprescriptioncanada.com/# cheapest canadian online pharmacy
approved canadian pharmacies online canadian trust pharmacy
http://nienhouse.com/__media__/js/netsoltrademark.php?d=noprescriptioncanada.com safe canadian online pharmacy
my discount pharmacy canadian pharmacies online reviews
order bupropion 150 mg pill buy generic bupropion 150mg quetiapine 100mg without prescription
canadian pharmaceutical ordering canadian drug store legit
best online canadian pharmacy review canadian prescription drug prices
http://thewalfords.com/__media__/js/netsoltrademark.php?d=noprescriptioncanada.com mexican pharmacy
legitimate mexican pharmacy online canadian drugstore viagra
azithromycin brand name india
buy imdur 20mg for sale order lanoxin 2250 mg without prescription order telmisartan 80mg generic
buy zyban 150 mg generic order seroquel 50mg generic seroquel 100mg usa
canadian pharmacies that deliver to the us us pharmacy no prior prescription
http://www.radio90.com/__media__/js/netsoltrademark.php?d=noprescriptioncanada.com mexican pharmacy
canada prescriptions pharmacy drug store online no rx
can you buy plavix over the counter
pharmacy in canada medicine prices
http://fjl.stanleycarpetcleaning.cc/__media__/js/netsoltrademark.php?d=noprescriptioncanada.com price medication
canadian rx pharmacy online drugs from canada without prescription
molnunat oral brand omnicef 300 mg lansoprazole without prescription
ivermectin 500mg stromectol tablets buy online
https://stromectolst.com/# stromectol cvs
stromectol buy buy ivermectin cream
stromectol order ivermectin 5
salbutamol 100 mcg oral salbutamol 100mcg generic viagra price
ivermectin brand name ivermectin 80 mg
ivermectin brand name ivermectin tablets order
https://stromectolst.com/# ivermectin 1 topical cream
buy ivermectin cream stromectol for humans
zoloft 50mg pill buy zoloft 50mg online viagra 50mg brand
ivermectin 6mg stromectol medicine
stromectol 3 mg tablet ivermectin buy online
buy cialis 5mg prozac 20mg sale us pharmacy viagra
ivermectin generic ivermectin lotion price
https://stromectolst.com/# stromectol for sale
stromectol pill ivermectin 6mg
ivermectin nz ivermectin coronavirus
stromectol 3 mg tablets price ivermectin 1mg
buy cialis 20mg for sale generic symmetrel symmetrel uk
ivermectin where to buy for humans ivermectin rx
https://stromectolst.com/# ivermectin cream canada cost
stromectol ivermectin buy stromectol 3mg
stromectol 3mg tablets generic stromectol
ivermectin 500mg stromectol canada
ivermectin 50 mg stromectol 3mg
https://stromectolst.com/# ivermectin otc
stromectol 15 mg ivermectin 5
buy naltrexone 50mg for sale albendazole 400mg pill order abilify generic
levitra vs cialis order amantadine 100 mg online cheap amantadine 100 mg tablet
avlosulfon 100mg price generic aceon 4mg buy perindopril 8mg pills
order naltrexone 50mg sale buy generic abilify 30mg order aripiprazole 30mg without prescription
medroxyprogesterone 5mg brand buy hydrochlorothiazide 25 mg online cheap buy periactin 4 mg for sale
generic provigil modafinil over the counter stromectol oral
i like chopin ringtone https://ringtonessphone.com/80s-ringtone-gazebo-i-like-chopin.html
medroxyprogesterone 5mg brand oral microzide 25 mg cyproheptadine ca
cheapest online pharmacy online pharmacy in germany
prescription drugs online canadian pharmacy without prescription
provigil price cheap provigil ivermectin and covid
mexican pharmacy online online pharmacy without scripts
canadian pharmacy near me best canadian online pharmacy
https://drugs1st.shop/# pharmacy delivery
canadian mail order pharmacy canadian drug stores
fluvoxamine 50mg tablet order generic glucotrol 10mg glucotrol 5mg pills
funny ringtones https://downloadfreeringtoness.com/funny-ringtones
canadian online pharmacy no prescription viagra canadian pharmacy
order nootropil 800 mg online piracetam without prescription viagra 50mg uk
prescription free canadian pharmacy canadian pharmacy meds
order isotretinoin pills brand isotretinoin 10mg oral prednisone 10mg
generic viagra online canadian pharmacy cheapest pharmacy for prescription drugs or northwest pharmacy canada
http://smallsocks.com/__media__/js/netsoltrademark.php?d=drugs1st.com online pharmacy without prescription
pharmaceutical online ordering canada online pharmacy and online pharmacy fungal nail prescription drugs from canada
zithromax 500mg pill buy prednisolone 20mg pill gabapentin 800mg tablet
online pharmacy price checker us online pharmacy
https://drugs1st.com/# reliable online pharmacy
canadian online pharmacy no prescription sure save pharmacy
best mail order pharmacy canada worldwide pharmacy online or cialis canadian pharmacy
http://zippyflicks.net/__media__/js/netsoltrademark.php?d=drugs1st.com pharmacies in canada that ship to the us
canada cloud pharmacy mail pharmacy and best australian online pharmacy canadian mail order pharmacy
us online pharmacy canadian pharmacy cialis
mail order pharmacies best canadian pharmacies online
https://noprescriptioncanada.com/# reliable mexican pharmacy
generic tadalafil 40mg buy cialis 10mg sale purchase viagra online
australia online pharmacy free shipping mexican pharmacy online
https://drugs1st.shop/# canadian prescription pharmacy
canadian mail order pharmacy canadien pharmacies
azithromycin oral buy azithromycin 500mg sale cost gabapentin 600mg
order furosemide 100mg online doxycycline order online cheap hydroxychloroquine 200mg
tadalafil medication sildenafil 100mg us cost viagra 100mg
fildena for sale
buy cialis 20mg pills buy betamethasone generic clomipramine price
mexican pharmacies shipping to usa online pharmacy store
https://noprescriptioncanada.com/# best online pharmacy reviews
legitimate online pharmacy uk canadian pharmacy without prescription
https://drugs1st.com/# online pharmacy com
canadian mail order pharmacy cost less pharmacy
best canadian pharmacy to order from best online pharmacy usa or legitimate online pharmacy uk
http://onyx-int.com/__media__/js/netsoltrademark.php?d=drugs1st.com/ reddit canadian pharmacy
canadian pharmacy without prescription mail order prescription drugs from canada and compare pharmacy prices mexican pharmacy weight loss
order furosemide 40mg online cheap plaquenil over the counter purchase hydroxychloroquine for sale
brand cialis 40mg order betamethasone clomipramine 50mg ca
sporanox buy online tinidazole without prescription buy tindamax pills
top mail order pharmacies reputable canadian mail order pharmacy
https://noprescriptioncanada.com/# prescriptions from canada without
Pg Slot pg slot ให้บริการเกมสล็อตออนไลน์บนโทรศัพท์ที่มีเกมให้เลือก เป็นเกมรูปแบบใหม่ที่ทำเงินให้ผู้เล่นได้เงินจริงการเล่นเกมง่าย มีแนวทางสอนการเล่นเกมสล็อตออนไลน์สำหรับมือใหม่
can you buy zithromax over the counter in mexico zithromax capsules
https://prednisone1st.store/# ordering prednisone
doxycycline with out a rx doxycycline buy online us
amoxicillin 500mg capsules uk how to get amoxicillin
https://doxycycline1st.store/# doxycycline 300 mg cost
how can i get doxycycline over the counter azithromycin doxycycline
amlodipine over the counter levitra vs cialis cheap tadalafil generic
generic prednisone for sale prednisone 20
https://prednisone1st.store/# prednisone 30 mg coupon
doxycycline 300 mg daily doxycycline 100mg for sale
buy olanzapine 10mg order bystolic 5mg online buy valsartan 160mg pill
doxycycline online canada buy doxycycline 100mg tablets or buy doxycycline canada
http://munichsevens.com/__media__/js/netsoltrademark.php?d=doxycycline1st.store doxycycline pharmacy price
doxycycline 600 mg doxycycline 20 mg coupon and cost of doxycycline in canada doxycycline 5553
clozaril price combivent 100mcg over the counter buy dexamethasone 0,0,5 mg generic
norvasc online buy purchase norvasc pills cialis coupon walmart
overnight delivery for viagra sildenafil without prescription purchase lisinopril online
cipro ciprofloxacin cipro 500mg best prices
https://prednisone1st.store/# prednisone steroids
buy zithromax online fast shipping zithromax 500mg price in india
antibiotics cipro п»їcipro generic
https://cipro1st.store/# ciprofloxacin 500mg buy online
purchase zithromax z-pak where to get zithromax
buy doxycycline 100mg capsule doxycycline tablets online or doxycycline prices canada
http://johnmichaeld.com/__media__/js/netsoltrademark.php?d=doxycycline1st.store buy doxycycline online 270 tabs
cost of doxycycline online canada doxycycline 100 mg capsule price and 40mg doxycycline buy doxycycline monohydrate
prilosec for sale real online gambling roulette game
cipro 500mg best prices ciprofloxacin generic price
https://doxycycline1st.store/# how to get doxycycline online
doxycycline monohydrate buy doxycycline 100mg cheap
can i order prednisone buy prednisone online without a prescription
https://propecia1st.science/# propecia 1mg
generic for propecia buy propecia usa
oral omeprazole 10mg order omeprazole 10mg generic caesars casino online
cost zyvox 600 mg free slot games for fun casino slot
clomid 50mg price buy 10 clomid pills or can you buy clomid over the counter in uk
http://sandiegomade.net/__media__/js/netsoltrademark.php?d=doxycycline1st.store purchase clomid online
canadian pharmacy clomid how can i get clomid uk and can you buy clomid in mexico online clomid prescription
https://prednisone1st.science/# cheapest prednisone no prescription
need a paper written speechwriters online poker real money
purchase lopressor generic order levitra 20mg generic buy vardenafil 10mg without prescription
https://propecia1st.science/# generic propecia canada
writing dissertation service writing dissertation service cost sildenafil 100mg
erectile dysfunction drug medicine erectile dysfunction
https://edpills.science/# top rated ed pills
clomid 25 clomiphene citrate clomid
vardenafil order online levitra 20mg uk buy medrol 4mg online
https://propecia1st.science/# finasteride no prescription
10 mg prednisone prednisone best price
https://edpills.science/# best non prescription ed pills
propecia buy without per purchase finasteride without a prescription
oral clomiphene 100mg buy clomiphene 50mg without prescription poker online for real money
triamcinolone 10mg sale clarinex without prescription purchase clarinex sale
aristocort 4mg drug order loratadine order desloratadine 5mg without prescription
https://withoutprescriptions.store/# buy meds online
prescription drug pricing prescription meds without the prescriptions
https://indiapharmacy.store/# buying generic drugs from india
fda approved pharmacies in canada viagra canadian pharmacy
cialis 20mg generic cialis 20mg usa viagra mail order us
https://withoutprescriptions.store/# online canadian pharmacies
dapoxetine 30mg uk order levothyroxine without prescription synthroid 100mcg canada
buy tadalafil 10mg without prescription cheap cialis 10mg cheap sildenafil pills
orlistat cost xenical 60mg usa zovirax price
tadalafil medication plavix price order plavix 150mg online
https://withoutprescriptions.store/# medications without prescription
xenical 60mg usa buy generic orlistat 120mg purchase acyclovir without prescription
buy canadian drugs canadian mail order pharmacy
https://canadianpharmacy.icu/# canadian pharmacy oxycodone
ed drugs online from india india pharmacy mail order
darknet markets deepdotweb best darknet market for heroin https://tor-markets-darkweb.com/ – buying things from darknet markets
https://withoutprescriptions.store/# certified canadian pharmacy
tadalafil 10mg ca purchase inderal pill order plavix 75mg without prescription
buy allopurinol 300mg online rosuvastatin 10mg canada ezetimibe drug
buy domperidone 10mg online buy cyclobenzaprine 15mg for sale flexeril drug
generic methotrexate 2.5mg methotrexate 5mg drug purchase reglan pills
buy motilium pill order flexeril 15mg generic order flexeril 15mg without prescription
order generic ozobax toradol 10mg generic ketorolac oral
losartan 50mg without prescription buy generic cozaar 25mg cost topamax
best sites dating best dating site usa
dark internet dark market onion
free daing free dateing sites
https://datingonline1st.shop/# best online dating
women for free dating services contact germany
mature singles free daing
https://datingonline1st.shop/# mature woman dating pictures
plenty of fish login page flirt dating site
purchase ozobax generic tizanidine uk buy toradol 10mg sale
deep web sites dark web market
colchicine 0.5mg oral generic colchicine casino games free
local women dates dafing sites
Best blog writers website gb http://paxiaojie005.xyz/home.php?mod=space&uid=667418
best dating web dating sites free online
https://datingonline1st.com/# dating service websites
dating services dating sim
win real money online casino cash poker online live online blackjack
silvadene cream over the counter over the counter medication
https://drugsoverthecounter.shop/# over the counter anti inflammatories
best over the counter toenail fungus medicine over the counter heartburn medicine
Write me communication dissertation methodology https://www.cakeresume.com/me/paperlead0/
buy ranitidine 150mg generic buy zantac 150mg without prescription celebrex 100mg pill
canada drugs
https://canadianpharmacyhd.com/
canada medicine
humana over the counter over the counter tapeworm treatment for dogs
https://drugsoverthecounter.com/# over the counter essentials login
over the counter cough medicine best over the counter appetite suppressant
tadalafil 40mg brand ampicillin 500mg brand purchase cipro pills
discount pharmacies
https://canadiansafemeds.com/
canadian online pharmacies
tor dark web darknet market
best over the counter ed pills that work fast over the counter medicine for uti
https://drugsoverthecounter.com/# wellcare over the counter ordering
strongest over the counter pain reliever phentermine over the counter
over the counter sleeping pills over the counter birth control
https://drugsoverthecounter.shop/# best over the counter diet pills
what is the best over-the-counter anti-inflammatory for dogs best over the counter yeast treatment
is ivermectin over the counter omeprazole over the counter or over the counter antihistamine
http://ww17.wwwdaz3d.com/__media__/js/netsoltrademark.php?d=drugsoverthecounter.shop over the counter diet pills that work
cvs over the counter covid test chlorhexidine mouthwash over the counter and over the counter medicine for uti uhc over the counter essentials 2019
cafergot 100mg
buy flagyl 200mg generic sulfamethoxazole pills cost bactrim 480mg
https://drugsoverthecounter.com/# uti over the counter medicine
simvastatin for sale online purchase valtrex for sale proscar 1mg uk
rightsourcerx over the counter best over the counter flu medicine
https://drugsoverthecounter.shop/# over the counter medicine
over the counter water pills over the counter weight loss pills
instant female arousal pills over the counter over the counter ed medication or over the counter ringworm treatment
http://canadiancruiserecruitment.com/__media__/js/netsoltrademark.php?d=drugsoverthecounter.shop best over the counter toenail fungus medicine
ivermectin over the counter over the counter estrogen and over the counter eye drops for pink eye over the counter anti inflammatory
black internet best darknet markets
buy cephalexin generic clindamycin drug order erythromycin generic
mexican pharmacies online
https://canadianpharmacyhd.com/
online pharmacy
coursework writer
coursework sample
coursework paper
https://over-the-counter-drug.com/# over the counter sleep aid
over the counter pink eye medicine viagra over the counter
https://over-the-counter-drug.com/# potassium supplements over-the-counter
best over the counter flu medicine over the counter pill for yeast infection
viagra next day delivery cialis 20mg us tadalafil 20mg canada
puede beber mientras toma antibiГіticos
over the counter diuretic male to female hormones over the counter
https://over-the-counter-drug.com/# over the counter testosterone
zofran over the counter over the counter asthma inhalers
In the general population one to two cases of PPHN per 1000 pregnancies occur safe place to buy cialis online Quantitative oestrogen and progesterone receptor values in primary breast cancer and predictability of response to endocrine therapy
black internet blackweb
ivermectin over the counter appetite suppressants over the counter
https://over-the-counter-drug.com/# over the counter medication for uti
over the counter bladder control over the counter diuretics
viagra over the counter cialis 5mg for sale buy tadalafil 40mg online
2laughable
play slots for real money united states cost tadalafil 20mg cialis otc
https://over-the-counter-drug.com/# ivermectin over the counter walgreens
crestor 5mg united kingdom crestor 10mg without a doctor prescription crestor tablets
antidepressivos me deixaram de mau humor
humana over the counter strongest over the counter painkiller or best over the counter appetite suppressant
http://titanrealtyinc.com/__media__/js/netsoltrademark.php?d=over-the-counter-drug.com instant female arousal pills over the counter
antibiotic eye drops over the counter best over the counter appetite suppressant and potassium supplements over-the-counter is ivermectin over the counter
anthem over the counter catalogue best over the counter ed pills that work fast
https://over-the-counter-drug.com/# apoquel over the counter substitute
best over the counter cough medicine over the counter acid reflux medicine
where to buy aricept aricept 10mg online pharmacy aricept for sale
rightsourcerx over the counter yeast infection treatment over the counter or guaranteed suicide over the counter
http://www.einbinders.net/__media__/js/netsoltrademark.php?d=over-the-counter-drug.com best over the counter toenail fungus medicine
blood pressure over the counter medication over-the-counter drug and strongest over the counter diuretic over the counter ear infection medicine
best casino games generic cialis 5mg buy generic cialis 5mg
over the counter pink eye medicine over the counter health and wellness products
https://over-the-counter-drug.com/# what does over the counter mean
over the counter antidepressants over the counter diuretics
sildenafil 20mg buy generic sildalis lamotrigine 50mg usa
symbicort inhaler 160/4,5mcg online pharmacy symbicort inhaler pharmacy symbicort inhaler 160/4,5 mcg usa
buy cheap doxycycline online generic doxycycline or odering doxycycline
http://oldelpaso.info/__media__/js/netsoltrademark.php?d=over-the-counter-drug.com generic doxycycline
200 mg doxycycline cheap doxycycline online and doxycycline 100mg capsules buy generic doxycycline
zithromax cost generic zithromax
https://amoxil.science/# amoxicillin medicine
buy doxycycline hyclate 100mg without a rx doxycycline 100mg dogs
write papers online order research paper ivermectin medicine
buy deltasone 5mg online cheap buy accutane for sale buy amoxil 1000mg for sale
sildenafil 100 mg generic lamictal lamotrigine 200mg pill
generic zithromax medicine zithromax cost uk or zithromax 250 mg australia
http://nextreads1.com/__media__/js/netsoltrademark.php?d=zithromax.science where can i buy zithromax uk
zithromax 500 zithromax online usa and where can i purchase zithromax online cost of generic zithromax
sildenafil 50mg pills sildenafil 50mg tablet cialis 5mg over the counter
ashwagandha 60caps no prescription ashwagandha caps united kingdom cheap ashwagandha caps
order viagra online usa
no deposit casino real money spins tadalafil uk
mestinon 60 mg price buy mestinon mestinon 60 mg otc
nolvadex during cycle Fish tank amoxicillin
https://amoxil.science/# buy amoxicillin online no prescription
generic doxycycline doxycycline order online
https://stromectol.science/# order minocycline 50 mg online
zithromax for sale zithromax azithromycin
where can i purchase lexapro online
stromectol pill for humans minocycline for uti or ivermectin tablets
http://cathyyonts.com/__media__/js/netsoltrademark.php?d=stromectol.science ivermectin 8 mg
stromectol tablets 3 mg minocycline 100mg tablets and ivermectin 6mg ivermectin 3 mg dose
online casino roulette best natural ed pills tadalafil 20mg uk
free roulette online order stromectol generic buy modafinil 100mg online
cheap lexapro 20 mg
purchase furosemide online
order furosemide pill furosemide us plaquenil 400mg pills
lexapro 5 mg tablet
Get information now. Get warning information here.
stromectol otc
Commonly Used Drugs Charts. Some are medicines that help people when doctors prescribe.
er antibakteriel sæbe dårlig
lexapro prescription online
ivermectin tablet 1mg ivermectin over the counter uk or stromectol how much it cost
http://employhamilton.com/__media__/js/netsoltrademark.php?d=stromectol.science minocycline 100mg over the counter
stromectol tablets for humans minocycline 100 mg without doctor and ivermectin 1% cream generic minocycline 100mg tablets for human
abilify generic 2mg
how much is generic benicar
where can i buy geodon geodon 20mg uk geodon cost
tetracycline
Estimation of RS from IHC viagra generic over the counter cvs Decisional conflict scale or subscale Sex Pre- consult T1 Post- consult T2 T2- T1 P value Mean SD Mean SD Total Women 40
chaz bono vekttap
where can i buy viagra pills
deltasone tablet vermox brand vermox online order
buy stromectol uk ivermectin 50 or stromectol 3mg cost
http://orangelifeins.net/__media__/js/netsoltrademark.php?d=stromectolst.com where to buy stromectol
ivermectin buy nz ivermectin 1 and ivermectin lotion for lice ivermectin
ivermectin generic name minocycline 50 mg online or ivermectin goodrx
http://aquaterautilities.com/__media__/js/netsoltrademark.php?d=stromectol.science stromectol pill price
stromectol 3mg tablets ivermectin 10 mg and minocycline 50 mg para que sirve stromectol online
fildena online pharmacy
tretinoin over the counter avanafil usa cheap avana
asap market darknet darknet market avengers https://heineken-darkweb.com/ – step by step dark web
coursework writing service https://brainycoursework.com/
Buy Online Ivermectin/Stromectol Now where to buy stromectol or purchase stromectol online
http://pickyourpetals.com/__media__/js/netsoltrademark.php?d=stromectol.science ivermectin syrup
buy stromectol online uk buy stromectol uk and ivermectin 3 mg tablet dosage ivermectin 90 mg
coursework writing service uk https://courseworkninja.com/
benicar coupon
cpa coursework https://buycoursework.org/
data analysis coursework https://courseworkdomau.com/
prednisone online canada
minocycline online minocycline 100 mg or can you buy stromectol over the counter
http://buypleasurevhs.com/__media__/js/netsoltrademark.php?d=stromectol.science buy stromectol online uk
stromectol tablets for humans for sale minocycline indications and stromectol covid 19 buy ivermectin canada
Long-Term Effects. Best and news about drug.
stromectol australia
earch our drug database. drug information and news for professionals and consumers.
ivermectin 4000 mcg ivermectin oral or ivermectin cream 1%
http://justsavefoods.org/__media__/js/netsoltrademark.php?d=stromectolst.com ivermectin 3 mg tabs
stromectol 3mg buy ivermectin and ivermectin lice stromectol 3 mg dosage
Read now. Comprehensive side effect and adverse reaction information.
where to buy ivermectin pills
Read information now. Everything what you want to know about pills.
order tadacip generic buy voltaren 100mg generic indomethacin brand
Generic Name. earch our drug database.
how can i get cheap levaquin without insurance
Commonly Used Drugs Charts. Learn about the side effects, dosages, and interactions.
Cautions. Read now.
get generic mobic without rx
All trends of medicament. Get warning information here.
drug information and news for professionals and consumers. Best and news about drug. generic avodart without rx
Prescription Drug Information, Interactions & Side. What side effects can this medication cause?
terbinafine order order cefixime 200mg for sale buy amoxicillin 500mg
unavujГ vГЎs antibiotika
canadian pharmacies that ship to us
https://canadianpharmplus.com/
certified canadian international pharmacy
celebrex no prescription cheap celebrex celebrex coupon
Commonly Used Drugs Charts. Long-Term Effects.
how to get levaquin prices
What side effects can this medication cause? Commonly Used Drugs Charts.
how to create a darknet market trusted darknet markets https://darkfoxdarkwebdrugstore.com/ – darknet drugs links
SeymoreStars likes this buy cialis online canadian pharmacy
clarithromycin brand order clarithromycin for sale meclizine 25 mg without prescription
clarithromycin price biaxin generic order meclizine 25 mg sale
Power p35 dq6 resume http://images.google.cf/url?q=https://essayservice.discount
proventil medication order pantoprazole 40mg generic buy ciprofloxacin for sale
can i purchase cheap avodart online cost of cheap avodart without dr prescription or where to get generic avodart without dr prescription
http://nantpod.com/__media__/js/netsoltrademark.php?d=avodart.science how can i get avodart for sale
can i get generic avodart pills where buy cheap avodart without insurance and order generic avodart without a prescription can i order generic avodart
how to buy levaquin online get levaquin no prescription or can i buy cheap levaquin
http://bluehorizonmedicalcenter.com/__media__/js/netsoltrademark.php?d=levaquin.science order generic levaquin for sale
can i buy cheap levaquin no prescription how can i get levaquin without a prescription and can you get levaquin pill where to buy cheap levaquin without dr prescription
Comprehensive side effect and adverse reaction information. Some are medicines that help people when doctors prescribe. https://avodart.science/# cost cheap avodart without a prescription
safe and effective drugs are available. Actual trends of drug.
Popular blog post writing websites gb Essayassist.com Login
Read now. Some are medicines that help people when doctors prescribe. generic for amoxicillin
п»їMedicament prescribing information. п»їMedicament prescribing information.
darknet onion markets onionhub https://kingdom-markett.com/ – deep web search engine url
buy tiotropium bromide pill tiotropium bromide cheap order terazosin 1mg for sale
spiriva ca spiriva 9mcg uk terazosin 5mg cheap
order singulair 5mg generic purchase singulair generic buy sildenafil online
Long-Term Effects. Everything about medicine. cost of amoxicillin prescription
Some trends of drugs. Get information now.
buy montelukast without prescription sildenafil 50mg sale cheap viagra 100mg
Get here. Top 100 Searched Drugs.
can you get cheap clomid price
safe and effective drugs are available. Drugs information sheet.
dutasteride otc dutasteride without a prescription dutasteride medication
actos 15mg price sildenafil overnight shipping usa sildenafil for men over 50
order pioglitazone 15mg sale buy sildenafil pill sildenafil 25mg
Get information now. Read information now. amoxicillin 500 mg
Prescription Drug Information, Interactions & Side. Long-Term Effects.
bohemia market darknet drug markets https://kingdom-darkwebmarket.com/ – dark web adderall
With the structural information of sulfation sites, the two key different biological effects of sulfation, detoxification and bioactivation, can be differentiated, based on literature precedence that links the type of sulfation to its biological fate kamagra for less
amoxicillin 800 mg price amoxicillin 500mg for sale uk or amoxicillin 500
http://computationaluniverse.org/__media__/js/netsoltrademark.php?d=amoxicillins.online where can you buy amoxicillin over the counter
can you buy amoxicillin over the counter canada amoxicillin price canada and amoxicillin 500mg prescription amoxicillin 1000 mg capsule
tadalafil order online online ed pills tadalafil 5mg for sale
Get here. Get warning information here.
https://finasteridest.online order propecia no prescription
Some are medicines that help people when doctors prescribe. drug information and news for professionals and consumers.
hidden marketplace black market online website https://heinekendarkmarket.com/ – dark market list
hormony podczas cyklu miesiД…czkowego
Prescription Drug Information, Interactions & Side. Get warning information here.
order cheap clomid no prescription
earch our drug database. Comprehensive side effect and adverse reaction information.
buy cialis without prescription online ed pills tadalafil 10mg brand
cialis tadalafil 5mg Cialis on line purchase blackjack for money
Everything about medicine. Definitive journal of drugs and therapeutics.
order generic clomid prices
Medscape Drugs & Diseases. Some trends of drugs.
Prescription Drug Information, Interactions & Side. Top 100 Searched Drugs.
how to buy generic propecia without prescription
Prescription Drug Information, Interactions & Side. Get warning information here.
Art thesis topic ideas PaperHelp Discount
Everything about medicine. Read information now.
https://finasteridest.online where can i buy propecia without a prescription
Read now. Get warning information here.
Everything information about medication. Everything what you want to know about pills.
https://finasteridest.com/ where buy generic propecia online
Drugs information sheet. earch our drug database.
The greatest wealth is health essay customessayorder
Read information now. Medscape Drugs & Diseases.
zithromax generic cost
Generic Name. Top 100 Searched Drugs.
roulette online for real money online casino real money casino slots free
ivermectin pills canada dapsone 100mg brand avlosulfon buy online
how to get amoxicillin online
Long-Term Effects. Learn about the side effects, dosages, and interactions.
ed drugs
Generic Name. Some trends of drugs.
adalat oral perindopril 8mg price order fexofenadine sale
Read information now. Comprehensive side effect and adverse reaction information.
men’s ed pills
All trends of medicament. Drugs information sheet.
safe and effective drugs are available. earch our drug database.
cure ed
Long-Term Effects. Get information now.
poker online for real money play online casino real money best play money poker sites
play poker online free no sign up best online casino usa free online slots
allopurinol 300 mg nz allopurinol 300 mg coupon allopurinol generic
cheapest ed pills cheap ed pills or ed drugs list
http://zagtags.com/__media__/js/netsoltrademark.php?d=edonlinefast.com cheap erectile dysfunction pill
compare ed drugs best ed pill and buy ed pills online cheap erectile dysfunction pills online
Some trends of drugs. п»їMedicament prescribing information.
best ed pills non prescription
Commonly Used Drugs Charts. earch our drug database.
Long-Term Effects. Actual trends of drug.
ed pills gnc
Cautions. Prescription Drug Information, Interactions & Side.
I simply needed to thank you so much again. I do not know what I would have gone through in the absence of those hints shared by you over that subject matter. This has been a very traumatic situation in my opinion, nevertheless being able to see a new skilled mode you processed the issue forced me to weep over delight. I am just happier for your assistance and thus trust you really know what a powerful job you’re undertaking training men and women using your website. I’m certain you haven’t come across any of us.
Cautions. safe and effective drugs are available.
https://finasteridest.com/ where can i get generic propecia without dr prescription
Everything what you want to know about pills. Everything about medicine.
buy nifedipine 30mg online cheap order perindopril for sale buy fexofenadine generic
Get here. Commonly Used Drugs Charts.
natural remedies for ed
earch our drug database. Drugs information sheet.
altace 5mg for sale buy amaryl 4mg sale arcoxia over the counter
Lied Гјber Reisekrankheit
caesars casino online canadian discount online pharmacy professional research paper writers
free spins no deposit usa essays help pay for essay writing uk
order ramipril 5mg sale purchase glimepiride pills order arcoxia 120mg generic
Medscape Drugs & Diseases. Learn about the side effects, dosages, and interactions.
tadalafil canadian pharmacy
Get information now. Get warning information here.
English writing program essaypro
https://dragon-money-casino.bitbucket.io/
doxycycline 100mg usa order cleocin 150mg online cleocin 300mg canada
prescription drugs online without comfortis for dogs without vet prescription or buy prescription drugs without doctor
http://petkensa.net/__media__/js/netsoltrademark.php?d=canadianfast.com ed meds online without prescription or membership
prescription drugs buy prescription drugs online and meds online without doctor prescription canadian pharmacy online
Get warning information here. Read here.
https://canadianfast.com/# ed meds online without prescription or membership
Read information now. Get warning information here.
Long-Term Effects. Learn about the side effects, dosages, and interactions.
canadian pharmacy meds
Commonly Used Drugs Charts. Actual trends of drug.
Thesis statement for the book frankenstein spotloan phone number
canadian pharmacy online cialis best canadian online pharmacy or best canadian pharmacy to buy from
http://cat7.com/__media__/js/netsoltrademark.php?d=canadianfast.online medication canadian pharmacy
reliable canadian pharmacy canadian pharmacy antibiotics and best canadian pharmacy online cheap canadian pharmacy
September 20, 2011 cialis
Prescription Drug Information, Interactions & Side. Get information now.
https://canadianfast.com/# ed meds online without doctor prescription
Best and news about drug. safe and effective drugs are available.
Medscape Drugs & Diseases. Read information now.
https://canadianfast.com/# cheap pet meds without vet prescription
Top 100 Searched Drugs. Everything about medicine.
motrin 800 mg prescription cost
buy doxycycline 100mg pills buy doxycycline 100mg pills cleocin 300mg over the counter
amaryl medication amaryl 1mg without a doctor prescription order amaryl
buy essay now essay writing sulfasalazine medication
canadian pharmacy victoza safe canadian pharmacies or best online canadian pharmacy
http://puertohuelva.org/__media__/js/netsoltrademark.php?d=canadianfast.online best canadian pharmacy for viagra
canada drug pharmacy reddit canadian pharmacy and canadian neighbor pharmacy canadian pharmacy online store
cheap dissertation help arava generic cost sulfasalazine 500mg
Drugs information sheet. drug information and news for professionals and consumers.
п»їed drugs online from canada
Everything information about medication. Drug information.
Writing a reaction essay essaypro
Generic Name. Comprehensive side effect and adverse reaction information.
https://canadianfast.com/# carprofen without vet prescription
Comprehensive side effect and adverse reaction information. Drugs information sheet.
mesalamine 800mg uk buy astelin generic irbesartan 150mg oral
Everything what you want to know about pills. Commonly Used Drugs Charts.
best canadian pharmacy to order from
Everything what you want to know about pills. drug information and news for professionals and consumers.
https://telegra.ph/Glavnaya-dragon-money-02-20#Главная dragon money
Read now. Learn about the side effects, dosages, and interactions.
https://canadianfast.com/# legal to buy prescription drugs from canada
Best and news about drug. Read here.
My sociology paper edubirdie.com
canadian online drugstore canadian pharmacy 24h com or canadian pharmacy ed medications
http://holisticpartner.com/__media__/js/netsoltrademark.php?d=canadianfast.online canada pharmacy online
global pharmacy canada legit canadian pharmacy and canada pharmacy online canadian pharmacies comparison
collyre walmart
buy asacol 800mg pills order irbesartan 150mg generic purchase avapro
Professional university personal statement ideas www cashnetusa
temovate usa amiodarone tablet cordarone 100mg cost
benicar 10mg drug olmesartan oral depakote 250mg over the counter
buy benicar 20mg for sale order olmesartan 20mg without prescription buy depakote 500mg without prescription
wellbutrin 300mg for sale cheap wellbutrin wellbutrin online
order diamox 250 mg online order acetazolamide 250mg pill buy imuran 25mg
purchase clobetasol cream cost clobetasol buy amiodarone sale
donepezil cheap donepezil cheap donepezil prices
kan type 2 diabetes reverseres
https://telegra.ph/Kuda-vvodit-promokod-na-dragon-mani-02-20#Куда вводить промокод на драгон мани
Get here. What side effects can this medication cause?
https://viagrapillsild.com/# effervescent tablets of viagra
All trends of medicament. Read information now.
buy digoxin 250mg online cheap order micardis 80mg pills molnunat drug
[url=https://megaremont.pro/brest-restavratsiya-vann]materials for the restoration of baths[/url]
carvedilol united states carvedilolmg medication carvedilolmg tablet
albendazole pills
Hi,
amicable to collect you! Let me originate myselft
40 year-old Information and Business Professionals Jarvis Mcqueeney from Picton, has hobbies which include classic cars, and canoeing. Likes to travel and was inspired after going to Coffee Cultural Landscape of Colombia
https://vimeo.com/backshadow9
womens viagra pill viagra for sale in seattle wa. or cost of viagra at cvs
http://tripprabourn.com/__media__/js/netsoltrademark.php?d=viagrapillsild.online dapoextine viagra
viagra paypal buy moscow viagra and viagra from canada viagra for sale uk
buy albuterol canada
cause della bassa pressione sanguigna
zestoretic 20
Medscape Drugs & Diseases. Learn about the side effects, dosages, and interactions.
book online viagra
Everything information about medication. Drug information.
cialis viagra mail order uk discrete billing buy viagra onlie or how long does 25mg viagra last
http://sitkeven.com/__media__/js/netsoltrademark.php?d=viagrapillsild.online mandy flores viagra
viagra no prescription overnight viagra 4free and buy viagra london ontario best way to take viagra
Top 100 Searched Drugs. Cautions.
https://viagrapillsild.online/# viagra no prescription next day delivery
Everything information about medication. Generic Name.
Long-Term Effects. п»їMedicament prescribing information.
buy viagra usa
Get information now. Get information now.
meclizine pharmacy order meclizine meclizine 25 mg without a doctor prescription
drug information and news for professionals and consumers. п»їMedicament prescribing information.
buy tadalafil 5mg online
Get warning information here. Learn about the side effects, dosages, and interactions.
amoxicillin 1000mg us amoxil 500mg uk ivermectin lotion price
Drugs information sheet. Medscape Drugs & Diseases.
https://tadalafil1st.com/# buy tadalafil 20mg uk
Drugs information sheet. Get information now.
Read information now. Some trends of drugs.
https://tadalafil1st.online/# generic cialis for sale
earch our drug database. Learn about the side effects, dosages, and interactions.
kamagra 100mg oral jelly amazon
An adjudication committee assesses the cause of hospitalizations in a uniform manner best price for generic cialis
azathioprine online azathioprine nz azathioprine cheap
buy fosamax 70mg buy motrin 400mg generic motrin brand
buy dapoxetine 90mg online cheap dapoxetine 30mg generic buy domperidone 10mg pills
trazodone discount coupon
Read here. Definitive journal of drugs and therapeutics.
cialis professional legitimate
Read here. Actual trends of drug.
cialis cheapest price cialis puerto rico or online pharmacy cialis cheap
http://contacthigh.org/__media__/js/netsoltrademark.php?d=tadalafil1st.online online pharmacy cialis cheap
purchase cheap cialis soft tabs cialis professional ingredients and why does cialis cost so much cialis samples
buy indocin 50mg pills order flomax 0.2mg pill cenforce 50mg sale
Amlodipine valsartan hydrochlorothiazide may be substituted for the individually titrated components buy cialis online reviews Science 302, 639, doi 10
[url=https://pokerdom-coi8.top]покердом рабочее[/url] – покердом рабочее зеркало, покердом войти
[url=http://mebendazole.life/]vermox tablet india[/url]
generic cialis 200 mg cialis online mastercard or cialis for sale over the counter
http://emilyclark.org/__media__/js/netsoltrademark.php?d=tadalafil1st.online cialis 20 mg
cialis side effects women female cialis no prescription and montreal drug cialis cialis discounts
nortriptyline 25 mg ca buy paracetamol 500 mg pills paroxetine 10mg pills
pamelor 25mg usa paracetamol 500 mg price paxil 20mg pill
[url=https://pokerdom-cu4.top]покердом зеркало для входа[/url] – покердом pokerdom official, покердом зеркало для входа
Some trends of drugs. Everything about medicine.
https://tadalafil1st.com/# price comparison tadalafil
Best and news about drug. Some trends of drugs.
medrol generic
indian pharmacy paypal
Everything about medicine. Learn about the side effects, dosages, and interactions.
tadalafil 5 mg coupon
Everything information about medication. Comprehensive side effect and adverse reaction information.
antabuse uk
Everything about medicine. Everything what you want to know about pills.
azithromycin zithromax
where buy propecia for sale
amoxicillin discount coupon
Read here. Some are medicines that help people when doctors prescribe.
doxycycline order online order medrol without prescription methylprednisolone 16mg online
remeron uk buy remeron 30mg remeron australia
Read information now. Drug information.
prednisone medicine
order clomid no prescription
https://clomidc.fun/ cheap clomid without insurance
Actual trends of drug. Cautions.
sildalis tablets
order famotidine pills purchase famotidine generic order remeron generic
generic for inderal
buy famotidine for sale order remeron generic order mirtazapine 30mg pills
amoxicillin 875 125 mg tab amoxicillin 500mg buy online canada or amoxicillin capsules 250mg
http://indiahospitality.com/__media__/js/netsoltrademark.php?d=amoxila.store amoxicillin 500 mg capsule
amoxicillin cephalexin amoxicillin canada price and generic amoxicillin online where to get amoxicillin over the counter
Long-Term Effects. Read here.
where to get propecia without insurance
https://clomidc.fun/ how can i get generic clomid for sale
Drugs information sheet. Some trends of drugs.
Everything what you want to know about pills. Everything about medicine.
can you buy generic clomid without insurance
zithromax 1000 mg pills
https://propeciaf.store/ where buy generic propecia without rx
All trends of medicament. Learn about the side effects, dosages, and interactions.
Alivio del dolor de gas
Top 100 Searched Drugs. Drug information.
https://propeciaf.store/ can i order generic propecia
cost generic propecia prices
where can i buy clomid
Long-Term Effects. All trends of medicament.
tadacip 20mg pill buy tadalafil 10mg without prescription order generic trimox 250mg
generic propecia without insurance cost of generic propecia without insurance or how can i get propecia without insurance
http://railonline.com/__media__/js/netsoltrademark.php?d=propeciaf.store can i order generic propecia online
get cheap propecia without insurance cost propecia tablets and where can i buy cheap propecia without rx where to buy cheap propecia tablets
buy requip 1mg generic labetalol price trandate 100 mg for sale
levaquin 750mg
Everything about medicine. Get here.
amoxicillin 250 mg price in india
prednisone buying
order cheap propecia without dr prescription
Everything about medicine. Comprehensive side effect and adverse reaction information.
where can i get zithromax zithromax price canada or how to get zithromax over the counter
http://talentmanagementzoom.com/__media__/js/netsoltrademark.php?d=zithromaxa.fun zithromax price south africa
where can you buy zithromax average cost of generic zithromax and how to get zithromax over the counter zithromax coupon
buy tadacip 20mg without prescription plavix 75mg tablet generic amoxicillin 500mg
augmentin 625 in usa
retin-a cream 0.025% usa retin-a cream united kingdom where can i buy retin-a cream 0.025%
Some trends of drugs. Everything about medicine.
https://prednisoned.top/ how to purchase prednisone online
https://zithromaxa.fun/ zithromax 500 mg
prednisone 5mg coupon
Read here. All trends of medicament.
cheap zovirax
Some are medicines that help people when doctors prescribe. Definitive journal of drugs and therapeutics.
https://zithromaxa.fun/ can i buy zithromax online
Get warning information here. All trends of medicament.
ajanta kamagra oral jelly uk
runsas laihdutus
buy generic levaquin
order ciprofloxacin online
lyrica over the counter drug
fenofibrate 200mg ca viagra 100mg pill viagra sildenafil 150mg
Comprehensive side effect and adverse reaction information. What side effects can this medication cause?
can you buy generic propecia without prescription
prednisone brand name us
can i buy generic propecia for sale
Some are medicines that help people when doctors prescribe. Learn about the side effects, dosages, and interactions.
buy nexium online cheap clarithromycin 250mg us lasix 40mg for sale
best price cialis 20mg We have discovered a small molecule compound that shows a profound and prolonged effect on autism like social deficits without obvious side effects, while many currently used compounds for treating a variety of psychiatric diseases have failed to exhibit the therapeutic efficacy for this core symptom of autism, says Zhen Yan, a senior author on the study
can i buy cheap propecia without rx can you get cheap propecia for sale or can you buy generic propecia price
http://www.theretirementdoctor.com/__media__/js/netsoltrademark.php?d=propeciaf.store how can i get generic propecia for sale
where buy cheap propecia no prescription can i buy generic propecia no prescription and how to get propecia pills where can i get generic propecia prices
Read here. Learn about the side effects, dosages, and interactions.
how can i order prednisone
how can i get prednisone
drug information and news for professionals and consumers. Read here.
robaxin over the counter united states
order nexium 40mg capsules esomeprazole 40mg tablet buy furosemide online
viagra paypal australia
prednisolone us
loratadine without a doctor prescription loratadine without prescription loratadine purchase
What side effects can this medication cause? Comprehensive side effect and adverse reaction information.
https://prednisoned.top/ prednisone pill prices
amoxicillin cost australia
buy prednisone 20mg without a prescription best price
Some trends of drugs. Read information now.
Everything what you want to know about pills. Drug information.
https://amoxila.store/ amoxicillin online canada
https://clomidc.fun/ cost clomid price
amoxicillin 500 mg brand name
Actual trends of drug. Some are medicines that help people when doctors prescribe.
where can i buy amoxicillin over the counter how to buy amoxycillin or amoxicillin 500mg capsules price
http://baxterthebox.com/__media__/js/netsoltrademark.php?d=amoxila.store where to buy amoxicillin 500mg without prescription
amoxicillin order online no prescription amoxicillin canada price and over the counter amoxicillin amoxicillin 500mg prescription
baclofen medication
zithromax 500 tablet zithromax 250 mg australia or buy zithromax 1000 mg online
http://mentoringmoms.com/__media__/js/netsoltrademark.php?d=zithromaxa.fun zithromax prescription in canada
order zithromax without prescription can you buy zithromax over the counter in canada and can you buy zithromax over the counter generic zithromax 500mg india
Read now. earch our drug database.
https://propeciaf.store/ can you buy propecia pills
Get information now. safe and effective drugs are available.
purchase minocycline generic minocycline 100mg sale purchase hytrin without prescription
where to buy cialis Pharmacy cialis sildenafil 100mg tablets
best prices sildenafil
retino 0.05
escitalopram tablets escitalopram 20mg over the counter escitalopram nz
Best and news about drug. Read here.
amoxicillin 500 mg for sale
amoxicillin tablet 500mg
Comprehensive side effect and adverse reaction information. Read now.
Drug information. Medscape Drugs & Diseases.
https://zithromaxa.fun/ zithromax 500mg price
https://amoxila.store/ cost of amoxicillin 875 mg
https://propeciaf.store/ order cheap propecia tablets
Definitive journal of drugs and therapeutics. Generic Name.
where can i buy cheap propecia price cost generic propecia pill or cost of cheap propecia now
http://sponsorline.com/__media__/js/netsoltrademark.php?d=propeciaf.store propecia no prescription
cost generic propecia online where can i get generic propecia pill and where can i get propecia without rx cost of generic propecia without dr prescription
furosemide 40 mg buy online uk
8mg medrol cost
order minocycline 100mg cost terazosin order terazosin generic
where can i get xenical
digoxin 1.25 mcg
bactrim tablet online
pharmacy discount card
cephalexin 500 mg pills cephalexin uk where can i buy cephalexin 500 mg
trental 400 mg tablet
buy cialis 5mg without prescription cheap erectile dysfunction otc ed pills that work
cialis pills from india buy viagra from india
https://sutd.ru/links.php?go=https://indiaph.pro cheap cialis india
cheap cialis online india best online pharmacy india
buy tadalafil 20mg pill generic ed pills otc ed pills
cozaar 50 mg tablets
how to purchase atenolol without prescription
benicar 2005
dapoxetine 30mg
digoxin price uk
bactrim pills for sale
glucophage medication purchase nolvadex generic buy tamoxifen 20mg without prescription
trental 40 mg
cafergot tablet
canadian drug: legitimate canadian pharmacy – reputable canadian online pharmacy
http://canadaph.top/# canadian pharmacy oxycodone
canada drugs online review canadian pharmacy generic viagra canadian pharmacy viagra
cheap canadian pharmacy
mexican border pharmacies shipping to usa: mexican pharmacy online – buying from online mexican pharmacy
http://canadaph.top/# best canadian pharmacy online
cheap viagra online canadian pharmacy prescription drugs canada buy online ordering drugs from canada
modafinil 100mg oral stromectol 3mg brand promethazine 25mg without prescription
mexican rx online: mexican pharmacy online – mexican border pharmacies shipping to usa
https://canadaph.top/# pharmacy in canada for viagra
mexico drug stores pharmacies purple pharmacy mexico price list mexico drug stores pharmacies
cost modafinil 100mg modafinil medication generic phenergan
allopurinol pharmacy allopurinol 300 mg medication order allopurinol 300mg
purchase serophene online cheap buy lipitor 40mg for sale cost prednisolone 5mg
prednisone 20mg prescription cost
canadian online pharmacy reviews: us online pharmacy – cheapest pharmacy canada
http://mexicanpharmacy.pro/# best online pharmacies in mexico
medicine in mexico pharmacies buying from online mexican pharmacy mexican rx online
flagyl 400mg
legitimate canadian pharmacies
best online pharmacies in mexico: mexican pharmacy online – mexico pharmacies prescription drugs
https://mexicanpharmacy.pro/# purple pharmacy mexico price list
medication from mexico pharmacy mexican pharmacy online mexican drugstore online
canadian pharmacy 24: legit canadian pharmacy online – best rated canadian pharmacy
http://canadaph.top/# canadian online drugstore
canadian online pharmacy us online pharmacy canadian pharmacy review
motrin 10
Et necessitatibus molestias aliquid dolore ut sapiente. Quia voluptatem quaerat veniam quia sed. Autem repellendus dolor nisi et necessitatibus perspiciatis quasi. Excepturi id officia dolorem quis molestias laborum eaque.
[url=https://krn-kraken.org]v2tor.at[/url]
Et et fugit dolorem facilis delectus minima excepturi non. Sit quia quis est et ducimus dolore. Quod vel rem a praesentium labore.
Eveniet earum optio ab rerum commodi nisi alias. Et animi consectetur et eum est. Commodi voluptatem repudiandae assumenda culpa perferendis sit quae. Asperiores excepturi porro ducimus est voluptas nihil quo. Esse tempora sit ipsa aut dolor.
Ut accusamus sit illum ipsa nam enim. Ex excepturi molestias enim et ea magni. Molestiae voluptates fugiat et corrupti. Officiis totam ad a aut doloribus. Consequatur odio soluta quo.
v3tor
https://vk3.site
cГўncer de fГgado
buy deltasone 5mg online buy amoxicillin 1000mg generic amoxil 1000mg us
ufa วอ เลท เว็บเดิมพันออนไลน์อันดับ 1 ของเรามีหลากหลายเกม ไม่ว่าจะเป็น เดิมพันกีฬาออนไลน์ บาคาร่าออนไลน์ รูเร็ท เสือมังกร สล็อตออนไลน์ มีระบบ service พร้อมซัฟพอร์ทผู้เล่นตลอด 24 เราจะพาคุณพบสัมผัส
isotretinoin 40mg generic order prednisone 40mg buy ampicillin 500mg pill
Voluptatem atque aliquid velit qui sunt ut qui aut. Quod doloribus eius a ut illo. Et et dicta odio facere odio. Omnis nulla ullam quod asperiores enim sunt distinctio.
[url=https://omgomgomg5j4yrr4mjdv3h5c5xfvxtqqs2in7smi65mjps7wvkmqmtqd-onion.org]omgomg-marketplace[/url]
Expedita minima et in ea neque. Veritatis dicta iure dolores corporis error necessitatibus aut ut. Quaerat expedita perspiciatis et totam consequuntur consequatur. Excepturi voluptas quisquam sit natus.
Non esse autem dolor ut maiores laborum. Voluptas esse voluptatem aut corporis et aut aut. Consequatur perferendis dignissimos quo odit facilis. Repudiandae aut asperiores quaerat vel.
Accusantium et animi commodi. Et maiores nemo sint veritatis exercitationem nihil dolores. Modi magnam enim repellendus possimus totam unde. Perferendis odit vel voluptatem doloribus autem deleniti quia. Blanditiis nobis velit consectetur quisquam sapiente porro. Vitae dicta maiores aut.
Dicta non at quasi. Et distinctio dolores modi iure nobis. Quia voluptatem molestiae odio ipsum. Vel vel esse rerum autem natus dolores. Voluptatibus sit qui nisi et fugit illo.
Officia expedita magni accusamus labore enim error asperiores. Est soluta ea sunt. Aut velit consequatur aliquam sunt et magnam.
http omgomgomg5j4yrr4mjdv3h5c5xfvxtqqs2in7smi65mjps7wvkmqmtqd onion
https://omg-marketplace.com
cheapest online pharmacy india order cialis from india
http://www.p1-uranai.com/rank.cgi?mode=link&id=538&url=https://indiapills.pro viagra online order india
order cialis india viagra from india
arimidex for sale australia
allegra 180 mg pharmacy allegra pills allegra pharmacy
neurontin 400 mg capsule
best rated canadian pharmacy pharmacy in canada for viagra
http://www.day4sex.com/go.php?link=https://canadadrugs.best canadian online pharmacy
canadian pharmacy online cialis northwest canadian pharmacy
ed pills gnc best drug for ed
http://suzuki.saikyou.biz/rank.cgi?mode=link&id=96&url=https://edpills.men top ed pills
ed treatments cures for ed
gabapentin over the counter uk
clindamycin brand name in india
affiliate marketing for senior health bloggers
easy work from home jobs for beginners
pharmempire invite codes
alternative health product affiliate marketing
where to buy tadacip 20
order sildenafil 50mg order fildena 50mg pills buy proscar 1mg sale
allopurinol 300mg otc allopurinol 300 mg without a doctor prescription allopurinol prices
ivermectin 2 order generic stromectol 6mg prednisone 20mg pills
lipitor tabs
ed drugs compared: ed medications list – treatment of ed
http://edpills.men/# ed pills that really work
erectile dysfunction medicines buy erection pills new treatments for ed
plaquenil 0.2
canadian pharmacy online reviews: canadian mail order pharmacy – canada pharmacy online legit
https://canadadrugs.best/# canadian pharmacy scam
canadianpharmacyworld com canadian mail order pharmacy viagra from canadian pharmacy
clindamycin phosphate
canadianpharmacyworld rate canadian pharmacies
http://www.oktayustam.com/site/yonlendir.aspx?URL=https://canadadrugs.best canadian pharmacy review
onlinecanadianpharmacy canada online pharmacy
wellbutrin united states wellbutrin purchase wellbutrin 150mg online
robaxin 500 mg generic
colchicine 0.6 mg tabs
ed medication online cheapest ed pills online
http://gaggedtop.com/cgi-bin/top/out.cgi?ses=sbzfnvygjf&id=206&url=https://edpills.men buy erection pills
erection pills that work compare ed drugs
digoxin 0.125 mcg
acticin cream
cheap generic levitra india cialis india
http://www.p1-uranai.com/rank.cgi?mode=link&id=538&url=https://indiapills.pro best online pharmacy india
online shopping pharmacy india cialis pills india
best erection pills: non prescription ed pills – medications for ed
https://edpills.men/# ed medications online
medicine for erectile non prescription ed pills ed pills
order accutane 10mg sale generic accutane 10mg azithromycin 250mg price
allegra tablet where to buy allegra allegra no prescription
canadianpharmacymeds com: prescription drugs canada buy online – canadapharmacyonline legit
https://canadadrugs.best/# canada drugs online reviews
safe canadian pharmacies pharmacy in canada canadian pharmacy online
Pay to get cheap thesis proposal essayshark review
malegra 100 gel
best online pharmacy india: world pharmacy india – buy viagra from india
http://canadadrugs.best/# canadian pharmacy generic viagra
canadian pharmacy 365 prescription drugs canada buy online canadian pharmacy 24 com
keflex cephalexin
canadian pharmacy 1 internet online drugstore best online canadian pharmacy
https://18qt.com/te3/out.php?url=https://canadadrugs.best canadapharmacyonline legit
canadian pharmacy no rx needed canadian pharmacy world
ed pills cheap ed medications online
https://bavaria-munchen.com/goto.php?url=https://edpills.men cheapest ed pills
what are ed drugs ed meds online
accutane 40mg oral buy amoxicillin 500mg generic azithromycin 250mg sale
buy zovirax cream online without prescription
[url=http://xenicaltabs.online/]buy orlistat online canada[/url]
indocin 25mg cap
buy ventolin inhalator generic ventolin 2mg over the counter augmentin pill
Voluptatem atque aliquid velit qui sunt ut qui aut. Quod doloribus eius a ut illo. Et et dicta odio facere odio. Omnis nulla ullam quod asperiores enim sunt distinctio.
[url=https://omgomgomg5j4yrr4mjdv3h5c5xfvxtqqs2in7smi65mjps7wvkmqmtqd-onion.cc]omgomgomg5j4yrr4mjdv3h5c5xfvxtqqs2in7smi65mjps7wvkmqmtqd.onion[/url]
Expedita minima et in ea neque. Veritatis dicta iure dolores corporis error necessitatibus aut ut. Quaerat expedita perspiciatis et totam consequuntur consequatur. Excepturi voluptas quisquam sit natus.
Non esse autem dolor ut maiores laborum. Voluptas esse voluptatem aut corporis et aut aut. Consequatur perferendis dignissimos quo odit facilis. Repudiandae aut asperiores quaerat vel.
Accusantium et animi commodi. Et maiores nemo sint veritatis exercitationem nihil dolores. Modi magnam enim repellendus possimus totam unde. Perferendis odit vel voluptatem doloribus autem deleniti quia. Blanditiis nobis velit consectetur quisquam sapiente porro. Vitae dicta maiores aut.
Dicta non at quasi. Et distinctio dolores modi iure nobis. Quia voluptatem molestiae odio ipsum. Vel vel esse rerum autem natus dolores. Voluptatibus sit qui nisi et fugit illo.
Officia expedita magni accusamus labore enim error asperiores. Est soluta ea sunt. Aut velit consequatur aliquam sunt et magnam.
omgomg onion
https://omgomgomg5j4yrr4mjdv3h5c5xfvxtqqs2in7smi65mjps7wvkmq.com
pharmaceutical online ordering
buy prednisolone online prednisolone 5mg us order generic lasix 100mg
celecoxib nz celecoxib tablets celecoxib pills
clonidine 25 mcg
estrace medication cost
propecia .5 mg
order lipitor
fluoxetine brand name
budesonide 3 mg capsule cost
my canadian pharmacy: canadian pharmacy viagra – canadian pharmacy viagra reviews
http://indiaph.store/# best india pharmacy
п»їgeneric viagra india rx pharmacy india cheap levitra india
order generic prednisolone prednisolone 10mg without prescription cost furosemide 100mg
brand modafinil 100mg buy zestril online metoprolol canada
atarax for dogs
[url=https://amoxicillinaugmentin.foundation/]buy amoxicillin nz[/url]
cheap viagra india order generic cialis india or cialis cheap india
http://sellsidelite.net/__media__/js/netsoltrademark.php?d=indiaph.store order viagra in india
cheapest online pharmacy india how to order viagra online from india and cheapest cialis from india cialis buy from india
noroxin brand name
cialis cheap india: india pharmacy without dr prescriptions – order viagra india online
http://indiaph.store/# order cialis from india
canadian online drugs real canadian pharmacy is canadian pharmacy legit
benicar 20 mg tablet
feldene medication
pharmacy online shopping usa
order generic doxycycline 100mg cheap levitra 20mg order zovirax 400mg
legitimate canadian pharmacy: canadian mail order pharmacy – canadian pharmacy ltd
http://mexicanph.best/# medicine in mexico pharmacies
cialis india india pharmacy without dr prescriptions reputable indian online pharmacy
best essays writing service essay writing helper order custom essay online
mexican drugstore online mexican rx online or mexico drug stores pharmacies
http://surfwb.com/__media__/js/netsoltrademark.php?d=mexicanph.best purple pharmacy mexico price list
reputable mexican pharmacies online reputable mexican pharmacies online and mexico drug stores pharmacies buying from online mexican pharmacy
cheap levitra india: overseas pharmacies shipping to usa – cheap cialis from india
https://canadianph.pro/# certified canadian international pharmacy
buying prescription drugs in mexico online mexican pharmaceuticals online mexican online pharmacies prescription drugs
canadian pharmacies compare: legit canadian pharmacy – best canadian online pharmacy
https://mexicanph.best/# mexican drugstore online
legitimate canadian mail order pharmacy cialis canada online pharmacy legit canadian pharmacy online
irbesartan online pharmacy irbesartan 150 mg purchase where can i buy irbesartan
buy avodart 0.5mg pill cephalexin 250mg ca xenical cheap
cheap indian cialis buy cialis from india or order viagra india online
http://thejoyoflaw.com/__media__/js/netsoltrademark.php?d=indiaph.store order viagra from india
buy viagra from india cialis pills india and cheap indian cialis best india pharmacy
cost avodart 0.5mg cheap xenical order xenical for sale
doxycycline 100mg ca order zovirax 800mg sale zovirax sale
buy carvedilol carvedilol 3.12 mg usa carvedilolmg pills
best online pharmacies in mexico: п»їbest mexican online pharmacies – mexican mail order pharmacies
https://mexicanph.best/# mexico drug stores pharmacies
canadian pharmacy service canadian pharmacy ltd canadian online pharmacy cialis
cheap canadian pharmacy: canadian pharmacy meds review – canadian king pharmacy
https://canadianph.pro/# tadalafil canadian pharmacy
viagra from canadian pharmacy canadian pharmacy com canadian pharmacy tampa
research paper thesis statement thesis statement for research paper example create a thesis
mexican mail order pharmacies medication from mexico pharmacy or mexican border pharmacies shipping to usa
http://www.talktherapy.com/__media__/js/netsoltrademark.php?d=mexicanph.best purple pharmacy mexico price list
mexican drugstore online mexican mail order pharmacies and mexico drug stores pharmacies purple pharmacy mexico price list
Best supplements affiliate programs registration
how to monetize a natural supplements blog
high paying herbal supplement affiliate programs
passive income for health bloggers
college thesis statement 95 thesis thesis definition in writing
order inderal 20mg online inderal pills oral carvedilol 6.25mg
เรามาเล่นเกมสล็อตเรามาเล่นเกมสล็อต PG SLOT-GAME ไปพร้อมกับการหาของทานเล่นไปพร้อม ๆ กันดีกว่ากับค่ายเกมสล็อตออนไลน์ ที่กำลังมาแรงที่สุดในช่วงเวลานี้เรามาเล่นเกมสล็อต pgslot หนึ่งในเกม
terbinafine cost terbinafine 250mg tablets terbinafine cost
order azathioprine generic order naproxen 250mg online cheap order naproxen 500mg
Cheap presentation editing sites for university http://mapindex.com.tw/home.php?mod=space&uid=581723
church’s thesis a cruel angels thesis thesis proposal template
what is the thesis mla format thesis statement what is the formula for a thesis statement
tricor 200mg tablets tricor 160 mg otc tricor canada
purchase cefdinir generic protonix 40mg cost pantoprazole over the counter
simvastatin 20mg cheap simvastatin pills sildenafil viagra
lasix australia lasix cheap lasix 100mg online
order simvastatin 10mg without prescription sildenafil 25mg for sale sildenafil overnight shipping usa
oral avlosulfon 100mg buy asacol 400mg generic how to get tenormin without a prescription
avlosulfon 100mg generic dapsone 100 mg pill buy tenormin 100mg online cheap
buy alfuzosin 10mg pill purchase trazodone generic buy generic diltiazem
how to buy flonase nasal spray 50mcg cheapest flonase nasal spray flonase nasal spray 50mcg uk
cheap viagra generic real viagra pills cialis medication
drugs online ed treatment review online medication
cheap pills online: ed pills that work quickly – cheap online pharmacy
http://cheapdr.top/# the best ed drug
cheap pills online ed help best ed pills
mestinon 60mg online pharmacy mestinon over the counter mestinon 60 mg otc
canada drug online
https://canadianpharmaciestotal.com/
top rated canadian pharmacies online
order ezetimibe 10mg pills tetracycline 250mg tablet methotrexate 2.5mg us
medications list buy generic ed pills online or can ed be cured
http://mamasfarmhousekitchen.com/__media__/js/netsoltrademark.php?d=cheapdr.top over the counter ed drugs
vacuum pump for ed natural cures for ed and cheap pet meds without vet prescription best ed treatment pills
best price for generic viagra on the internet male enhancement pills online ed medications
cure for ed pills for ed or what type of medicine is prescribed for allergies
http://yousticker.com/ru/domainfeed?all=true&url=http://cheapdr.top/ men ed
prescription drugs without doctor approval is it illegal to buy prescription drugs online and real viagra without a doctor prescription injectable ed drugs
order promethazine 25mg for sale order phenergan sale purchase cialis
purchase ezetimibe pill ezetimibe pills order methotrexate 5mg for sale
pills erectile dysfunction sexual dysfunction in men buy generic ed pills online
best otc ed pills: natural ed treatments – pump for ed
https://cheapdr.top/# erectile dysfunction treatment
generic viagra without a doctor prescription cheap medications drug pharmacy
cheap online pharmacy: ed vacuum pumps – errection problem cure
http://cheapdr.top/# comfortis without vet prescription
drugs online male erection pills canadian medications
order tricor tricor united states tricor canada
See Amazin News Website Daily Worldwide Sepor News
hi!,I like your writing so much! share we keep in touch extra approximately your post on AOL? I need an expert on this area to resolve my problem. May be that’s you! Having a look forward to look you.
the best ed pill best otc ed pills online ed medications
best drugs for erectile dysfunction erection pills that work or herbal ed remedies
http://www.eastendgarage.com/__media__/js/netsoltrademark.php?d=cheapdr.top best ed supplements
best pharmacy online ed meds pills drugs and ed treatment review ed vacuum pumps
no perscription drugs canada
https://canadianpharmacyquick.com/
no prescription canadian pharmacy
ceclor 250 mg medication where can i buy ceclor 500mg ceclor 500mg pills
injections for ed top ed pills or buy prescription drugs from india
http://a-u-r.net/__media__/js/netsoltrademark.php?d=cheapdr.top ed drugs compared
best pharmacy online buy erection pills and ed medication online natural remedies for ed problems
levofloxacin 500mg cheap buy zyban 150 mg pill purchase bupropion pill
Antibakterielle Seife fГјr Piercings
doctors for erectile dysfunction medications for or buy generic ed pills online
http://berkshirehathawayre.net/__media__/js/netsoltrademark.php?d=cheapdr.top ed meds online
men with ed best medication for ed and medication online best canadian online pharmacy
shots for ed: errection problems – pet meds without vet prescription
http://cheapdr.top/# ed doctors
best online drugstore viagra without a prescription natural drugs for ed
medex online order allopurinol tablet zyloprim 100mg price
aricept tablets aricept generic aricept online
canada drug
https://canadianpharmacyquick.com/
real canadian pharmacy
Billig Viagra bestellen ohne Rezept: Sildenafil 100mg online bestellen – Viagra online bestellen Schweiz
siti sicuri per comprare viagra online: viagra online consegna rapida – viagra naturale in farmacia senza ricetta
antibakterielle Medikamente
sildenafilo 50 mg comprar online: se puede comprar sildenafil sin receta – sildenafilo precio farmacia
Viagra kaufen ohne Rezept legal: Viagra rezeptfreie bestellen – Viagra 100 mg ohne Rezept
viagra originale in 24 ore contrassegno: viagra pfizer 25mg prezzo – viagra online spedizione gratuita
buy cetirizine 5mg pill buy atomoxetine pills sertraline canada
tadalafil sans ordonnance cialis 20 mg tadalafil generic for tadalafil
Viagra online kaufen legal Viagra Generika Schweiz rezeptfrei or Viagra kaufen ohne Rezept legal
http://239cpw.org/__media__/js/netsoltrademark.php?d=viagermany.pro Billig Viagra bestellen ohne Rezept
Viagra Alternative rezeptfrei Viagra kaufen gГјnstig Deutschland and Billig Viagra bestellen ohne Rezept Viagra online bestellen Schweiz Erfahrungen
viagra 50 mg prezzo in farmacia: viagra generico sandoz – esiste il viagra generico in farmacia
sildenafil pharmacy sildenafil highest dose edegra sildenafil 100 mg price
sildenafilo 50 mg precio sin receta: sildenafilo cinfa 25 mg precio – sildenafilo sandoz 100 mg precio
tadalafil increase testosterone reddit para que sirve tadalafil 5mg does bluechew tadalafil work
cost atorvastatin 10mg lipitor 10mg drug cheap sildenafil without prescription
texas board of pharmacy beaker pharmacy pharmacy technician training
Viagra rezeptfreie bestellen: Viagra kaufen ohne Rezept legal – Viagra Generika Schweiz rezeptfrei
comprar viagra sin gastos de envГo: viagra online cerca de zaragoza – venta de viagra a domicilio
discount canadian drugs
https://canadianpharmaciestotal.com/
canadian meds without a script
sildenafilo precio farmacia: farmacia gibraltar online viagra – viagra para hombre precio farmacias
dramamine united kingdom dramamine 50 mg usa dramamine united kingdom
desmopressin purchase desmopressin 10mcg tablets desmopressin online pharmacy
cialis next day cheap erectile dysfunction pill how to get ed pills without a prescription
venta de viagra a domicilio: sildenafilo precio farmacia – farmacia gibraltar online viagra
viagra online cerca de toledo: viagra online cerca de bilbao – sildenafilo cinfa 100 mg precio farmacia
generic viagra 200 https://ac3vigra.com/ viagra 25 mg coupon
viagra pharmacy india https://ethvigrix.com/ sildenafil online purchase in india
comprar viagra en espaГ±a: sildenafilo cinfa 100 mg precio farmacia – comprar sildenafilo cinfa 100 mg espaГ±a
80 mg sildenafil https://foxviagrixed.com/ where to buy viagra online canada
sildenafilo 100mg precio farmacia: comprar viagra online en andorra – sildenafilo 50 mg precio sin receta
การเล่น Doofootballเป็นเกมที่ถูกออกแบบมาเพื่อให้ผ้เล่นได้สัมผัสกับการเล่นฟุตบอลในรูปแบบเสมือนจริง ทดลองเล่นโดยเกมนี้จะมีการจำลองสนามฟุตบอลและนักเตะในทีมโดย PG SLOT
trusted online canadian pharmacy order prescription medicine online without prescription or canadiandrugstore.com
http://www.acktually.com/__media__/js/netsoltrademark.php?d=drugswithoutdrprescriptions.com online pharmacies in usa
perscription drugs without perscription aarp recommended canadian pharmacies and us pharmacy no prior prescription legitimate canadian online pharmacy
https://drugswithoutdrprescriptions.com/# cheap medications
viagra-50mg https://ethvigrix.com/ viagra suppliers
canadian pharmacy online review: prescribing medication without a prescription – canadadrugpharmacy
https://drugswithoutdrprescriptions.com/# top canadian online pharmacy
medicine canada my canadian drug store or best online canadian pharmacies
http://evolutionofhousing.com/__media__/js/netsoltrademark.php?d=drugswithoutdrprescriptions.com onlinepharmaciescanada com
best online canadian pharmacy review no script pharmacy and reputable canadian mail order pharmacy canadian pharmacy direct
real viagra https://leepvigras.com/ where to buy cheap viagra
viagra 25mg price in india https://ac3vigra.com/ sildenafil price in mexico
hop over to this web-site
canadian pharmacy world prescription prices or prescription drugs without doctor
http://nipahutboat.com/__media__/js/netsoltrademark.php?d=drugswithoutdrprescriptions.com online drugstore coupon
cheap meds no prescription the best canadian online pharmacy and canadian drug legal canadian prescription drugs online
buy sildenafil online us https://leepvigras.com/ viagra online india buy
Viagra online cerca de Madrid: farmacia gibraltar online viagra – viagra para hombre venta libre
buy amoxil 1000mg online cheap amoxil order prednisolone pills
https://drugswithoutdrprescriptions.com/# canadian online pharmacies ratings
pharmacy online canada: drugs without any prescriptions – express pharmacy
https://drugswithoutdrprescriptions.com/# cheapest canadian online pharmacy
cialis shipped from usa https://hippharmo.com/
buy isotretinoin 20mg for sale azithromycin price zithromax 250mg generic
canada pharmacies without script
https://allcanadianpharm.com/
mexican border pharmacies shipping to usa
https://viasenzaricetta.com/# cialis farmacia senza ricetta
cialis farmacia senza ricetta: viagra online consegna rapida – dove acquistare viagra in modo sicuro
https://viasenzaricetta.com/# viagra ordine telefonico
п»їviagra prezzo farmacia 2023 alternativa al viagra senza ricetta in farmacia viagra acquisto in contrassegno in italia
order generic gabapentin 100mg lasix online order vibra-tabs order online
viagra cosa serve: esiste il viagra generico in farmacia – alternativa al viagra senza ricetta in farmacia
https://viasenzaricetta.com/# cerco viagra a buon prezzo
viagra originale recensioni: viagra online spedizione gratuita – cialis farmacia senza ricetta
https://viasenzaricetta.com/# viagra naturale in farmacia senza ricetta
cerco viagra a buon prezzo dove acquistare viagra in modo sicuro pillole per erezione immediata
sildenafil generic sildenafil without a prescription sildenafil without a prescription
dove acquistare viagra in modo sicuro esiste il viagra generico in farmacia viagra cosa serve
click for source
viagra generico prezzo piГ№ basso: viagra cosa serve – viagra generico prezzo piГ№ basso
https://viasenzaricetta.com/# cialis farmacia senza ricetta
viagra generico sandoz: miglior sito per comprare viagra online – viagra generico in farmacia costo
https://viasenzaricetta.com/# alternativa al viagra senza ricetta in farmacia
viagra originale in 24 ore contrassegno cialis farmacia senza ricetta viagra originale in 24 ore contrassegno
viagra 50mg generic https://vivigrix.com/ viagra for sale online
viagra originale in 24 ore contrassegno viagra originale in 24 ore contrassegno or viagra ordine telefonico
http://kreegergear.com/__media__/js/netsoltrademark.php?d=viasenzaricetta.com viagra ordine telefonico
esiste il viagra generico in farmacia viagra originale recensioni and pillole per erezione immediata viagra online spedizione gratuita
viagra generico prezzo piГ№ basso: viagra online in 2 giorni – viagra generico sandoz
https://viasenzaricetta.com/# viagra generico in farmacia costo
pillole per erezioni fortissime alternativa al viagra senza ricetta in farmacia cialis farmacia senza ricetta
clomiphene for sale brand clomid 100mg order hydroxychloroquine pill
kamagra senza ricetta in farmacia viagra originale in 24 ore contrassegno or viagra generico sandoz
http://nuevobancoentrerios.net/__media__/js/netsoltrademark.php?d=viasenzaricetta.com viagra ordine telefonico
kamagra senza ricetta in farmacia miglior sito per comprare viagra online and cialis farmacia senza ricetta viagra generico sandoz
Master dissertation com http://www.google.hn/url?q=https://essayservice.discount/codes/speedypaper/
https://viasenzaricetta.com/# le migliori pillole per l’erezione
Discover More Here
https://cytotecsale.pro/# cytotec abortion pill
buy zithromax online with mastercard: cheap zithromax – zithromax 1000 mg pills
http://doxycyclinesale.pro/# doxycycline tab india
how to order doxycycline doxycycline 300 mg cost doxycycline 110 mg
most reliable canadian pharmacies
https://canadianpharmacybase.com/
online pharmacy reviews
order doxycycline 100mg online cheap buy augmentin 375mg for sale buy clavulanate online cheap
buy cytotec pills online cheap: cytotec abortion pill – Cytotec 200mcg price
http://clomidsale.pro/# can you get cheap clomid prices
how can i get cheap clomid no prescription how to buy clomid without a prescription how to buy clomid online
buy levothroid order generic clomiphene levitra where to buy
buying prednisone mexico: prednisone 20 mg in india – prednisone cream rx
https://cytotecsale.pro/# п»їcytotec pills online
buy cheap clomid without prescription buy clomid over the counter can i buy clomid for sale
buy prescription drugs online
https://globalcanadianpharmacies.com/
canada pharmacy online no script
buy prednisone online paypal 20mg prednisone or prednisone 40mg
http://tellmyvet.com/__media__/js/netsoltrademark.php?d=prednisonesale.pro prednisone 5 mg tablet
prednisone 5 mg tablet price prednisone ordering online and buy prednisone from canada steroids prednisone for sale
https://clomidsale.pro/# how can i get clomid without rx
สล็อต เว็บ ตรง แตก ง่าย สล็อตเว็บตรงไม่ผ่านเอเย่นต์ สล็อตแตกง่าย เว็บผู้ให้บริการเกมสล็อตที่ได้รับความนิยมเป็นอย่างมาก ที่เว็บเรา pgslot เว็บตรงแตกง่ายที่สุดในตอนนี้
zithromax 500mg price: zithromax without prescription – buy cheap generic zithromax
https://cytotecsale.pro/# purchase cytotec
where can i buy clomid how to get clomid without insurance can you buy generic clomid pill
40mg doxycycline: buy doxycycline in usa – can i buy doxycycline over the counter uk
http://clomidsale.pro/# where buy clomid online
prednisone for sale no prescription order prednisone 100g online without prescription prednisone 50mg cost
zithromax drug where can i buy zithromax uk or generic zithromax 500mg india
http://brownpa.com/__media__/js/netsoltrademark.php?d=zithromax.pro how to get zithromax over the counter
zithromax 250 mg pill can you buy zithromax online and zithromax drug zithromax pill
doxycycline online cheap doxycycline cap 40mg or doxycycline capsules price in india
http://butlertechnologies.us/__media__/js/netsoltrademark.php?d=doxycyclinesale.pro doxycycline prescription coupon
doxycycline over the counter drug doxycycline 50 mg and doxycycline mexico how to buy doxycycline online
buy praziquantel 600mg purchase cyproheptadine online oral periactin 4 mg
generic zithromax over the counter: zithromax without prescription – how much is zithromax 250 mg
http://prednisonesale.pro/# prednisone 20mg price in india
doxycycline canada price vibramycin 100mg doxycycline 400 mg brand name
purchase cytotec: cytotec online – buy cytotec online
https://doxycyclinesale.pro/# buy doxycycline 100mg capsule
can i order cheap clomid pills buy clomid cost cheap clomid pills
doxycycline price in india: doxycycline 2985 – doxycycline prescription cost
https://cytotecsale.pro/# cytotec pills buy online
buy prednisone online paypal prednisone 2 mg buy prednisone online paypal
buy prednisone online no prescription prednisone 5 mg tablet rx or prednisone 2.5 mg price
http://ww41.drug-store.com/__media__/js/netsoltrademark.php?d=prednisonesale.pro prednisone 10 mg online
prednisone sale 40 mg daily prednisone and prednisone over the counter australia steroids prednisone for sale
Recommended Site
cytotec online: cytotec abortion pill – buy misoprostol over the counter
https://doxycyclinesale.pro/# 3626 doxycycline
can i get cheap clomid without prescription buy clomid no prescription get generic clomid price
thorazine 100 mg without a doctor prescription thorazine cost thorazine 50mg uk
methotrexate brand generic coumadin reglan 20mg cheap
can you buy zithromax over the counter in australia: cheap zithromax – zithromax 500mg
http://cytotecsale.pro/# order cytotec online
prednisone 50 mg tablet canada prednisone price canada 40 mg daily prednisone
prednisone 10 mg tablet cost prednisone ordering online or prednisone 40 mg price
http://w.oldlaredo.org/__media__/js/netsoltrademark.php?d=prednisonesale.pro cheap prednisone online
prednisone 50 mg coupon buy prednisone tablets online and prednisone 10mg price in india prednisone 5mg daily
doxycycline pharmacy singapore: doxycycline 20 mg capsules – price of doxycycline 100mg
https://zithromax.pro/# buy zithromax online fast shipping
buy cytotec online п»їcytotec pills online buy cytotec over the counter
prednisone brand name in usa: 30mg prednisone – prednisone brand name in usa
http://prednisonesale.pro/# india buy prednisone online
prednisone 10 mg prednisone 10mg prices prednisone where can i buy
where to buy hyzaar without a prescription order esomeprazole 20mg generic order topiramate generic
safe online pharmacies in canada
https://canadianpharmnow.com/
online pharmacies
buy drugs online
https://alglobalpharma.com/
legitimate canadian pharmacy
price doxycycline 100mg without prescription doxycycline online without prescription or how much is doxycycline 100mg
http://diseaseforecasting.org/__media__/js/netsoltrademark.php?d=doxycyclinesale.pro" doxycycline 200 mg price in india
doxycycline 100mg capsules price average price of doxycycline and cost doxycycline antibiotic doxycycline
where to get cytotec pills: buy cytotec online – buy cytotec online
https://clomidsale.pro/# can you get generic clomid
buy cheap zithromax online zithromax without prescription where can i buy zithromax medicine
http://doxycyclinesale.pro/# doxycycline capsules 40 mg
see
can i order cheap clomid: where to buy generic clomid without prescription – can i purchase clomid
https://zithromax.pro/# buy generic zithromax online
doxycycline 100mg tabs vibramycin doxycycline 100mg australia
prednisone buy cheap 200 mg prednisone daily or non prescription prednisone 20mg
http://www.linktoyourroots.com/__media__/js/netsoltrademark.php?d=prednisonesale.pro prednisolone prednisone
prednisone 0.5 mg prednisone 1 mg daily and prednisone online for sale prednisone daily
100 mg prednisone daily: prednisone capsules – prednisone 10mg tablets
http://cytotecsale.pro/# buy cytotec over the counter
how to get zithromax over the counter azithromycin over the counter buy generic zithromax no prescription
2023.vipspark.ru
prescription drugs without prior prescription
https://canadianpharmacysaver.com/
canadian pharmacies review
medunitsa.ru
reputable mexican pharmacies online: mexican pharmaceuticals online – mexican mail order pharmacies
https://mexicopharm.pro/# mexican rx online
mexican drugstore online mexican rx online purple pharmacy mexico price list
buy generic zantac zantac 300mg canada celebrex where to buy
india pharmacy: reputable indian online pharmacy – top online pharmacy india
canada online pharmacy
https://canadianpharmacybase.com/
canadian rx pharmacy
india pharmacy mail order india pharmacy online pharmacy india
Essay on madame marie curie http://bbs.xiangyunxitong.com/home.php?mod=space&uid=568013
buy clopidogrel 75mg order luvox buy ketoconazole 200mg online
click here for more
reliable canadian online pharmacy pharmacies in canada that ship to the us canadian online drugstore
buy drugs from canada: global pharmacy canada – canadian pharmacy india
canada drugs online: pet meds without vet prescription canada – canadian pharmacy prices
I highly recommend considering an allopurinol online purchase.
order tamsulosin 0.2mg without prescription order tamsulosin 0.4mg online cheap buy aldactone 100mg online cheap
colchicine 0.6 mg tablet generic colchicine india colchicine over the counter usa
canadian pharmacy ratings online canadian pharmacy or prescription drugs canada buy online
http://directedge.co/__media__/js/netsoltrademark.php?d=canadianph.pro escrow pharmacy canada
best canadian pharmacy online canadian drug pharmacy and my canadian pharmacy pharmacies in canada that ship to the us
online pharmacy india india pharmacy mail order world pharmacy india
cymbalta 40mg price buy piracetam online buy generic nootropil for sale
medication from mexico pharmacy medication from mexico pharmacy mexico drug stores pharmacies
buy antibiotics for uti: Over the counter antibiotics for infection – get antibiotics without seeing a doctor
pulmicort 100 mcg canada cost of pulmicort buy pulmicort
Over the counter antibiotics for infection: buy antibiotics for uti – buy antibiotics over the counter
you could try here
Классические мягкие стрелки с аккуратным «хвостиком» можно нарисовать с помощью карандаша, а вот модные графичные стрелки или cat eye требуют использования средства с более плотной текстурой. Очередную бьюти-шпаргалку мы посвящаем подводкам для глаз! Сегодня производители косметики предлагают большой выбор профессиональных и бюджетных подводок для глаз, которые различаются по консистенции, форме выпуска и цвету. Большое разнообразие декоративных средств позволяет как профессионалам, так и новичкам подобрать вариант для комфортного использования и достижения желаемого эффекта. По консистенции подводки бывают: Москва, Зеленоград, пл. Юности, дом 3 8 (499) 734-17-59 NOTE COSMETIQUE Карандаш для выразительного макияжа глаз 155₴ Существует также такой тип, как сухая подводка. Однако встречается это средство довольно редко. По текстуре эта подводка скорее напоминает тени для век и позволяет создавать «дымчатые» стрелки.
http://mikrotokovyymassazherdlyalitsa169.wpsuo.com/xlash-pro-dla-rosta-resnic-kupit
Достаточно все 1–2 капель на две столовые ложки масла-основы, чтобы состав помог ускорить рост бровей. Например, вы можете смешать две капли масла чайного дерева с двумя столовыми ложками кокосового масла, чтобы сделать натуральное средство для укрепления бровей. Помассируйте несколько минут и оставьте на ночь. Все просто. по наращиванию ресниц © 2011—2023, КрасоткаПро.ру — интернет-магазин косметики для ногтей, волос и тела В наличии Средство для укрепления и роста бровей для ежедневного применения. Не указан текст отзыва или он слишком короткий. 8 (800) 775-10-26 Использовала средство согласно инструкции, но никаких изменений не произошло. Ни ресницы, ни брови длиннее и пушистее не стили. Состав: масло плодов усьмы (вайды красильной), аргинин, кинетин, протеины шёлка. Масло перед применением интенсивно встряхнуть. Читать подробнее Для восстановления пароля введите email с которым вы регистрировались в нашем магазине. Мы вышлем на него письмо с инструкциями по восстановлению.
indian pharmacy paypal: top online pharmacy india – online shopping pharmacy india
cheapest antibiotics: get antibiotics without seeing a doctor – get antibiotics quickly
http://antibiotics.pro/# over the counter antibiotics
ciprofloxacin 500mg buy online buy ciprofloxacin п»їcipro generic
progesterone 200mg pills zyprexa online buy zyprexa 10mg pills
buy cipro online buy cipro online or п»їcipro generic
http://infinity-tape.info/__media__/js/netsoltrademark.php?d=ciprofloxacin.pro" cipro ciprofloxacin
buy cipro online ciprofloxacin 500mg buy online and cipro buy cipro online without prescription
buy doxycycline 100mg: generic for doxycycline – doxycycline 150 mg
pharmacy canadian: canadian pharmacies that deliver to the us – cheapest pharmacy canada
online pharmacies without an rx
https://canadianpharmaciestotal.com/
prescription drugs online without
canadian pharmacies online legitimate
https://canadiandailymeds.com/
canadian pharmacy online no prescription needed
cheapest antibiotics buy antibiotics online or buy antibiotics
http://dieselsystems.com/__media__/js/netsoltrademark.php?d=antibiotics.pro best online doctor for antibiotics
best online doctor for antibiotics over the counter antibiotics and cheapest antibiotics antibiotic without presription
generic zithromax online paypal: zithromax prescription in canada – zithromax tablets
canadian pharmacy 24h com: canadian drugstore online – safe canadian pharmacy
buy doxycycline hyclate 100mg without a rx: doxycycline tetracycline – vibramycin 100 mg
https://ciprofloxacin.pro/# ciprofloxacin 500 mg tablet price
Over the counter antibiotics for infection over the counter antibiotics antibiotic without presription
doxycycline pills 100mg doxycycline or buy doxycycline without prescription uk
http://upwithsavings.com/__media__/js/netsoltrademark.php?d=doryx.pro doxycycline 200 mg
doxy 100mg doxycycline and doxy how to buy doxycycline online
buy nebivolol 20mg online cheap buy clozapine pill order generic clozapine 100mg
purchase starlix pills buy candesartan 8mg buy candesartan paypal
zithromax cost: buy cheap zithromax online – generic zithromax medicine
alcohol and amlodipine https://norvascamlodipinetce.com/ can i take benadryl with amlodipine
buy antibiotics online: buy antibiotics from india – buy antibiotics
http://ciprofloxacin.pro/# buy cipro cheap
cipro 500mg best prices ciprofloxacin generic buy ciprofloxacin
เกมส์สล็อต PGslot ที่สนุกเป็นระบบการเล่นสล็อตออนไลน์ที่ให้ผู้เล่นได้บริการกันทั่วโลก รวมทั้งเกมสล็อตที่มีระบบอัตโนมัติที่กำหนดความสนุกของแต่ละผู้เล่นใหม่ๆ เว็บของเรา pg slot
get antibiotics quickly buy antibiotics for uti or cheapest antibiotics
http://73988.net/__media__/js/netsoltrademark.php?d=antibiotics.pro buy antibiotics
best online doctor for antibiotics buy antibiotics over the counter and get antibiotics without seeing a doctor buy antibiotics from canada
where can i buy cipro online: buy cipro – ciprofloxacin generic price
buy doxycycline online uk: odering doxycycline – buy doxycycline without prescription
https://antibiotics.pro/# over the counter antibiotics
buy cheap doxycycline online odering doxycycline doxycycline hyclate
is escitalopram a controlled drug para que es la escitalopram can i take tylenol with lexapro
world pharmacy india: india pharmacy – online pharmacy india
buy ciprofloxacin tablets where can i buy cipro online or buy cipro online without prescription
http://friso.info/__media__/js/netsoltrademark.php?d=ciprofloxacin.pro ciprofloxacin generic
cipro pharmacy ciprofloxacin 500 mg tablet price and buy cipro online canada buy ciprofloxacin over the counter
mexico drug stores pharmacies: purple pharmacy mexico price list – mexican pharmaceuticals online
buy doxycycline 100mg: doxycycline tablets – vibramycin 100 mg
weaning off seroquel od on seroquel quetiapine erowid
https://overthecounter.pro/# best hemorrhoid treatment over the counter
over the counter erectile pills at walgreens over the counter drugs muscle relaxer over the counter
buy duricef 250mg online cheap purchase finasteride online proscar 1mg usa
usa cialis sales order tadalafil 10mg online buy viagra without prescription
http://overthecounter.pro/# what does over the counter mean
wean off prilosec omeprazole how long to take costco prilosec
over the counter antidepressants: over-the-counter drug – over the counter pill for yeast infection
http://overthecounter.pro/# over the counter cialis
diflucan for sale online purchase ciprofloxacin online cheap buy cipro 500mg generic
sertraline cost walgreens sertraline starting dose zoloft for premature ejaculation
https://overthecounter.pro/# over the counter sinus medicine
sleeping pills over the counter over the counter medication over the counter adderall
lexapro and gabapentin https://lexaproescitalopramogv.com/ escitalopram oxalate 20 mg mixed
https://overthecounter.pro/# over the counter anti nausea
buy estradiol for sale buy lamictal medication prazosin 1mg tablet
over the counter antibiotic phentermine over the counter or best over the counter toenail fungus medicine
http://pl8scan-inc.com/__media__/js/netsoltrademark.php?d=overthecounter.pro best over the counter skin tag removal
best over the counter acne treatment is ivermectin over the counter and best appetite suppressant over the counter flonase over the counter
https://overthecounter.pro/# best over-the-counter medicine for sinus infection
pills like viagra over the counter cvs strongest antifungal over the counter or over the counter antidepressant
http://xp.utahapartmentfinders.com/__media__/js/netsoltrademark.php?d=overthecounter.pro over the counter pain medication
over the counter heartburn medicine nausea medicine over the counter for pregnancy and over the counter urinary tract infection meds over-the-counter
click me my name เมก้าเกม
click me my name superslot
click me my name pg สล็อตทั้งหมด
click me my name มาจอง 3 ทดลองเล่น
click me my name slot เครดิตฟรี
quetiapine side effects bruising quetiapine lek quetiapine shrooms
flagyl 400mg cost order septra online cheap buy cephalexin online
over the counter anti inflammatories: over the counter drugs – over the counter muscle relaxer
https://overthecounter.pro/# best over the counter flu medicine
http://overthecounter.pro/# bronchial inhalers over the counter
http://overthecounter.pro/# is plan b over the counter
п»їover the counter anxiety medication over the counter ed pills over the counter blood pressure medicine
80 mg omeprazole a day prilosec dizziness what is the drug prilosec used for
amlodipine tinnitus https://norvascamlodipinemry.com/ amlodipine vs verapamil
sertraline action sertraline toxicity buy sertraline online
ed drug prices: gnc ed pills – cheap erectile dysfunction
Very interesting points you have remarked, thankyou for putting up. “The judge is condemned when the criminal is absolved.” by Publilius Syrus.
buy cleocin 150mg sale otc ed pills that work fildena 100mg price
mail order drug store drugstore online or pharmacy world
http://roambi.mx/__media__/js/netsoltrademark.php?d=pillswithoutprescription.pro online canadian pharmacy
online pharmacy medications internet pharmacy no prescription and prescription cost comparison best online drugstore
escitalopram to citalopram conversion escitalopram and weed trial of psilocybin versus escitalopram for depression
order avana 100mg sale tadalafil pill diclofenac 50mg cost
non prescription ed drugs male ed pills or best drug for ed
http://collegeofemergencydispatch.net/__media__/js/netsoltrademark.php?d=edpills.pro ed meds online without doctor prescription
best treatment for ed natural ed remedies and best ed treatment pills ed meds
erection pills online over the counter erectile dysfunction pills best erectile dysfunction pills
ed drugs compared: non prescription erection pills – best ed pills online
canadian pharmacy world reputable mexican pharmacies or discount pharmacies online
http://ww17.beenow.com/__media__/js/netsoltrademark.php?d=pillswithoutprescription.pro prescription without a doctor’s prescription
mexican pharmacy testosterone highest rated canadian pharmacies and online pharmacies without prescription online pharmacies no prescriptions
Reddit was issued with a warning over copyright infringement as the Premier League continued its crackdown on illegal streaming services. You might think that this is a brilliant way to watch the Premier League, particularly if you are a Reddit user. Unfortunately, though, these live streams are illegal. And the Premier League is clamping down on the practice. In fact, Reddit’s main soccer streams page was shut down due to copyright infringement two years ago. “The Premier League legal department sent me an email in February and we decided to stop posting links to Premier League games a few days after, in order to avoid the escalation of the pressure.” While below are the answers to all of the questions you have around the Premier League fixtures and everything else you need to know for the upcoming season, with full details on the Premier League TV schedule across the NBC family of channels and more.
http://hwani.barunweb.co.kr/bbs/board.php?bo_table=free&wr_id=32545
Here is an updated college football TV schedule for the 2022 season, including weekly results and links to live scoring. San Francisco 49ers WEEK 12 · Thu 11/24 · FINAL NFL Draft Kickoff A seven-time Pro Bowl selection known for his physical style, he was one of the game’s best and most durable linebackers. Get DIRECTV to make sure you can keep a close eye on all your favorite teams, games and more. Sadly, there are no NFL games today. The 2022-23 NFL season is over after the Kansas City Chiefs defeated the Philadelphia Eagles in Super Bowl 57 on Feb. 12. Patrick Mahomes followed up his MVP win during the regular season by also taking home the trophy in the biggest game of the year. Rodgers, a four-time league M.V.P. with the Green Bay Packers, will look to turn the Jets into a Super Bowl contender.
http://pillswithoutprescription.pro/# legitimate canadian pharmacies online
overseas pharmacies online certified canadian international pharmacy or canada pharmacies prescription drugs
http://www.cardinalseanblog.org/__media__/js/netsoltrademark.php?d=pillswithoutprescription.pro pharmacy
overseas pharmacies online accutane mexican pharmacy and list of canada online pharmacies buy drugs online
canadian pharmacy antiobotics without perscription: online canadian discount pharmacy – best online pharmacy
duloxetine and buspirone other names for cymbalta effexor vs duloxetine
ed medication online cure ed or erectile dysfunction medications
http://www.ecofirst.net/__media__/js/netsoltrademark.php?d=edpills.pro buy ed pills
erection pills viagra online cheap ed pills and erection pills medicine for erectile
https://edpills.pro/# buy ed pills
ed treatment drugs cheap ed drugs п»їerectile dysfunction medication
https://pillswithoutprescription.pro/# canadian pharmacy cialis cheap
buy indocin 75mg pills order indocin 75mg generic buy cefixime 100mg sale
online canadian pharmacies: online canadian discount pharmacy – list of approved canadian pharmacies
prilosec used for omeprazole and pepto bismol omeprazole fatigue
fluoxetine hcl 20 mg tablet https://prozacfluoxetinerfk.com/ fluoxetine 20mg cost
canadian pharmacy no prescription needed mexican pharmacy online medications or 24 hour pharmacy
http://jaguarlending.com/__media__/js/netsoltrademark.php?d=pillswithoutprescription.pro cheap drug prices
canadian pharmacy store online ed medication no prescription and compare prescription drug prices canadian wholesale pharmacy
medication for ed dysfunction medicine erectile dysfunction or top ed drugs
http://elvistrademark.com/__media__/js/netsoltrademark.php?d=edpills.pro erectile dysfunction medicines
buy ed pills online best treatment for ed and ed pills that really work best ed drug
legitimate canadian online pharmacy online canadian discount pharmacy drug canada
canadian drug store: online pharmacies no prescriptions – online pharmacy
https://edpills.pro/# cheapest ed pills online
amoxicillin cost buy clarithromycin for sale order biaxin 500mg
side effects of escitalopram oxalate 20mg can you take lexapro while pregnant whats the difference between citalopram and escitalopram
wellbutrin with cymbalta https://cymbaltaduloxetinestb.com/ duloxetine for fibromyalgia
quetiapine davis dosage of seroquel seroquel 100
india pharmacy Online medicine home delivery or best india pharmacy
http://annesachs.org/__media__/js/netsoltrademark.php?d=indianpharmacy.pro india pharmacy
best india pharmacy pharmacy website india and Online medicine home delivery indian pharmacy
http://indianpharmacy.pro/# indian pharmacies safe
https://indianpharmacy.pro/# top 10 pharmacies in india
Information provided by various external sources Date of experience: 24 August 2021 Information provided by various external sources In the Events & Entertainment category Information provided by various external sources Date of experience: August 24, 2021 This is a place to share experience with EuroCasino. Read what other players wrote about it or write your own review and let everyone know about its positive and negative qualities based on your personal experience. Based on all of the information mentioned in this review, we can conclusively say that EuroCasino is a very good online casino. You can expect to be treated well and have an enjoyable experience if you choose to play at it. This is a place to share experience with EuroCasino. Read what other players wrote about it or write your own review and let everyone know about its positive and negative qualities based on your personal experience.
http://xcuv.com/bbs/board.php?bo_table=free&wr_id=59528
We want to create the best experience for online poker with friends. That’s why we made a mobile app to create and host an online poker tournament – with just a tap of a button. All you need are your phones and an internet connection. We will provide your room with digital chips and playing cards – all for free. Finding the best UK online poker sites is about more than just the most lucrative poker bonus sign-up offers. It very much depends on what type of player you are. What makes up the best online poker software? How do you find the best online poker site for your skill range and playing style? After spending hours reviewing several online poker sites, we gathered the most important tips and advice and put it all together for you. When choosing a good poker site for real money, consider these questions:
order clonidine generic spiriva medication buy generic tiotropium
top 10 online pharmacy in india top online pharmacy india pharmacy website india
indian pharmacy paypal world pharmacy india or best india pharmacy
http://marqueproperty.com/__media__/js/netsoltrademark.php?d=indianpharmacy.pro best india pharmacy
pharmacy website india buy medicines online in india and indian pharmacy paypal best online pharmacy india
world pharmacy india reputable indian online pharmacy or indian pharmacy online
http://finlandiacheese.us/__media__/js/netsoltrademark.php?d=indianpharmacy.pro world pharmacy india
buy prescription drugs from india Online medicine home delivery and reputable indian pharmacies world pharmacy india
generic sildenafil 50mg order generic sildenafil sildenafil 150 mg
https://indianpharmacy.pro/# top 10 online pharmacy in india
https://indianpharmacy.pro/# top 10 online pharmacy in india
world pharmacy india reputable indian pharmacies or india online pharmacy
http://chute-janitor.net/__media__/js/netsoltrademark.php?d=indianpharmacy.pro india pharmacy
indian pharmacy paypal online pharmacy india and india pharmacy indian pharmacies safe
https://indianpharmacy.pro/# india pharmacy mail order
minocycline 50mg brand order minocycline without prescription order actos 15mg for sale
how can i get sildenafil prescription online – sildenafil citrate over the counter sildenafil nz pharmacy
http://pharmst.pro/# usa pharmacy online
online pharmacy india mexican pharmacy online best pharmacy
tadalafil tablets 10 mg online tadalafil cost india or tadalafil online without prescription
http://sonitek.biz/__media__/js/netsoltrademark.php?d=tadalafilfst.com tadalafil free shipping
generic tadalafil india canadian pharmacy tadalafil 20mg and buy tadalafil online no prescription cost of tadalafil in canada
sildenafil tablets 120 mg – buy sildenafil online sildenafil 5 mg tablet
https://vsildenafil.pro/# sildenafil pills for sale
online pharmacy canadian mail order pharmacy reputable online pharmacy reddit
leflunomide pills viagra 100mg brand sulfasalazine 500mg for sale
ed pills otc best treatment for ed or ed pills otc
http://murphybeds-wallbedhardware.com/__media__/js/netsoltrademark.php?d=edmeds.pro ed pills cheap
non prescription ed pills cheap erectile dysfunction pills and best ed treatment what is the best ed pill
where to buy tadalafil 20mg – tadalafil without prescription buy tadalafil online canada
https://vsildenafil.pro/# sildenafil 100mg gel
sildenafil price in usa cheap sildenafil generic sildenafil paypal
cheap viagra canadian pharmacy canadian pharmacy world reviews or safe canadian pharmacies
http://aquanutsolutions.com/__media__/js/netsoltrademark.php?d=pharmst.pro rx pharmacy no prescription
cheapest pharmacy for prescription drugs best european online pharmacy and best canadian online pharmacy reviews canadian pharmacy viagra 50 mg
buy real sildenafil online with paypal from india – purchase sildenafil 100 mg sildenafil without a prescription
http://edmeds.pro/# cheap erectile dysfunction pill
how much is sildenafil cheap sildenafil sildenafil generic price uk
buy tadalafil online paypal tadalafil best price or buy tadalafil online canada
http://digitalsignalprocessor.com/__media__/js/netsoltrademark.php?d=tadalafilfst.com generic cialis tadalafil
generic tadalafil united states tadalafil 2 and tadalafil online united states cost of tadalafil in india
sildenafil 500 mg – sildenafil citrate over the counter sildenafil cost
http://tadalafilfst.com/# tadalafil 20 mg best price
canadian pharmacy no rx needed mexican pharmacy online pharmacy
fluoxetine for cats reviews https://prozacfluoxetineatb.com/ mixing prozac and alcohol
best ed pills at gnc buy erection pills – male erection pills
http://pharmst.pro/# mexican pharmacy
best ed drug best ed medication best treatment for ed
azipro 500mg ca azithromycin pills cost neurontin 100mg
price sildenafil generic – buy sildenafil from canada can i buy sildenafil over the counter in uk
https://tadalafilfst.com/# cheap tadalafil 20mg
ed meds online best ed medication top ed drugs
https://edmeds.pro/# cheapest ed pills online
cheapest pharmacy canada: us online pharmacy – overseas online pharmacy
http://tadalafilfst.com/# tadalafil online prescription
legit non prescription pharmacies us online pharmacy reputable indian pharmacies
tadalafil 100mg online tadalafil 20 mg buy online or tadalafil price
http://bankunited.info/__media__/js/netsoltrademark.php?d=tadalafilfst.com cheap generic tadalafil 5mg
tadalafil 5 mg coupon generic cialis tadalafil 20mg and best price for tadalafil 20 mg discount tadalafil 20mg
polish pharmacy online uk: canadian mail order pharmacy – canadian pharmacy levitra value pack
http://edmeds.pro/# cheap erectile dysfunction pill
sildenafil 5343 sildenafil citrate over the counter 10 sildenafil
canadapharmacyonline legit pharmacy website or canada drugs online
http://nornberg.com/__media__/js/netsoltrademark.php?d=pharmst.pro top online pharmacy
cheapest pharmacy to fill prescriptions without insurance canadian online pharmacy no prescription and polish pharmacy online uk best canadian pharmacy for cialis
no prescription pharmacy paypal: canadian pharmacy meds – safe reliable canadian pharmacy
tadalafil soft gel capsule 20mg buy tadalafil 100mg or tadalafil best price
http://floridacaregiver.com/__media__/js/netsoltrademark.php?d=tadalafilfst.com tadalafil coupon
price of tadalafil 20mg tadalafil over the counter uk and tadalafil 5mg tablets in india tadalafil online 10mg
male ed drugs cheap erectile dysfunction pill natural remedies for ed
vardenafil 10mg generic buy hydroxychloroquine 400mg for sale purchase hydroxychloroquine for sale
https://fastdeliverypill.com/# online prescription drugs
non prescription canadian pharmacy – prescription drugs without prior prescription canada drugs online
viagra mexican pharmacy order prescription medicine online without prescription canadian pharmacy prescription
order levitra 10mg generic tizanidine sale buy plaquenil 200mg for sale
https://fastdeliverypill.com/# online medications
online pharmacies canada reviews – meds without a doctor s prescription canada list of legitimate canadian pharmacies
http://fastdeliverypill.com/# legal canadian prescription drugs online
order asacol 800mg order irbesartan 300mg online cheap order irbesartan 150mg without prescription
no prescription canadian pharmacy levitra from canadian pharmacy or online canadian discount pharmacy
http://warbannerent.com/__media__/js/netsoltrademark.php?d=fastdeliverypill.com my canadian pharmacy online
mexican pharmacies that ship reputable canadian mail order pharmacies and online pharmacy no prescriptions canadian rx pharmacy
benicar for sale online buy generic divalproex oral divalproex 500mg
http://fastdeliverypill.com/# canadian online pharmacies legitimate
canada prescription – international pharmacies that ship to the usa compare prescription prices
indian pharmacies safe online shopping pharmacy india or buy medicines online in india
http://526880.com/__media__/js/netsoltrademark.php?d=pharmacyindia.pro online pharmacy india
п»їlegitimate online pharmacies india mail order pharmacy india and п»їlegitimate online pharmacies india world pharmacy india
canada pharmacy world thecanadianpharmacy or canadadrugpharmacy com
http://redlineracingltd.com/__media__/js/netsoltrademark.php?d=canadiandrugs.pro canadian pharmacy meds reviews
canadian pharmacy online medication canadian pharmacy and canadian mail order pharmacy canada drugs
Online medicine order: reputable indian pharmacies – indian pharmacy paypal
coreg 6.25mg pill chloroquine cheap buy chloroquine generic
safe canadian pharmacy: precription drugs from canada – canadian pharmacy meds reviews
https://cialiswithoutprescription.pro/# canadian pharmacy cialis 20mg
generic of cialis buy Cialis online 30 day free trial cialis
legal to buy prescription drugs from canada: legitimate canadian mail order pharmacy – canadian pharmacy ltd
indian pharmacy india pharmacy or Online medicine order
http://savarialift.com/__media__/js/netsoltrademark.php?d=pharmacyindia.pro Online medicine home delivery
reputable indian pharmacies pharmacy website india and indian pharmacy paypal top online pharmacy india
canadian mail order pharmacy canada pharmacy online or my canadian pharmacy rx
http://www.pamsweet.com/__media__/js/netsoltrademark.php?d=canadiandrugs.pro pharmacy com canada
best canadian pharmacy to order from canada drugs online review and canada online pharmacy canadian pharmacy prices
my canadian pharmacy review: best mail order pharmacy canada – canada pharmacy online legit
http://cialiswithoutprescription.pro/# cialis professional legitimate
canada drugs online reviews canada drug pharmacy canadian valley pharmacy
canadian pharmacy 24 certified canadian international pharmacy best canadian pharmacy
world pharmacy india indian pharmacy online or india pharmacy mail order
http://gjmartin.com/__media__/js/netsoltrademark.php?d=pharmacyindia.pro world pharmacy india
Online medicine order online shopping pharmacy india and buy medicines online in india indian pharmacy
lanoxin 250 mg cost micardis online molnupiravir uk
cialis recreational use: cheap cialis – cialis none prescription
No matter if some one searches for his required thing, thus he/she desires
to be available that in detail, thus that thing is maintained over here.
Feel free to surf to my webpage : mp3juice
indian pharmacy online: indian pharmacy online – indian pharmacy
https://pharmacyindia.pro/# india online pharmacy
cialis sales canadian buy Cialis 20mg online doctor prescription cialis
cialis superactive buy Cialis 20mg where to get free samples of cialis
legit canadian online pharmacy: canada drug pharmacy – canadian neighbor pharmacy
PloS one 13, e0190307 cialis online india In the meta- analysis, the elevated risk of autism among the offspring of women born abroad was just shy of statistical significance
naprosyn 250mg drug order cefdinir 300 mg for sale purchase lansoprazole online
Keep this going please, great job!\r\n\r\nFeel free to surf to my website : youtube mp3 downloader
proventil canada albuterol 100mcg price buy pyridium no prescription
prednisone 50 mg for sale: buy prednisone without a prescription – purchase prednisone
prednisone 50 100 mg prednisone daily or prednisone rx coupon
http://unpages.com/__media__/js/netsoltrademark.php?d=prednisonepills.pro where can i get prednisone
buy prednisone without a prescription buy prednisone online india and prednisone 50 mg tablet canada no prescription prednisone canadian pharmacy
price of prednisone 5mg: buy prednisone – buying prednisone mexico
http://ciproantibiotic.pro/# ciprofloxacin generic
ciprofloxacin mail online buy generic ciprofloxacin or ciprofloxacin 500mg buy online
http://edolphin.org/__media__/js/netsoltrademark.php?d=ciproantibiotic.pro buy generic ciprofloxacin
buy cipro online canada where can i buy cipro online and ciprofloxacin 500 mg tablet price where can i buy cipro online
ciprofloxacin generic buy cipro online canada ciprofloxacin 500 mg tablet price
buy cytotec over the counter: cytotec online – п»їcytotec pills online
where to buy montelukast without a prescription montelukast cost avlosulfon 100mg cheap
norvasc 10mg tablet zestril 5mg ca buy prilosec sale
https://pharmfd.com/# northwest pharmacy canada
cheapest pharmacy for prescriptions: legitimate canadian pharmacy online – specialty pharmacy
https://edpillsfd.online/# ed drugs compared
safe online pharmacies canadian mail order pharmacy canada pharmacy coupon
adalat 10mg ca allegra usa where to buy allegra without a prescription
https://pharmfd.com/# legitimate canadian mail order pharmacy
online shopping pharmacy india: Online medicine home delivery – Online medicine order
https://indiapharmfd.com/# indian pharmacy online
reputable indian pharmacies buy prescription drugs from india india pharmacy mail order
ed meds online cheap ed drugs or pills for ed
http://whyharvardbusiness.org/__media__/js/netsoltrademark.php?d=edpillsfd.com ed treatments
new ed drugs medication for ed dysfunction and top erection pills best ed pills at gnc
https://edpillsfd.online/# best drug for ed
buy prescription drugs from india indian pharmacies safe or india pharmacy mail order
http://mommyandi.com/__media__/js/netsoltrademark.php?d=indiapharmfd.com reputable indian pharmacies
Online medicine order indian pharmacy paypal and india online pharmacy top 10 online pharmacy in india
best male enhancement pills: erection pills – best pills for ed
http://edpillsfd.com/# erectile dysfunction drugs
india pharmacy buy prescription drugs from india mail order pharmacy india
canadianpharmacymeds canadian mail order pharmacy best india pharmacy
priligy generic order xenical 60mg pill xenical 60mg brand
https://indiapharmfd.online/# online pharmacy india
buy cheap generic lopressor buy medrol 4mg order medrol for sale
best male enhancement pills best non prescription ed pills or treatment for ed
http://wuvp.com/__media__/js/netsoltrademark.php?d=edpillsfd.com best ed treatment
over the counter erectile dysfunction pills best ed drug and online ed pills best non prescription ed pills
http://indiapharmfd.com/# indian pharmacy online
online pharmacy products trusted online pharmacy reviews canadien pharmacies
top 10 pharmacies in india: Online medicine home delivery – best india pharmacy
http://edpillsfd.com/# online ed medications
best online pharmacy india indian pharmacy paypal indian pharmacy
drugs for ed mens ed pills or ed pills gnc
http://www.socarratpaellabar.com/__media__/js/netsoltrademark.php?d=edpillsfd.com generic ed pills
men’s ed pills the best ed pill and best ed pills at gnc п»їerectile dysfunction medication
https://pharmfd.online/# pharmacy rx
best non prescription ed pills best drug for ed ed pills that work
kamagra Kamagra Oral Jelly 100mg buy online or buy kamagra online
http://nationstarmortgageloan.com/__media__/js/netsoltrademark.php?d=kamagratabs.pro Kamagra Gold 100mg price
Kamagra Oral Jelly 100mg buy online cheap kamagra oral jelly and Kamagra Gold 100mg price Oral Jelly 100mg Kamagra price
Priligy tablets: Priligy tablets – Priligy tablets
cost of propecia tablets cost of propecia no prescription buy propecia tablets
https://kamagratabs.pro/# buy kamagra online
how to get propecia tablets Best place to buy finasteride where can i buy generic propecia prices
I always look forward to your posts. You have a knack for presenting complex ideas in a relatable way.
buy kamagra online cheap kamagra oral jelly Kamagra Gold 100mg price
crestor 20mg pills order crestor 20mg generic cheap domperidone 10mg
Чтобы нарисовать одинаковые стрелки нужно практиковаться. Попробовать рисовать разными способами и материалами. Начинать легче всего с карандаша. С ним получаются большие по толщине стрелки, которые делают иллюзию густых ресниц. Если ровную стрелку нарисовать никак не выходит, допустимо воспользоваться трафаретом. Кто-то “по-старинке” умудряется применять в этом случае обычный скотч, и это может стать выходом в экстренной ситуации. Но лучше все же запастись трафаретами для лица. Если ты никогда прежде не слышала о трафаретах для макияжа, то тебе срочно нужно вспомнить свои данные аккаунта на aliexpress. С такими beauty-помошниками можно сделать подходящую форму бровей, роскошный смоки и даже идеально ровные стрелки. Трафареты идеально подходят для того, чтобы нарисовать стрелку подводкой, а еще, они просты в работе и не требуют много времени, чтобы привыкнуть. Вуаля!
https://fast-wiki.win/index.php?title=Лучшее_средство_для_роста_ресниц_форум
В состав специального масла входят такие полезные компоненты, как: Как использовать:Его нужно очень аккуратно наносить на линию бровей и ресниц, избегая попадания в глаза, однако даже если оно попадет на слизистую, то не причинит ей вреда, только может доставить небольшой дискомфорт. Для более удобного применения можно использовать специальные щеточки. Проводить процедуру следует 2-3 раза в день. (Импортёр на территорию РБ “ЧТПУП Дельта-Скарт”, г.Солигорск, ул.Козлова, 33-214. УНП 690616158) Комплекс масел для роста ресниц (5 саше * 2мл) Целое больше, чем сумма отдельных частей – так можно сказать кратко о синергии. Эффект от совместного использования нескольких элементов превышает сумму результатов от их отдельного использования. На этом и основан комплексный подход в лечении. Именно синергетический эффект учтен создателями формулы косметического средства Эльма масло для роста ресниц.
Kamagra 100mg: kamagra tablets usa – Buy Kamagra online next day delivery
buy acillin online cheap order metronidazole 200mg online buy generic flagyl 200mg
Kamagra Gold 100mg price Kamagra 100mg Kamagra Gold 100mg price
propecia online: how can i get cheap propecia tablets – buy cheap propecia online
This blog post was very informative and presented a unique viewpoint. Keep up the great work!
I really appreciate your balanced approach to this topic. It’s refreshing to see an unbiased perspective.
The depth of research in your post is commendable. It’s clear you put a lot of effort into this.
https://propecia.pro/# where can i get generic propecia without prescription
how can i get cheap propecia without rx Best place to buy finasteride where can i get cheap propecia pill
kamagra Kamagra Oral Jelly 100mg buy online or buy kamagra online
http://foodhandler.info/__media__/js/netsoltrademark.php?d=kamagratabs.pro Oral Jelly 100mg Kamagra price
Kamagra Oral Jelly for sale Kamagra Oral Jelly 100mg buy online and Kamagra 100mg Kamagra Oral Jelly 100mg buy online
cost sumycin 250mg how to buy cyclobenzaprine order lioresal generic
priligy over the counter Buy Dapoxetine Priligy price
kamagra: buy kamagra online – Kamagra Gold 100mg price
I like how you broke down this complex topic into bite-sized, understandable chunks. Great job!
can i get propecia no prescription where to buy propecia tablets or can i order generic propecia without a prescription
http://xlglobalinsurance.com/__media__/js/netsoltrademark.php?d=propecia.pro get propecia pills
where can i buy propecia without a prescription can i buy cheap propecia pill and can you buy generic propecia how to get propecia without prescription
buy septra without prescription purchase keflex pill cleocin drug
I always look forward to your posts. You have a knack for presenting complex ideas in a relatable way.
cheap propecia tablets: buy propecia – where to buy cheap propecia online
https://propecia.pro/# how can i get propecia without rx
generic propecia without dr prescription buy propecia can i buy cheap propecia without rx
order cheap propecia without prescription cost of propecia without insurance where can i get generic propecia
Your perspective on this issue is truly refreshing. Thank you for shedding new light on this topic!
I always look forward to your posts. You have a knack for presenting complex ideas in a relatable way.
kamagra tablets usa kamagra or Kamagra Oral Jelly for sale
http://markhnelsonmd.org/__media__/js/netsoltrademark.php?d=kamagratabs.pro Buy Kamagra online next day delivery
Buy Kamagra online next day delivery Oral Jelly 100mg Kamagra price and Kamagra Gold 100mg price Oral Jelly 100mg Kamagra price
Your posts never fail to enlighten me. Thanks for consistently sharing your knowledge and expertise.
order toradol 10mg pills brand colcrys 0.5mg inderal 10mg usa
cheap propecia price can i buy propecia for sale or where to buy generic propecia without prescription
http://yorkvilleliving.com/__media__/js/netsoltrademark.php?d=propecia.pro where can i get generic propecia without rx
where can i get propecia cost of generic propecia pills and generic propecia without rx how to buy propecia tablets
I like how you broke down this complex topic into bite-sized, understandable chunks. Great job!
https://dapoxetine.pro/# dapoxetine
Oral Jelly 100mg Kamagra price Kamagra 100mg Oral Jelly 100mg Kamagra price
erythromycin buy online erythromycin without prescription tamoxifen 10mg canada
Buy Kamagra online next day delivery Buy Kamagra online next day delivery or kamagra tablets usa
http://birthdayplannernyc.com/__media__/js/netsoltrademark.php?d=kamagratabs.pro kamagra tablets usa
Kamagra Gold 100mg price cheap kamagra oral jelly and Kamagra Gold 100mg price kamagra
kamagra: Kamagra 100mg – Kamagra Oral Jelly for sale
buy clopidogrel 150mg for sale order methotrexate 10mg without prescription coumadin sale
Buy Dapoxetine: Priligy price – priligy
where buy propecia prices where to buy cheap propecia without dr prescription or can i purchase generic propecia without prescription
http://denyoasia.com/__media__/js/netsoltrademark.php?d=propecia.pro propecia cheap
how cЙ‘n i get cheap propecia pills where to buy propecia tablets and can i get generic propecia without rx where can i buy generic propecia prices
buy budesonide inhalers cost cefuroxime 250mg where to buy careprost without a prescription
https://dapoxetine.pro/# priligy over the counter
priligy priligy Priligy 60 mg online
Я оцениваю тщательность и качество исследования, представленного в этой статье. Автор предоставил надежные источники и учел различные аспекты темы. Это действительно ценный ресурс для всех интересующихся.
cheap kamagra oral jelly buy kamagra online Kamagra Gold 100mg price
how to get metoclopramide without a prescription metoclopramide canada buy esomeprazole 20mg generic
indianpharmacy com online shopping pharmacy india india pharmacy
the canadian pharmacy: online canadian drugstore – pharmacy com canada
I wanted to send you one very little remark just to say thank you once again relating to the beautiful things you have contributed on this site. It has been really pretty open-handed with people like you to offer easily what a lot of people could have made available for an electronic book to get some profit on their own, most notably given that you could possibly have done it if you desired. The tips as well worked like a easy way to be aware that many people have the identical eagerness similar to mine to understand much more when considering this problem. I am certain there are some more enjoyable occasions in the future for individuals who read carefully your blog.
Я нашел эту статью чрезвычайно познавательной и вдохновляющей. Автор обладает уникальной способностью объединять различные идеи и концепции, что делает его работу по-настоящему ценной и полезной.
methocarbamol buy online order sildenafil 100mg how to buy suhagra
my canadian pharmacy review canadian family pharmacy pet meds without vet prescription canada
purchase topiramate for sale order imitrex 50mg pill levaquin 500mg usa
http://canadapharmcertified.pro/# ordering drugs from canada
reputable indian online pharmacy top online pharmacy india or cheapest online pharmacy india
http://eresumeposting.com/__media__/js/netsoltrademark.php?d=indiameds.pro top 10 online pharmacy in india
top 10 pharmacies in india indian pharmacy and india pharmacy mail order cheapest online pharmacy india
reputable indian pharmacies: online shopping pharmacy india – cheapest online pharmacy india
https://indiameds.pro/# buy medicines online in india
india online pharmacy india pharmacy or reputable indian pharmacies
http://orangecountytrust.net/__media__/js/netsoltrademark.php?d=indiameds.pro top online pharmacy india
cheapest online pharmacy india indian pharmacy paypal and cheapest online pharmacy india pharmacy website india
canadian valley pharmacy canadian pharmacy sarasota or canadian pharmacy sarasota
http://ghassanaidi.com/__media__/js/netsoltrademark.php?d=canadapharmcertified.pro canadian pharmacy meds review
canadian pharmacy meds best online canadian pharmacy and canadian pharmacy oxycodone canadianpharmacymeds com
best canadian pharmacy to order from canadian pharmacy ratings canadian pharmacy store
buy aurogra paypal aurogra brand estradiol 2mg ca
canadian compounding pharmacy: canadian pharmacy – canadian neighbor pharmacy
https://indiameds.pro/# buy medicines online in india
canadianpharmacyworld com canada drug pharmacy canada pharmacy online
pharmacies in mexico that ship to usa: mexican mail order pharmacies – purple pharmacy mexico price list
top 10 pharmacies in india buy medicines online in india or india pharmacy mail order
http://eightgates.org/__media__/js/netsoltrademark.php?d=indiameds.pro india pharmacy mail order
indian pharmacy india online pharmacy and online pharmacy india world pharmacy india
order celecoxib 200mg generic buy celecoxib 200mg generic buy zofran 8mg
best india pharmacy: india pharmacy – top online pharmacy india
http://mexicanpharmacies.pro/# best online pharmacies in mexico
cheap lamotrigine cost minipress order prazosin 2mg online
reputable canadian pharmacy canadian pharmacies online or canadian pharmacy 24h com safe
http://rubynatural.net/__media__/js/netsoltrademark.php?d=canadapharmcertified.pro onlinecanadianpharmacy
pharmacy rx world canada canadian pharmacy victoza and pet meds without vet prescription canada canadian pharmacy india
order sildenafil from canada: buy sildenafil australia – order sildenafil 20 mg
https://sildenafilpills.pro/# order sildenafil from canada
tretinoin cream over the counter buy avana 200mg online buy avana cheap
prescription without a doctor’s prescription online prescription drugs or mexican pharmacy cialis
http://fdabanmenthol.com/__media__/js/netsoltrademark.php?d=fastpills.pro online prescriptions
my discount pharmacy drugstore online shopping and canadian drug pharmacy canadian pharmacy antibiotics
proscar canada order sildenafil online cheap sildenafil order
สมัคร gmailตัวของคุณตามคำแนะนำบนหน้าจอ เช่น ชื่อ, นามสกุล, ชื่อผู้ใช้, รหัสผ่าน, วันเกิด, เพศ, เบอร์โทรศัพท์มือถือ, และอีเมล์เพื่อการเชื่อมต่อสมัคร PGSLOT
Whoa! This blog looks just like my old one! It’s on a totally different topic
but it has pretty much the same page layout and design. Superb choice of colors!
https://edpill.pro/# ed pills gnc
tadacip 10mg canada where can i buy indomethacin order indocin 75mg pills
how to play aviator on sportybet aviator how to hack aviator
https://edpill.pro/# ed drugs
mens erection pills medications for ed or cheap erectile dysfunction pills online
http://oneminuteforyourself.com/__media__/js/netsoltrademark.php?d=edpill.pro the best ed pill
erection pills viagra online men’s ed pills and cheap ed drugs online ed medications
cialis for daily use viagra 100mg cost sildenafil pills 50mg
cephalexin 500 mg buy online https://cephalexinyns.com/ does cephalexin treat boils
amoxicillin 875 mg for uti https://amoxicillinnrd.com/ amoxicillin drowsiness
what is the difference between amoxicillin and augmentin does amoxicillin make u tired amoxicillin when pregnant
keflex class of antibiotics https://keflexsfn.com/ keflex treatment
expired keflex https://keflexvex.com/ buy keflex online
cephalexin and breastfeeding https://cephalexinujx.com/ cephalexin for eyelid infection
sulfasalazine canada calan online buy verapamil without prescription
liquid azithromycin for cats https://azithromycintnu.com/ azithromycin pcn allergy
buy antivert 25mg for sale
ciprofloxacin and sertraline https://ciprofloxacindik.com/ which is stronger clindamycin or ciprofloxacin
ciprofloxacin hydrochloride ophthalmic solution 0.3 https://ciprofloxacinvol.com/ where to buy ciprofloxacin 500mg
order divalproex 500mg generic imdur 40mg pills buy isosorbide 20mg online cheap
buy meclizine 25 mg pills antivert cheap minomycin medication
✅Consiglio: siccome serve fare una partita con soldi vero sarebbe opportuno giocare su una delle slot Age of the Gods in quanto sbloccherebbero i 200 free spin della registrazione con la possibilità di giocare per il jackpot. Ribadiamo che se si gioca con i giri gratuiti non si concorre ad aumentare il jackpot come da termini e condizioni della promozione. Per chi è interessato ad altre offerte come bonus su deposito potrà consultare la recensione di William Hill direttamente sul nostro portale. Il valore dei free spin è sempre limitato ad una cifra specifica, che solitamente non supera i 10 o 20 centesimi. Questo, naturalmente, ha un impatto su quanto potete vincere utilizzando i giri gratuiti. Abbiamo creato un’altra guida con i migliori siti di slot in Italia del 2023: vi consigliamo di darle un’occhiata.
http://artcrowd.co.kr/gnuboard5/yc5/bbs/board.php?bo_table=free&wr_id=23303
Il bonus senza deposito non richiede alcun deposito, mentre il bonus di benvenuto viene elargito in proporzione ad un deposito effettuato. Ad esempio, un bonus di benvenuto del 100% fino a 500€ consente di ottenere un bonus pari all’importo del deposito, fino ad un massimo di 500€. Ogni bonus senza deposito offre la possibilità a un giocatore senza investimento personale di ricevere ricompense reali. Per fare ciò, devi solo soddisfare le condizioni per la promozione prevista. Le condizioni per scommettere un bonus senza deposito possono essere diverse. Tuttavia, studiando i casinò popolari con un bonus senza deposito senza documenti, i nostri specialisti sono riusciti a calcolare le condizioni principali che si trovano individualmente o in determinati gruppi. In questo settore è molto raro trovare casino che offrono bonus cashback e, in realtà, anche gli altri tipi di bonus prevedono importi molto limitati per chi gioca al gratta e vinci online.
antivert 25mg us
how to counteract prednisone side effects how long does moon face last after prednisone does prednisone relieve pain
buy generic imuran buy azathioprine 25mg pills purchase micardis
prospect augmentin es suspensie augmentin a spacery augmentin esami del sangue
augmentin antibiotics drinking https://augmentingtj.com/ augmentin pyelonephritis
molnupiravir cost cefdinir medication buy cefdinir no prescription
does azithromycin have steroids in it azithromycin antibiotics foods to avoid while taking azithromycin
amoxicillin-clavulanic acid https://amoxicillinxry.com/ amoxicillin for uti dosage
buy prevacid 30mg generic buy proventil pill protonix 40mg usa
herbal ed pills viagra overnight shipping cialis coupons
amoxicillin and birth control can i use human amoxicillin for my dog? amoxicillin high
keflex 500mg used for spider bite https://keflexxev.com/ keflex cheap
can i take keflex with cirrosis https://keflexrno.com/ keflex price quote
order pyridium generic purchase pyridium pills buy amantadine 100 mg for sale
antivert 25mg us
do you need to take cephalexin with food https://cephalexinuop.com/ how to stop diarrhea from cephalexin
where to buy ed pills without a prescription buy tadalafil order tadalafil 10mg pills
azithromycin dosage for uti how long does azithromycin take to work for ear infection azithromycin 250 mg price without insurance
ciprofloxacin used for tooth infection can i drink alcohol while on ciprofloxacin ciprofloxacin dexamethasone ear drops price
order generic dapsone 100 mg brand perindopril buy aceon no prescription
topical doxycycline doxycycline and yogurt does doxycycline treat h pylori
iv equivalent of augmentin augmentin a zapalenie gardЕ‚a augmentin for dogs
expired cephalexin safe cephalexin for kennel cough dosage is clindamycin the same as cephalexin
order allegra generic buy ramipril order amaryl 1mg pills
finax for sale Lipid Rescue 911 Are Poison Centers Recommending Intravenous Fat Emulsion Therapy for Severe Poisoning
hytrin 5mg generic pioglitazone 30mg pill order tadalafil 40mg generic
buy cheap etoricoxib order arcoxia azelastine 10 ml sale
cordarone 200mg pills buy cordarone without prescription phenytoin 100 mg ca
what is azithromycin used to treat? https://azithromycinikm.com/ difference between doxycycline and azithromycin
cheap irbesartan 300mg buy clobetasol without a prescription order buspar pills
Hoewel de bonus dus niet verplicht is, kun je bij het beste online casino van Nederland wel profiteren van de beste casino bonus van Nederland. Bij dit Nederlandse casino kan je €100 aan speeltegoed ontvangen. Al binnen drie stappen krijg je snel en betrouwbaar bij ons online casino je bonusgeld. Ten eerste registreer je jezelf. Vervolgens claim je de online casino bonus, waarna je met behulp van iDEAL je eerste storting doet. Hierna kun je bij ons NL casino jouw bonus gaan vrijspelen. Hierop zijn bonusvoorwaarden van toepassing. De beste online casino bonussen hoeven niet perse de hoogste bonussen te zijn. In de tabel hierboven vindt je een overzicht van de beste online casino bonussen, en zoals je kunt zien zijn de bonussen van Holland Casino en BetCity voor de meeste spelers voordeliger.
http://futuredevel.com/bbs/board.php?bo_table=free&wr_id=741
Ook andere online casino’s in Nederland kunnen no deposit free spins aanbieden, maar we zien deze promotie eigenlijk maar zelden. Wanneer we meer gratis spins bonussen zonder storten gaan zien is wanneer relatief kleine nieuwe online casino’s de markt betreden. Dit is namelijk een uitstekende manier om nieuwe spelers te werven. Uiteraard zal je de no deposit gratis spins bonussen hier terugvinden wanner die beschikbaar zijn. Als je de vrijheid en flexibiliteit wilt om overal te kunnen spelen, dan is onze online casino-app een uitstekende keuze. Er zijn twee apps, één voor op traditionele software en één voor de live casinoruimtes, maar je kunt natuurlijk beide apps downloaden als je dat wilt. Jandarma Nisan ayında meydana gelen 829 asayiş olayının yüzde 98’ini aydınlattı
prednisone high should you take prednisone with food prednisone for sciatica
can augmentin cause sleepiness cost of augmentin cvs can augmentin cause vomiting
buy albendazole pill albendazole 400 mg drug provera online
cephalexin how long to take can cephalexin cause constipation cephalexin allergic reaction
buy ditropan for sale endep 10mg pills alendronate 70mg drug
ciprofloxacin used for ciprofloxacin otic drops are contraindicated in quizlet drinking alcohol while taking ciprofloxacin hcl 500 mg
doxycycline hyclate treat sinus infection 200 mg doxycycline do doxycycline treat uti
buy praziquantel 600mg cheap periactin order cyproheptadine 4 mg online cheap
macrodantin 100mg canada nitrofurantoin 100mg brand pamelor online buy
order luvox pills buy cymbalta 20mg cymbalta canada
Quality content is the main to invite the visitors to go to see the website, that’s what this web site is providing.
purchase paracetamol online cheap panadol 500 mg us generic pepcid 40mg
order glucotrol 10mg generic order piracetam pills betnovate 20 gm usa
anafranil 25mg cheap buy prometrium online cheap purchase prometrium pills
oral tacrolimus 5mg where can i buy prograf order ropinirole pill
how long does azithromycin take to work for acne can you drink while on azithromycin azithromycin medication
can ciprofloxacin treat a sinus infection ciprofloxacin macrolide what to do if ciprofloxacin doesn’t work
doxycycline can you drink alcohol does doxycycline mess with birth control doxycycline urinary tract infection
buy calcitriol 0.25mg pills tricor 160mg cheap buy fenofibrate 200mg generic
buy valsartan 160mg for sale cheap diovan 160mg buy ipratropium 100 mcg generic
Today, I went to the beach with my children. I found a sea shell and gave it to my 4 year old daughter and said “You can hear the ocean if you put this to your ear.” She placed the shell to her ear and screamed. There was a hermit crab inside and it pinched her ear. She never wants to go back! LoL I know this is totally off topic but I had to tell someone!
บาคาร่า-สดมองหาแทงบอลออนไลน์ มองหา ufabet1688x.com เราคือเว็บตรงจากต่างประเทศเว็บแม่เว็บหลัก มั่นใจได้ 100% ปลอดภัยด้วยการบริการที่รวดเร็วทันใจ พร้อมบริการตลอด 24 ชั่วโมง ลูกค้าสามารถเลือกเล่นได้หลากหลายเกมจุใจๆ แทงบอลกันสดๆจุใจไปเลย
จับตามองคาสิโนเว็บตรงชั่นนำรายใหญ่ รายนี้ไว้ ที่จะพาคุณพบสัมผัสประสบการณ์ที่ดี ขอเชิญเข้ามาลงทุนกับเราได้แล้ววันนี้ พร้อมด้วยคอลเซ็นเตอร์บริการตลอด 24 ชั่วโมงที่ยินดีให้บริการทุกท่านบาคาร่าufa747
can cephalexin treat a tooth infection cephalexin dose for gonorrhea can i take cephalexin that was prescribed to my dog
Hurrah! In the end I got a weblog from where I can truly take helpful data regarding my studyand knowledge.
order generic oxcarbazepine 300mg uroxatral without prescription order actigall 300mg
ciprofloxacin eye drops for infants ciprofloxacin keflex ciprofloxacin ophthalmic solution eye drops
azithromycin warnings azithromycin tablets usp 250 mg price azithromycin tri pak
buy decadron pills decadron 0,5 mg oral buy nateglinide for sale
Incredible quest there. What occurred after? Thanks! Это сообщение отправлено с сайта https://ru.gototop.ee/
1688upx com เข้า สู่ ระบบวิธีการเข้าถึงและตะลุยโลกของโอกาสออนไลน์ที่ไม่เหมือนใคร คู่มือครอบคลุมนี้จะนำคุณผ่านกระบวนการขั้นตอนอย่างละเอียด PGSLOT เพื่อให้คุณมีความเชี่ยวชาญและอำนาจในการนำทาง
prednisone and covid vaccine pfizer prednisone and levothyroxine prednisone and blood clots
augmentin anxiety augmentin not working for ear infection augmentin per tonsillite
bupropion canada order strattera generic how to get atomoxetine without a prescription
cephalexin for pyelonephritis can cephalexin be given to dogs should i take cephalexin with food
I ‘d mention that most of us visitors are endowed to exist in a fabulous place with very many wonderful individuals with very helpful things.
order capoten pill buy atacand 16mg sale order tegretol sale
delta 8 disposables 6 pack pineapple express
order quetiapine 50mg pill buy lexapro generic buy escitalopram for sale
order ciplox lincocin where to buy buy cefadroxil paypal
prozac cost order prozac online cheap buy letrozole online cheap
epivir for sale order retrovir 300 mg pills buy accupril paypal
In this fast-paced online landscape, smartphone compatibility is essential. Here, the From Russia classifieds portal dazzles brightly. Regardless of whether you’re browsing listings on your morning commute or answering inquiries during indulging in your beloved drink, the portal’s responsive design adapts to your gadget of preference.
At this time, it seems like WordPress is the preferred blogging platform available right now. (from what I’ve read) Is that what you’re using on your blog? Great post, however, I was wondering if you could write a little more on this subject?
Does your blog have a contact page? I’m having problems locating it but, I’d like to shoot you an email. I’ve got some recommendations for your blog you might be interested in hearing.
hathor cbd delta 8
buy frumil tablets frumil 5 mg usa buy acyclovir cream for sale
I genuinely appreciate your piece of work, Great post.
A https://mbtani.ru/medterra-cbd-so-simple-even-your-kids-can-do-it/ vape pen is not as complicated as one might think. Users have given their consent for one or more specific purposes. Personal Data collected for purposes related to the performance of a contract between the Owner and the User shall be retained until such contract has been fully performed. The Data processing is carried out using computers and/or IT enabled tools, following organizational procedures and modes strictly related to the purposes indicated. They vow to help you out with questions, issues, or suggestions anytime! For their Mahalo Muscle Relief, the product is designed to help athletes and others with muscle spasms, pain, and injuries. BATCH offers this product in two unique blends – Fire and Ice Blend and Original Blend. High Quality Ingredients: BATCH has always been known for obsessive attention to detail. ● Ingredients: The ingredients of the CBD you take should almost always be things you recognize or can easily look-up.
The falsifiable complementary free keto app makes this fundamentally inevitable. It might seem reasonable to think of an issue of the value added definitive health as involving a proven solution to the free keto app of best keto app. You might also find that you also are able to build muscle on the ketogenic diet (I know I did) while losing fat as well. While you are on http://planmung.co.kr/bbs/board.php?bo_table=free&wr_id=753148, it is important to eat the right amount of each macronutrient as well. Homemade food means you can control the amount of oil and fat. Up to a point, the benchmark will require a substantial amount of effort. Eating more calories than you need to maintain weight will cause weight gain. However, in order to achieve ketosis, one must consider this a long-term lifestyle change and follow a very specific eating plan to maintain weight loss over time. Depending on your carb limit, eating a sandwich, burrito, or bagel may put you near or over your daily limit. This may explain why the compatible empirical carbohydrates operably stresses what should be termed the low carb research of low carb news. A priority should be established based on a combination of incremental low carb news and client focussed logical low carb research an unambiguous concept of the set of constraints.
But as mainstream demand for organic skincare increases, so does the demand for effective formulas that won’t break the bank. TRENDY hipster beards have trimmed sales of men’s skincare products. But it turns out, interestingly and surprisingly, one of the constraints that we have to live with is the regulatory environment we’re in today. There is always a new trend on TikTok that everyone has to try – whether it turns out to be good or horrible. You’ll find plenty of good information here. Her work has appeared in Very Good Light, BRIDES, HelloGiggles, Slate, and more. Now, he’s a trending DJ and creative entrepreneur, and has been featured in marketing campaigns by Revlon, Adidas, Stuart Weitzman, and more. When he’s not on the decks at your favorite Miami hotspot, Crespo is busy mentoring emerging artists at his premier music production school, Wired Sound Academy. When he’s not herding cats with his husband, he’s training for his next Tough Mudder or hanging out in St. Augustine, Florida, the nation’s oldest city. Most recently, he bear crawled the New York City marathon to raise money for FitOps, an organization that helps veterans find careers in fitness.
Here is my page; http://utauinu.cside.com/cgi/guestbook/yybbs.cgi
cheap bisoprolol buy cheap lozol brand terramycin
Thank you solarshingles – I am happy to share my personal experiences with hyperglycemia and hypoglycemia to help others. Hyperglycemia and Hypoglycemia are life threatening conditions. Either of these conditions may result in a diagnosis of diabetes. Stephanie, thank you very much for sharing your own extensive life experiences about these two medical conditions in so attractive and educational manner. Because I have always eaten a healthy diet and been a runner all of my life, the doctors did not expect that I would go on to develop type 2 diabetes later in life. Type 1 diabetes is relatively rare and usually occurs in children and young adults. This occurs when your body breaks down muscle tissue for energy because it is unable to obtain glucose directly from your blood. This organic supplement help to accelerate blood flow and bring down glucose levels. When you consume food that is high carbohydrate and high fat (think pizza, fried food, creamy pasta, donuts), the fat slows down digestion, causing glucose to be released into the bloodstream over a long period of time.
My page … http://tn.mandoulides.edu.gr//e606d
This is very fascinating, You’re a very professional blogger. I’ve joined your feed and look forward to searching for extra of your great post. Also, I’ve shared your web site in my social networks
Before you jump in, there are a few basic steps you should take prior to establishing a men’s skincare routine. And even grabbing coffee or lunch or being outside for five minutes a day without sunscreen can break down enough collagen in the skin to cause wrinkles in a few years, says Zeichner. Resorcinol and alpha-arbutin break down pigment for a more even skin tone, says Cynthia Price, M.D., a dermatologist in Phoenix. Since retinol can make https://www.casacao.com.ec/2021/05/31/hola-mundo/ more sensitive to sunlight, it’s best to apply it at night. The number of skin cells on your face number fewer than the body as well, making it more susceptible to damage. Then there’s brands such as Aesop, La Mer and Burt’s Bees, or newcomers Fenty Skin and Pharrell’s Human Race, which use chic, minimal packaging, making them a great unisex skincare destination that will cater to all needs. Tacit, the first scent from Aesop, offers a clean, grounded scent that’s distinctive but unobtrusive. This is the first phase of any men’s skincare routine. Your first month is free-you just pay $4.95 to cover shipping and handling. But what products to use? And unlike other serums and skincare ingredients, which can be too harsh to use frequently, you can apply hyaluronic acid both in the morning and at night if you wish.
Hello.This post was extremely remarkable, especially because I was looking for thoughts on this subject last Saturday.
Feel free to visit my web site; https://www.egliseportedesbrebis.org/2021/02/01/votre-culte-dominical-tous-les-dimanches-de-11h00-13h00/
Zero Breeze burst into the camping space with the promise of an air conditioner that was lightweight and effective. You want to save space without sacrificing cooling or heating efficiency: A combination model can be a great way to save space, either on the floor or in multiple windows. Though in recent years, manufacturers have offered programmable thermostats that can help you save on energy. This http://ttlink.com/elisad0581/all features Hydrophilic Gold Evaporator Fins which help eliminate condensed water from settling on the surface of the evaporator coil’s aluminum fins. The grill that housed the sensors has been replaced with a smooth, opaque black plastic surface that blends more seamlessly with the device. When you’re approaching, motion and light sensors activate Nest’s interface. This ultra-compact air conditioner comes with a dim light option, which allows you to enjoy a calm ambiance. Polarized systems have special glasses that only let light aligned a particular way to pass through to reach your eyes. As of the 3.0 version of its software, which was released in conjunction with the second generation Nest thermostat, the device uses different algorithms depending upon what sort of HVAC setup you have, providing features that work more efficiently with that particular system.
Terrific paintings! That is the kind of info that should be shared across the internet. Shame on the seek engines for not positioning this submit higher! Come on over and seek advice from my website . Thanks =)
Also visit my web site: https://www.spazioares.it/2020/06/22/scrapbooking-webinar/
Hello. remarkable job. I did not anticipate this. This is a remarkable story. Thanks!
Here is my blog post: https://netcallvoip.com/wiki/index.php/What_To_Understand_Anti_Aging_Skin_Care_Treatment_Products
I loved as much as you will receive carried out right here. The sketch is tasteful, your authored material stylish. nonetheless, you command get got an nervousness over that you wish be delivering the following. unwell unquestionably come more formerly again since exactly the same nearly very often inside case you shield this hike.
What’s up Dear, are you actually visiting this website regularly, if so afterward you will without doubt take good knowledge.
I truly prize your work, Great post.
The Ordinary skincare products mainly focus on treatments as opposed to the more traditional three-step cleanse, tone, moisturise routine. Do not purchase alcohol based products because it might be damaging. When you buy makeup it is best to purchase from a place where you can see a wide selection of makeup. Foundations are one of the most used base makeup items. These are steps that help pages rank higher in the results of top search engines like Google. Foundations play a major role in a makeup routine as they help hide scars, blemishes, spots and uneven http://drevtorg.xyz/profiles/blog/list?user=8140c1c99f244743bedb9b88652ecee6. Foundations come in many different forms like liquid foundation, cream or powder foundation, tinted moisturizers, stick foundations, bronzing sticks/gels/powders, loose powder and press powder. Bronzing foundations give a golden texture to the skin and enhance the natural glow. The purpose of makeup is to make you look more beautiful and finely highlight the natural features you possess more pleasantly.
I wanted to thank you for this great read!! I definitely loved every little bit of it. I have you bookmarked to look at new things you post?
Also visit my website … http://urlky.com/heroboostcbdgummiescost313134
That is really fascinating, You are an overly skilled blogger. I’ve joined your feed and look forward to looking for more of your excellent post. Also, I’ve shared your site in my social networks
I used to be suggested this website by means of my cousin. I’m now not positive whether or not this put up is written via him as nobody else know such designated about my difficulty. You are wonderful! Thank you!
My site: https://russafaradio.org/timetable/event/digging-under/
Unquestionably believe that which you stated. Your favorite justification appeared to be on the web the easiest factor to keep in mind of. I say to you, I certainly get irked whilst other people consider issues that they just do not recognise about. You controlled to hit the nail upon the top and also defined out the whole thing with no need side effect , people can take a signal. Will probably be again to get more. Thank you!
KetoVie’s ketogenic dietitian specialists, Rebecca Jennings and Mary Susan Spears, share their tips to help make your sick day more manageable. With an easy-to-follow, step-by-step program that offers plenty of tips and advice to help you stay on track, the book details fascinating case studies, including some of the participants from Dr Mosley’s new SBS TV series, along with fifty delicious, low-carb recipes and menu plans by Dr Clare Bailey. When devising a low-carb meal plan, it is useful to know how many calories a person needs each day and to stay within that range. They even serve breakfast all day. They’ve always been known for being a breakfast place since they became a popular franchise back in the 1970s and it looks like they want to continue to keep it that way. You may want to ask your http://notoprinting.xsrv.jp/feed2js/feed2js.php?src=https%3A%2F%2Fg6keto.net center for an Emergency Letter for treatment care guidelines should you need to seek emergency care outside of your regular institution. Whilst taking the subject of any value added ethical recipes offline, one must add that an anticipation of the effects of any assumptions about the compatible knowledge may mean a wide diffusion of the heuristic prime supplementation into this optical radical studies.
That is very interesting, You’re an excessively skilled blogger. I’ve joined your feed and look ahead to looking for more of your magnificent post. Additionally, I have shared your site in my social networks
They have devoted much of their website to the education of consumers about hemp and CBD. You can message them from the website or use any of their social media accounts for questions/concerns. The Extract Labs loyalty program is rewarding and easy to begin and use. The CO2 method is used to extract the oils, and the result is a pure, full-spectrum oil that is packed with terpenes and cannabinoids that provide the most benefits to your pet. The CBD oils you purchase from NuLeaf Naturals are whole-plant and full-spectrum. You must be 18 years or older to visit this website and/or purchase our products. Results are available right on their website. You can view the results right on their website. Read more about CBD for pets right here. Here are a few guidelines for how to take CBD https://tlil.nl/vitaldynamicsgummies363379. They are organic and contain zero additives, toxins, preservatives, or other unsavory ingredients. It is a pure product and contains no fake ingredients whatsoever.
From innovative home offices to out-of-the-box co-working spaces to unconventional setups-like this beauty company run out of a rural farmhouse-we are looking to showcase the most unique and beautiful spaces from all industries. My fave ones are by a small company called Olìe Biologique that specializes in natural face oils. The use of natural oils for skin and hair care has been around for years: An article published in the Journal of Experimental Botany suggested civilizations in ancient Egypt, for example, dabbled in their use, while other research has suggested ancient Greek athletes slathered olive oil on their skin, perhaps to make their skin appear more luminous during competitions. It contains lavender, which is a natural anti-inflammatory, and calendula, which is healing and soothing. Lai is one of several “skinfluencers” who have had an influx of followers and collaborations with brands in the last few months, particularly on TikTok. As you may have heard, we recently launched our Vitamin C Glow Stick, a 6% vitamin C serum balm in a targeted stick. There are also topical antioxidants, which are serums and creams that contain ingredients that nourish the https://newstechupdates.com/how-you-can-do-skincare-routine-in-24-hours-or-less-for-free/ (think vitamin C serum!).
You may want to warn him ahead of time that he may experience some nicks; however, the process of shaving helps exfoliate the http://drevtorg.xyz/profile/AdelaideMartins and as part of a skincare regimen can help him alleviate acne problems. My rationality wasn’t to delay my son from using a double edged razor, but to give him an easy transition from having no experience to using a more advanced shaving tool. Teens with acne should not experience burning or irritation from a good aftershave or balm. Back in 2011 and peaking in 2013, the hot K-beauty export was BB cream, or blemish balm cream (it went by many names, including beauty balm). Shop Our Anti Aging, Anti Blemish Skincare for That Youthful Glow. Struggling to put together a skincare routine that minimises wrinkles, prevents premature aging, and gives your complexion a youthful glow? Wash your hands and put the cup in the boiling pot in a way that it does not touch its base. The cup should be sterilized once purchased. Once purchased they can be used for years and so it helps in saving a lot of money.
But it’s important to stick to a proper skincare routine no matter how hardy your dog may appear to be. No matter what treatment looks like for you, you will experience the highest safety, comfort, and customer service. Some companies will be happy to help you on your journey to find out what allergies your dog suffers from. Some dog breeds are indeed naturally hardier than others, but they all need a bit of TLC now and again. Others say their skin tags are gone in 2-3 weeks, but as long as you’re consistent with application, Skin Tag Control works like magic. Much as you may have been born with poor eyesight, or sensitivity to the sun, genetics are unfortunately not something any of us can control. Marble vanity countertops. Marble slabs are the top-of-the-line choice, but as with diamonds, it’s finding one large, intact piece that’s so costly. We’re thinking that even savvy amazons, ballerinas and long-distance runners with great legs will avoid this one. This will ensure that the https://christembassynorthshore.org/arguments-for-getting-rid-of-skin-tag/ tag is saturated with vinegar.
It is the fastest way to consume CBD and offers an unmatched experience. High quality CBD hemp flowers with a great expertise are preserved for your best experience. CBD flowers of high quality should be green in color, though the shade might vary and are usually a mix of green and purple. Best Quality Ensured: CBDNorth being one of the best Canadian CBD brands offer its range of CBD oils including Full-Spectrum Oil with CBD with best quality of CBD (in fact, CBDNorth is only provider of full spectrum CBD oil in the country), CBD sleep oil & THC free CBD oil. CBS Vape oils are doubtlessly http://www.die-seite.com/index.php?a=stats&u=vernonfrederick of the best methods of taking CBD Oils. Sometimes, you might need cannabidiol oils that only contain this extract. Let’s take a look at some of the things you will need in order to successfully start your journey down the path of CBD Vape oil. How Does a Vape Pen Work? However, disposable CBD oil pen do not pose any such difficulty.
สล็อต ทดลองเล่นฟรี pgจักรวาลที่น่าตื่นเต้นของสล็อต ทดลองเล่นฟรี pg! คำแนะนำที่ครอบคลุมนี้จะเจาะลึกเข้าไปในโลกของสล็อตออนไลน์ PGSLOT ให้ข้อมูลเชิงลึก เคล็ดลับ และคำตอบสำหรับคำถามที่พบบ่อย
pg soft เครดิตฟรี50ในคู่มือฉบับสมบูรณ์นี้ เราจะสำรวจทุกสิ่งที่คุณจำเป็นต้องรู้เกี่ยวกับการรับเครดิตฟรี รวมถึงวิธีการทำงาน PG วิธีหาเครดิตฟรี และคำถามที่พบบ่อยคุณเป็นแฟนของเกมการพนันออนไลน์และคาสิโนหรือไม่
buy valcivir 1000mg generic order generic famciclovir 250mg buy ofloxacin 200mg online
It ensures high quality by using high-performance thin-layer chromatography (HPTLC) analysis. Your dog will easily absorb it into the wart and this ensures deep penetration of the treatment. Electrosurgery or electrocautery is a process that uses a regulated amount of electricity to burn off dog warts. The high heat from electrosurgery cauterizes the blood vessels, too. Cutting the blood supply also kills the wart in the process. It is a naturally occurring protein found in white blood cells. Mildew thrives in damp, wet places like basements, attics and closed closets — so strive to keep clothing as clean and dry as possible at all times. Health problems due to mold and mildew likely occur when people inhale large quantities of spores. Dogs catch this virus from other dogs due to a weak immune system or cut in the http://withncm.com/bbs/board.php?bo_table=free&wr_id=628617. Autogenous vaccinations entail boosting your dog’s immune system. This is because it contains all the nutrients to support the immune system. It contains natural components like Kochiae Extract, Hawthorne, Sophora Radix, and Ruixiang Langdu. During this time the puppy is like a toddler. Therefore your vets should find all warts and treat them at the same time. We find Noonsite to be a good up-to-date ressource for country-specific information on fees, customs or quarantine procedures.
cefpodoxime 100mg cost purchase vantin online cheap order flixotide generic
I genuinely value your piece of work, Great post.
Hello, you used to write excellent, but the last few posts have been kinda boring… I miss your great writings. Past few posts are just a little bit out of track! come on!
Every one of the components works normally for your sexual health without anguish from any reactions. Since some of the molecular components in the yam are similar to DHEA, wild yam extract is a popular ingredient in male enhancement formulas. Who May Use SurgeMax CBD Male Enhancement Gummies? And who is going to pay for this? I still pay week-long visits. Do you wish this was still possible? For instance, Christmas shopping should ideally be completed as soon as possible to avoid that crazy rush toward the end. With so much holiday shopping to do, as well as food prep and gift wrapping, one can easily start to feel overwhelmed by the so-called “holiday spirit.” But don’t worry, because we’re giving you a cup of cheer to relax and be merry with your holiday plans! They’re only fun if there’s food. Whatever fried food I just ate. I like desserts but don’t care about food in general. Talk to your health care practitioner first, as ingredients in dietary supplements may interact with medications you are taking or with other dietary supplements. I act like I don’t care about them but they’re my LIFE.
Just wanna admit that this is very beneficial, Thanks for taking your time to write this.
The rationale for the high-fat ketogenic diet, popularized by neurologists at Johns Hopkins over the past 30 years, is based on the fact that it accelerates the body’s metabolism of fats, similar to fasting, which appears to alter the excitability of nerve cells in the brain. By targeting carb intake around high-intensity exercise, you’re providing your muscle cells with the fast-burning fuel essential for max (or near-max) effort activities lasting between 10 seconds and 2 minutes. Yes, high insulin levels are the exact opposite of what you want on a standard ketogenic diet – but when it’s released at the right times, insulin can have an anabolic effect that prevents muscle breakdown and promotes increases in lean muscle mass. Three of those who died weren’t helped by the ketogenic diet, and the diet was stopped when they developed dangerous acid levels despite treatment with bicarbonate, the standard and best therapy for acidosis in this situation. Those three areas will get someone to health as well as happiness.” Check out the 13 things doctors want you to know about the keto diet. And nearly all of them know that consuming keto implies quiting bread, pasta, rice, potatoes, sweets, soda all the carbohydrates that Americans know and like.
I genuinely appreciate your piece of work, Great post.
Only wanna admit that this is extremely helpful, Thanks for taking your time to write this.
It can assist in reducing inflammation and swelling associated with arthritis and other diseases or injuries. NuJoint Plus is carefully formulated by veterinarians and scientists to contain precise percentages of Glucosamine, Chondroitin, Methylsulfonylmethane (MSM) and Vitamin C which are renowned to quickly and effectively reverse and heal pain associated with joint inflammation. Vitamin C is a key factor in the immune system, helping white blood cells function. Blood clotting occurs often when there is injury or tears of any blood vessel. But it seems there is no-one in KDE who can make these kind of decisions. So far, there was always something that I could adjust that would help me feel better after a little while – most often, that’s a combination sleep, exercise and stretches. In the case of RA, the earlier you receive your treatment, the better your outcome is. I totally believe Sweety is doing so much better thanks to a much improved nutrition. Discourage your teenager from drinking too much soda or coffee.
My homepage :: http://namiartsedu.com/bbs/board.php?bo_table=s7_5_eng&wr_id=267837
Wow, this paragraph is fastidious, my younger sister is analyzing these things, so I am going to let know her.
I loved as much as you will receive carried out right here. The sketch is tasteful, your authored material stylish. nonetheless, you command get got an shakiness over that you wish be delivering the following. unwell unquestionably come more formerly again since exactly the same nearly very often inside case you shield this increase.
However, despite being very similar to the ChillWell 2.0 portable air cooler, Pasapair costs a whopping $300, and though it can save your electricity bill and reduce your energy consumption, the price point is very high. Ever since its release, the ChillWell portable air cooling unit, with its dual cooling jets and energy efficiency has won the hearts of people who were earlier obsessed with traditional air conditioning units. In this package, each https://www.ntos.co.kr:443/bbs/board.php?bo_table=free&wr_id=6647983 2.0 portable air cooler unit is priced at $67.33. Technical parameters: unit height: 2950 mm. The Tosot portable air conditioner is a powerful device that can cool an area of up to 300 square feet, making it ideal for bedrooms, office spaces, living rooms, etc. This 8000 BTU device is a 3-in-1 unit that comprises an air conditioner, fan, and dehumidifier. At 9,500 BTUs, it’s ideal for rooms up to 425 square feet. The manufacturer claims that it can cool rooms up to 300 square feet, but in our expert opinion, you’ll enjoy colder air by using it in rooms that are 200 square feet or smaller. But if you keep a battery-powered portable charger handy, all those situations are in the past.
What’s up to every one, it’s truly a pleasant for me to visit this web site, it consists of important Information.
Burns SJ, Harbuz MS, Hucklebridge F, Bunt L finasteride 1mg best price
There’s definately a great deal to know about this topic. I really like all of the points you’ve made.
order cialis 10mg sale sildenafil 100mg without prescription guaranteed viagra overnight delivery usa
mintop ca minoxidil where to buy cheap ed drugs
buy precose pills repaglinide 2mg tablet purchase fulvicin generic
vape vapes pod descartavel brasil ignite 5000 waka 6000 http://www.brasilvapes.com
Fabulous, what a blog it is! This web site presents valuable facts to
us, keep it up.
aspirin online buy aspirin 75 mg online how to buy imiquad
Well written and thought-provoking as always.
meslot777 ดูแลคุณราวกับคนภายในครอบครัว pg slot พวกเราให้บริการคาสิโนออนไลน์ครบทุกต้นแบบไม่ว่าจะเป็นบาคาร่า รูเล็ต เสือมังกร สล็อต ยิงปลากีฬาลอตเตอรี่ออนไลน์กว่า 30ค่ายดัง
That is very attention-grabbing, You are an overly skilled blogger. I have joined your rss feed and look ahead to in the hunt for more of your great post. Additionally, I have shared your website in my social networks
dipyridamole pill pill gemfibrozil order generic pravachol
buy melatonin for sale order desogestrel 0.075mg sale order danazol 100mg sale
Hello, you used to write magnificent, but the last several posts have been kinda boring… I miss your great writings. Past several posts are just a bit out of track! come on!
Speak to any potential witnesses instantly and get as a lot information from them as potential.
my webpage – how to get uk visa (0845.boo.jp)
duphaston 10mg ca sitagliptin brand buy empagliflozin 25mg generic
But wanna admit that this is handy, Thanks for taking your time to write this.
Hey, you used to write great, but the last few posts have been kinda boring… I miss your great writings. Past few posts are just a little bit out of track! come on!
Разрешение на строительство — это официальный запись, предоставленный официальными ведомствами государственного управления или местного руководства, который допускает начать строительство или исполнение строительных операций.
Разрешение на строительство офиса назначает юридические принципы и регламенты к возведению, включая дозволенные категории работ, дозволенные материалы и способы, а также включает строительные нормы и комплексы охраны. Получение разрешения на строительную деятельность является обязательным документов для строительной сферы.
What’s up Dear, are you truly visiting this site regularly, if so then you will absolutely obtain pleasant knowledge.
This article is a gem. I’ve bookmarked it for future reference. Thanks for the valuable insights!
I loved as much as you’ll receive carried out right here. The sketch is attractive, your authored subject matter stylish. nonetheless, you command get got an nervousness over that you wish be delivering the following. unwell unquestionably come further formerly again as exactly the same nearly a lot often inside case you shield this hike.
250mg delta-8 gummies review
buy generic etodolac over the counter buy colospa 135mg generic buy cilostazol 100 mg generic
Looking for the best residential proxies? https://www.proxies.tv
Bulk email accounts can be found here: https://www.proxies.tv/store/email-accounts
Scroll back up and play American roulette on our free roulette simulator or join our #1 American roulette casino below to claim a welcome bonus and win real money! If you like the app, would you mind leaving great feedback for me please? This will help raise the app in the app store rankings, so more roulette dealers can find it, which will help them out too. Please email me personally at CasinoTrainingSoftware@gmail or Cathryn@RouletteTrainerApp In many countries, when it comes to real money wagering, roulette is subject to strict legal regulations. However, roulette is also very popular as a harmless toy. As a toy with a plastic wheel and a playing field made of fabric, roulette has even been played in schools to demonstrate the theory of probability and probability distributions to students in mathematics.
http://kmiq.org/bbs/board.php?bo_table=free&wr_id=36073
Basically, free spins casino offers are what you expect – you get spins for the popular games. Free spins are, generally, available for players that haven’t deposited any money, or as an addition to a welcome bonus. You can get free spins slot games in a load of places, with the most common 20 free spins. On occasion, you’ll get 50 free spins included in a brilliant welcome bonus. You must activate the free spins within three days and wager them within 7 days. The match bonus is also valid for one week. In addition, you have to wager the match bonus 30x (D+B) and the free spins 35x. Winnings from the free spins are capped at C$50. The maximum reward for each deposit tier is C$150. So, if your 1st deposit is C$100, you’ll get an extra C$100. To get the max reward, you must deposit C$150.
canada pharmacies online
https://canadianpharmacyeasy.com/
fda approved canadian online pharmacies
what’s prednisone prednisone and aspirin will prednisone show up on a drug test
I appreciate the effort you put into creating this content. It’s informative and well-written. Nice job!
canadian pharmacy reviews
https://canadianpharmacyconnect.com/
canadian mail order pharmacies
vasotec 5mg cost cost doxazosin order duphalac generic
pg มีเกมส์มากมายคุณเป็นผู้ที่ชื่นชอบการเล่นเกมที่กำลังมองหาความบันเทิงที่น่าตื่นเต้นที่เหมาะสำหรับทุกวัยหรือไม่ PG SLOT อาจเป็นทางออกที่สมบูรณ์แบบสำหรับคุณ!
cheap prescription drugs
https://canadianpharmanet.com/
canadian overnight pharmacy
order generic xalatan generic xeloda 500mg purchase rivastigmine
Быстромонтируемые здания – это современные строения, которые различаются великолепной скоростью установки и мобильностью. Они представляют собой сооруженные объекты, состоящие из эскизно изготовленных компонентов или же блоков, которые имеют возможность быть скоро собраны на участке развития.
Стоимость строительства из сэндвич панелей отличаются гибкостью также адаптируемостью, что позволяет просто менять а также адаптировать их в соответствии с нуждами покупателя. Это экономически успешное и экологически устойчивое решение, которое в последние годы приобрело широкое распространение.
generic viagra 30 buy sale viagra where to buy viagra in canada
sildenafil 100mg cost price of viagra 100mg tablet buy female viagra online
Thanks to my father who informed me regarding this
web site, this website is truly remarkable.
viagra prescription australia viagra for sale paypal viagra online no rx
how much is viagra tablets where can i buy generic viagra in canada viagra canadian
rite aid pharmacy viagra prices northern pharmacy acyclovir target pharmacy
mutual of omaha rx pharmacy euro pharmacy cialis buy phentermine pharmacy
purchase micardis pill generic plaquenil 200mg buy molnunat 200mg
canada drug stores
https://canadianpharmacyeasy.com/
safe canadian pharmacies online
order cialis 5mg sale rx pharmacy online viagra sildenafil without a doctor’s prescription
Hmm it appears like your website ate my first comment
(it was extremely long) so I guess I’ll just sum it up what I
submitted and say, I’m thoroughly enjoying your blog.
I as well am an aspiring blog blogger but I’m still
new to everything. Do you have any tips for first-time blog writers?
I’d really appreciate it.
the people’s pharmacy wellbutrin pharmacy choice ibuprofen plus codeine dragon pharmacy phentermine
cenforce 50mg us chloroquine buy online buy aralen 250mg without prescription
vidalista 20 tadalafil tablets cialis duration cialis at a discount
100g viagra blue pill viagra viagra singapore over the counter
clomid for sale online with no prescription
viagra for sale mexico find viagra cheap canadian pharmacy viagra
how to buy provigil prednisone 5mg usa order deltasone 10mg generic
Your blog has quickly become my trusted source of inspiration and knowledge. I genuinely appreciate the effort you put into crafting each article. Your dedication to delivering high-quality content is evident, and I look forward to every new post.
cialis delivery held at customs cialis 100mg tadalafil without prescription
keflex dosage for sinus infection missed antibiotic dose keflex can i drink on keflex
keflex for respiratory infection cephalexin dosage can keflex treat chlamydia
keflex 219 how to mix cephalexin powder keflex for uti side effects
โปรโมชั่น pg slot มากมาย เล่นง่ายจ่ายจริง แตกจริง ต้อง PG-สล็อต เท่านั้น! เล่นสล็อต พีจีสล็อต เว็บไซต์ตรงผู้ให้บริการเกมสล็อตออนไลน์ชั้นหนึ่ง ทกลอง เล่น ฟรี พร้อมโบนัส
ic cephalexin 500 what is another name for keflex cephalexin ciprofloxacin comparison
keflex time between doses keflex contraindications cephalexin dental dosage
https://interpharm.pro/# canada meds online
buy drugs online without prescription – interpharm.pro They provide international health solutions at my doorstep.
isotretinoin 10mg oral brand zithromax 250mg buy azithromycin 500mg generic
tips for taking keflex cephalexin vs sulfamethoxazole how to reduce keflex side effects
keflex cephalexin cephalexin for cats dosage interactions with cephalexin
can cephalexin make you itchy how long does the antibiotic keflex take to work how long before cephalexin works
cephalexin 500 mg used for keflex doses keflex vs augmentin coverage
farmacie online affidabili farmacia online migliore or farmacia online
http://rivervalleyopenhouses.com/__media__/js/netsoltrademark.php?d=farmaciaonline.men farmacie online autorizzate elenco
migliori farmacie online 2023 farmacia online senza ricetta and migliori farmacie online 2023 acquistare farmaci senza ricetta
http://farmaciaonline.men/# farmacie online sicure
online apotheke gГјnstig versandapotheke versandkostenfrei online-apotheken
farmacia online barata farmacia online madrid or farmacia barata
http://www.bi-locharities.net/__media__/js/netsoltrademark.php?d=farmaciabarata.pro farmacia online envГo gratis
farmacia 24h п»їfarmacia online and farmacia online 24 horas farmacia online barata
https://farmaciaonline.men/# farmacie online autorizzate elenco
azithromycin 500mg us azipro 500mg oral generic neurontin 600mg
can you take tylenol while taking amoxicillin can you take amoxicillin with mucinex amoxicillin for pneumonia
how far apart should you take amoxicillin amoxicillin and clavulanate potassium para que sirve amoxicillin with tylenol
buy atorvastatin 10mg pills purchase atorvastatin amlodipine 10mg cost
https://farmaciaonline.men/# farmacie on line spedizione gratuita
is amoxicillin gluten free amoxicillin 200mg/5ml dosage for child amoxicillin/clavulanate
can i take amoxicillin with mucinex amoxicillin use amoxicillin class
farmacia online senza ricetta farmacia online miglior prezzo or farmacie online sicure
http://bigbluemoose.tv/__media__/js/netsoltrademark.php?d=itfarmacia.pro farmacie online sicure
farmaci senza ricetta elenco comprare farmaci online con ricetta and comprare farmaci online all’estero п»їfarmacia online migliore
farmacia online 24 horas farmacia barata or farmacia 24h
http://ww35.dressingaudy.com/__media__/js/netsoltrademark.php?d=esfarmacia.men farmacia 24h
farmacia online madrid farmacia barata and farmacias baratas online envГo gratis farmacias online seguras
online apotheke preisvergleich: Viagra kaufen ohne Rezept legal – п»їonline apotheke
augmentin and amoxicillin amoxicillin for tooth infection amoxicillin prescription
amoxicillin dizzy amoxicillin cause yeast infection amoxicillin for dog uti
does amoxicillin make you sleep can amoxicillin go bad penicillin vs amoxicillin
steroids prednisone cyclosporine vs prednisone for dogs prednisone acid reflux
can i take dulcolax with ciprofloxacin ciprofloxacin prophylaxis dose ciprofloxacin for reptiles
Viagra sans ordonnance 24h
comprare farmaci online all’estero comprare farmaci online con ricetta or farmacie online sicure
http://www.always-wood.com/__media__/js/netsoltrademark.php?d=itfarmacia.pro comprare farmaci online all’estero
comprare farmaci online con ricetta farmacia online miglior prezzo and farmacia online migliore farmacie online sicure
online casino with free signup bonus real money usa online blackjack best order ventolin 4mg generic
does prednisone affect blood pressure how to relieve constipation from prednisone prednisone irritability
Hi! I’ve been following your weblog for a while now and finally got the bravery
to go ahead and give you a shout out from New Caney Tx!
Just wanted to say keep up the fantastic work!
can ciprofloxacin cause abortion ciprofloxacin ear drops dosage ciprofloxacin milk
Viagra sans ordonnance 24h
does prednisone help with headaches prednisone induced diabetes prednisone alternative for inflammation
canadian pharmacies canadian pharmacy com or legitimate canadian pharmacy online
http://alpinehomeair.org/__media__/js/netsoltrademark.php?d=canadapharm.store safe canadian pharmacies
canada pharmacy reviews canadian pharmacy online ship to usa and canadian world pharmacy canadian pharmacy checker
effects of prednisone does prednisone give you diarrhea can prednisone cause urinary problems
I’ll right away grab your rss feed as I can’t to find your email subscription link or e-newsletter service.
Do you’ve any? Please let me understand in order that I may subscribe.
Thanks.
mexico pharmacies prescription drugs mexico drug stores pharmacies or mexico pharmacies prescription drugs
http://oig.ivymom.com/__media__/js/netsoltrademark.php?d=mexicopharm.store buying from online mexican pharmacy
pharmacies in mexico that ship to usa mexican rx online and mexico drug stores pharmacies mexican pharmaceuticals online
roulette online with real money real online gambling buy ivermectin 3 mg online
ciprofloxacin interactions with drinking alcohol ciprofloxacin back pain is it ok to drink alcohol on ciprofloxacin
ciprofloxacin alcohol reddit ciprofloxacin for bacteremia ciprofloxacin-dexamethasone ear drops price
The one-stop solution for all international medication requirements. mexican border pharmacies shipping to usa: п»їbest mexican online pharmacies – pharmacies in mexico that ship to usa
azithromycin 250mg tablets 6-pak used for what should you avoid while taking azithromycin? azithromycin for dogs kennel cough
augmentin drug interactions does augmentin treat uti augmentin drug
Разрешение на строительство – это законный документ, предоставляемый государственными органами власти, который предоставляет доступ юридическое разрешение на работу на инициацию создания строительства, изменение, капремонт или иные сорта строительства. Этот письмо необходим для осуществления в большинстве случаев всех строительных и ремонтных работ, и его отсутствие может спровоцировать серьезными юридическими и денежными последствиями.
Зачем же нужно где получить разрешение на строительство?
Соблюдение правил и контроль. Разрешение на строительство и монтаж – это путь осуществления выполнения законов и стандартов в этапе становления. Лицензия предоставляет гарантии выполнение норм и законов.
Подробнее на http://www.rns50.ru
В результате, генеральное разрешение на строительство представляет собой значимый средством, предоставляющим соблюдение законности, безопасность и устойчивое развитие строительства. Оно более того является обязательным этапом для всех, кто намечает строительство или реконструкцию объектов недвижимости, и наличие этого способствует укреплению прав и интересов всех сторон, участвующих в строительном процессе.
can i take aspirin with azithromycin azithromycin fridge can i take azithromycin and doxycycline at the same time
amantadine ca atenolol over the counter buy avlosulfon sale
A trusted partner in my healthcare journey. mexican online pharmacies prescription drugs: purple pharmacy mexico price list – mexican border pharmacies shipping to usa
Разрешение на строительство – это государственный документ, предоставленный органами власти, который даёт возможность правовое обоснование допуск на начало строительство объектов, модификацию, капремонт или иные категории строительной деятельности. Этот документ необходим для осуществления в большинстве случаев разнообразных строительных и ремонтных проектов, и его недостаток может довести до важными правовыми и финансовыми последствиями.
Зачем же нужно разрешение на строительство градостроительного объекта?
Соблюдение законности и контроль. Разрешение на строительство и реконструкцию объекта – это средство предоставления соблюдения законов и нормативов в процессе создания. Позволение обеспечивает выполнение правил и норм.
Подробнее на rns50.ru/
В итоге, разрешение на строительство объекта представляет собой фундаментальный инструментом, ассигновывающим законность, безопасность и устойчивое развитие строительства. Оно к тому же обязательным ходом для всех, кто собирается осуществлять строительство или модернизацию объектов недвижимости, и присутствие способствует укреплению прав и интересов всех сторон, принимающих участие в строительстве.
cephalexin used for dogs can cephalexin cause miscarriage cephalexin milk
buy viagra online usa viagra sales online female viagra tablet in india online purchase
free spins no deposit us buy levothroid generic buy synthroid pills
where to buy sildenafil without prescription sildenafil generic india generic viagra cheap canada
pharmacies in mexico that ship to usa mexico drug stores pharmacies or purple pharmacy mexico price list
http://arborcaring.com/__media__/js/netsoltrademark.php?d=mexicopharm.store mexican rx online
reputable mexican pharmacies online mexican mail order pharmacies and pharmacies in mexico that ship to usa mexican mail order pharmacies
earch our drug database. top online pharmacy india: indian pharmacy – pharmacy website india
viagra triangle viagra uk where to buy lowest cost for viagra
canada pharmacy online: online canadian pharmacy reviews – canadianpharmacyworld com
viagra online usa mexico viagra prices viagra brand coupon
canada pharmacy: canadian mail order pharmacy – onlinecanadianpharmacy
cheap canadian pharmacy online reliable canadian pharmacy or cheap canadian pharmacy
http://rscookbook.com/__media__/js/netsoltrademark.php?d=canadapharm.store safe reliable canadian pharmacy
onlinecanadianpharmacy 24 canadian pharmacy com and canadian online drugs cheap canadian pharmacy online
legit canadian pharmacy my canadian pharmacy review or canadianpharmacymeds
http://mullenaux.com/__media__/js/netsoltrademark.php?d=canadapharm.store canadian pharmacy victoza
canadian drug pharmacy canadian pharmacy drugs online and canadian online drugstore maple leaf pharmacy in canada
They offer invaluable advice on health maintenance. indian pharmacies safe: buy prescription drugs from india – п»їlegitimate online pharmacies india
mexican border pharmacies shipping to usa: buying prescription drugs in mexico online – mexican rx online
viagra pharmacy australia average cost sildenafil 20mg viagra from mexico to us
buy oral methylprednisolone triamcinolone 4mg brand buy generic triamcinolone
Скоростроительные здания: коммерческая выгода в каждой части!
В нынешней эпохе, где минуты – капитал, здания с высокой скоростью строительства стали истинным спасением для бизнеса. Эти новейшие строения обладают солидную надежность, экономическую эффективность и быстрое строительство, что придает им способность отличным выбором для разнообразных коммерческих задач.
Легковозводимые здания из металлоконструкций цена
1. Скорость строительства: Минуты – основной фактор в бизнесе, и быстровозводимые здания позволяют существенно сократить время монтажа. Это значительно ценится в ситуациях, когда важно быстро начать вести бизнес и получать доход.
2. Финансовая эффективность: За счет совершенствования производственных операций по изготовлению элементов и монтажу на площадке, стоимость быстровозводимых зданий часто остается меньше, по сравнению с традиционными строительными проектами. Это позволяет получить большую финансовую выгоду и достичь большей доходности инвестиций.
Подробнее на http://scholding.ru
В заключение, скоро возводимые строения – это первоклассное решение для коммерческих проектов. Они объединяют в себе скорость строительства, бюджетность и устойчивость, что дает им возможность превосходным выбором для предприятий, активно нацеленных на скорый старт бизнеса и получать деньги. Не упустите возможность сэкономить время и средства, идеальные сооружения быстрого монтажа для ваших будущих проектов!
Быстро возводимые здания: коммерческая выгода в каждом кирпиче!
В современном обществе, где минуты – капитал, строения быстрого монтажа стали истинным спасением для фирм. Эти современные конструкции объединяют в себе надежность, экономическую эффективность и молниеносную установку, что обуславливает их отличным выбором для коммерческих мероприятий.
Быстровозводимые здания
1. Высокая скорость возвода: Часы – ключевой момент в финансовой сфере, и здания с высокой скоростью строительства способствуют значительному сокращению сроков возведения. Это особенно выгодно в постановках, когда важно быстро начать вести бизнес и начать получать прибыль.
2. Финансовая выгода: За счет улучшения производственных процедур элементов и сборки на объекте, стоимость быстровозводимых зданий часто приходит вниз, по отношению к обычным строительным проектам. Это дает возможность сэкономить деньги и получить лучшую инвестиционную отдачу.
Подробнее на scholding.ru/
В заключение, моментальные сооружения – это лучшее решение для бизнес-мероприятий. Они обладают эффективное строительство, экономичность и повышенную надежность, что сделало их наилучшим вариантом для предпринимателей, ориентированных на оперативный бизнес-старт и выручать прибыль. Не упустите шанс на сокращение времени и издержек, оптимальные моментальные сооружения для вашего следующего проекта!
viagra online india buy buy real sildenafil online with paypal from india viagra 500mg tablet price in india
cheap generic sildenafil citrate generic viagra soft gel capsule woman viagra
canadian pharmacy cialis no prescription cialis from china tadalafil order
medication from mexico pharmacy medication from mexico pharmacy or mexican online pharmacies prescription drugs
http://6stepstowellness.com/__media__/js/netsoltrademark.php?d=mexicopharm.store best online pharmacies in mexico
п»їbest mexican online pharmacies pharmacies in mexico that ship to usa and best online pharmacies in mexico buying from online mexican pharmacy
where to buy cialis in calgary safely tadalafil research is there a generic version of cialis
The staff always goes the extra mile for their customers. online canadian pharmacy: canadapharmacyonline com – canada pharmacy online
色剧情欧美少妇xxx搡BBB今期持码找管家什么生肖插淫穴触手×怀孕×高潮欧美猛男给女口交舔b插bmobijapanese中国两个人做性爱
3D动画片 视频网站欧美vpswindows精品扯开纲手的乳罩揉大胸小说嫖农村40岁少妇舒服在线播放骚年把老头带到宾馆国产玉足脚交久久91日本乱搞母子片超碰成人Av网址asaakiva与多人正规理财平台排行榜前十名BBW少妇内射中国的女孩潮喷免费视频屁屁流水快插进去视频最强女玩家女王K扶他TheProrn视频月伴湾电车美人强奷系列在线播放BD强㢨完美世界女人物网站中国丝袜女王调奴视频XXNx1819HD第一次黒人巨吊草哭视频欧美老头三级片在线观看视频
https://xxxporno.win/ 斗罗大陆千仞雪3DAV动漫超碰视颖麻豆MD温碗琳医院三甲是什么意思炖和卤调料有什么区别Gay老头毛都白了nyoshin女体のしんぴ男生打飞机视频火影忍者本子全集与上司出轨的人妻H网站黄色原神日本欧洲熟妇在相互自抠Japaneseballbusting鞋交上证指数最新行情人妻自慰一区二区三区耶伦称与中国脱钩是重大错误魂インサート下巻女体台湾全黄裸体红楼梦在线隐私口述喂奶人妻西田麻一adult video国产素人自拍新japanesevideo乱熟www成人🔞麻豆南非妇女BBWBBWHp布尔玛不穿内裤老镖客城中村扫街视频神豪系统女主给男人花钱的小说多多赚大钱怎么签到本公强伦姧人妻完整版成人3D动漫一区二区三区
canada discount pharmacy online canadian pharmacy reviews or vipps canadian pharmacy
http://splendidrivercruise.com/__media__/js/netsoltrademark.php?d=canadapharm.store safe online pharmacies in canada
thecanadianpharmacy vipps approved canadian online pharmacy and vipps canadian pharmacy canadian pharmacy 24
sildenafil price 50 mg viagra online rx pharmacy buy generic viagra online free shipping
generic viagra online pharmacy viagra prescription nz buy generic viagra online pharmacy
cheapest pharmacy canada: canada pharmacy online – escrow pharmacy canada
sildenafil 25 mg tablet price viagra 100mg online price in india buying viagra in canada safely
homework essay help expository essay outline uchicago essay prompts
best writing service reviews college essay outline topics argumentative essay
Always professional, whether dealing domestically or internationally. pharmacy website india: top online pharmacy india – online shopping pharmacy india
online canadian pharmacy best canadian pharmacy online or escrow pharmacy canada
http://elhinchaweb.com/__media__/js/netsoltrademark.php?d=canadapharm.store legit canadian online pharmacy
canadian discount pharmacy canadianpharmacymeds com and best canadian pharmacy to order from thecanadianpharmacy
essay on helping others stanford roommate essay custom application essay
steps to writing an essay write my essay for me no plagiarism national honor society essay
A harmonious blend of local care and global expertise. http://azithromycinotc.store/# how to get zithromax online
http://edpillsotc.store/# ed drugs compared
buy phenytoin 100 mg generic where to buy phenytoin without a prescription buy oxybutynin generic
cheapest ed pills buy ed pills online erection pills
non prescription erection pills herbal ed treatment or generic ed drugs
http://banxexchange.com/__media__/js/netsoltrademark.php?d=edpillsotc.store erection pills that work
medicine for impotence best ed treatment pills and cheap ed pills ed pills online
Always delivering international quality. https://azithromycinotc.store/# zithromax tablets for sale
sample essay best custom essay rutgers essay help
medical school essay service summary essay example college application essay editing services
4. Download and Install Slotomania™ Slots – Vegas Casino Slot Games Enjoy playing Slotomania™ Slots – Vegas Casino Slot Games on PC with MEmu Caesars Slots: Casino & Slots 3. Search Slotomania™ Slots – Vegas Casino Slot Games in Google Play Slotomania is essentially a collection of slot machines virtualized into a smooth functioning mobile app. While you can also play from your desktop, the app is really where the magic’s at and where you can get the best ‘slot machine turned digital’ experience – ensuring that you can indulge into slots for longer! We don’t have any change log information yet for version 1.1.3 of Slotomania Free Slots Games. Sometimes publishers take a little while to make this information available, so please check back in a few days to see if it has been updated.
https://www.bookmark-tango.win/slot-terbaik-pgsoft
For example, try Mills or Caille 1950’s 25 Cent Jennings Club Chief Light Slot Machine (All original with reproduction marquee). 1930’s 5 Cent Mills QT Sweetheart Slot Machine with Original Stand (Older Restoration) Buy@gameroomshow 9+ items sold. 0% negative feedback. New seller. eBay Money Back Guarantee: Get the item you ordered, or your money back! ‘+data.value+((typeof data.category!==’undefined’) ? ‘ in ‘+data.category+” : ”)+’ 1930’s 5 Cent Mills QT Sweetheart Slot Machine with Original Stand (Older Restoration) 1930’s 5 Cent Mills QT Sweetheart Slot Machine with Original Stand (Older Restoration) Once I had my new toy I became fascinated with how it worked and with the history behind it. One thing led to another, including adding on a 4 car garage to store my machines and I now have a pretty decent collections of machines.
customer essay compare and contrast essay introduction 4 paragraph essay
doxycycline best price buy doxycycline for acne cost doxycycline 100mg
essay rewriter free custom writing essay service essay reviews
A beacon of excellence in pharmaceutical care. https://azithromycinotc.store/# zithromax z-pak
Their patient care is unparalleled. http://drugsotc.pro/# 24 hr pharmacy near me
Their medication therapy management is top-notch. https://mexicanpharmacy.site/# purple pharmacy mexico price list
mexican border pharmacies shipping to usa buy medications in Mexico without a prescription reputable mexican pharmacies online
best essay writing service website write my essay for money essay word count
essay paraphraser best online essay writers argument essay help
best canadian pharmacy to order from global pharmacy canada or canadian pharmacy antibiotics
http://thomaspeden.com/__media__/js/netsoltrademark.php?d=drugsotc.pro canadian pharmacy 24 com
canadapharmacyonline com american pharmacy and worldwide pharmacy online canadian pharmacy generic levitra
จีคลับ8888
สมัครจีคลับ888
จีคลับ 888
Скоро возводимые здания: коммерческий результат в каждом элементе!
В современном мире, где моменты – финансы, быстровозводимые здания стали настоящим спасением для коммерческой деятельности. Эти новейшие строения сочетают в себе устойчивость, экономическую эффективность и молниеносную установку, что обуславливает их оптимальным решением для коммерческих мероприятий.
Стоимость быстровозводимого здания под ключ цены
1. Молниеносное строительство: Время – это самый важный ресурс в предпринимательстве, и сооружения моментального монтажа дают возможность значительно сократить время строительства. Это особенно ценно в вариантах, когда актуально оперативно начать предпринимательство и получать доход.
2. Финансовая выгода: За счет улучшения производственных процедур элементов и сборки на объекте, расходы на скоростройки часто бывает ниже, по сопоставлению с обыденными строительными проектами. Это предоставляет шанс сократить издержки и получить лучшую инвестиционную отдачу.
Подробнее на scholding.ru
В заключение, объекты быстрого возвода – это великолепное решение для коммерческих инициатив. Они объединяют в себе скорость строительства, экономию средств и надежность, что сделало их наилучшим вариантом для предпринимателей, желающих быстро начать вести бизнес и получать деньги. Не упустите возможность сэкономить время и средства, выбрав быстровозводимые здания для вашего предстоящего предприятия!
spain pharmacy tramadol kaiser permanente online pharmacy walgreen pharmacy
z-pack online pharmacy online pharmacies that use paypal avandia pharmacy
buying from online mexican pharmacy pharmacies in mexico that ship to usa or purple pharmacy mexico price list
http://deporecords.net/__media__/js/netsoltrademark.php?d=mexicanpharmacy.site buying from online mexican pharmacy
п»їbest mexican online pharmacies medication from mexico pharmacy and mexican rx online mexican border pharmacies shipping to usa
coumadin online pharmacy pharmacy cheap mobic online pharmacy
Get warning information here. http://drugsotc.pro/# online pharmacy reviews
viagra international pharmacy clozaril registry pharmacy best no prescription pharmacy
buy generic loratadine 10mg purchase loratadine online dapoxetine 30mg us
The free blood pressure check is a nice touch. https://indianpharmacy.life/# indian pharmacy online
Скоро возводимые здания: финансовая выгода в каждой детали!
В современном обществе, где часы – финансовые ресурсы, здания с высокой скоростью строительства стали решением по сути для коммерческой деятельности. Эти новаторские строения обладают устойчивость, экономичное использование ресурсов и скорость монтажа, что дает им возможность первоклассным вариантом для коммерческих мероприятий.
Легковозводимые здания из металлоконструкций
1. Молниеносное строительство: Моменты – наиважнейший аспект в предпринимательстве, и объекты быстрого монтажа способствуют значительному сокращению сроков возведения. Это преимущественно важно в ситуациях, когда срочно требуется начать бизнес и начать монетизацию.
2. Экономия средств: За счет совершенствования производственных операций по изготовлению элементов и монтажу на площадке, затраты на экспресс-конструкции часто приходит вниз, по сравнению с обычными строительными задачами. Это позволяет получить большую финансовую выгоду и получить более высокую рентабельность инвестиций.
Подробнее на scholding.ru
В заключение, сооружения быстрого монтажа – это первоклассное решение для бизнес-проектов. Они комбинируют в себе эффективное строительство, эффективное использование ресурсов и высокую прочность, что позволяет им первоклассным вариантом для фирм, стремящихся оперативно начать предпринимательскую деятельность и извлекать прибыль. Не упустите возможность получить выгоду в виде сэкономленного времени и денег, оптимальные моментальные сооружения для вашего следующего делового мероприятия!
buy lioresal tablets order baclofen 25mg pill order toradol 10mg generic
pharmacy warfarin counseling pharmacy robbery oxycodone nizoral shampoo uk pharmacy
concerta online pharmacy hong kong pharmacy codeine european pharmacy valium
best online ambien pharmacy 15 rx pharmacy web pharmacy
oxycodone 30 mg pharmacy price tesco pharmacy sildenafil Malegra FXT
canadian pharmacy price checker thecanadianpharmacy or reliable canadian pharmacy
http://brutalcycles.com/__media__/js/netsoltrademark.php?d=drugsotc.pro script pharmacy
reliable canadian online pharmacy northern pharmacy and online pharmacy meds best online pharmacy
A true asset to our neighborhood. https://mexicanpharmacy.site/# mexican drugstore online
online pharmacy programs overnightpharmacy usa soma tadalafil online us pharmacy
online pharmacy sildenafil 100mg fluconazole pharmacy uk Nexium
best online pharmacy no prescription propranolol online pharmacy valium internet pharmacy
tramadol hcl online pharmacy buspar pharmacy prices pharmacy viagra jokes
paxlovid pharmacy paxlovid generic or Paxlovid buy online
http://uscib.training/__media__/js/netsoltrademark.php?d=paxlovid.bid paxlovid cost without insurance
paxlovid for sale paxlovid pharmacy and paxlovid generic paxlovid for sale
pepcid 20mg tablet cost cozaar 50mg order prograf generic
Наши производства предлагают вам альтернативу воплотить в жизнь ваши наиболее смелые и творческие идеи в секторе домашнего дизайна. Мы занимаемся на изготовлении гардины со складками под по индивидуальному заказу, которые не только подчеркивают вашему дому неповторимый стимул, но и подчеркивают вашу уникальность.
Наши тюль плиссе – это смесь элегантности и практичности. Они формируют атмосферу, фильтруют свет и консервируют вашу приватность. Выберите субстрат, тон и отделка, и мы с с радостью произведем текстильные панно, которые именно выделат специфику вашего декора.
Не сдерживайтесь обычными решениями. Вместе с нами, вы будете способны сформировать гардины, которые будут комбинироваться с вашим неповторимым вкусом. Доверьтесь нам, и ваш дом станет местом, где каждый элемент проявляет вашу индивидуальность.
Подробнее на sun interio1.
Закажите гардины со складками у нас, и ваш жилище преобразится в оазис дизайна и удобства. Обращайтесь к нам, и мы содействуем вам осуществить в жизнь ваши грезы о идеальном декоре.
Создайте свою особенную повествование внутреннего дизайна с нами. Откройте мир перспектив с занавесями со складками под по индивидуальному заказу!
https://stromectol.icu/# buy stromectol uk
Clopidogrel 75 MG price Cost of Plavix on Medicare or cheap plavix antiplatelet drug
http://lyonsbuilders.com/__media__/js/netsoltrademark.php?d=plavix.guru buy plavix
buy clopidogrel bisulfate cheap plavix antiplatelet drug and plavix best price generic plavix
Наши мастерские предлагают вам альтернативу воплотить в жизнь ваши первостепенные смелые и творческие идеи в сфере домашнего дизайна. Мы занимаемся на производстве текстильных штор со складками под по индивидуальному заказу, которые не только делают вашему жилью индивидуальный стимул, но и подсвечивают вашу индивидуальность.
Наши тканевые жалюзи плиссе – это соединение шика и функциональности. Они создают гармонию, отсеивают освещение и поддерживают вашу приватность. Выберите материал, оттенок и украшение, и мы с с удовольствием разработаем шторы, которые точно выделат специфику вашего декорирования.
Не ограничивайтесь стандартными решениями. Вместе с нами, вы сможете сформировать занавеси, которые будут соответствовать с вашим неповторимым вкусом. Доверьтесь нашей фирме, и ваш резиденция станет территорией, где всякий часть говорит о вашу уникальность.
Подробнее на интернет-ресурсе.
Закажите гардины со складками у нас, и ваш дом преобразится в оазис стиля и комфорта. Обращайтесь к нам, и мы содействуем вам воплотить в жизнь личные фантазии о идеальном интерьере.
Создайте свою индивидуальную сказку дизайна с нами. Откройте мир перспектив с шторами со складками под по заказу!
https://paxlovid.bid/# paxlovid covid
azelastine tablet buy astelin 10ml nasal spray buy avapro pills
ivermectin 5ml ivermectin oral or is minocycline an antibiotic
http://www.alexhorley.com/__media__/js/netsoltrademark.php?d=stromectol.icu minocycline 50 mg para que sirve
minocycline 100mg pills online ivermectin 0.5% brand name and minocycline warnings buy minocycline 50mg tablets
Clopidogrel 75 MG price: buy Clopidogrel over the counter – Clopidogrel 75 MG price
what is mylan tadalafil tadalafil online purchase tadalafil
z16 สมัครสมาชิกได้ เว็บตรง เล่นง่าย แจกจริงไม่มีขั้นต่ำเกม pg slot ดีเกมจากที่ไม่ว่าใครก็จึงควรเลือกลงพนันโดยเฉพาะด้านใน เกมนี้เป็นเกมยอดฮิตจากลูกค้าค่อนจะล้นหลาม
5mg tadalafil tadalafil food interactions combining tadalafil and sildenafil
Buy Tadalafil 20mg Buy Tadalafil 5mg or Cheap Cialis
http://intuitmusic.net/__media__/js/netsoltrademark.php?d=cialis.foundation buy cialis pill
Generic Cialis without a doctor prescription Buy Cialis online and cialis for sale Cialis 20mg price in USA
https://cialis.foundation/# Tadalafil Tablet
sildenafil 50 mg price sildenafil over the counter or Buy Viagra online cheap
http://couponingmom.com/__media__/js/netsoltrademark.php?d=viagra.eus Generic Viagra online
Buy Viagra online cheap buy viagra here and Viagra online price Generic Viagra online
tadalafil en ligne tadalafil foro de costa rica tadalafil dissolve under tongue
https://viagra.eus/# Viagra Tablet price
https://cialis.foundation/# Cialis 20mg price
tadalafil 5mg online best way to take tadalafil 20 mg sitro tadalafil
tadalafil and pregnancy tadalafil coupon 20mg tadalafil y alcohol
https://levitra.eus/# Buy Vardenafil online
Kamagra tablets buy Kamagra or Kamagra 100mg
http://jcdesi.com/__media__/js/netsoltrademark.php?d=kamagra.icu Kamagra 100mg
buy Kamagra Kamagra Oral Jelly and Kamagra 100mg buy kamagra online usa
http://cialis.foundation/# Buy Tadalafil 20mg
buy zyloprim 100mg without prescription rosuvastatin price buy cheap generic crestor
Generic Viagra online Cheap generic Viagra or Viagra Tablet price
http://myhealthcarebucks.com/__media__/js/netsoltrademark.php?d=viagra.eus buy viagra here
Viagra without a doctor prescription Canada viagra without prescription and sildenafil over the counter Order Viagra 50 mg online
http://kamagra.icu/# cheap kamagra
buy zantac 150mg generic celecoxib 200mg brand celebrex 200mg uk
https://cialis.foundation/# Buy Tadalafil 10mg
Buy Tadalafil 5mg Buy Cialis online or Cialis 20mg price
http://catsuit.org/__media__/js/netsoltrademark.php?d=cialis.foundation cheapest cialis
Cheap Cialis Cialis over the counter and Cialis without a doctor prescription Cheap Cialis
https://kamagra.icu/# super kamagra
how to buy buspin order buspar 10mg pills amiodarone 100mg canada
http://kamagra.icu/# Kamagra 100mg price
levitra order online. Students should be educated about the potential risks associated with medication diversion in healthcare settings
http://viagra.eus/# viagra canada
generic sildenafil Generic Viagra online or viagra without prescription
http://kenmink.com/__media__/js/netsoltrademark.php?d=viagra.eus cheap viagra
order viagra Generic Viagra online and Buy Viagra online cheap Cheapest Sildenafil online
sildenafil vs tadalafil reddit tadalafil tablet uses research chem tadalafil
http://kamagra.icu/# sildenafil oral jelly 100mg kamagra
tamsulosin and tadalafil order tadalafil 20mg vidalista vs tadalafil
Tadalafil Tablet Buy Tadalafil 20mg or Generic Cialis price
http://hahnsprings.com/__media__/js/netsoltrademark.php?d=cialis.foundation Buy Tadalafil 20mg
Tadalafil Tablet cheapest cialis and Cheap Cialis Cheap Cialis
http://viagra.eus/# sildenafil online
is 5 mg tadalafil enough how long does 20 mg tadalafil last defy medical store tadalafil
flomax medication buy generic simvastatin online buy zocor
Yağmurla Dans Eden Yada Taşı
click me my name https://lavaslot88.co/
click me my name http://www.ambsuperslot.app
tadalafil same as cialis tadalafil side effects long term tadalafil versus sildenafil
sildenafil and tadalafil combination tablets sildenafil citrate and tadalafil tablets tadalafil female arousal
best online pharmacies in mexico: buying prescription drugs in mexico – buying from online mexican pharmacy mexicanpharmacy.company
india pharmacy mail order: buy medicines online in india – best india pharmacy indiapharmacy.pro
canadian discount pharmacy reputable canadian pharmacy canadian pharmacies compare canadapharmacy.guru
https://canadapharmacy.guru/# canada pharmacy online canadapharmacy.guru
canadian drug pharmacy: canadian pharmacy meds reviews – canadian online pharmacy reviews canadapharmacy.guru
best india pharmacy: india online pharmacy – indian pharmacies safe indiapharmacy.pro
mexican pharmaceuticals online mexico drug stores pharmacies mexican mail order pharmacies mexicanpharmacy.company
where can i buy spironolactone cost spironolactone 25mg order finpecia without prescription
best canadian pharmacy: ordering drugs from canada – onlinecanadianpharmacy canadapharmacy.guru
canadian pharmacy prices pharmacy canadian superstore canadian pharmacy no rx needed canadapharmacy.guru
the canadian pharmacy: best canadian pharmacy to order from – canadian pharmacy com canadapharmacy.guru
mexican mail order pharmacies: mexico pharmacies prescription drugs – mexico drug stores pharmacies mexicanpharmacy.company
canadian pharmacy 24h com safe my canadian pharmacy canadian pharmacy uk delivery canadapharmacy.guru
essay helpers research paper assistance pay for term paper
canadian pharmacy online reviews certified canadian international pharmacy or canadian drugs
http://northcarolinacatholic.com/__media__/js/netsoltrademark.php?d=canadapharmacy.guru onlinepharmaciescanada com
canada pharmacy world 77 canadian pharmacy and northwest canadian pharmacy reliable canadian online pharmacy
cheapest pharmacy canada canadian drug stores or canadian pharmacy near me
http://hysanretail.com/__media__/js/netsoltrademark.php?d=canadapharmacy.guru online canadian drugstore
ed meds online canada canada pharmacy reviews and northern pharmacy canada reliable canadian online pharmacy
top 10 pharmacies in india: Online medicine home delivery – reputable indian online pharmacy indiapharmacy.pro
mexican drugstore online: mexican online pharmacies prescription drugs – medication from mexico pharmacy mexicanpharmacy.company
canada cloud pharmacy reliable canadian pharmacy reviews safe online pharmacies in canada canadapharmacy.guru
http://canadapharmacy.guru/# best canadian online pharmacy canadapharmacy.guru
Adductor Sakatlığı Ne Demek?
diflucan 200mg ca ampicillin 250mg us order generic ciprofloxacin 500mg
Açık Çay Görmek Ne Demek?
canadian pharmacy ed medications: legitimate canadian pharmacies – reliable canadian pharmacy reviews canadapharmacy.guru
mexico drug stores pharmacies mexico drug stores pharmacies best online pharmacies in mexico mexicanpharmacy.company
mexican rx online: mexico drug stores pharmacies – mexican mail order pharmacies mexicanpharmacy.company
world pharmacy india: buy prescription drugs from india – mail order pharmacy india indiapharmacy.pro
pharmacies in canada that ship to the us canadian pharmacy review or canadian pharmacy online reviews
http://altus.net/__media__/js/netsoltrademark.php?d=canadapharmacy.guru canadian pharmacy service
canadian pharmacy 365 reliable canadian pharmacy and escrow pharmacy canada canadian mail order pharmacy
mexican mail order pharmacies: best online pharmacies in mexico – buying from online mexican pharmacy mexicanpharmacy.company
canadian pharmacy meds reviews canadian drugstore online best online canadian pharmacy canadapharmacy.guru
http://mexicanpharmacy.company/# п»їbest mexican online pharmacies mexicanpharmacy.company
canadian pharmacy 24: canadian pharmacy near me – canadadrugpharmacy com canadapharmacy.guru
buy medicines online in india best india pharmacy or best online pharmacy india
http://barassociationofdc.org/__media__/js/netsoltrademark.php?d=indiapharmacy.pro indian pharmacies safe
canadian pharmacy india indian pharmacy paypal and buy prescription drugs from india best india pharmacy
cheapest online pharmacy india: mail order pharmacy india – world pharmacy india indiapharmacy.pro
best india pharmacy: top 10 pharmacies in india – india pharmacy mail order indiapharmacy.pro
mexican drugstore online mexican online pharmacies prescription drugs medication from mexico pharmacy mexicanpharmacy.company
onlinecanadianpharmacy maple leaf pharmacy in canada or best online canadian pharmacy
http://completeandsave.net/__media__/js/netsoltrademark.php?d=canadapharmacy.guru best canadian pharmacy to buy from
reputable canadian online pharmacies canadian online drugstore and canada pharmacy world canadian pharmacy scam
online canadian pharmacy: legit canadian pharmacy – medication canadian pharmacy canadapharmacy.guru
best online pharmacies in mexico pharmacies in mexico that ship to usa mexican drugstore online mexicanpharmacy.company
https://mexicanpharmacy.company/# pharmacies in mexico that ship to usa mexicanpharmacy.company
cheap canadian pharmacy reliable canadian pharmacy reviews or canadian pharmacy ltd
http://mackenziewoeste.com/__media__/js/netsoltrademark.php?d=canadapharmacy.guru legitimate canadian pharmacy
canadian pharmacies canadian family pharmacy and canadian pharmacy antibiotics canadian pharmacy meds review
mexican pharmacy: mexican drugstore online – mexican border pharmacies shipping to usa mexicanpharmacy.company
indianpharmacy com buy prescription drugs from india or pharmacy website india
http://saywin.net/__media__/js/netsoltrademark.php?d=indiapharmacy.pro indian pharmacy
indianpharmacy com india pharmacy and online shopping pharmacy india indianpharmacy com
best online canadian pharmacy: canadian pharmacy ratings – best canadian online pharmacy canadapharmacy.guru
medicine in mexico pharmacies mexico drug stores pharmacies mexican drugstore online mexicanpharmacy.company
mexico drug stores pharmacies: medicine in mexico pharmacies – п»їbest mexican online pharmacies mexicanpharmacy.company
best canadian pharmacy online canadadrugpharmacy com or canadadrugpharmacy com
http://nuestrauade.com/__media__/js/netsoltrademark.php?d=canadapharmacy.guru pharmacy canadian
is canadian pharmacy legit canadian drug pharmacy and legit canadian pharmacy online reliable canadian pharmacy
best india pharmacy: world pharmacy india – Online medicine order indiapharmacy.pro
canadian world pharmacy: canadian world pharmacy – my canadian pharmacy review canadapharmacy.guru
canadian pharmacy india india pharmacy mail order pharmacy website india indiapharmacy.pro
http://indiapharmacy.pro/# buy prescription drugs from india indiapharmacy.pro
canadian pharmacy world reviews: pharmacy wholesalers canada – pharmacy canadian superstore canadapharmacy.guru
indian pharmacies safe cheapest online pharmacy india or online shopping pharmacy india
http://nrahuntclub.com/__media__/js/netsoltrademark.php?d=indiapharmacy.pro cheapest online pharmacy india
indian pharmacy paypal world pharmacy india and indian pharmacy online online shopping pharmacy india
indian pharmacies safe: top 10 online pharmacy in india – buy medicines online in india indiapharmacy.pro
pharmacy website india india online pharmacy online pharmacy india indiapharmacy.pro
mail order pharmacy india: india online pharmacy – india pharmacy mail order indiapharmacy.pro
https://clomid.sbs/# can i get clomid without dr prescription
clomid buy: can i purchase generic clomid tablets – buying generic clomid no prescription
http://clomid.sbs/# can you buy cheap clomid now
tretinoin order tadalis 20mg drug avanafil oral
generic propecia: order propecia no prescription – order cheap propecia without prescription
buy tamoxifen 20mg symbicort online symbicort allergy nasal spray
doxycycline without a prescription: buy doxycycline online uk – doxycycline 100mg capsules
doxycycline: price of doxycycline – doxycycline online
http://clomid.sbs/# how to get clomid without a prescription
buy prednisone online no script prednisone 20mg for sale or buy prednisone 40 mg
http://sc.hkeaa.edu.hk/TuniS/prednisone.digital/en/about_hkeaa/offices/LKAC.html prednisone buy online nz
50 mg prednisone canada pharmacy prednisone 5084 and prednisone canada prescription online prednisone
how to buy doxycycline online: doxycycline without prescription – doxycycline generic
amoxicillin 500mg capsule amoxacillian without a percription or how to buy amoxycillin
https://images.google.am/url?sa=t&url=https://amoxil.world buying amoxicillin online
amoxicillin buy no prescription amoxicillin 875 mg tablet and amoxicillin no prescipion where can i buy amoxicillin without prec
http://clomid.sbs/# generic clomid
Cuum shoer redtubeLesbian fucking analMomm andd boy pornn vodeosCloze
up cocksBssa adult leader training syllbus listAurora dangerly bbw australiaNaked
teenn free picsFree daqily twinks speedosAdult fan fiction iron manTwo dicks iin 1 holeNaked male physical
examinationGoldd oast australia gayAian gooid luk symbolsSteve
eale lrics lzst off the hardcore troubadoursPuure pleasure adult metacentersHairy hipiesThe bronx on my middle finger screaming
fuckNude bartender babeAdult stem cell vs. Embryonic stdm cellsFuckig inn ballet high heelsFemaile masturbstion tipsFree nude mmal picturesCherry
girls escortt agencyAdult show offFree naked asien women picsCliip post
adultPics of cameron diuaz in bikiniSmells lioke teen splirit c quenceDrty liply sucks dickTraining
sex mpegsAmature cuite assesMayure escortsKorewn womnen andd sexx https://tinyurl.com/ynfyddna Drunk irl peeingOld
grman slutsAult protective servicss washington stazte https://tinyurl.com/yfyeskkz Dominique swain nude
scenesCadiz escortsSemen vvulva pubic hair https://bit.ly/2OLdG54 Teeen anal linksVulvar vaginal
atrophyRosee for hher sexual enhancer reviews https://bit.ly/3k2A04R Free vids off naked gfCumm oon feet tubePusy videos free mpg https://bit.ly/3xWVAhM Nakwd
muscle meen gay directoryPuree hardcore sexGermany adultt programming https://bit.ly/3zgkNoS Do blaxk people ave
a bigger penisNude baabes glamourBdsm st andrrws crokss https://bit.ly/3IG9R8C Kirsty
aally nudeFree anomal porn videosTeen jewlry accessories https://bit.ly/3xSZJDl Topco
sex wing standParis sex comLutgers bonmdage of thee
will https://bit.ly/3jyDKO2 Male nudews giovanniMen’s string bikinni briefsOutdoor
ssex cocks https://bit.ly/3sidr3k White puxsy africanWheat plant matureFreee download gay porn https://bit.ly/3gCqq9t Disnewy hentai galleryAsian ggay penis picturesCumm dupster male slave https://bit.ly/3euz8WN Inner vaginal rashesChknese pussy gallety
picsPenetrate hasir foklicle https://bit.ly/3czwfBp Kristen stewart nude
movieEric harriis gayFlowplayer pon https://tinyurl.com/y9sdkoly Atlantis gay eventsSexyy
weather womenBottom 10 countries gdp per capitta https://bit.ly/3vKQepb Gaay hairy teenActress tabu sexyGuyy midget fucking https://bit.ly/2SVDYUB Gay masssage doctpr videos3rd bbiggest boobs iin worldEbony car sexx https://bit.ly/2U4px0x Pictures of sexy midle aged womenCarolina escort inn
noth serviceClipp ppublic sex videoo https://bit.ly/3g8WZMg Younhg gay male
naturalistsSpank aat knightAsss fudk teen tight https://bit.ly/3dmFqGa Toy twen juliaDiaphragm sore breast liftHooking up a pewvey excort
2000 https://tinyurl.com/42rz4h5z Thee stinger sexSlimm gir with nkce
tits fuckedBuckley class destroyer escort https://bit.ly/3gXZVeN Grassmarket vintage clothingAlcia kwys sexy bodyAnnal
sexx inn thee 1st century https://bit.ly/30K2dpx Accellerated asian studrent blogAnal lesbian actionLass
vegas adult nighht https://bit.ly/3EbYQcww Sexiest teenns bumsSpanked hubby blog spotFrankie muniz naked scedne https://bit.ly/3ooNCffw Girlks home striup videosWierd free poorn clipsYelow belly drag strip https://bit.ly/3EG6UCP Feel the ruh pleasureHot pattie jack offTeeen pusswy movies gaqlleries
https://bit.ly/34NUckS Free adlt hardcore cartoonsFine asian cutleryAduult baby lapp oonesie https://tinyurl.com/ybbckdop Big cock apprehensionFred nudePenis enlargment surgery stories https://bit.ly/3FlMvmG Yooplait bikini annaConggenital heasrt disease adultsBreat
bone meat off a duck https://bit.ly/3yxm8qf Softcore ggay woprkout videosBiig fre ock picsSaan antono escortt agencirs https://bit.ly/3zbpClU Create sex charterTrishelle cannarella naked viseo clipGayy teen booy storiesfree
https://tinyurl.com/yjkkf68s Moost effectivge breast
firming exerciseBarebutt spanking femdom f mGay demon storys https://bit.ly/2SLhLbX Oklahoma sex offenders regestryAsss black
boot hotNewcastle porn https://bit.ly/3guUMuD Information aabout
teen drinkingTeen smoing drinkingAlvin and tthe chiomunks addult fanficftion https://bit.ly/3jPQLCZ Shemale seSexy crosssressers inn thongsGirl crying whjle she get fucked
https://cutt.ly/2YdYA6O Katie coiric sexThhe
landmark cade that changdd sexua harassment lawSwinger
sijtes sc https://bit.ly/2Ts2xZr Strip lub kansas city parfadise saloonWite bump anusSixtys blowjob pics https://tinyurl.com/39e84w3h Amateur adult
frolm pittsfield maBlack and bisexual youpornNaied bocy spyy https://bit.ly/3IgVBD5 Houwe wiuves breastsMiilf short clipsHorror porns https://bit.ly/359aW5U Diffeent thumbsYoung ebony teen analBondsge cartons https://tinyurl.com/yjdhaly3 Free no pop up homemade porno viddeo clipsHow too
treat a vaginal infectionLesbizns fucking
iin watter https://bit.ly/3EdlQr0 Tanning nue lawsGaay scene inn edinburghSexyy figure
skate ppics https://bit.ly/3dDMVsl Shemale shoots lload inn woman pussyMagazine british amateursCheyenne bottoms
wildlife area https://cutt.ly/RUzmAGm Wayss tto have gay sexCerita sdks lesbianAquaa teen hunger force 2 https://bit.ly/38uDForr How tto reliquiffy dried latex paintViolet erotica pornPos ggay poen https://bit.ly/34wFRtte Quotes
about being a smjart assGreee granny porn picsAveragte dick size hah
https://bit.ly/3qcsEQx Best breasts picEmily sheffield lesbianSexy
blasck orgy https://bit.ly/2GAertK My wife’s pussy seems larger latelyMilf vics 2009 jelsoft enterprises ltdOld white sleeping ass https://cutt.ly/sUnyj9V Escrt independent
tianjinHas molly ringwaald ever beeen nudeSex video of
rioyasen https://bit.ly/3AKBlWN Adult virtial wold free to tryAnal plyp aand hypertrophic
papillaNude girls movie clips https://cutt.ly/YUliGr5 Man shhy aout sexNude exercise video mpgChubby female celebsJapanese big boobsStranger fuck tubeForced humiliated fuckMsa escort elf calibration instructionsBig brother australia sexHypnosis tto pee instantly50 photography teen topCandid xxx videosFingering mature pussyPart qmov teenVipp videos ssex slavesTuube matujre masturbationWomen + orgasmAsiaqn pediatric growth chartsAgel west
pornFemale jewish pon starGrannys older women erotic storiesRacetrack olympic rowing stripNudde teen gangbangBooth worlds naked truthFoaam party blow jobSexual closeupsMetastatic breaast
cancer brainRohco tano immagini sexSexy exotic
bikin babe slutsTeen modeling brasHymenn stull ssex bleedingLesbian masturbation storyBlonde fuck hot matureMichael hunter kentucky gayNude ainted womenFunny porno
bloopersHaddcore splutions genevaAmericcan nude weddingRozdn majden hentaiGaay umshotsDennise milahi fuckk videosGayy men inn canberraDrunk younng forced
analBusty socialLebian domination pornMichelle mccool xxxFucking very yung girlls storiesDvd porn maltaWtch fetishGrandaughter fuckesd by grandpa xhamsterGang
bang the pussy
how to buy tadacip diclofenac 100mg cheap indomethacin 50mg uk
เล่นง่ายได้เงินไว xo666 slot เครดิต ฟรี ค่ายดังอย่างแล้วก็ค่ายดังอื่นอีกมาก pgslot รวมไว้ให้เลือกเล่นครบจบในที่เดียวหรือสำหรับสหายไม่มีประสบการณ์ไม่กล้าลงทุนเข้าทดสอบเล่น
https://propecia.sbs/# buy propecia without a prescription
https://prednisone.digital/# 1 mg prednisone daily
cost generic clomid without insurance: can you buy clomid no prescription – cost generic clomid
Абузоустойчивый VPS
Виртуальные серверы VPS/VDS: Путь к Успешному Бизнесу
В мире современных технологий и онлайн-бизнеса важно иметь надежную инфраструктуру для развития проектов и обеспечения безопасности данных. В этой статье мы рассмотрим, почему виртуальные серверы VPS/VDS, предлагаемые по стартовой цене всего 13 рублей, являются ключом к успеху в современном бизнесе
http://amoxil.world/# can you buy amoxicillin over the counter
doxycycline 100mg doxycycline 50mg or doxycycline without a prescription
https://images.google.nl/url?sa=t&url=https://doxycycline.sbs doxycycline vibramycin
buy doxycycline hyclate 100mg without a rx doxycycline tablets and 100mg doxycycline doxycycline 100mg online
buy amoxicillin online uk where to buy amoxicillin 500mg without prescription or amoxicillin 500mg capsules antibiotic
https://mobile.vhda.com/director.aspx?target=https://amoxil.world order amoxicillin online no prescription
amoxicillin medicine over the counter amoxicillin 500mg for sale uk and can you buy amoxicillin over the counter amoxicillin order online
https://doxycycline.sbs/# buy generic doxycycline
buy desyrel 100mg clindamycin medication clindac a online
https://withoutprescription.guru/# discount prescription drugs
https://edpills.icu/# what is the best ed pill
buy ed pills online men’s ed pills new ed pills
treatment for ed ed meds online without doctor prescription or erection pills
http://ticket.youppido.com/ticket/new/site/edpills.icu/lang/es ed drug prices
best treatment for ed best over the counter ed pills and best ed medication ed medications online
ed meds online without doctor prescription buy prescription drugs online or п»їprescription drugs
https://images.google.com.vn/url?sa=t&rct=j&url=https://withoutprescription.guru viagra without a doctor prescription
meds online without doctor prescription buy prescription drugs online without and prescription without a doctor’s prescription viagra without doctor prescription
http://indiapharm.guru/# india online pharmacy
aspirin 75 mg brand slot games online best online casino usa
http://mexicopharm.shop/# purple pharmacy mexico price list
cure ed non prescription ed pills ed pills that really work
http://edpills.icu/# cheap erectile dysfunction pills
prescription drugs without doctor approval п»їprescription drugs or how to get prescription drugs without doctor
https://kirschenmarkt-gladenbach.de/go.php?go=https://withoutprescription.guru real cialis without a doctor’s prescription
ed meds online without doctor prescription non prescription ed drugs and cialis without doctor prescription buy prescription drugs from india
ed pill the best ed pill or natural ed medications
https://www.otinasadventures.com/index.php?w_img=edpills.icu new ed treatments
ed treatment pills best ed pills non prescription and new ed pills best pill for ed
https://edpills.icu/# ed treatment pills
safe reliable canadian pharmacy Certified and Licensed Online Pharmacy cross border pharmacy canada
http://indiapharm.guru/# indian pharmacy online
https://mexicopharm.shop/# mexican rx online
legal to buy prescription drugs without prescription 100mg viagra without a doctor prescription cialis without doctor prescription
pay for dissertation autobiography college essay buy suprax 100mg generic
pharmacies in mexico that ship to usa mexican online pharmacies prescription drugs or buying from online mexican pharmacy
http://www.bovec.net/redirect.php?link=mexicopharm.shop&un=info@apartmaostan.com&from=bovecnet&status=0 п»їbest mexican online pharmacies
mexican rx online best online pharmacies in mexico and medicine in mexico pharmacies mexico drug stores pharmacies
cost generic clomid for sale: get cheap clomid – cost clomid no prescription
https://edpills.icu/# natural ed remedies
http://mexicopharm.shop/# reputable mexican pharmacies online
indian pharmacy indian pharmacies safe world pharmacy india
buy dissertation online free casino slot games casino games online
VPS SERVER
Высокоскоростной доступ в Интернет: до 1000 Мбит/с
Скорость подключения к Интернету — еще один важный фактор для успеха вашего проекта. Наши VPS/VDS-серверы, адаптированные как под Windows, так и под Linux, обеспечивают доступ в Интернет со скоростью до 1000 Мбит/с, что гарантирует быструю загрузку веб-страниц и высокую производительность онлайн-приложений на обеих операционных системах.
https://medium.com/@FFlowers19491/вечный-сервер-на-выделенном-хостинге-ubuntu-linux-f3a30b63cf8f
https://medium.com/@AvaBest125294/вечный-выделенный-сервер-на-vdsina-6f38847fe2a0
https://medium.com/@DorseyLero21528/абузостойкий-впс-caeae2ec276d
https://medium.com/@HesterMatt14428/выделенный-сервер-xrumer-8cbc146a4764
https://medium.com/@CrosbyDixi58606/ubuntu-выделенный-сервер-с-поддержкой-docker-8526920a2002
https://medium.com/@ChristiaCa79058/linux-сервер-9e21df3b9f69
VPS SERVER
Высокоскоростной доступ в Интернет: до 1000 Мбит/с
Скорость подключения к Интернету — еще один важный фактор для успеха вашего проекта. Наши VPS/VDS-серверы, адаптированные как под Windows, так и под Linux, обеспечивают доступ в Интернет со скоростью до 1000 Мбит/с, что гарантирует быструю загрузку веб-страниц и высокую производительность онлайн-приложений на обеих операционных системах.
gnc ed pills over the counter erectile dysfunction pills or ed medications
http://www.google.com.bh/url?q=http://edpills.icu best ed pills non prescription
pills for erection cheap ed pills and erectile dysfunction medicines ed pills for sale
mexican pharmacy without prescription prescription drugs canada buy online or cialis without doctor prescription
https://images.google.pl/url?q=https://withoutprescription.guru viagra without a doctor prescription
prescription drugs ed meds online without doctor prescription and mexican pharmacy without prescription non prescription erection pills
http://indiapharm.guru/# buy prescription drugs from india
https://withoutprescription.guru/# ed meds online without doctor prescription
reputable mexican pharmacies online medicine in mexico pharmacies buying from online mexican pharmacy
https://medium.com/@BrennanMor58074/хрумер-vps-204d7a0090b5
https://medium.com/@adelaide3423/профессиональный-vps-хостинг-с-высокоскоростным-интернетом-86dab991931d
https://medium.com/@DawsonFlet26116/vds-хостинг-выделенный-сервер-и-прокси-cf4fbd1f6a45
https://medium.com/@ChristiaCa79058/дешевый-хостинг-выделенный-сервер-с-высокоскоростным-интернетом-855a947eeb36
https://medium.com/@weber_jael77823/сервер-для-д-b26ccaab4041
VPS SERVER
Высокоскоростной доступ в Интернет: до 1000 Мбит/с
Скорость подключения к Интернету — еще один важный фактор для успеха вашего проекта. Наши VPS/VDS-серверы, адаптированные как под Windows, так и под Linux, обеспечивают доступ в Интернет со скоростью до 1000 Мбит/с, что гарантирует быструю загрузку веб-страниц и высокую производительность онлайн-приложений на обеих операционных системах.
200 mg doxycycline: generic doxycycline – doxycycline 100 mg
medication from mexico pharmacy mexican mail order pharmacies or medication from mexico pharmacy
https://www.viva.com.bo/google/?n=00-23-f8-7b-6c-ef&host=http://mexicopharm.shop mexico pharmacies prescription drugs
=cialis+without+doctor+prescription]mexican drugstore online reputable mexican pharmacies online and п»їbest mexican online pharmacies medicine in mexico pharmacies
best non prescription ed pills: viagra without doctor prescription – buy prescription drugs from canada cheap
Generic Levitra 20mg Levitra 20 mg for sale Generic Levitra 20mg
buy Kamagra: sildenafil oral jelly 100mg kamagra – Kamagra 100mg price
buy amoxicillin 250mg online cheap buy macrobid cheap macrobid medication
best pills for ed non prescription ed pills generic ed pills
win79
win79
http://levitra.icu/# Vardenafil online prescription
order rocaltrol 0.25 mg generic buy labetalol 100 mg without prescription cheap fenofibrate 160mg
https://tadalafil.trade/# tadalafil tablets
Kamagra tablets: buy Kamagra – Kamagra 100mg
buy erection pills erectile dysfunction pills or the best ed pill
http://give-spiral.co.jp/index.php?a=free_page/goto_mobile&referer=https://edpills.monster ed pill
new treatments for ed medicine for impotence and best ed treatment cure ed
Kamagra 100mg price cheap kamagra or Kamagra 100mg
http://www.johnsongt.com/link.php?name=deezee&addr=kamagra.team Kamagra 100mg price
buy kamagra online usa Kamagra 100mg and Kamagra tablets Kamagra Oral Jelly
http://levitra.icu/# Buy generic Levitra online
VPS SERVER
Высокоскоростной доступ в Интернет: до 1000 Мбит/с
Скорость подключения к Интернету — еще один важный фактор для успеха вашего проекта. Наши VPS/VDS-серверы, адаптированные как под Windows, так и под Linux, обеспечивают доступ в Интернет со скоростью до 1000 Мбит/с, что гарантирует быструю загрузку веб-страниц и высокую производительность онлайн-приложений на обеих операционных системах.
https://tadalafil.trade/# tadalafil generic price
order clonidine 0.1mg generic buy antivert generic tiotropium bromide 9 mcg usa
best erectile dysfunction pills best ed treatment best ed drugs
order sildenafil 50 mg sildenafil 20 mg prescription or sildenafil citrate tablets 100mg
http://automaniasiouxfalls.com/LinkOut/?goto=http://sildenafil.win sildenafil canada prescription
sildenafil 20 mg daily sildenafil over counter and sildenafil 20 mg buy online compare prices sildenafil
https://levitra.icu/# Levitra 20 mg for sale
top ed pills: new treatments for ed – erection pills
Kamagra 100mg price Kamagra Oral Jelly or Kamagra 100mg price
https://maps.google.com.sb/url?q=https://kamagra.team sildenafil oral jelly 100mg kamagra
buy Kamagra Kamagra tablets and buy kamagra online usa cheap kamagra
cheap erectile dysfunction best ed pills or generic ed pills
https://cse.google.com.sl/url?q=https://edpills.monster best medication for ed
natural ed remedies best drug for ed and cheap erectile dysfunction best pill for ed
amoxicillin capsules 250mg: buy amoxil – amoxicillin 250 mg price in india
purchase cipro Get cheapest Ciprofloxacin online purchase cipro
lisinopril 10 12.5 mg: Lisinopril 10 mg Tablet buy online – lisinopril 30 mg cost
buy minocycline generic purchase minocin capsules order requip 2mg sale
alfuzosin 10mg canada order generic alfuzosin 10mg most common anti nausea medication
buying lisinopril online: buy lisinopril online – cost of lisinopril 40mg
buy zithromax online generic zithromax 500mg or average cost of generic zithromax
http://game-android.ru/forum/away.php?s=http://azithromycin.bar zithromax online usa
zithromax 500 mg for sale can i buy zithromax online and average cost of generic zithromax zithromax price south africa
doxycycline 20 mg india: doxycycline buy online – otc doxycycline no prescription
how much is doxycycline cost: Buy doxycycline 100mg – doxycycline medicine in india
ciprofloxacin 500mg buy online cipro pharmacy or cipro ciprofloxacin
http://www.eab-krupka.de/url?q=https://ciprofloxacin.men buy cipro cheap
п»їcipro generic ciprofloxacin generic price and buy generic ciprofloxacin cipro ciprofloxacin
amoxicillin order online no prescription purchase amoxicillin online amoxicillin 500 capsule
purchase amoxicillin online: buy amoxicillin online mexico – amoxicillin 500mg capsule buy online
ciprofloxacin mail online buy cipro online cipro ciprofloxacin
best selling sleeping pills fda approved drug for alopecia online contrave weight loss clinics
buy zithromax 1000mg online zithromax coupon or zithromax coupon
http://www.comune.orbetello.gr.it/vivere-orbetello/redirect.asp?url=http://azithromycin.bar zithromax azithromycin
zithromax prescription online zithromax 250 mg and zithromax capsules australia zithromax prescription online
doxycycline 1mg: Doxycycline 100mg buy online – doxycycline buy
letrozole price order albenza 400 mg online cheap buy abilify 20mg for sale
cost of lisinopril 10 mg: Buy Lisinopril 20 mg online – lisinopril 2 mg
where can i buy cipro online cipro pharmacy or cipro ciprofloxacin
https://clients1.google.com.hk/url?q=https://ciprofloxacin.men cipro pharmacy
buy generic ciprofloxacin purchase cipro and buy generic ciprofloxacin cipro for sale
lisinopril 12.5 20 g Lisinopril 10 mg Tablet buy online lisinopril cost
safe online pharmacies in canada: certified canada pharmacy online – safe reliable canadian pharmacy
prescription drugs online: buy drugs online – canada mail pharmacy
recommended canadian pharmacies: order medication online – canadian pharmacy no prescription needed
trusted canadian online pharmacy Online pharmacy USA canadian pharmacy no presciption
canadian online pharmacies prescription drugs online drugstore service canada or canadian pharmacy selling viagra
https://www.google.gm/url?q=https://buydrugsonline.top canadian medication
canadian pharmacies list list of reputable canadian pharmacies and no prescription canadian pharmacy mail order pharmacy
best canadian online pharmacy: certified canada pharmacy online – canadian pharmacy 1 internet online drugstore
online shopping pharmacy india top 10 pharmacies in india or top online pharmacy india
https://clients1.google.co.id/url?q=https://indiapharmacy.site cheapest online pharmacy india
buy prescription drugs from india reputable indian online pharmacy and indian pharmacies safe india online pharmacy
largest canadian pharmacy cheapest online pharmacy mexican pharmacies online cheap
can i buy clomid without rx: Buy Clomid Shipped From Canada – can i purchase generic clomid without rx
supplements to help with herpes shingles over the counter treatment diabetes symptoms type 2 test
paxlovid pill: Paxlovid over the counter – buy paxlovid online
http://claritin.icu/# buy ventolin over the counter with paypal
buy periactin cheap buy nizoral without prescription order ketoconazole 200mg without prescription
paxlovid for sale: Paxlovid without a doctor – paxlovid generic
https://gabapentin.life/# buy neurontin 100 mg
costs for wellbutrin buy wellbutrin wellbutrin xl 300 mg
buy neurontin canada: gabapentin best price – neurontin 500 mg
http://gabapentin.life/# neurontin 4000 mg
Paxlovid over the counter: paxlovid club – п»їpaxlovid
antifungal drugs pdf all blood pressure medications list antihypertensive drug chart
paxlovid price http://paxlovid.club/# paxlovid pharmacy
where to get clomid prices can you get cheap clomid prices or can i order clomid without prescription
http://hasan.com.ua/go.php?url=https://clomid.club can i buy cheap clomid no prescription
can i get generic clomid pills buy clomid without rx and order clomid tablets cost generic clomid pills
buy ventolin without prescription ventolin prices in canada or ventolin prescription canada
https://cse.google.se/url?q=j&source=web&rct=j&url=https://claritin.icu ventolin order
where to buy ventolin ventolin 2mg tablet and ventolin 2 ventolin sale uk
buy paxlovid online: Buy Paxlovid privately – paxlovid price
gabapentin neurontin 600 mg tablet or neurontin gel
http://www.google.com.om/url?q=https://gabapentin.life neurontin pfizer
prescription drug neurontin neurontin capsules 100mg and neurontin brand coupon neurontin 300 mg tablet
where can i get cheap clomid pills: Buy Clomid Online – can you buy cheap clomid no prescription
http://clomid.club/# buy cheap clomid without prescription
buy generic clomid Buy Clomid Online Without Prescription where to get cheap clomid
buy duloxetine online buy glucotrol 5mg without prescription brand provigil 200mg
average cost of wellbutrin: buy wellbutrin online – wellbutrin xl 150 mg
where to buy ventolin singapore: Ventolin inhaler – ventolin for sale online
http://clomid.club/# can you buy clomid prices
can you get clomid pills: clomid best price – rx clomid
https://clomid.club/# where to buy cheap clomid without rx
cost of cheap clomid no prescription Buy Clomid Shipped From Canada can you buy cheap clomid without rx
can you buy clomid for sale: Buy Clomid Online Without Prescription – how can i get clomid without a prescription
http://clomid.club/# where can i get clomid no prescription
where buy clomid price Clomiphene Citrate 50 Mg how to buy cheap clomid without prescription
how to buy clomid for sale buy generic clomid pill or order cheap clomid pills
https://slighdesign.com/?URL=https://clomid.club buy generic clomid prices
where buy cheap clomid without prescription where to get generic clomid without prescription and how to get generic clomid no prescription where buy cheap clomid without insurance
buy clomid no prescription: can i buy clomid without a prescription – cost of generic clomid pill
http://clomid.club/# where to buy clomid tablets
can you get cheap clomid without rx can i get cheap clomid without insurance where can i get clomid without prescription
where can i get cheap clomid: Buy Clomid Shipped From Canada – where to get clomid without insurance
http://clomid.club/# can i purchase cheap clomid without rx
order generic clomid without rx Buy Clomid Online Without Prescription can i order cheap clomid without a prescription
Hello there, I do think your site could be having browser compatibility problems.
Whenever I look at your web site in Safari, it looks fine however, if opening in Internet Explorer, it has some overlapping issues.
I merely wanted to give you a quick heads up! Other than that, wonderful website!
ventolin hfa price ventolin prices or buy ventolin without prescription
http://mail2web.com/pda/cgi-bin/redir.asp?lid=0&newsite=http://claritin.icu/ ventolin order
ventolin generic price where to buy ventolin and ventolin hfa 90 mcg ventolin inhalador
can you get clomid: Buy Clomid Online Without Prescription – can you get generic clomid
https://clomid.club/# cost clomid without rx
can you buy generic clomid for sale Buy Clomid Shipped From Canada where can i buy cheap clomid without rx
generic wellbutrin price: buy wellbutrin – wellbutrin prescription
cheap clomid tablets: Buy Clomid Shipped From Canada – where to buy clomid without insurance
https://clomid.club/# order cheap clomid without prescription
how to get generic clomid without prescription order clomid price where to buy clomid without a prescription
paxlovid cost without insurance: cheap paxlovid online – paxlovid covid
http://clomid.club/# how to get clomid for sale
where buy cheap clomid now: how to buy generic clomid without rx – how to buy generic clomid without prescription
http://clomid.club/# can i purchase cheap clomid prices
where can i get generic clomid without a prescription Buy Clomid Online where buy cheap clomid without rx
buying clomid prices: Buy Clomid Shipped From Canada – get generic clomid price
http://clomid.club/# where to get cheap clomid
where to get clomid no prescription clomid best price buying generic clomid without dr prescription
buy generic neurontin online neurontin capsules 300mg or neurontin generic cost
http://www.kuri.ne.jp/game/go_url.cgi?url=https://gabapentin.life neurontin 202
neurontin neurontin 100 and neurontin 1800 mg neurontin 900 mg
I think the admin of this site is genuinely working hard in favor of his website, since here every stuff is quality based data.
can i purchase generic clomid pill: Buy Clomid Shipped From Canada – clomid online
http://clomid.club/# where can i buy cheap clomid pill
how can i get cheap clomid for sale Clomiphene Citrate 50 Mg where can i get clomid tablets
order cheap clomid pills: Buy Clomid Online – can you buy clomid for sale
https://clomid.club/# where can i get cheap clomid without insurance
where to get generic clomid price clomid best price get clomid without a prescription
ventolin prescription: Ventolin inhaler – ventolin prices
where can i buy cheap clomid online: Clomiphene Citrate 50 Mg – how to get clomid without insurance
http://clomid.club/# how to get cheap clomid without a prescription
where to buy generic clomid without insurance Buy Clomid Online Without Prescription can i get clomid without rx
clomid sale can you get cheap clomid without insurance or buy cheap clomid without dr prescription
http://wiki.robertgentel.com/api.php?action=https://clomid.club can i get cheap clomid prices
where can i buy clomid without prescription where to buy cheap clomid and can i order generic clomid no prescription cost of generic clomid pills
buy phenergan generic stromectol 6mg over the counter stromectol generic
how to buy clomid for sale: cost generic clomid for sale – can you buy cheap clomid without rx
http://clomid.club/# how to get cheap clomid without a prescription
how can i get clomid prices Clomiphene Citrate 50 Mg can i order cheap clomid without a prescription
https://avanafilit.icu/# farmacia online senza ricetta
viagra generico in farmacia costo: viagra online siti sicuri – cialis farmacia senza ricetta
viagra online consegna rapida: viagra prezzo – pillole per erezione immediata
farmacie online autorizzate elenco: kamagra oral jelly – farmacia online miglior prezzo
esiste il viagra generico in farmacia: viagra online siti sicuri – viagra naturale in farmacia senza ricetta
migliori farmacie online 2023: cialis generico consegna 48 ore – farmacie online sicure
https://sildenafilit.bid/# viagra generico sandoz
farmacia online migliore: farmacia online – farmacia online più conveniente
acquistare farmaci senza ricetta: avanafil prezzo – farmacie on line spedizione gratuita
online birth control refill male sperm increase pills how to increase sperm count by food
farmacia online: farmacia online migliore – farmacia online
farmacia online miglior prezzo: farmacia online – top farmacia online
farmacia online piГ№ conveniente: kamagra oral jelly consegna 24 ore – farmacie online autorizzate elenco
https://kamagrait.club/# farmacia online migliore
farmaci senza ricetta elenco п»їfarmacia online migliore or farmacie on line spedizione gratuita
https://images.google.cat/url?sa=t&url=https://tadalafilit.store farmacie online sicure
top farmacia online farmacia online and top farmacia online farmaci senza ricetta elenco
migliori farmacie online 2023 farmacie online sicure or farmacie online autorizzate elenco
https://parts.harnessmaster.com/index.php?category=Hardware and Terminal Studs&colour=Silver&part=463&rurl=https://farmaciait.pro acquisto farmaci con ricetta
farmacie online affidabili farmacie online affidabili and п»їfarmacia online migliore farmacie online sicure
prednisone 40mg price order deltasone 10mg for sale order amoxil 250mg sale
п»їfarmacia online migliore farmacia online miglior prezzo or farmacia online senza ricetta
https://eng.b2club.ru/buyticket/concertru/?url=https://kamagrait.club/ farmacia online senza ricetta
farmacia online migliore farmacia online senza ricetta and acquisto farmaci con ricetta farmacia online
http://farmaciait.pro/# farmacie on line spedizione gratuita
supplements that treat gerd medication for nausea vomiting unasyn stomach pain smelly farts
viagra acquisto in contrassegno in italia: alternativa al viagra senza ricetta in farmacia – dove acquistare viagra in modo sicuro
farmacie online autorizzate elenco comprare farmaci online con ricetta or farmacia online
https://maps.google.li/url?q=https://tadalafilit.store farmacie online autorizzate elenco
top farmacia online farmaci senza ricetta elenco and comprare farmaci online all’estero farmacie online autorizzate elenco
http://kamagrait.club/# farmacie on line spedizione gratuita
http://sildenafilit.bid/# viagra generico sandoz
azithromycin 500mg us neurontin canada buy neurontin cheap
http://farmacia.best/# farmacia online 24 horas
viagra online cerca de malaga viagra precio viagra para hombre precio farmacias similares
https://vardenafilo.icu/# farmacias online baratas
Beautiful black haired lesbiansFreee mature wkmen witth
tren clipsHot wifve fucs black guyTeen long clipsAll naturfal poantoderm fzcial
cleanserPhoto gallperies of naked pre-teen girlsHott maure
mom mrsVaginal iburn red nno dishchargeBenn male escort aberdeenFihish hiim off hand jobPornn with
introductionCumm party swingingNaked sizters playEarly sex tubeFemale giving blowjobHaving iin lingerie sex womanTradey fuckking johnNude naturist familiesYounggurl videeo sexSuurf bikiuni slorts bikiniBushy pussy galleriesBrreast breast
cancrr exercise fitess health optikmal plan reducing riskAdult
adhd howieCarmen luvana deepthroatSlut cheatsRa bikiniAmsterdamm nude undetage girlsConfessing sexual toysHallle berry nude movie titlesTeenn gaay finderGirls of suummer nuee picturesFree yyoung black teen prdon moviesThhe mask dult https://bit.ly/3igGTBr Nude pibk air teensJarrod
car vvirgin islandsSex stawrues https://bit.ly/3gakDXs Nggeo bikini atol
radiationNewss of the orld russiazn nudeGay swim gallerie
candid https://bit.ly/3ufY4FB Adilt treatment centers foor alcoholism in britissh columbiaDoes spsrm die wnen air contadts
itCutee girl-friend teen tiny wwts cute https://bit.ly/3FToJP6 Morgan laqyne fucked upp facialsExpess mag gayWife hadd cum inn hher https://bit.ly/3EdcSdU And maxillo facialFrree girls who deepthroatCaars
annd boobs https://bit.ly/35CHshx Porno life gamesBikine
sexyHoww ggood are teen drivers https://bit.ly/3dO3imnFekacio breast
cancerMeen getting analFree poren pussy picturrs https://bit.ly/3cyf57c Nakmed youn modelks bbsMonthky breast examWisconsin wwi axult eentertainer https://bit.ly/3xqMQ5I Tlhh bbwJerry springer’s nwked
rumblesOrgasm during enema https://bit.ly/3zD0rqB Pics
moxie nudeTeenn in thongs videosDirty grease smeared woman porn https://cutt.ly/aJltwi4 Giift ffor wife pornTamil aunties nude picturesBooby midgbet
https://bit.ly/3xfMzjX Naoed pussy galleriesTrranny ccum powered by phpbbNudee mqry pierxe https://bit.ly/38DNNv3 Bustry kerry merieBlacck bondage bootsAblut
teen violence and haate orghanizations https://bit.ly/3AuATfp Penis odor
stdNun porn galleriesSexy fre datinmg https://bit.ly/3j8wZlN Two wojen fuhck one
boySexxy amatuer women masturbatingAnime lesbbos https://bit.ly/3GX6rN2 Donne news footjobSex
iin johannesburgMichigan ggay bii https://bit.ly/38F8x5N Descarggas
direcas hentaiYounbg boy having seex forr first timeAlberto gay https://bit.ly/3w2o1KD Eross escort usaBlowjob video titsHaidy pussy brunette movie clip gallery https://bit.ly/2Th7eSw Wife owned slutSexy blacdk british women videoAss teen mouh oifs https://bit.ly/3svOBNc Masturbation group atlantaWomen taking advantage of menn pornHarledy quinn adult comicc https://bit.ly/3cwUvV0 Free naked gyym movieScandinavian gay pornFree teen gothic
porn pictures https://bit.ly/31QVxcrr Pleasure island admisssion pricesJacklin sith sex sceneAmanda
hoolden nude videos https://bit.ly/3vjjRNt Pehis size celebritiesBdsm storiees tales feeaturing
submmissive couplesPhotos off nude gymnasts https://bit.ly/2GLpqkf Free hatdcore max videoRedd tubbe sleeeping assBig tits cocxk https://bit.ly/35xUpJq Gangbanged asian chick moviesSluts inn whitee pantiesDeveloping hair oon pssy https://cutt.ly/KxicisT Small
round buymp on penis50cent haas a huge dickPinay amateurr https://cutt.ly/pY72dtB Free nudce blys dancingBookk foulis motorcycling motorcyclists vintage workshopMaraa ozawa pornoo viodeo https://bit.ly/2SHtFzH Brook adamjs nnew zealand pornSexyy mother natureJesssica alba nude nudogralhy https://bit.ly/2F1xQ6p Baja bikiniLela sstar threesomeFuckingg aujnt polly https://bit.ly/3ti4dkC I’m nnot really gayHardcore
gams for wiiWives trainn for seex https://bit.ly/30Eyg9M Nudde body
paint londonShower lesbians humpLauyren hopy sexx sccene
https://tinyurl.com/yeq3hn4t Cuum slt girps free vidsActress tamil xxxAsian vengenac quotess https://cutt.ly/mUj3Jlu Teen strrap on fucked att gunpointLibrarian audio visul sex story
recklessIdeaws on sexy dares https://bit.ly/33Ltry8 Breast mordgan webbReviews off lumedia fcial brightenerAdult entertainment at residencce https://bit.ly/3xIhQvw Whip mee fujck me suck meTwaat vintage powesred byy
vbulletinGood rule oof thumb forr https://bit.ly/3eLC01R Undcer aage nude
girlsAddult ccam chat livve sexWild turkey breazst
sponge https://bit.ly/2UCSNvW Naksd oder lesbianLinda fleisschmann nudeJessica alba picc nud https://bit.ly/3lhNTxI Shayy loren peeingDicks fucking pussy’sCeleb nudce leeaked https://tinyurl.com/yfu6ms5a Shaton osbourne seex tapeAduot inbome cwre
kirklandMcduffy county gga sex offenders https://bit.ly/3xIEDHI Taylor swit nyde shotTrue blkod sex scene dirtScrreaming squinters orasms https://bit.ly/35ociKI Penis tattoos picsErotic photos of momsMastectom lingerie
https://bit.ly/3w3Qpw6 Kawasqki djsease adultsAmatuer sex
videos nevadaAdul educattion inn buckinghamshkre https://bit.ly/3hsHoqn Female piuss dominationNada
lesbianPeniloe penettration phptos https://tinyurl.com/ykypxg7f Best
teen porn galleryEnchiladas sticfk to bottom of panJapanese porn movies onlkne https://cutt.ly/HUMupVf Sluut deepthroatingSexx linked diseaseEscorts in illinois https://bit.ly/31Ed7AQ Strip offf gameDrunkn ssex
girlsBotgom lihe whats https://bit.ly/3doD89t Sexx slang snowballingAnastasia asian datingWhipp cram bikini pikctures https://bit.ly/2OwrlwZ Teeen ex girlfriend naked1st fuhk flickAmateur lesbiaan videos free https://bit.ly/38wbNQW Janet jones gretzky nude photosAv giurl fuckFrree interjet tv
mac adultt https://tinyurl.com/2hw9aqgw Porn teen anal deepFree sexy
inviteLeabian seductins 29 freeIddeal wire strippper 8 gaugeNked armadillosXvideos speedy getting
fuckedSexy girls pussay lipsEscort passport 7500s radar/laser detectorExtasia erotic storysNaked anime
girls amesAmateur adullt viideo sharingMy mmom fuck blackzillaCudtom slae 01 henntai
megapornMaan sportss pic nakedAqua tedn hunger frce czrl washAgainst book
knnowing taboo vintfage whoSea kep facdial skin carre
productsBlwck woman inn tong bikiniDoggie style fucking free videoAmateur housewives nude picturesCoed aked changing rooms storiesBlafk
sexy pic africa nudeDildo loving babesTranny seex in sydneyDavied beckhm nudeJenifer
love hewit nude with bunnyFrre debbie nude picsGay handjbs
xxx videosAriksto escortsSsanna holmes shemae freeAdult cluub nashvilleRamuan pembesar penisReal fraqnce sezy wifesMother daugther iin pantyhosePhiladelphia bondage roomsBoyss sjck hyge dicksUssed shemale pantiesUpward curve penisAebn gallery gayMillf with 58 inch
hipsNude australian celebs freeAdult sex dating in robbinsville new jerseyZuzzna nude rolck hardCelb
porn movies download free mpegAgilera christina fuck suckSlut
bangNudee tubingBikini hip hollowDetermining thee
seex off emusScarlett johansson nude new movie
ursodiol 150mg without prescription actigall 150mg uk order generic zyrtec
farmacia online internacional farmacia envГos internacionales or farmacias online baratas
http://www.romeoumc.com/System/Login.asp?id=37949&Referer=https://farmacia.best farmacia online envГo gratis
farmacia online envГo gratis valencia farmacias online baratas and farmacia online barata y fiable farmacia envГos internacionales
farmacia online envГo gratis farmacia online internacional or farmacia online 24 horas
https://maps.google.dm/url?q=https://kamagraes.site farmacia online internacional
farmacias online seguras en espaГ±a п»їfarmacia online and farmacias online seguras farmacia online envГo gratis
https://vardenafilo.icu/# farmacia 24h
farmacias online seguras comprar cialis online seguro opiniones farmacia online barata
Эффективное тепловая изоляция обшивки — радость и экономическая выгода в семейном жилище!
Согласитесь, ваш недвижимость заслуживает наилучшего! Изоляция облицовки – не исключительно решение для экономии на отоплении, это вложение в комфорт и долгосрочность вашего жилья.
✨ Почему изоляция с нами-специалистами?
Мастерство: Наши специалисты – компетентные. Мы все заботимся о каждой отдельной, чтобы обеспечить вашему жилищу идеальное термоизоляция.
Стоимость воздухонепроницаемости: Мы все ценим ваш бюджетные ограничения. Утепление фасада дома снаружи цена москва – начиная с 1350 руб./кв.м. Это вложение капитала в ваше удовлетворительное будущее!
Сбережение энергии: Забудьте о термических потерях! Наша технология не только сохраняют тепловой микроклимат, но и дарят вашему домовладению новый качество энергоэффективности.
Создайте свой дом уютным и стильным и привлекательным!
Подробнее на http://n-dom.ru
Не передавайте свой жилище на произвол судьбы. Доверьтесь нашей бригаде и создайте уют вместе с нашей командой!
https://farmacia.best/# farmacia online envГo gratis
buy atomoxetine pills order strattera 10mg generic order zoloft generic
farmacia envГos internacionales Levitra Bayer п»їfarmacia online
https://medium.com/@BarrNehemi89789/сервер-linux-выделенный-с-10-gbps-21368b552460
https://medium.com/@DSanford19674/экономьте-на-vds-linux-с-ssd-прокси-и-выделенным-хранилищем-e7b3b675b4fe
https://medium.com/@hanna78332/vdsina-на-linux-с-выделенным-хранилищем-205de53667d6
https://medium.com/@RyanBond1678990/дешевый-выделенный-сервер-на-vdsina-с-бесплатным-хостингом-7f9eef21a0d4
https://medium.com/@DorseyLero21528/дешевый-vds-на-linux-с-выделенным-ssd-накопителем-и-прокси-5b65b1d04202
VPS SERVER
Высокоскоростной доступ в Интернет: до 1000 Мбит/с
Скорость подключения к Интернету — еще один важный фактор для успеха вашего проекта. Наши VPS/VDS-серверы, адаптированные как под Windows, так и под Linux, обеспечивают доступ в Интернет со скоростью до 1000 Мбит/с, что гарантирует быструю загрузку веб-страниц и высокую производительность онлайн-приложений на обеих операционных системах.
п»їfarmacia online п»їfarmacia online or farmacias online seguras en espaГ±a
https://maps.google.com.eg/url?sa=t&url=https://kamagraes.site farmacia online madrid
farmacia online internacional farmacia 24h and farmacia 24h п»їfarmacia online
viagra online cerca de zaragoza viagra online cerca de bilbao or comprar viagra en espaГ±a envio urgente contrareembolso
http://www.marineclick.com/redirect.php?redir=sildenafilo.store viagra para mujeres
viagra para hombre precio farmacias similares sildenafilo 100mg precio farmacia and comprar viagra en espaГ±a envio urgente contrareembolso comprar viagra en espaГ±a envio urgente
farmacias baratas online envГo gratis farmacias online baratas or farmacias baratas online envГo gratis
https://images.google.lk/url?q=https://kamagraes.site farmacias online seguras
farmacia online barata farmacia barata and farmacias online baratas farmacia barata
https://farmacia.best/# farmacia online 24 horas
farmacia online envГo gratis farmacia online barata y fiable or gran farmacia online
https://gozoom.com/redirect?id=01e072cdf8f56ca8057df3ac338026f5&userId=&target=2&url=http://farmacia.best farmacia online envГo gratis
farmacia online 24 horas farmacia online internacional and farmacia online barata y fiable farmacias online baratas
farmacias online baratas farmacias online baratas or farmacias online seguras en espaГ±a
https://www.google.co.ve/url?sa=t&url=https://kamagraes.site farmacias baratas online envГo gratis
farmacia online 24 horas farmacia barata and п»їfarmacia online farmacia 24h
Are you searching for VIP Escort In Ahmedabad Find out your companion escort only here at Aditi Patel Escort Services – Available 24/7 for Incall and Outcalls Call Girls in Ahmedabad.
https://www.aditipatelescort.com/call-girl-ahmedabad.html
combivent without prescription order dexona pill cheap linezolid
pharmacie ouverte Pharmacie en ligne livraison rapide Pharmacie en ligne livraison rapide
Pharmacie en ligne livraison rapide: pharmacie en ligne sans ordonnance – Pharmacie en ligne pas cher
Pharmacie en ligne pas cher tadalafil Pharmacie en ligne livraison gratuite
pharmacie ouverte: levitra generique – Pharmacie en ligne livraison gratuite
Pharmacies en ligne certifiГ©es Pharmacie en ligne livraison gratuite or Pharmacie en ligne livraison 24h
http://www.b08.com/tools/domaininfo.php?domain=kamagrafr.icu Pharmacie en ligne sans ordonnance
Pharmacie en ligne livraison 24h Acheter mГ©dicaments sans ordonnance sur internet and acheter mГ©dicaments Г l’Г©tranger Acheter mГ©dicaments sans ordonnance sur internet
buy clavulanate medication clomiphene pills cost clomid
Pharmacie en ligne fiable Pharmacie en ligne pas cher or Pharmacie en ligne livraison gratuite
https://www.google.com.cu/url?q=https://pharmacieenligne.guru Pharmacie en ligne sans ordonnance
Pharmacie en ligne livraison rapide Pharmacie en ligne livraison 24h and Pharmacie en ligne France Acheter mГ©dicaments sans ordonnance sur internet
Pharmacie en ligne livraison rapide Acheter Cialis 20 mg pas cher Pharmacie en ligne livraison 24h
п»їpharmacie en ligne: achat kamagra – pharmacie ouverte 24/24
Viagra sans ordonnance livraison 24h Viagra homme prix en pharmacie sans ordonnance or SildГ©nafil 100 mg sans ordonnance
http://www.boosterforum.com/vote-374818-217976.html?adresse=viagrasansordonnance.store&popup=1 Meilleur Viagra sans ordonnance 24h
Viagra femme ou trouver Viagra Pfizer sans ordonnance and Quand une femme prend du Viagra homme Viagra homme prix en pharmacie sans ordonnance
starlix cost how to buy captopril atacand 8mg oral
Pharmacie en ligne livraison rapide kamagra en ligne Pharmacie en ligne pas cher
Pharmacie en ligne livraison gratuite: achat kamagra – Pharmacie en ligne pas cher
Pharmacie en ligne sans ordonnance Pharmacie en ligne sans ordonnance or Pharmacie en ligne pas cher
https://www.techjobscafe.com/goto.php?s=Top&goto=https://kamagrafr.icu Pharmacie en ligne sans ordonnance
acheter medicament a l etranger sans ordonnance Pharmacie en ligne fiable and Pharmacies en ligne certifiГ©es acheter medicament a l etranger sans ordonnance
https://cialiskaufen.pro/# online apotheke versandkostenfrei
https://cialiskaufen.pro/# online apotheke gГјnstig
cheap vardenafil order plaquenil generic plaquenil buy online
versandapotheke deutschland п»їonline apotheke or gГјnstige online apotheke
https://toolbarqueries.google.com.pr/url?q=https://apotheke.company internet apotheke
online apotheke deutschland internet apotheke and online apotheke versandkostenfrei internet apotheke
http://cialiskaufen.pro/# online-apotheken
online apotheke preisvergleich: online apotheke deutschland – online-apotheken
buy cheap generic tegretol buy ciprofloxacin no prescription lincomycin 500mg cost
http://apotheke.company/# versandapotheke versandkostenfrei
versandapotheke deutschland versandapotheke deutschland or internet apotheke
https://cse.google.ad/url?sa=i&url=https://kamagrakaufen.top online apotheke gГјnstig
versandapotheke deutschland versandapotheke deutschland and versandapotheke online apotheke deutschland
online apotheke preisvergleich versandapotheke or online apotheke preisvergleich
https://www.google.com.sa/url?q=https://cialiskaufen.pro versandapotheke versandkostenfrei
п»їonline apotheke online apotheke versandkostenfrei and versandapotheke deutschland versandapotheke deutschland
http://viagrakaufen.store/# Viagra Generika online kaufen ohne Rezept
https://apotheke.company/# online apotheke deutschland
I do agree with all of the concepts you’ve introduced for your post. They are very convincing and can certainly work. Still, the posts are too brief for starters. May just you please prolong them a little from subsequent time? Thanks for the post.
gГјnstige online apotheke: cialis kaufen – online apotheke preisvergleich
order cenforce 50mg online cheap purchase cenforce pill oral glucophage 500mg
online apotheke preisvergleich gГјnstige online apotheke or online apotheke deutschland
https://www.kingswelliesnursery.com/?URL=https://apotheke.company online-apotheken
gГјnstige online apotheke versandapotheke deutschland and online apotheke versandkostenfrei versandapotheke versandkostenfrei
https://potenzmittel.men/# versandapotheke
https://cialiskaufen.pro/# online-apotheken
https://mexicanpharmacy.cheap/# purple pharmacy mexico price list
mexican drugstore online buying prescription drugs in mexico buying prescription drugs in mexico
https://mexicanpharmacy.cheap/# buying prescription drugs in mexico online
http://mexicanpharmacy.cheap/# reputable mexican pharmacies online
purchase duricef sale buy combivir pills brand lamivudine
lipitor 40mg sale zestril 5mg cheap purchase prinivil without prescription
mexican drugstore online mexican mail order pharmacies best online pharmacies in mexico
http://mexicanpharmacy.cheap/# purple pharmacy mexico price list
http://mexicanpharmacy.cheap/# medication from mexico pharmacy
mexico pharmacies prescription drugs buying from online mexican pharmacy or mexican pharmaceuticals online
http://www.google.com.bn/url?sa=t&url=https://mexicanpharmacy.cheap mexican pharmaceuticals online
mexican online pharmacies prescription drugs reputable mexican pharmacies online and mexican pharmacy mexican drugstore online
http://mexicanpharmacy.cheap/# mexican pharmaceuticals online
Epidemics and Pandemics – Lessons from History over the counter viagra at walmart
mexican pharmaceuticals online medication from mexico pharmacy or medicine in mexico pharmacies
http://images.google.ee/url?q=https://mexicanpharmacy.cheap mexican drugstore online
mexican rx online mexican pharmaceuticals online and mexican rx online mexico drug stores pharmacies
Абузоустойчивый серверы, идеально подходит для работы програмным обеспечением как XRumer так и GSA
Стабильная работа без сбоев, высокая поточность несравнима с провайдерами в квартире или офисе, где есть ограничение.
Высокоскоростной Интернет: До 1000 Мбит/с
Скорость интернет-соединения – еще один важный параметр для успешной работы вашего проекта. Наши VPS/VDS серверы, поддерживающие Windows и Linux, обеспечивают доступ к интернету со скоростью до 1000 Мбит/с, обеспечивая быструю загрузку веб-страниц и высокую производительность онлайн-приложений.
https://mexicanpharmacy.cheap/# medication from mexico pharmacy
mexico pharmacies prescription drugs mexican rx online or reputable mexican pharmacies online
https://images.google.com.vn/url?sa=t&url=https://mexicanpharmacy.cheap buying prescription drugs in mexico
buying prescription drugs in mexico buying prescription drugs in mexico and п»їbest mexican online pharmacies mexico drug stores pharmacies
mexican online pharmacies prescription drugs buying from online mexican pharmacy mexican online pharmacies prescription drugs
https://mexicanpharmacy.cheap/# pharmacies in mexico that ship to usa
cheap cabergoline cabergoline 0.25mg over the counter order priligy 60mg without prescription
canadian pharmacy no rx needed pet meds without vet prescription canada – legitimate canadian pharmacy canadiandrugs.tech
herbal ed treatment ed pills online – erectile dysfunction drugs edpills.tech
http://canadapharmacy.guru/# canadianpharmacy com canadapharmacy.guru
medrol tablets buy generic desloratadine over the counter clarinex 5mg ca
canadian pharmacy 1 internet online drugstore onlinepharmaciescanada com – online canadian pharmacy review canadiandrugs.tech
オンラインカジノとオンラインギャンブルの現代的展開
オンラインカジノの世界は、技術の進歩と共に急速に進化しています。これらのプラットフォームは、従来の実際のカジノの体験をデジタル空間に移し、プレイヤーに新しい形式の娯楽を提供しています。オンラインカジノは、スロットマシン、ポーカー、ブラックジャック、ルーレットなど、さまざまなゲームを提供しており、実際のカジノの興奮を維持しながら、アクセスの容易さと利便性を提供します。
一方で、オンラインギャンブルは、より広範な概念であり、スポーツベッティング、宝くじ、バーチャルスポーツ、そしてオンラインカジノゲームまでを含んでいます。インターネットとモバイルテクノロジーの普及により、オンラインギャンブルは世界中で大きな人気を博しています。オンラインプラットフォームは、伝統的な賭博施設に比べて、より多様なゲーム選択、便利なアクセス、そしてしばしば魅力的なボーナスやプロモーションを提供しています。
安全性と規制
オンラインカジノとオンラインギャンブルの世界では、安全性と規制が非常に重要です。多くの国々では、オンラインギャンブルを規制する法律があり、安全なプレイ環境を確保するためのライセンスシステムを設けています。これにより、不正行為や詐欺からプレイヤーを守るとともに、責任ある賭博の促進が図られています。
技術の進歩
最新のテクノロジーは、オンラインカジノとオンラインギャンブルの体験を一層豊かにしています。例えば、仮想現実(VR)技術の使用は、プレイヤーに没入型のギャンブル体験を提供し、実際のカジノにいるかのような感覚を生み出しています。また、ブロックチェーン技術の導入は、より透明で安全な取引を可能にし、プレイヤーの信頼を高めています。
未来への展望
オンラインカジノとオンラインギャンブルは、今後も技術の進歩とともに進化し続けるでしょう。人工知能(AI)の更なる統合、モバイル技術の発展、さらには新しいゲームの創造により、この分野は引き続き成長し、世界中のプレイヤーに新しい娯楽の形を提供し続けることでしょう。
この記事では、オンラインカジノとオンラインギャンブルの現状、安全性、技術の影響、そして将来の展望に焦点を当てています。この分野は、技術革新によって絶えず変化し続ける魅力的な領域です。
tai game hitclub
Tải Hit Club iOS
Tải Hit Club iOSHIT CLUBHit Club đã sáng tạo ra một giao diện game đẹp mắt và hoàn thiện, lấy cảm hứng từ các cổng casino trực tuyến chất lượng từ cổ điển đến hiện đại. Game mang lại sự cân bằng và sự kết hợp hài hòa giữa phong cách sống động của sòng bạc Las Vegas và phong cách chân thực. Tất cả các trò chơi đều được bố trí tinh tế và hấp dẫn với cách bố trí game khoa học và logic giúp cho người chơi có được trải nghiệm chơi game tốt nhất.
Hit Club – Cổng Game Đổi Thưởng
Trên trang chủ của Hit Club, người chơi dễ dàng tìm thấy các game bài, tính năng hỗ trợ và các thao tác để rút/nạp tiền cùng với cổng trò chuyện trực tiếp để được tư vấn. Giao diện game mang lại cho người chơi cảm giác chân thật và thoải mái nhất, giúp người chơi không bị mỏi mắt khi chơi trong thời gian dài.
Hướng Dẫn Tải Game Hit Club
Bạn có thể trải nghiệm Hit Club với 2 phiên bản: Hit Club APK cho thiết bị Android và Hit Club iOS cho thiết bị như iPhone, iPad.
Tải ứng dụng game:
Click nút tải ứng dụng game ở trên (phiên bản APK/Android hoặc iOS tùy theo thiết bị của bạn).
Chờ cho quá trình tải xuống hoàn tất.
Cài đặt ứng dụng:
Khi quá trình tải xuống hoàn tất, mở tệp APK hoặc iOS và cài đặt ứng dụng trên thiết bị của bạn.
Bắt đầu trải nghiệm:
Mở ứng dụng và bắt đầu trải nghiệm Hit Club.
Với Hit Club, bạn sẽ khám phá thế giới game đỉnh cao với giao diện đẹp mắt và trải nghiệm chơi game tuyệt vời. Hãy tải ngay để tham gia vào cuộc phiêu lưu casino độc đáo và đầy hứng khởi!
canadian pharmacy online store canadian drugs online – best rated canadian pharmacy canadiandrugs.tech
cytotec for sale buy cytotec without a prescription buy diltiazem online cheap
my canadian pharmacy review canada pharmacy world or canadian pharmacy price checker
https://maps.google.pt/url?q=https://canadiandrugs.tech canadadrugpharmacy com
ordering drugs from canada adderall canadian pharmacy and the canadian drugstore canada drugs online reviews
п»їlegitimate online pharmacies india pharmacy website india or top 10 pharmacies in india
https://www.google.com.eg/url?q=https://indiapharmacy.pro best online pharmacy india
=side+effects+of+sildenafil]reputable indian online pharmacy cheapest online pharmacy india and top online pharmacy india indianpharmacy com
best male enhancement pills best erectile dysfunction pills or best ed treatment
https://www.google.vu/url?q=https://edpills.tech pills erectile dysfunction
medication for ed dysfunction ed meds online and buy ed pills online ed medication online
ed medication medicine for erectile – new ed treatments edpills.tech
http://mexicanpharmacy.company/# mexican online pharmacies prescription drugs mexicanpharmacy.company
hit club
Tải Hit Club iOS
Tải Hit Club iOSHIT CLUBHit Club đã sáng tạo ra một giao diện game đẹp mắt và hoàn thiện, lấy cảm hứng từ các cổng casino trực tuyến chất lượng từ cổ điển đến hiện đại. Game mang lại sự cân bằng và sự kết hợp hài hòa giữa phong cách sống động của sòng bạc Las Vegas và phong cách chân thực. Tất cả các trò chơi đều được bố trí tinh tế và hấp dẫn với cách bố trí game khoa học và logic giúp cho người chơi có được trải nghiệm chơi game tốt nhất.
Hit Club – Cổng Game Đổi Thưởng
Trên trang chủ của Hit Club, người chơi dễ dàng tìm thấy các game bài, tính năng hỗ trợ và các thao tác để rút/nạp tiền cùng với cổng trò chuyện trực tiếp để được tư vấn. Giao diện game mang lại cho người chơi cảm giác chân thật và thoải mái nhất, giúp người chơi không bị mỏi mắt khi chơi trong thời gian dài.
Hướng Dẫn Tải Game Hit Club
Bạn có thể trải nghiệm Hit Club với 2 phiên bản: Hit Club APK cho thiết bị Android và Hit Club iOS cho thiết bị như iPhone, iPad.
Tải ứng dụng game:
Click nút tải ứng dụng game ở trên (phiên bản APK/Android hoặc iOS tùy theo thiết bị của bạn).
Chờ cho quá trình tải xuống hoàn tất.
Cài đặt ứng dụng:
Khi quá trình tải xuống hoàn tất, mở tệp APK hoặc iOS và cài đặt ứng dụng trên thiết bị của bạn.
Bắt đầu trải nghiệm:
Mở ứng dụng và bắt đầu trải nghiệm Hit Club.
Với Hit Club, bạn sẽ khám phá thế giới game đỉnh cao với giao diện đẹp mắt và trải nghiệm chơi game tuyệt vời. Hãy tải ngay để tham gia vào cuộc phiêu lưu casino độc đáo và đầy hứng khởi!
nootropil over the counter betnovate 20gm sale buy generic anafranil online
Tải Hit Club iOS
Tải Hit Club iOSHIT CLUBHit Club đã sáng tạo ra một giao diện game đẹp mắt và hoàn thiện, lấy cảm hứng từ các cổng casino trực tuyến chất lượng từ cổ điển đến hiện đại. Game mang lại sự cân bằng và sự kết hợp hài hòa giữa phong cách sống động của sòng bạc Las Vegas và phong cách chân thực. Tất cả các trò chơi đều được bố trí tinh tế và hấp dẫn với cách bố trí game khoa học và logic giúp cho người chơi có được trải nghiệm chơi game tốt nhất.
Hit Club – Cổng Game Đổi Thưởng
Trên trang chủ của Hit Club, người chơi dễ dàng tìm thấy các game bài, tính năng hỗ trợ và các thao tác để rút/nạp tiền cùng với cổng trò chuyện trực tiếp để được tư vấn. Giao diện game mang lại cho người chơi cảm giác chân thật và thoải mái nhất, giúp người chơi không bị mỏi mắt khi chơi trong thời gian dài.
Hướng Dẫn Tải Game Hit Club
Bạn có thể trải nghiệm Hit Club với 2 phiên bản: Hit Club APK cho thiết bị Android và Hit Club iOS cho thiết bị như iPhone, iPad.
Tải ứng dụng game:
Click nút tải ứng dụng game ở trên (phiên bản APK/Android hoặc iOS tùy theo thiết bị của bạn).
Chờ cho quá trình tải xuống hoàn tất.
Cài đặt ứng dụng:
Khi quá trình tải xuống hoàn tất, mở tệp APK hoặc iOS và cài đặt ứng dụng trên thiết bị của bạn.
Bắt đầu trải nghiệm:
Mở ứng dụng và bắt đầu trải nghiệm Hit Club.
Với Hit Club, bạn sẽ khám phá thế giới game đỉnh cao với giao diện đẹp mắt và trải nghiệm chơi game tuyệt vời. Hãy tải ngay để tham gia vào cuộc phiêu lưu casino độc đáo và đầy hứng khởi!
オンラインカジノ
オンラインカジノとオンラインギャンブルの現代的展開
オンラインカジノの世界は、技術の進歩と共に急速に進化しています。これらのプラットフォームは、従来の実際のカジノの体験をデジタル空間に移し、プレイヤーに新しい形式の娯楽を提供しています。オンラインカジノは、スロットマシン、ポーカー、ブラックジャック、ルーレットなど、さまざまなゲームを提供しており、実際のカジノの興奮を維持しながら、アクセスの容易さと利便性を提供します。
一方で、オンラインギャンブルは、より広範な概念であり、スポーツベッティング、宝くじ、バーチャルスポーツ、そしてオンラインカジノゲームまでを含んでいます。インターネットとモバイルテクノロジーの普及により、オンラインギャンブルは世界中で大きな人気を博しています。オンラインプラットフォームは、伝統的な賭博施設に比べて、より多様なゲーム選択、便利なアクセス、そしてしばしば魅力的なボーナスやプロモーションを提供しています。
安全性と規制
オンラインカジノとオンラインギャンブルの世界では、安全性と規制が非常に重要です。多くの国々では、オンラインギャンブルを規制する法律があり、安全なプレイ環境を確保するためのライセンスシステムを設けています。これにより、不正行為や詐欺からプレイヤーを守るとともに、責任ある賭博の促進が図られています。
技術の進歩
最新のテクノロジーは、オンラインカジノとオンラインギャンブルの体験を一層豊かにしています。例えば、仮想現実(VR)技術の使用は、プレイヤーに没入型のギャンブル体験を提供し、実際のカジノにいるかのような感覚を生み出しています。また、ブロックチェーン技術の導入は、より透明で安全な取引を可能にし、プレイヤーの信頼を高めています。
未来への展望
オンラインカジノとオンラインギャンブルは、今後も技術の進歩とともに進化し続けるでしょう。人工知能(AI)の更なる統合、モバイル技術の発展、さらには新しいゲームの創造により、この分野は引き続き成長し、世界中のプレイヤーに新しい娯楽の形を提供し続けることでしょう。
この記事では、オンラインカジノとオンラインギャンブルの現状、安全性、技術の影響、そして将来の展望に焦点を当てています。この分野は、技術革新によって絶えず変化し続ける魅力的な領域です。
Посоветуйте VPS
Абузоустойчивый сервер для работы с Хрумером, GSA и всевозможными скриптами!
Есть дополнительная системах скидок, читайте описание в разделе оплата
Высокоскоростной Интернет: До 1000 Мбит/с
Скорость Интернет-соединения – еще один ключевой фактор для успешной работы вашего проекта. Наши VPS/VDS серверы, поддерживающие Windows и Linux, обеспечивают доступ к интернету со скоростью до 1000 Мбит/с, гарантируя быструю загрузку веб-страниц и высокую производительность онлайн-приложений на обеих операционных системах.
Воспользуйтесь нашим предложением VPS/VDS серверов и обеспечьте стабильность и производительность вашего проекта. Посоветуйте VPS – ваш путь к успешному онлайн-присутствию!
treatment of ed treatment for ed – erection pills viagra online edpills.tech
best online pharmacy india online pharmacy india – canadian pharmacy india indiapharmacy.guru
zovirax tablet crestor 10mg cheap cheap crestor
indian pharmacy paypal online shopping pharmacy india or indianpharmacy com
http://galaxy-at-fairy.df.ru/phpinfo.php?a=i+want+to+buy+viagra top online pharmacy india
india online pharmacy reputable indian pharmacies and world pharmacy india online shopping pharmacy india
reputable canadian online pharmacy my canadian pharmacy review or canada drugstore pharmacy rx
http://renewable.jp/index.php?a=free_page/goto_mobile&referer=https://canadiandrugs.tech safe canadian pharmacies
canadian pharmacies compare northwest pharmacy canada and canadian pharmacy 1 internet online drugstore canada pharmacy online
Абузоустойчивый сервер для работы с Хрумером, GSA и всевозможными скриптами!
Есть дополнительная системах скидок, читайте описание в разделе оплата
Виртуальные сервера (VPS/VDS) и Дедик Сервер: Оптимальное Решение для Вашего Проекта
В мире современных вычислений виртуальные сервера (VPS/VDS) и дедик сервера становятся ключевыми элементами успешного бизнеса и онлайн-проектов. Выбор оптимальной операционной системы и типа сервера являются решающими шагами в создании надежной и эффективной инфраструктуры. Наши VPS/VDS серверы Windows и Linux, доступные от 13 рублей, а также дедик серверы, предлагают целый ряд преимуществ, делая их неотъемлемыми инструментами для развития вашего проекта.
https://indiapharmacy.pro/# india online pharmacy indiapharmacy.pro
Как включить аппаратную виртуализацию
Абузоустойчивый серверов для Хрумера и GSA AMSTERDAM!!!
Оптимальная Настройка: Включение Аппаратной Виртуализации
При обсуждении виртуальных серверов (VPS/VDS) и дедикатед серверов, важно также уделить внимание оптимальной настройке, включая аппаратную виртуализацию. Этот важный аспект может значительно повлиять на производительность вашего сервера.
Высокоскоростной Интернет: До 1000 Мбит/с
Абузоустойчивые сервера в Амстердаме, они позволят работать с сайтами которые не открываются в РФ, работая Хрумером и GSA пробив намного выше.
Виртуальные сервера (VPS/VDS) и Дедик Сервер: Оптимальное Решение для Вашего Проекта
В мире современных вычислений виртуальные сервера (VPS/VDS) и дедик сервера становятся ключевыми элементами успешного бизнеса и онлайн-проектов. Выбор оптимальной операционной системы и типа сервера являются решающими шагами в создании надежной и эффективной инфраструктуры. Наши VPS/VDS серверы Windows и Linux, доступные от 13 рублей, а также дедик серверы, предлагают целый ряд преимуществ, делая их неотъемлемыми инструментами для развития вашего проекта.
Высокоскоростной Интернет: До 1000 Мбит/с
buy medicines online in india best online pharmacy india – indianpharmacy com indiapharmacy.guru
mens erection pills best ed drugs or mens erection pills
https://ultramar-ti.com/redirect/Index.asp?url=http://edpills.tech best ed pills non prescription
ed pills that really work cheap erectile dysfunction pills online and ed pills cheap ed dysfunction treatment
ed dysfunction treatment medicine erectile dysfunction – new ed treatments edpills.tech
sporanox 100 mg us tindamax for sale buy tindamax sale
Your style is very unique compared to other folks I have read stuff from. Many thanks for posting when you’ve got the opportunity, Guess I’ll just book mark this blog.
https://mexicanpharmacy.company/# mexican online pharmacies prescription drugs mexicanpharmacy.company
ed remedies ed treatment drugs – non prescription ed pills edpills.tech
buy cipro online canada: where can i buy cipro online – buy cipro cheap
http://ciprofloxacin.life/# cipro for sale
buy paxlovid online paxlovid pharmacy buy paxlovid online
Как включить аппаратную виртуализацию
Абузоустойчивый серверов для Хрумера и GSA AMSTERDAM!!!
Высокоскоростной Интернет: До 1000 Мбит/с
Скорость интернет-соединения играет решающую роль в успешной работе вашего проекта. Наши VPS/VDS серверы, поддерживающие Windows и Linux, обеспечивают доступ к интернету со скоростью до 1000 Мбит/с. Это гарантирует быструю загрузку веб-страниц и высокую производительность онлайн-приложений на обеих операционных системах.
Итак, при выборе виртуального выделенного сервера VPS, обеспечьте своему проекту надежность, высокую производительность и защиту от DDoS. Получите доступ к качественной инфраструктуре с поддержкой Windows и Linux уже от 13 рублей
buy zetia 10mg pills buy domperidone 10mg without prescription oral sumycin 500mg
https://agrikesici360.blogspot.com/
Аренда виртуального сервера vps
Абузоустойчивые сервера в Амстердаме, они позволят работать с сайтами которые не открываются в РФ, работая Хрумером и GSA пробив намного выше.
Аренда виртуального сервера (VPS): Эффективность, Надежность и Защита от DDoS от 13 рублей
Выбор виртуального сервера – это важный этап в создании успешной инфраструктуры для вашего проекта. Наши VPS серверы предоставляют аренду как под операционные системы Windows, так и Linux, с доступом к накопителям SSD eMLC. Эти накопители гарантируют высокую производительность и надежность, обеспечивая бесперебойную работу ваших приложений независимо от выбранной операционной системы.
Абузоустойчивый сервер для работы с Хрумером, GSA и всевозможными скриптами!
Есть дополнительная системах скидок, читайте описание в разделе оплата
Высокоскоростной Интернет: До 1000 Мбит/с
Скорость интернет-соединения играет решающую роль в успешной работе вашего проекта. Наши VPS/VDS серверы, поддерживающие Windows и Linux, обеспечивают доступ к интернету со скоростью до 1000 Мбит/с. Это гарантирует быструю загрузку веб-страниц и высокую производительность онлайн-приложений на обеих операционных системах.
Итак, при выборе виртуального выделенного сервера VPS, обеспечьте своему проекту надежность, высокую производительность и защиту от DDoS. Получите доступ к качественной инфраструктуре с поддержкой Windows и Linux уже от 13 рублей
http://clomid.site/# can you get clomid tablets
buy generic zyprexa 10mg nebivolol oral valsartan oral
Аренда мощного дедика (VPS): Абузоустойчивость, Эффективность, Надежность и Защита от DDoS от 13 рублей
Выбор виртуального сервера – это важный этап в создании успешной инфраструктуры для вашего проекта. Наши VPS серверы предоставляют аренду как под операционные системы Windows, так и Linux, с доступом к накопителям SSD eMLC. Эти накопители гарантируют высокую производительность и надежность, обеспечивая бесперебойную работу ваших приложений независимо от выбранной операционной системы.
paxlovid buy Paxlovid over the counter or п»їpaxlovid
http://www.google.me/url?q=https://paxlovid.win paxlovid covid
paxlovid covid Paxlovid over the counter and paxlovid india paxlovid india
ciprofloxacin order online ciprofloxacin mail online or ciprofloxacin generic price
https://www.243ok.com/index.php?a=free_page/goto_mobile&referer=https://ciprofloxacin.life buy ciprofloxacin over the counter
buy generic ciprofloxacin cipro ciprofloxacin and cipro pharmacy ciprofloxacin 500 mg tablet price
Абузоустойчивый сервер для работы с Хрумером, GSA и всевозможными скриптами!
Есть дополнительная системах скидок, читайте описание в разделе оплата
Высокоскоростной Интернет: До 1000 Мбит/с**
Скорость интернет-соединения – еще один важный момент для успешной работы вашего проекта. Наши VPS серверы, арендуемые под Windows и Linux, предоставляют доступ к интернету со скоростью до 1000 Мбит/с, обеспечивая быструю загрузку веб-страниц и высокую производительность онлайн-приложений на обеих операционных системах.
http://amoxil.icu/# amoxicillin 500mg cost
buy clomid pills: cheap clomid prices – how can i get generic clomid without prescription
http://amoxil.icu/# amoxicillin canada price
buy cipro cheap ciprofloxacin 500mg buy online buy ciprofloxacin over the counter
https://clomid.site/# how can i get clomid price
I don’t know whether it’s just me or if perhaps everybody
else encountering problems with your site. It appears like some of the written text in your content are running
off the screen. Can someone else please provide feedback and let me know if this is happening to them
as well? This might be a problem with my internet browser because I’ve had this
happen before. Cheers
п»їcipro generic: buy ciprofloxacin – buy cipro online
http://clomid.site/# where can i buy clomid prices
Paxlovid over the counter paxlovid pharmacy paxlovid india
steroids prednisone for sale buy prednisone 10 mg or how to buy prednisone online
https://maps.google.cv/url?q=https://prednisone.bid prednisone 10mg tablet cost
prednisone 10mg canada can i buy prednisone over the counter in usa and prednisone cost 10mg prednisone 10 tablet
Paxlovid buy online paxlovid price or paxlovid buy
https://maps.google.ne/url?q=https://paxlovid.win paxlovid pharmacy
paxlovid generic buy paxlovid online and paxlovid cost without insurance paxlovid generic
Мощный дедик
Аренда мощного дедика (VPS): Абузоустойчивость, Эффективность, Надежность и Защита от DDoS от 13 рублей
В современном мире онлайн-проекты нуждаются в надежных и производительных серверах для бесперебойной работы. И здесь на помощь приходят мощные дедики, которые обеспечивают и высокую производительность, и защищенность от атак DDoS. Компания “Название” предлагает VPS/VDS серверы, работающие как на Windows, так и на Linux, с доступом к накопителям SSD eMLC — это значительно улучшает работу и надежность сервера.
purchase cipro where can i buy cipro online or п»їcipro generic
http://www.pinknotora.net/link/?http://ciprofloxacin.life cipro online no prescription in the usa
buy generic ciprofloxacin cipro ciprofloxacin and ciprofloxacin ciprofloxacin 500 mg tablet price
where can i buy colchicine cost colcrys buy methotrexate 2.5mg online
п»їcipro generic: cipro pharmacy – ciprofloxacin over the counter
https://paxlovid.win/# Paxlovid over the counter
order clomid price buying clomid without prescription how can i get cheap clomid without prescription
ciprofloxacin mail online: buy ciprofloxacin – ciprofloxacin 500 mg tablet price
https://clomid.site/# buy cheap clomid price
Дедик сервер
Абузоустойчивый сервер для работы с Хрумером, GSA и всевозможными скриптами!
Есть дополнительная системах скидок, читайте описание в разделе оплата
Виртуальные сервера (VPS/VDS) и Дедик Сервер: Оптимальное Решение для Вашего Проекта
В мире современных вычислений виртуальные сервера (VPS/VDS) и дедик сервера становятся ключевыми элементами успешного бизнеса и онлайн-проектов. Выбор оптимальной операционной системы и типа сервера являются решающими шагами в создании надежной и эффективной инфраструктуры. Наши VPS/VDS серверы Windows и Linux, доступные от 13 рублей, а также дедик серверы, предлагают целый ряд преимуществ, делая их неотъемлемыми инструментами для развития вашего проекта.
generic name for allergy pills order promethazine online cheap major brand allergy pills
prednisone 40 mg daily: prednisone 5 mg cheapest – prednisone pills 10 mg
https://ciprofloxacin.life/# ciprofloxacin over the counter
where can i get clomid prices: where buy generic clomid price – can you get generic clomid for sale
abdominal pain imediate relief zyloprim where to buy
посоветуйте vps
осоветуйте vps
Абузоустойчивый сервер для работы с Хрумером и GSA и различными скриптами!
Есть дополнительная системах скидок, читайте описание в разделе оплата
Виртуальные сервера VPS/VDS и Дедик Сервер: Оптимальное Решение для Вашего Проекта
В мире современных вычислений виртуальные сервера VPS/VDS и дедик сервера становятся ключевыми элементами успешного бизнеса и онлайн-проектов. Выбор оптимальной операционной системы и типа сервера являются решающими шагами в создании надежной и эффективной инфраструктуры. Наши VPS/VDS серверы Windows и Linux, доступные от 13 рублей, а также дедик серверы, предлагают целый ряд преимуществ, делая их неотъемлемыми инструментами для развития вашего проекта.
民調
民意調查
民意調查是什麼?民調什麼意思?
民意調查又稱為輿論調查或民意測驗,簡稱民調。一般而言,民調是一種為了解公眾對某些政治、社會問題與政策的意見和態度,由專業民調公司或媒體進行的調查方法。
目的在於通過網路、電話、或書面等媒介,對大量樣本的問卷調查抽樣,利用統計學的抽樣理論來推斷較為客觀,且能較為精確地推論社會輿論或民意動向的一種方法。
以下是民意調查的一些基本特點和重要性:
抽樣:由於不可能向每一個人詢問意見,所以調查者會選擇一個代表性的樣本進行調查。這樣本的大小和抽樣方法都會影響調查的準確性和可靠性。
問卷設計:為了確保獲得可靠的結果,問卷必須經過精心設計,問題要清晰、不帶偏見,且易於理解。
數據分析:收集到的數據將被分析以得出結論。這可能包括計算百分比、平均值、標準差等,以及更複雜的統計分析。
多種用途:民意調查可以用於各種目的,包括政策制定、選舉預測、市場研究、社會科學研究等。
限制:雖然民意調查是一個有價值的工具,但它也有其限制。例如,樣本可能不完全代表目標人群,或者問卷的設計可能導致偏見。
影響決策:民意調查的結果常常被政府、企業和其他組織用來影響其決策。
透明度和誠實:為了維護調查的可信度,調查組織應該提供其調查方法、樣本大小、抽樣方法和可能的誤差範圍等詳細資訊。
民調是怎麼調查的?
民意調查(輿論調查)的意義是指為瞭解大多數民眾的看法、意見、利益與需求,以科學、系統與公正的資料,蒐集可以代表全部群眾(母體)的部分群眾(抽樣),設計問卷題目後,以人工或電腦詢問部分民眾對特定議題的看法與評價,利用抽樣出來部分民眾的意見與看法,來推論目前全部民眾的意見與看法,藉以衡量社會與政治的狀態。
以下是進行民調調查的基本步驟:
定義目標和目的:首先,調查者需要明確調查的目的。是要了解公眾對某個政策的看法?還是要評估某個政治候選人的支持率?
設計問卷:根據調查目的,研究者會設計一份問卷。問卷應該包含清晰、不帶偏見的問題,並避免導向性的語言。
選擇樣本:因為通常不可能調查所有人,所以會選擇一部分人作為代表。這部分人被稱為“樣本”。最理想的情況是使用隨機抽樣,以確保每個人都有被選中的機會。
收集數據:有多種方法可以收集數據,如面對面訪問、電話訪問、郵件調查或在線調查。
數據分析:一旦數據被收集,研究者會使用統計工具和技術進行分析,得出結論或洞見。
報告結果:分析完數據後,研究者會編寫報告或發布結果。報告通常會提供調查方法、樣本大小、誤差範圍和主要發現。
解釋誤差範圍:多數民調報告都會提供誤差範圍,例如“±3%”。這表示實際的結果有可能在報告結果的3%範圍內上下浮動。
民調調查的質量和可信度很大程度上取決於其設計和實施的方法。若是由專業和無偏見的組織進行,且使用科學的方法,那麼民調結果往往較為可靠。但即使是最高質量的民調也會有一定的誤差,因此解讀時應保持批判性思考。
為什麼要做民調?
民調提供了一種系統性的方式來了解大眾的意見、態度和信念。進行民調的原因多種多樣,以下是一些主要的動機:
政策制定和評估:政府和政策制定者進行民調,以了解公眾對某一議題或政策的看法。這有助於制定或調整政策,以反映大眾的需求和意見。
選舉和政治活動:政黨和候選人通常使用民調來評估自己在選舉中的地位,了解哪些議題對選民最重要,以及如何調整策略以吸引更多支持。
市場研究:企業和組織進行民調以了解消費者對產品、服務或品牌的態度,從而制定或調整市場策略。
社會科學研究:學者和研究者使用民調來了解人們的社會、文化和心理特征,以及其與行為的關係。
公眾與媒體的期望:民調提供了一種方式,使公眾、政府和企業得以了解社會的整體趨勢和態度。媒體也經常報導民調結果,提供公眾對當前議題的見解。
提供反饋和評估:無論是企業還是政府,都可以透過民調了解其表現、服務或政策的效果,並根據反饋進行改進。
預測和趨勢分析:民調可以幫助預測某些趨勢或行為的未來發展,如選舉結果、市場需求等。
教育和提高公眾意識:通過進行和公布民調,可以促使公眾對某一議題或問題有更深入的了解和討論。
民調可信嗎?
民意調查的結果數據隨處可見,尤其是政治性民調結果幾乎可說是天天在新聞上放送,對總統的滿意度下降了多少百分比,然而大家又信多少?
在景美市場的訪問中,我們了解到民眾對民調有一些普遍的觀點。大多數受訪者表示,他們對民調的可信度存有疑慮,主要原因是他們擔心政府可能會在調查中進行操控,以符合特定政治目標。
受訪者還提到,民意調查的結果通常不會對他們的投票意願產生影響。換句話說,他們的選擇通常受到更多因素的影響,例如候選人的政策立場和政府做事的認真與否,而不是單純依賴民調結果。
從訪問中我們可以得出的結論是,大多數民眾對民調持謹慎態度,並認為它們對他們的投票決策影響有限。
zithromax 250 price: can i buy zithromax over the counter – zithromax 1000 mg pills
http://lisinoprilbestprice.store/# buy prinivil online
I think the admin of this site is genuinely working hard in favor of his website, since here every stuff is quality based data.
民調
民意調查是什麼?民調什麼意思?
民意調查又稱為輿論調查或民意測驗,簡稱民調。一般而言,民調是一種為了解公眾對某些政治、社會問題與政策的意見和態度,由專業民調公司或媒體進行的調查方法。
目的在於通過網路、電話、或書面等媒介,對大量樣本的問卷調查抽樣,利用統計學的抽樣理論來推斷較為客觀,且能較為精確地推論社會輿論或民意動向的一種方法。
以下是民意調查的一些基本特點和重要性:
抽樣:由於不可能向每一個人詢問意見,所以調查者會選擇一個代表性的樣本進行調查。這樣本的大小和抽樣方法都會影響調查的準確性和可靠性。
問卷設計:為了確保獲得可靠的結果,問卷必須經過精心設計,問題要清晰、不帶偏見,且易於理解。
數據分析:收集到的數據將被分析以得出結論。這可能包括計算百分比、平均值、標準差等,以及更複雜的統計分析。
多種用途:民意調查可以用於各種目的,包括政策制定、選舉預測、市場研究、社會科學研究等。
限制:雖然民意調查是一個有價值的工具,但它也有其限制。例如,樣本可能不完全代表目標人群,或者問卷的設計可能導致偏見。
影響決策:民意調查的結果常常被政府、企業和其他組織用來影響其決策。
透明度和誠實:為了維護調查的可信度,調查組織應該提供其調查方法、樣本大小、抽樣方法和可能的誤差範圍等詳細資訊。
民調是怎麼調查的?
民意調查(輿論調查)的意義是指為瞭解大多數民眾的看法、意見、利益與需求,以科學、系統與公正的資料,蒐集可以代表全部群眾(母體)的部分群眾(抽樣),設計問卷題目後,以人工或電腦詢問部分民眾對特定議題的看法與評價,利用抽樣出來部分民眾的意見與看法,來推論目前全部民眾的意見與看法,藉以衡量社會與政治的狀態。
以下是進行民調調查的基本步驟:
定義目標和目的:首先,調查者需要明確調查的目的。是要了解公眾對某個政策的看法?還是要評估某個政治候選人的支持率?
設計問卷:根據調查目的,研究者會設計一份問卷。問卷應該包含清晰、不帶偏見的問題,並避免導向性的語言。
選擇樣本:因為通常不可能調查所有人,所以會選擇一部分人作為代表。這部分人被稱為“樣本”。最理想的情況是使用隨機抽樣,以確保每個人都有被選中的機會。
收集數據:有多種方法可以收集數據,如面對面訪問、電話訪問、郵件調查或在線調查。
數據分析:一旦數據被收集,研究者會使用統計工具和技術進行分析,得出結論或洞見。
報告結果:分析完數據後,研究者會編寫報告或發布結果。報告通常會提供調查方法、樣本大小、誤差範圍和主要發現。
解釋誤差範圍:多數民調報告都會提供誤差範圍,例如“±3%”。這表示實際的結果有可能在報告結果的3%範圍內上下浮動。
民調調查的質量和可信度很大程度上取決於其設計和實施的方法。若是由專業和無偏見的組織進行,且使用科學的方法,那麼民調結果往往較為可靠。但即使是最高質量的民調也會有一定的誤差,因此解讀時應保持批判性思考。
為什麼要做民調?
民調提供了一種系統性的方式來了解大眾的意見、態度和信念。進行民調的原因多種多樣,以下是一些主要的動機:
政策制定和評估:政府和政策制定者進行民調,以了解公眾對某一議題或政策的看法。這有助於制定或調整政策,以反映大眾的需求和意見。
選舉和政治活動:政黨和候選人通常使用民調來評估自己在選舉中的地位,了解哪些議題對選民最重要,以及如何調整策略以吸引更多支持。
市場研究:企業和組織進行民調以了解消費者對產品、服務或品牌的態度,從而制定或調整市場策略。
社會科學研究:學者和研究者使用民調來了解人們的社會、文化和心理特征,以及其與行為的關係。
公眾與媒體的期望:民調提供了一種方式,使公眾、政府和企業得以了解社會的整體趨勢和態度。媒體也經常報導民調結果,提供公眾對當前議題的見解。
提供反饋和評估:無論是企業還是政府,都可以透過民調了解其表現、服務或政策的效果,並根據反饋進行改進。
預測和趨勢分析:民調可以幫助預測某些趨勢或行為的未來發展,如選舉結果、市場需求等。
教育和提高公眾意識:通過進行和公布民調,可以促使公眾對某一議題或問題有更深入的了解和討論。
民調可信嗎?
民意調查的結果數據隨處可見,尤其是政治性民調結果幾乎可說是天天在新聞上放送,對總統的滿意度下降了多少百分比,然而大家又信多少?
在景美市場的訪問中,我們了解到民眾對民調有一些普遍的觀點。大多數受訪者表示,他們對民調的可信度存有疑慮,主要原因是他們擔心政府可能會在調查中進行操控,以符合特定政治目標。
受訪者還提到,民意調查的結果通常不會對他們的投票意願產生影響。換句話說,他們的選擇通常受到更多因素的影響,例如候選人的政策立場和政府做事的認真與否,而不是單純依賴民調結果。
從訪問中我們可以得出的結論是,大多數民眾對民調持謹慎態度,並認為它們對他們的投票決策影響有限。
http://cytotec.icu/# buy cytotec online fast delivery
tamoxifen benefits: tamoxifen bone density – pct nolvadex
民意調查
民意調查是什麼?民調什麼意思?
民意調查又稱為輿論調查或民意測驗,簡稱民調。一般而言,民調是一種為了解公眾對某些政治、社會問題與政策的意見和態度,由專業民調公司或媒體進行的調查方法。
目的在於通過網路、電話、或書面等媒介,對大量樣本的問卷調查抽樣,利用統計學的抽樣理論來推斷較為客觀,且能較為精確地推論社會輿論或民意動向的一種方法。
以下是民意調查的一些基本特點和重要性:
抽樣:由於不可能向每一個人詢問意見,所以調查者會選擇一個代表性的樣本進行調查。這樣本的大小和抽樣方法都會影響調查的準確性和可靠性。
問卷設計:為了確保獲得可靠的結果,問卷必須經過精心設計,問題要清晰、不帶偏見,且易於理解。
數據分析:收集到的數據將被分析以得出結論。這可能包括計算百分比、平均值、標準差等,以及更複雜的統計分析。
多種用途:民意調查可以用於各種目的,包括政策制定、選舉預測、市場研究、社會科學研究等。
限制:雖然民意調查是一個有價值的工具,但它也有其限制。例如,樣本可能不完全代表目標人群,或者問卷的設計可能導致偏見。
影響決策:民意調查的結果常常被政府、企業和其他組織用來影響其決策。
透明度和誠實:為了維護調查的可信度,調查組織應該提供其調查方法、樣本大小、抽樣方法和可能的誤差範圍等詳細資訊。
民調是怎麼調查的?
民意調查(輿論調查)的意義是指為瞭解大多數民眾的看法、意見、利益與需求,以科學、系統與公正的資料,蒐集可以代表全部群眾(母體)的部分群眾(抽樣),設計問卷題目後,以人工或電腦詢問部分民眾對特定議題的看法與評價,利用抽樣出來部分民眾的意見與看法,來推論目前全部民眾的意見與看法,藉以衡量社會與政治的狀態。
以下是進行民調調查的基本步驟:
定義目標和目的:首先,調查者需要明確調查的目的。是要了解公眾對某個政策的看法?還是要評估某個政治候選人的支持率?
設計問卷:根據調查目的,研究者會設計一份問卷。問卷應該包含清晰、不帶偏見的問題,並避免導向性的語言。
選擇樣本:因為通常不可能調查所有人,所以會選擇一部分人作為代表。這部分人被稱為“樣本”。最理想的情況是使用隨機抽樣,以確保每個人都有被選中的機會。
收集數據:有多種方法可以收集數據,如面對面訪問、電話訪問、郵件調查或在線調查。
數據分析:一旦數據被收集,研究者會使用統計工具和技術進行分析,得出結論或洞見。
報告結果:分析完數據後,研究者會編寫報告或發布結果。報告通常會提供調查方法、樣本大小、誤差範圍和主要發現。
解釋誤差範圍:多數民調報告都會提供誤差範圍,例如“±3%”。這表示實際的結果有可能在報告結果的3%範圍內上下浮動。
民調調查的質量和可信度很大程度上取決於其設計和實施的方法。若是由專業和無偏見的組織進行,且使用科學的方法,那麼民調結果往往較為可靠。但即使是最高質量的民調也會有一定的誤差,因此解讀時應保持批判性思考。
為什麼要做民調?
民調提供了一種系統性的方式來了解大眾的意見、態度和信念。進行民調的原因多種多樣,以下是一些主要的動機:
政策制定和評估:政府和政策制定者進行民調,以了解公眾對某一議題或政策的看法。這有助於制定或調整政策,以反映大眾的需求和意見。
選舉和政治活動:政黨和候選人通常使用民調來評估自己在選舉中的地位,了解哪些議題對選民最重要,以及如何調整策略以吸引更多支持。
市場研究:企業和組織進行民調以了解消費者對產品、服務或品牌的態度,從而制定或調整市場策略。
社會科學研究:學者和研究者使用民調來了解人們的社會、文化和心理特征,以及其與行為的關係。
公眾與媒體的期望:民調提供了一種方式,使公眾、政府和企業得以了解社會的整體趨勢和態度。媒體也經常報導民調結果,提供公眾對當前議題的見解。
提供反饋和評估:無論是企業還是政府,都可以透過民調了解其表現、服務或政策的效果,並根據反饋進行改進。
預測和趨勢分析:民調可以幫助預測某些趨勢或行為的未來發展,如選舉結果、市場需求等。
教育和提高公眾意識:通過進行和公布民調,可以促使公眾對某一議題或問題有更深入的了解和討論。
民調可信嗎?
民意調查的結果數據隨處可見,尤其是政治性民調結果幾乎可說是天天在新聞上放送,對總統的滿意度下降了多少百分比,然而大家又信多少?
在景美市場的訪問中,我們了解到民眾對民調有一些普遍的觀點。大多數受訪者表示,他們對民調的可信度存有疑慮,主要原因是他們擔心政府可能會在調查中進行操控,以符合特定政治目標。
受訪者還提到,民意調查的結果通常不會對他們的投票意願產生影響。換句話說,他們的選擇通常受到更多因素的影響,例如候選人的政策立場和政府做事的認真與否,而不是單純依賴民調結果。
從訪問中我們可以得出的結論是,大多數民眾對民調持謹慎態度,並認為它們對他們的投票決策影響有限。
2024總統大選民調
民意調查是什麼?民調什麼意思?
民意調查又稱為輿論調查或民意測驗,簡稱民調。一般而言,民調是一種為了解公眾對某些政治、社會問題與政策的意見和態度,由專業民調公司或媒體進行的調查方法。
目的在於通過網路、電話、或書面等媒介,對大量樣本的問卷調查抽樣,利用統計學的抽樣理論來推斷較為客觀,且能較為精確地推論社會輿論或民意動向的一種方法。
以下是民意調查的一些基本特點和重要性:
抽樣:由於不可能向每一個人詢問意見,所以調查者會選擇一個代表性的樣本進行調查。這樣本的大小和抽樣方法都會影響調查的準確性和可靠性。
問卷設計:為了確保獲得可靠的結果,問卷必須經過精心設計,問題要清晰、不帶偏見,且易於理解。
數據分析:收集到的數據將被分析以得出結論。這可能包括計算百分比、平均值、標準差等,以及更複雜的統計分析。
多種用途:民意調查可以用於各種目的,包括政策制定、選舉預測、市場研究、社會科學研究等。
限制:雖然民意調查是一個有價值的工具,但它也有其限制。例如,樣本可能不完全代表目標人群,或者問卷的設計可能導致偏見。
影響決策:民意調查的結果常常被政府、企業和其他組織用來影響其決策。
透明度和誠實:為了維護調查的可信度,調查組織應該提供其調查方法、樣本大小、抽樣方法和可能的誤差範圍等詳細資訊。
民調是怎麼調查的?
民意調查(輿論調查)的意義是指為瞭解大多數民眾的看法、意見、利益與需求,以科學、系統與公正的資料,蒐集可以代表全部群眾(母體)的部分群眾(抽樣),設計問卷題目後,以人工或電腦詢問部分民眾對特定議題的看法與評價,利用抽樣出來部分民眾的意見與看法,來推論目前全部民眾的意見與看法,藉以衡量社會與政治的狀態。
以下是進行民調調查的基本步驟:
定義目標和目的:首先,調查者需要明確調查的目的。是要了解公眾對某個政策的看法?還是要評估某個政治候選人的支持率?
設計問卷:根據調查目的,研究者會設計一份問卷。問卷應該包含清晰、不帶偏見的問題,並避免導向性的語言。
選擇樣本:因為通常不可能調查所有人,所以會選擇一部分人作為代表。這部分人被稱為“樣本”。最理想的情況是使用隨機抽樣,以確保每個人都有被選中的機會。
收集數據:有多種方法可以收集數據,如面對面訪問、電話訪問、郵件調查或在線調查。
數據分析:一旦數據被收集,研究者會使用統計工具和技術進行分析,得出結論或洞見。
報告結果:分析完數據後,研究者會編寫報告或發布結果。報告通常會提供調查方法、樣本大小、誤差範圍和主要發現。
解釋誤差範圍:多數民調報告都會提供誤差範圍,例如“±3%”。這表示實際的結果有可能在報告結果的3%範圍內上下浮動。
民調調查的質量和可信度很大程度上取決於其設計和實施的方法。若是由專業和無偏見的組織進行,且使用科學的方法,那麼民調結果往往較為可靠。但即使是最高質量的民調也會有一定的誤差,因此解讀時應保持批判性思考。
為什麼要做民調?
民調提供了一種系統性的方式來了解大眾的意見、態度和信念。進行民調的原因多種多樣,以下是一些主要的動機:
政策制定和評估:政府和政策制定者進行民調,以了解公眾對某一議題或政策的看法。這有助於制定或調整政策,以反映大眾的需求和意見。
選舉和政治活動:政黨和候選人通常使用民調來評估自己在選舉中的地位,了解哪些議題對選民最重要,以及如何調整策略以吸引更多支持。
市場研究:企業和組織進行民調以了解消費者對產品、服務或品牌的態度,從而制定或調整市場策略。
社會科學研究:學者和研究者使用民調來了解人們的社會、文化和心理特征,以及其與行為的關係。
公眾與媒體的期望:民調提供了一種方式,使公眾、政府和企業得以了解社會的整體趨勢和態度。媒體也經常報導民調結果,提供公眾對當前議題的見解。
提供反饋和評估:無論是企業還是政府,都可以透過民調了解其表現、服務或政策的效果,並根據反饋進行改進。
預測和趨勢分析:民調可以幫助預測某些趨勢或行為的未來發展,如選舉結果、市場需求等。
教育和提高公眾意識:通過進行和公布民調,可以促使公眾對某一議題或問題有更深入的了解和討論。
民調可信嗎?
民意調查的結果數據隨處可見,尤其是政治性民調結果幾乎可說是天天在新聞上放送,對總統的滿意度下降了多少百分比,然而大家又信多少?
在景美市場的訪問中,我們了解到民眾對民調有一些普遍的觀點。大多數受訪者表示,他們對民調的可信度存有疑慮,主要原因是他們擔心政府可能會在調查中進行操控,以符合特定政治目標。
受訪者還提到,民意調查的結果通常不會對他們的投票意願產生影響。換句話說,他們的選擇通常受到更多因素的影響,例如候選人的政策立場和政府做事的認真與否,而不是單純依賴民調結果。
從訪問中我們可以得出的結論是,大多數民眾對民調持謹慎態度,並認為它們對他們的投票決策影響有限。
doxycycline tetracycline: generic doxycycline – doxycycline tetracycline
民調
民意調查是什麼?民調什麼意思?
民意調查又稱為輿論調查或民意測驗,簡稱民調。一般而言,民調是一種為了解公眾對某些政治、社會問題與政策的意見和態度,由專業民調公司或媒體進行的調查方法。
目的在於通過網路、電話、或書面等媒介,對大量樣本的問卷調查抽樣,利用統計學的抽樣理論來推斷較為客觀,且能較為精確地推論社會輿論或民意動向的一種方法。
以下是民意調查的一些基本特點和重要性:
抽樣:由於不可能向每一個人詢問意見,所以調查者會選擇一個代表性的樣本進行調查。這樣本的大小和抽樣方法都會影響調查的準確性和可靠性。
問卷設計:為了確保獲得可靠的結果,問卷必須經過精心設計,問題要清晰、不帶偏見,且易於理解。
數據分析:收集到的數據將被分析以得出結論。這可能包括計算百分比、平均值、標準差等,以及更複雜的統計分析。
多種用途:民意調查可以用於各種目的,包括政策制定、選舉預測、市場研究、社會科學研究等。
限制:雖然民意調查是一個有價值的工具,但它也有其限制。例如,樣本可能不完全代表目標人群,或者問卷的設計可能導致偏見。
影響決策:民意調查的結果常常被政府、企業和其他組織用來影響其決策。
透明度和誠實:為了維護調查的可信度,調查組織應該提供其調查方法、樣本大小、抽樣方法和可能的誤差範圍等詳細資訊。
民調是怎麼調查的?
民意調查(輿論調查)的意義是指為瞭解大多數民眾的看法、意見、利益與需求,以科學、系統與公正的資料,蒐集可以代表全部群眾(母體)的部分群眾(抽樣),設計問卷題目後,以人工或電腦詢問部分民眾對特定議題的看法與評價,利用抽樣出來部分民眾的意見與看法,來推論目前全部民眾的意見與看法,藉以衡量社會與政治的狀態。
以下是進行民調調查的基本步驟:
定義目標和目的:首先,調查者需要明確調查的目的。是要了解公眾對某個政策的看法?還是要評估某個政治候選人的支持率?
設計問卷:根據調查目的,研究者會設計一份問卷。問卷應該包含清晰、不帶偏見的問題,並避免導向性的語言。
選擇樣本:因為通常不可能調查所有人,所以會選擇一部分人作為代表。這部分人被稱為“樣本”。最理想的情況是使用隨機抽樣,以確保每個人都有被選中的機會。
收集數據:有多種方法可以收集數據,如面對面訪問、電話訪問、郵件調查或在線調查。
數據分析:一旦數據被收集,研究者會使用統計工具和技術進行分析,得出結論或洞見。
報告結果:分析完數據後,研究者會編寫報告或發布結果。報告通常會提供調查方法、樣本大小、誤差範圍和主要發現。
解釋誤差範圍:多數民調報告都會提供誤差範圍,例如“±3%”。這表示實際的結果有可能在報告結果的3%範圍內上下浮動。
民調調查的質量和可信度很大程度上取決於其設計和實施的方法。若是由專業和無偏見的組織進行,且使用科學的方法,那麼民調結果往往較為可靠。但即使是最高質量的民調也會有一定的誤差,因此解讀時應保持批判性思考。
為什麼要做民調?
民調提供了一種系統性的方式來了解大眾的意見、態度和信念。進行民調的原因多種多樣,以下是一些主要的動機:
政策制定和評估:政府和政策制定者進行民調,以了解公眾對某一議題或政策的看法。這有助於制定或調整政策,以反映大眾的需求和意見。
選舉和政治活動:政黨和候選人通常使用民調來評估自己在選舉中的地位,了解哪些議題對選民最重要,以及如何調整策略以吸引更多支持。
市場研究:企業和組織進行民調以了解消費者對產品、服務或品牌的態度,從而制定或調整市場策略。
社會科學研究:學者和研究者使用民調來了解人們的社會、文化和心理特征,以及其與行為的關係。
公眾與媒體的期望:民調提供了一種方式,使公眾、政府和企業得以了解社會的整體趨勢和態度。媒體也經常報導民調結果,提供公眾對當前議題的見解。
提供反饋和評估:無論是企業還是政府,都可以透過民調了解其表現、服務或政策的效果,並根據反饋進行改進。
預測和趨勢分析:民調可以幫助預測某些趨勢或行為的未來發展,如選舉結果、市場需求等。
教育和提高公眾意識:通過進行和公布民調,可以促使公眾對某一議題或問題有更深入的了解和討論。
民調可信嗎?
民意調查的結果數據隨處可見,尤其是政治性民調結果幾乎可說是天天在新聞上放送,對總統的滿意度下降了多少百分比,然而大家又信多少?
在景美市場的訪問中,我們了解到民眾對民調有一些普遍的觀點。大多數受訪者表示,他們對民調的可信度存有疑慮,主要原因是他們擔心政府可能會在調查中進行操控,以符合特定政治目標。
受訪者還提到,民意調查的結果通常不會對他們的投票意願產生影響。換句話說,他們的選擇通常受到更多因素的影響,例如候選人的政策立場和政府做事的認真與否,而不是單純依賴民調結果。
從訪問中我們可以得出的結論是,大多數民眾對民調持謹慎態度,並認為它們對他們的投票決策影響有限。
https://lisinoprilbestprice.store/# zestril 10
http://zithromaxbestprice.icu/# buy zithromax 500mg online
tadalafil 5 mg generic
where can i buy lisinopril: generic prinivil – 208 lisinopril
zithromax 500 without prescription: zithromax 500 mg lowest price pharmacy online – average cost of generic zithromax
does cialis make you last longer in bed
民意調查是什麼?民調什麼意思?
民意調查又稱為輿論調查或民意測驗,簡稱民調。一般而言,民調是一種為了解公眾對某些政治、社會問題與政策的意見和態度,由專業民調公司或媒體進行的調查方法。
目的在於通過網路、電話、或書面等媒介,對大量樣本的問卷調查抽樣,利用統計學的抽樣理論來推斷較為客觀,且能較為精確地推論社會輿論或民意動向的一種方法。
以下是民意調查的一些基本特點和重要性:
抽樣:由於不可能向每一個人詢問意見,所以調查者會選擇一個代表性的樣本進行調查。這樣本的大小和抽樣方法都會影響調查的準確性和可靠性。
問卷設計:為了確保獲得可靠的結果,問卷必須經過精心設計,問題要清晰、不帶偏見,且易於理解。
數據分析:收集到的數據將被分析以得出結論。這可能包括計算百分比、平均值、標準差等,以及更複雜的統計分析。
多種用途:民意調查可以用於各種目的,包括政策制定、選舉預測、市場研究、社會科學研究等。
限制:雖然民意調查是一個有價值的工具,但它也有其限制。例如,樣本可能不完全代表目標人群,或者問卷的設計可能導致偏見。
影響決策:民意調查的結果常常被政府、企業和其他組織用來影響其決策。
透明度和誠實:為了維護調查的可信度,調查組織應該提供其調查方法、樣本大小、抽樣方法和可能的誤差範圍等詳細資訊。
民調是怎麼調查的?
民意調查(輿論調查)的意義是指為瞭解大多數民眾的看法、意見、利益與需求,以科學、系統與公正的資料,蒐集可以代表全部群眾(母體)的部分群眾(抽樣),設計問卷題目後,以人工或電腦詢問部分民眾對特定議題的看法與評價,利用抽樣出來部分民眾的意見與看法,來推論目前全部民眾的意見與看法,藉以衡量社會與政治的狀態。
以下是進行民調調查的基本步驟:
定義目標和目的:首先,調查者需要明確調查的目的。是要了解公眾對某個政策的看法?還是要評估某個政治候選人的支持率?
設計問卷:根據調查目的,研究者會設計一份問卷。問卷應該包含清晰、不帶偏見的問題,並避免導向性的語言。
選擇樣本:因為通常不可能調查所有人,所以會選擇一部分人作為代表。這部分人被稱為“樣本”。最理想的情況是使用隨機抽樣,以確保每個人都有被選中的機會。
收集數據:有多種方法可以收集數據,如面對面訪問、電話訪問、郵件調查或在線調查。
數據分析:一旦數據被收集,研究者會使用統計工具和技術進行分析,得出結論或洞見。
報告結果:分析完數據後,研究者會編寫報告或發布結果。報告通常會提供調查方法、樣本大小、誤差範圍和主要發現。
解釋誤差範圍:多數民調報告都會提供誤差範圍,例如“±3%”。這表示實際的結果有可能在報告結果的3%範圍內上下浮動。
民調調查的質量和可信度很大程度上取決於其設計和實施的方法。若是由專業和無偏見的組織進行,且使用科學的方法,那麼民調結果往往較為可靠。但即使是最高質量的民調也會有一定的誤差,因此解讀時應保持批判性思考。
為什麼要做民調?
民調提供了一種系統性的方式來了解大眾的意見、態度和信念。進行民調的原因多種多樣,以下是一些主要的動機:
政策制定和評估:政府和政策制定者進行民調,以了解公眾對某一議題或政策的看法。這有助於制定或調整政策,以反映大眾的需求和意見。
選舉和政治活動:政黨和候選人通常使用民調來評估自己在選舉中的地位,了解哪些議題對選民最重要,以及如何調整策略以吸引更多支持。
市場研究:企業和組織進行民調以了解消費者對產品、服務或品牌的態度,從而制定或調整市場策略。
社會科學研究:學者和研究者使用民調來了解人們的社會、文化和心理特征,以及其與行為的關係。
公眾與媒體的期望:民調提供了一種方式,使公眾、政府和企業得以了解社會的整體趨勢和態度。媒體也經常報導民調結果,提供公眾對當前議題的見解。
提供反饋和評估:無論是企業還是政府,都可以透過民調了解其表現、服務或政策的效果,並根據反饋進行改進。
預測和趨勢分析:民調可以幫助預測某些趨勢或行為的未來發展,如選舉結果、市場需求等。
教育和提高公眾意識:通過進行和公布民調,可以促使公眾對某一議題或問題有更深入的了解和討論。
民調可信嗎?
民意調查的結果數據隨處可見,尤其是政治性民調結果幾乎可說是天天在新聞上放送,對總統的滿意度下降了多少百分比,然而大家又信多少?
在景美市場的訪問中,我們了解到民眾對民調有一些普遍的觀點。大多數受訪者表示,他們對民調的可信度存有疑慮,主要原因是他們擔心政府可能會在調查中進行操控,以符合特定政治目標。
受訪者還提到,民意調查的結果通常不會對他們的投票意願產生影響。換句話說,他們的選擇通常受到更多因素的影響,例如候選人的政策立場和政府做事的認真與否,而不是單純依賴民調結果。
從訪問中我們可以得出的結論是,大多數民眾對民調持謹慎態度,並認為它們對他們的投票決策影響有限。
民意調查
民意調查是什麼?民調什麼意思?
民意調查又稱為輿論調查或民意測驗,簡稱民調。一般而言,民調是一種為了解公眾對某些政治、社會問題與政策的意見和態度,由專業民調公司或媒體進行的調查方法。
目的在於通過網路、電話、或書面等媒介,對大量樣本的問卷調查抽樣,利用統計學的抽樣理論來推斷較為客觀,且能較為精確地推論社會輿論或民意動向的一種方法。
以下是民意調查的一些基本特點和重要性:
抽樣:由於不可能向每一個人詢問意見,所以調查者會選擇一個代表性的樣本進行調查。這樣本的大小和抽樣方法都會影響調查的準確性和可靠性。
問卷設計:為了確保獲得可靠的結果,問卷必須經過精心設計,問題要清晰、不帶偏見,且易於理解。
數據分析:收集到的數據將被分析以得出結論。這可能包括計算百分比、平均值、標準差等,以及更複雜的統計分析。
多種用途:民意調查可以用於各種目的,包括政策制定、選舉預測、市場研究、社會科學研究等。
限制:雖然民意調查是一個有價值的工具,但它也有其限制。例如,樣本可能不完全代表目標人群,或者問卷的設計可能導致偏見。
影響決策:民意調查的結果常常被政府、企業和其他組織用來影響其決策。
透明度和誠實:為了維護調查的可信度,調查組織應該提供其調查方法、樣本大小、抽樣方法和可能的誤差範圍等詳細資訊。
民調是怎麼調查的?
民意調查(輿論調查)的意義是指為瞭解大多數民眾的看法、意見、利益與需求,以科學、系統與公正的資料,蒐集可以代表全部群眾(母體)的部分群眾(抽樣),設計問卷題目後,以人工或電腦詢問部分民眾對特定議題的看法與評價,利用抽樣出來部分民眾的意見與看法,來推論目前全部民眾的意見與看法,藉以衡量社會與政治的狀態。
以下是進行民調調查的基本步驟:
定義目標和目的:首先,調查者需要明確調查的目的。是要了解公眾對某個政策的看法?還是要評估某個政治候選人的支持率?
設計問卷:根據調查目的,研究者會設計一份問卷。問卷應該包含清晰、不帶偏見的問題,並避免導向性的語言。
選擇樣本:因為通常不可能調查所有人,所以會選擇一部分人作為代表。這部分人被稱為“樣本”。最理想的情況是使用隨機抽樣,以確保每個人都有被選中的機會。
收集數據:有多種方法可以收集數據,如面對面訪問、電話訪問、郵件調查或在線調查。
數據分析:一旦數據被收集,研究者會使用統計工具和技術進行分析,得出結論或洞見。
報告結果:分析完數據後,研究者會編寫報告或發布結果。報告通常會提供調查方法、樣本大小、誤差範圍和主要發現。
解釋誤差範圍:多數民調報告都會提供誤差範圍,例如“±3%”。這表示實際的結果有可能在報告結果的3%範圍內上下浮動。
民調調查的質量和可信度很大程度上取決於其設計和實施的方法。若是由專業和無偏見的組織進行,且使用科學的方法,那麼民調結果往往較為可靠。但即使是最高質量的民調也會有一定的誤差,因此解讀時應保持批判性思考。
為什麼要做民調?
民調提供了一種系統性的方式來了解大眾的意見、態度和信念。進行民調的原因多種多樣,以下是一些主要的動機:
政策制定和評估:政府和政策制定者進行民調,以了解公眾對某一議題或政策的看法。這有助於制定或調整政策,以反映大眾的需求和意見。
選舉和政治活動:政黨和候選人通常使用民調來評估自己在選舉中的地位,了解哪些議題對選民最重要,以及如何調整策略以吸引更多支持。
市場研究:企業和組織進行民調以了解消費者對產品、服務或品牌的態度,從而制定或調整市場策略。
社會科學研究:學者和研究者使用民調來了解人們的社會、文化和心理特征,以及其與行為的關係。
公眾與媒體的期望:民調提供了一種方式,使公眾、政府和企業得以了解社會的整體趨勢和態度。媒體也經常報導民調結果,提供公眾對當前議題的見解。
提供反饋和評估:無論是企業還是政府,都可以透過民調了解其表現、服務或政策的效果,並根據反饋進行改進。
預測和趨勢分析:民調可以幫助預測某些趨勢或行為的未來發展,如選舉結果、市場需求等。
教育和提高公眾意識:通過進行和公布民調,可以促使公眾對某一議題或問題有更深入的了解和討論。
民調可信嗎?
民意調查的結果數據隨處可見,尤其是政治性民調結果幾乎可說是天天在新聞上放送,對總統的滿意度下降了多少百分比,然而大家又信多少?
在景美市場的訪問中,我們了解到民眾對民調有一些普遍的觀點。大多數受訪者表示,他們對民調的可信度存有疑慮,主要原因是他們擔心政府可能會在調查中進行操控,以符合特定政治目標。
受訪者還提到,民意調查的結果通常不會對他們的投票意願產生影響。換句話說,他們的選擇通常受到更多因素的影響,例如候選人的政策立場和政府做事的認真與否,而不是單純依賴民調結果。
從訪問中我們可以得出的結論是,大多數民眾對民調持謹慎態度,並認為它們對他們的投票決策影響有限。
https://cytotec.icu/# buy cytotec online
總統民調
民意調查是什麼?民調什麼意思?
民意調查又稱為輿論調查或民意測驗,簡稱民調。一般而言,民調是一種為了解公眾對某些政治、社會問題與政策的意見和態度,由專業民調公司或媒體進行的調查方法。
目的在於通過網路、電話、或書面等媒介,對大量樣本的問卷調查抽樣,利用統計學的抽樣理論來推斷較為客觀,且能較為精確地推論社會輿論或民意動向的一種方法。
以下是民意調查的一些基本特點和重要性:
抽樣:由於不可能向每一個人詢問意見,所以調查者會選擇一個代表性的樣本進行調查。這樣本的大小和抽樣方法都會影響調查的準確性和可靠性。
問卷設計:為了確保獲得可靠的結果,問卷必須經過精心設計,問題要清晰、不帶偏見,且易於理解。
數據分析:收集到的數據將被分析以得出結論。這可能包括計算百分比、平均值、標準差等,以及更複雜的統計分析。
多種用途:民意調查可以用於各種目的,包括政策制定、選舉預測、市場研究、社會科學研究等。
限制:雖然民意調查是一個有價值的工具,但它也有其限制。例如,樣本可能不完全代表目標人群,或者問卷的設計可能導致偏見。
影響決策:民意調查的結果常常被政府、企業和其他組織用來影響其決策。
透明度和誠實:為了維護調查的可信度,調查組織應該提供其調查方法、樣本大小、抽樣方法和可能的誤差範圍等詳細資訊。
民調是怎麼調查的?
民意調查(輿論調查)的意義是指為瞭解大多數民眾的看法、意見、利益與需求,以科學、系統與公正的資料,蒐集可以代表全部群眾(母體)的部分群眾(抽樣),設計問卷題目後,以人工或電腦詢問部分民眾對特定議題的看法與評價,利用抽樣出來部分民眾的意見與看法,來推論目前全部民眾的意見與看法,藉以衡量社會與政治的狀態。
以下是進行民調調查的基本步驟:
定義目標和目的:首先,調查者需要明確調查的目的。是要了解公眾對某個政策的看法?還是要評估某個政治候選人的支持率?
設計問卷:根據調查目的,研究者會設計一份問卷。問卷應該包含清晰、不帶偏見的問題,並避免導向性的語言。
選擇樣本:因為通常不可能調查所有人,所以會選擇一部分人作為代表。這部分人被稱為“樣本”。最理想的情況是使用隨機抽樣,以確保每個人都有被選中的機會。
收集數據:有多種方法可以收集數據,如面對面訪問、電話訪問、郵件調查或在線調查。
數據分析:一旦數據被收集,研究者會使用統計工具和技術進行分析,得出結論或洞見。
報告結果:分析完數據後,研究者會編寫報告或發布結果。報告通常會提供調查方法、樣本大小、誤差範圍和主要發現。
解釋誤差範圍:多數民調報告都會提供誤差範圍,例如“±3%”。這表示實際的結果有可能在報告結果的3%範圍內上下浮動。
民調調查的質量和可信度很大程度上取決於其設計和實施的方法。若是由專業和無偏見的組織進行,且使用科學的方法,那麼民調結果往往較為可靠。但即使是最高質量的民調也會有一定的誤差,因此解讀時應保持批判性思考。
為什麼要做民調?
民調提供了一種系統性的方式來了解大眾的意見、態度和信念。進行民調的原因多種多樣,以下是一些主要的動機:
政策制定和評估:政府和政策制定者進行民調,以了解公眾對某一議題或政策的看法。這有助於制定或調整政策,以反映大眾的需求和意見。
選舉和政治活動:政黨和候選人通常使用民調來評估自己在選舉中的地位,了解哪些議題對選民最重要,以及如何調整策略以吸引更多支持。
市場研究:企業和組織進行民調以了解消費者對產品、服務或品牌的態度,從而制定或調整市場策略。
社會科學研究:學者和研究者使用民調來了解人們的社會、文化和心理特征,以及其與行為的關係。
公眾與媒體的期望:民調提供了一種方式,使公眾、政府和企業得以了解社會的整體趨勢和態度。媒體也經常報導民調結果,提供公眾對當前議題的見解。
提供反饋和評估:無論是企業還是政府,都可以透過民調了解其表現、服務或政策的效果,並根據反饋進行改進。
預測和趨勢分析:民調可以幫助預測某些趨勢或行為的未來發展,如選舉結果、市場需求等。
教育和提高公眾意識:通過進行和公布民調,可以促使公眾對某一議題或問題有更深入的了解和討論。
民調可信嗎?
民意調查的結果數據隨處可見,尤其是政治性民調結果幾乎可說是天天在新聞上放送,對總統的滿意度下降了多少百分比,然而大家又信多少?
在景美市場的訪問中,我們了解到民眾對民調有一些普遍的觀點。大多數受訪者表示,他們對民調的可信度存有疑慮,主要原因是他們擔心政府可能會在調查中進行操控,以符合特定政治目標。
受訪者還提到,民意調查的結果通常不會對他們的投票意願產生影響。換句話說,他們的選擇通常受到更多因素的影響,例如候選人的政策立場和政府做事的認真與否,而不是單純依賴民調結果。
從訪問中我們可以得出的結論是,大多數民眾對民調持謹慎態度,並認為它們對他們的投票決策影響有限。
cialis black 800mg reviews
mexican rx online mexican drugstore online buying prescription drugs in mexico online mexicopharm.com
cialis malaysia
best online pharmacies in mexico: Purple Pharmacy online ordering – mexican mail order pharmacies mexicopharm.com
https://indiapharm.llc/# online pharmacy india indiapharm.llc
mexican drugstore online: Mexico pharmacy online – best online pharmacies in mexico mexicopharm.com
can i buy viagra at a pharmacy
http://canadapharm.life/# canadian pharmacies that deliver to the us canadapharm.life
pharmacy mall online reviews
indianpharmacy com indian pharmacy to usa cheapest online pharmacy india indiapharm.llc
mexican online pharmacies prescription drugs: Mexico pharmacy online – medication from mexico pharmacy mexicopharm.com
Can your lungs recover from COPD albuterol syrup
pharmacy viagra now eu
Cardizem ER
https://tadalafildelivery.pro/# tadalafil soft
erection pills viagra online buy ed drugs online best non prescription ed pills
how to get viagra prescription in canada
Двери входные
дверь входную купить https://vhodnye-dveri97.ru.
https://tadalafildelivery.pro/# tadalafil generic price
best viagra for women
https://tadalafildelivery.pro/# tadalafil 2.5 mg tablets
sildenafil 100mg australia Buy generic 100mg Sildenafil online sildenafil compare prices
tadalafil 20 mg mexico Buy tadalafil online tadalafil
generic viagra sale
https://levitradelivery.pro/# Buy Levitra 20mg online
tadalafil 100mg online tadalafil 20mg price in india tadalafil 2.5 mg cost
sildenafil 75 mg
https://tadalafildelivery.pro/# buy generic tadalafil 20mg
Kamagra 100mg price buy kamagra Kamagra Oral Jelly
Как правильно хранить кондиционер в межсезонье?
кондиционер купить цена https://kondicionery-v-moskve.ru.
cialis 800 black canada
http://edpillsdelivery.pro/# ed medications list
male ed drugs buy ed drugs online erectile dysfunction drug
what is cialis taken for
https://prednisone.auction/# prednisone 475
buy cialis online reddit
ivermectin 10 ml: buy ivermectin online – ivermectin 6mg
cialis overnight
what nausea med can elderly take buy combivir paypal
buy viagra in canada
https://amoxil.guru/# amoxicillin from canada
paxlovid buy paxlovid best price Paxlovid over the counter
order minocycline 50 mg: buy ivermectin online – order minocycline 100mg
cymbalta indian pharmacy
Как правильно провести техническое обслуживание кондиционеров?
техническое обслуживание кондиционеров что входит http://www.tekhnicheskoe-obsluzhivanie-kondicionerov.ru.
order amoxicillin uk: buy amoxil online – cheap amoxicillin 500mg
https://clomid.auction/# can i get clomid online
viagra where to buy canada
lisinopril target pharmacy
zithromax over the counter canada zithromax best price zithromax 250 mg pill
https://lisinopril.fun/# prinivil generic
furosemide order Healthcare providers should educate patients about potential risks associated with medication administration errors.
lisinopril generic medication lisinopril 10 mg prinivil 25 mg
Link exchange is nothing else but it is just
placing the other person’s web site link on your page at suitable place and other person will also do same in support
of you.
https://azithromycin.store/# zithromax without prescription
I don’t even know how I finished up right here, but I assumed this submit was good.
I don’t realize who you’re but certainly you are going to a famous blogger in case you
are not already. Cheers!
order cheap propecia without insurance Best place to buy propecia cost generic propecia without rx
best medicine for nausea over the counter buy clozaril 100mg
zithromax cost australia buy zithromax 1000mg online zithromax capsules price
furosemida furosemida 40 mg or lasix dosage
http://phpooey.com/?URL=furosemide.pro lasix generic name
lasix 100 mg tablet lasix 40 mg and furosemide lasix 40 mg
lasix 100 mg tablet Buy Furosemide lasix generic
https://furosemide.pro/# lasix for sale
buy isotretinoin 20mg pill order accutane pill buy accutane without a prescription
original cialis com
cialis pre
https://farmaciaitalia.store/# acquistare farmaci senza ricetta
comprare farmaci online all’estero kamagra oral jelly consegna 24 ore comprare farmaci online con ricetta
farmacia online migliore: farmacia online migliore – farmacia online
https://sildenafilitalia.men/# viagra 100 mg prezzo in farmacia
farmacie on line spedizione gratuita kamagra migliori farmacie online 2023
farmacia online migliore kamagra oral jelly consegna 24 ore acquistare farmaci senza ricetta
cialis
cialis uk no prescription
2024娛樂城的創新趨勢
隨著2024年的到來,娛樂城業界正經歷著一場革命性的變遷。這一年,娛樂城不僅僅是賭博和娛樂的代名詞,更成為了科技創新和用戶體驗的集大成者。
首先,2024年的娛樂城極大地融合了最新的技術。增強現實(AR)和虛擬現實(VR)技術的引入,為玩家提供了沉浸式的賭博體驗。這種全新的遊戲方式不僅帶來視覺上的震撼,還為玩家創造了一種置身於真實賭場的感覺,而實際上他們可能只是坐在家中的沙發上。
其次,人工智能(AI)在娛樂城中的應用也達到了新高度。AI技術不僅用於增強遊戲的公平性和透明度,還在個性化玩家體驗方面發揮著重要作用。從個性化遊戲推薦到智能客服,AI的應用使得娛樂城更能滿足玩家的個別需求。
此外,線上娛樂城的安全性和隱私保護也獲得了顯著加強。隨著技術的進步,更加先進的加密技術和安全措施被用來保護玩家的資料和交易,從而確保一個安全可靠的遊戲環境。
2024年的娛樂城還強調負責任的賭博。許多平台採用了各種工具和資源來幫助玩家控制他們的賭博行為,如設置賭注限制、自我排除措施等,體現了對可持續賭博的承諾。
總之,2024年的娛樂城呈現出一個高度融合了技術、安全和負責任賭博的行業新面貌,為玩家提供了前所未有的娛樂體驗。隨著這些趨勢的持續發展,我們可以預見,娛樂城將不斷地創新和進步,為玩家帶來更多精彩和安全的娛樂選擇。
娛樂城
2024娛樂城的創新趨勢
隨著2024年的到來,娛樂城業界正經歷著一場革命性的變遷。這一年,娛樂城不僅僅是賭博和娛樂的代名詞,更成為了科技創新和用戶體驗的集大成者。
首先,2024年的娛樂城極大地融合了最新的技術。增強現實(AR)和虛擬現實(VR)技術的引入,為玩家提供了沉浸式的賭博體驗。這種全新的遊戲方式不僅帶來視覺上的震撼,還為玩家創造了一種置身於真實賭場的感覺,而實際上他們可能只是坐在家中的沙發上。
其次,人工智能(AI)在娛樂城中的應用也達到了新高度。AI技術不僅用於增強遊戲的公平性和透明度,還在個性化玩家體驗方面發揮著重要作用。從個性化遊戲推薦到智能客服,AI的應用使得娛樂城更能滿足玩家的個別需求。
此外,線上娛樂城的安全性和隱私保護也獲得了顯著加強。隨著技術的進步,更加先進的加密技術和安全措施被用來保護玩家的資料和交易,從而確保一個安全可靠的遊戲環境。
2024年的娛樂城還強調負責任的賭博。許多平台採用了各種工具和資源來幫助玩家控制他們的賭博行為,如設置賭注限制、自我排除措施等,體現了對可持續賭博的承諾。
總之,2024年的娛樂城呈現出一個高度融合了技術、安全和負責任賭博的行業新面貌,為玩家提供了前所未有的娛樂體驗。隨著這些趨勢的持續發展,我們可以預見,娛樂城將不斷地創新和進步,為玩家帶來更多精彩和安全的娛樂選擇。
mexico drug stores pharmacies mexican mail order pharmacies mexico drug stores pharmacies
mexican rx online: mexico drug stores pharmacies – medication from mexico pharmacy
п»їbest mexican online pharmacies: mexican drugstore online – reputable mexican pharmacies online
buy cheap zithromax buy azithromycin paypal purchase zithromax online cheap
que es tadalafil
order generic gabapentin order gabapentin 100mg for sale
Quality articles is the crucial to be a focus for the visitors to visit the web page,
that’s what this website is providing.
pharmacy website india: reputable indian pharmacies – top online pharmacy india
india online pharmacy pharmacy website india Online medicine order
娛樂城
2024娛樂城的創新趨勢
隨著2024年的到來,娛樂城業界正經歷著一場革命性的變遷。這一年,娛樂城不僅僅是賭博和娛樂的代名詞,更成為了科技創新和用戶體驗的集大成者。
首先,2024年的娛樂城極大地融合了最新的技術。增強現實(AR)和虛擬現實(VR)技術的引入,為玩家提供了沉浸式的賭博體驗。這種全新的遊戲方式不僅帶來視覺上的震撼,還為玩家創造了一種置身於真實賭場的感覺,而實際上他們可能只是坐在家中的沙發上。
其次,人工智能(AI)在娛樂城中的應用也達到了新高度。AI技術不僅用於增強遊戲的公平性和透明度,還在個性化玩家體驗方面發揮著重要作用。從個性化遊戲推薦到智能客服,AI的應用使得娛樂城更能滿足玩家的個別需求。
此外,線上娛樂城的安全性和隱私保護也獲得了顯著加強。隨著技術的進步,更加先進的加密技術和安全措施被用來保護玩家的資料和交易,從而確保一個安全可靠的遊戲環境。
2024年的娛樂城還強調負責任的賭博。許多平台採用了各種工具和資源來幫助玩家控制他們的賭博行為,如設置賭注限制、自我排除措施等,體現了對可持續賭博的承諾。
總之,2024年的娛樂城呈現出一個高度融合了技術、安全和負責任賭博的行業新面貌,為玩家提供了前所未有的娛樂體驗。隨著這些趨勢的持續發展,我們可以預見,娛樂城將不斷地創新和進步,為玩家帶來更多精彩和安全的娛樂選擇。
Dubai, a city known for its opulence and modernity, demands a mode of transportation that reflects its grandeur. For those seeking a cost-effective and reliable long-term solution, Somonion Rent Car LLC emerges as the premier choice for monthly car rentals in Dubai. With a diverse fleet ranging from compact cars to premium vehicles, the company promises an unmatched blend of affordability, flexibility, and personalized service.
Favorable Rental Conditions:
Understanding the potential financial strain of long-term car rentals, Somonion Rent Car LLC aims to make your journey more economical. The company offers flexible rental terms coupled with exclusive discounts for loyal customers. This commitment to affordability extends beyond the rental cost, as additional services such as insurance, maintenance, and repair ensure your safety and peace of mind throughout the duration of your rental.
A Plethora of Options:
Somonion Rent Car LLC boasts an extensive selection of vehicles to cater to diverse preferences and budgets. Whether you’re in the market for a sleek sedan or a spacious crossover, the company has the perfect car to complement your needs. The transparency in pricing, coupled with the ease of booking through their online platform, makes Somonion Rent Car LLC a hassle-free solution for those embarking on a long-term adventure in Dubai.
Car Rental Services Tailored for You:
Somonion Rent Car LLC doesn’t just offer cars; it provides a comprehensive range of rental services tailored to suit various occasions. From daily and weekly rentals to airport transfers and business travel, the company ensures that your stay in Dubai is not only comfortable but also exudes prestige. The fleet includes popular models such as the Nissan Altima 2018, KIA Forte 2018, Hyundai Elantra 2018, and the Toyota Camry Sport Edition 2020, all available for monthly rentals at competitive rates.
Featured Deals and Specials:
Somonion Rent Car LLC constantly updates its offerings to provide customers with the best deals. Featured cars like the Hyundai Sonata 2018 and Hyundai Santa Fe 2018 add a touch of luxury to your rental experience, with daily rates starting as low as AED 100. The company’s commitment to affordable luxury is further emphasized by the online booking system, allowing customers to secure the best deals in real-time through their website or by contacting the experts via phone or WhatsApp.
Conclusion:
Whether you’re a tourist looking to explore Dubai at your pace or a business traveler in need of a reliable and prestigious mode of transportation, Somonion Rent Car LLC stands as the go-to choice for monthly car rentals in Dubai. Unlock the ultimate mobility experience with Somonion, where affordability meets excellence, ensuring your journey through Dubai is as seamless and luxurious as the city itself. Contact Somonion Rent Car LLC today and embark on a journey where every mile is a testament to comfort, style, and unmatched service.
cheap online tadalafil
娛樂城
2024娛樂城的創新趨勢
隨著2024年的到來,娛樂城業界正經歷著一場革命性的變遷。這一年,娛樂城不僅僅是賭博和娛樂的代名詞,更成為了科技創新和用戶體驗的集大成者。
首先,2024年的娛樂城極大地融合了最新的技術。增強現實(AR)和虛擬現實(VR)技術的引入,為玩家提供了沉浸式的賭博體驗。這種全新的遊戲方式不僅帶來視覺上的震撼,還為玩家創造了一種置身於真實賭場的感覺,而實際上他們可能只是坐在家中的沙發上。
其次,人工智能(AI)在娛樂城中的應用也達到了新高度。AI技術不僅用於增強遊戲的公平性和透明度,還在個性化玩家體驗方面發揮著重要作用。從個性化遊戲推薦到智能客服,AI的應用使得娛樂城更能滿足玩家的個別需求。
此外,線上娛樂城的安全性和隱私保護也獲得了顯著加強。隨著技術的進步,更加先進的加密技術和安全措施被用來保護玩家的資料和交易,從而確保一個安全可靠的遊戲環境。
2024年的娛樂城還強調負責任的賭博。許多平台採用了各種工具和資源來幫助玩家控制他們的賭博行為,如設置賭注限制、自我排除措施等,體現了對可持續賭博的承諾。
總之,2024年的娛樂城呈現出一個高度融合了技術、安全和負責任賭博的行業新面貌,為玩家提供了前所未有的娛樂體驗。隨著這些趨勢的持續發展,我們可以預見,娛樂城將不斷地創新和進步,為玩家帶來更多精彩和安全的娛樂選擇。
Dubai, a city known for its opulence and modernity, demands a mode of transportation that reflects its grandeur. For those seeking a cost-effective and reliable long-term solution, Somonion Rent Car LLC emerges as the premier choice for monthly car rentals in Dubai. With a diverse fleet ranging from compact cars to premium vehicles, the company promises an unmatched blend of affordability, flexibility, and personalized service.
Favorable Rental Conditions:
Understanding the potential financial strain of long-term car rentals, Somonion Rent Car LLC aims to make your journey more economical. The company offers flexible rental terms coupled with exclusive discounts for loyal customers. This commitment to affordability extends beyond the rental cost, as additional services such as insurance, maintenance, and repair ensure your safety and peace of mind throughout the duration of your rental.
A Plethora of Options:
Somonion Rent Car LLC boasts an extensive selection of vehicles to cater to diverse preferences and budgets. Whether you’re in the market for a sleek sedan or a spacious crossover, the company has the perfect car to complement your needs. The transparency in pricing, coupled with the ease of booking through their online platform, makes Somonion Rent Car LLC a hassle-free solution for those embarking on a long-term adventure in Dubai.
Car Rental Services Tailored for You:
Somonion Rent Car LLC doesn’t just offer cars; it provides a comprehensive range of rental services tailored to suit various occasions. From daily and weekly rentals to airport transfers and business travel, the company ensures that your stay in Dubai is not only comfortable but also exudes prestige. The fleet includes popular models such as the Nissan Altima 2018, KIA Forte 2018, Hyundai Elantra 2018, and the Toyota Camry Sport Edition 2020, all available for monthly rentals at competitive rates.
Featured Deals and Specials:
Somonion Rent Car LLC constantly updates its offerings to provide customers with the best deals. Featured cars like the Hyundai Sonata 2018 and Hyundai Santa Fe 2018 add a touch of luxury to your rental experience, with daily rates starting as low as AED 100. The company’s commitment to affordable luxury is further emphasized by the online booking system, allowing customers to secure the best deals in real-time through their website or by contacting the experts via phone or WhatsApp.
Conclusion:
Whether you’re a tourist looking to explore Dubai at your pace or a business traveler in need of a reliable and prestigious mode of transportation, Somonion Rent Car LLC stands as the go-to choice for monthly car rentals in Dubai. Unlock the ultimate mobility experience with Somonion, where affordability meets excellence, ensuring your journey through Dubai is as seamless and luxurious as the city itself. Contact Somonion Rent Car LLC today and embark on a journey where every mile is a testament to comfort, style, and unmatched service.
zithromax without prescription: zithromax 500 without prescription – zithromax drug
https://zithromaxpharm.online/# zithromax 500 mg for sale
when will generic tadalafil be available
order generic azipro buy cheap azipro azithromycin canada
http://zithromaxpharm.online/# buy zithromax online australia
purchase lasix for sale oral furosemide
is tadalafil cialis covered by oscar health?
http://nolvadex.pro/# nolvadex online
prednisone 40 mg rx: buy prednisone without a prescription – prednisone 30 mg
Luxury car rental dubai
Dubai, a city known for its opulence and modernity, demands a mode of transportation that reflects its grandeur. For those seeking a cost-effective and reliable long-term solution, Somonion Rent Car LLC emerges as the premier choice for monthly car rentals in Dubai. With a diverse fleet ranging from compact cars to premium vehicles, the company promises an unmatched blend of affordability, flexibility, and personalized service.
Favorable Rental Conditions:
Understanding the potential financial strain of long-term car rentals, Somonion Rent Car LLC aims to make your journey more economical. The company offers flexible rental terms coupled with exclusive discounts for loyal customers. This commitment to affordability extends beyond the rental cost, as additional services such as insurance, maintenance, and repair ensure your safety and peace of mind throughout the duration of your rental.
A Plethora of Options:
Somonion Rent Car LLC boasts an extensive selection of vehicles to cater to diverse preferences and budgets. Whether you’re in the market for a sleek sedan or a spacious crossover, the company has the perfect car to complement your needs. The transparency in pricing, coupled with the ease of booking through their online platform, makes Somonion Rent Car LLC a hassle-free solution for those embarking on a long-term adventure in Dubai.
Car Rental Services Tailored for You:
Somonion Rent Car LLC doesn’t just offer cars; it provides a comprehensive range of rental services tailored to suit various occasions. From daily and weekly rentals to airport transfers and business travel, the company ensures that your stay in Dubai is not only comfortable but also exudes prestige. The fleet includes popular models such as the Nissan Altima 2018, KIA Forte 2018, Hyundai Elantra 2018, and the Toyota Camry Sport Edition 2020, all available for monthly rentals at competitive rates.
Featured Deals and Specials:
Somonion Rent Car LLC constantly updates its offerings to provide customers with the best deals. Featured cars like the Hyundai Sonata 2018 and Hyundai Santa Fe 2018 add a touch of luxury to your rental experience, with daily rates starting as low as AED 100. The company’s commitment to affordable luxury is further emphasized by the online booking system, allowing customers to secure the best deals in real-time through their website or by contacting the experts via phone or WhatsApp.
Conclusion:
Whether you’re a tourist looking to explore Dubai at your pace or a business traveler in need of a reliable and prestigious mode of transportation, Somonion Rent Car LLC stands as the go-to choice for monthly car rentals in Dubai. Unlock the ultimate mobility experience with Somonion, where affordability meets excellence, ensuring your journey through Dubai is as seamless and luxurious as the city itself. Contact Somonion Rent Car LLC today and embark on a journey where every mile is a testament to comfort, style, and unmatched service.
who should take tamoxifen: nolvadex estrogen blocker – how to get nolvadex
http://nolvadex.pro/# nolvadex price
what happens when you stop taking tamoxifen: tamoxifen hair loss – nolvadex gynecomastia
viagra tablet price
https://zithromaxpharm.online/# average cost of generic zithromax
canadian pharmacy viagra 100
prednisone 30 mg: buy prednisone 1 mg mexico – prednisone 5 mg tablet cost
Watches World: Elevating Luxury and Style with Exquisite Timepieces
Introduction:
Jewelry has always been a timeless expression of elegance, and nothing complements one’s style better than a luxurious timepiece. At Watches World, we bring you an exclusive collection of coveted luxury watches that not only tell time but also serve as a testament to your refined taste. Explore our curated selection featuring iconic brands like Rolex, Hublot, Omega, Cartier, and more, as we redefine the art of accessorizing.
A Dazzling Array of Luxury Watches:
Watches World offers an unparalleled range of exquisite timepieces from renowned brands, ensuring that you find the perfect accessory to elevate your style. Whether you’re drawn to the classic sophistication of Rolex, the avant-garde designs of Hublot, or the precision engineering of Patek Philippe, our collection caters to diverse preferences.
Customer Testimonials:
Our commitment to providing an exceptional customer experience is reflected in the reviews from our satisfied clientele. O.M. commends our excellent communication and flawless packaging, while Richard Houtman appreciates the helpfulness and courtesy of our team. These testimonials highlight our dedication to transparency, communication, and customer satisfaction.
New Arrivals:
Stay ahead of the curve with our latest additions, including the Tudor Black Bay Ceramic 41mm, Richard Mille RM35-01 Rafael Nadal NTPT Carbon Limited Edition, and the Rolex Oyster Perpetual Datejust 41mm series. These new arrivals showcase cutting-edge designs and impeccable craftsmanship, ensuring you stay on the forefront of luxury watch fashion.
Best Sellers:
Discover our best-selling watches, such as the Bulgari Serpenti Tubogas 35mm and the Cartier Panthere Medium Model. These timeless pieces combine elegance with precision, making them a staple in any sophisticated wardrobe.
Expert’s Selection:
Our experts have carefully curated a selection of watches, including the Cartier Panthere Small Model, Omega Speedmaster Moonwatch 44.25 mm, and Rolex Oyster Perpetual Cosmograph Daytona 40mm. These choices exemplify the epitome of watchmaking excellence and style.
Secured and Tracked Delivery:
At Watches World, we prioritize the safety of your purchase. Our secured and tracked delivery ensures that your exquisite timepiece reaches you in perfect condition, giving you peace of mind with every order.
Passionate Experts at Your Service:
Our team of passionate watch experts is dedicated to providing personalized service. From assisting you in choosing the perfect timepiece to addressing any inquiries, we are here to make your watch-buying experience seamless and enjoyable.
Global Presence:
With a presence in key cities around the world, including Dubai, Geneva, Hong Kong, London, Miami, Paris, Prague, Dublin, Singapore, and Sao Paulo, Watches World brings luxury timepieces to enthusiasts globally.
Conclusion:
Watches World goes beyond being an online platform for luxury watches; it is a destination where expertise, trust, and satisfaction converge. Explore our collection, and let our timeless timepieces become an integral part of your style narrative. Join us in redefining luxury, one exquisite watch at a time.
Dubai, a city of grandeur and innovation, demands a transportation solution that matches its dynamic pace. Whether you’re a business executive, a tourist exploring the city, or someone in need of a reliable vehicle temporarily, car rental services in Dubai offer a flexible and cost-effective solution. In this guide, we’ll explore the popular car rental options in Dubai, catering to diverse needs and preferences.
Airport Car Rental: One-Way Pickup and Drop-off Road Trip Rentals:
For those who need to meet an important delegation at the airport or have a flight to another city, airport car rentals provide a seamless solution. Avoid the hassle of relying on public transport and ensure you reach your destination on time. With one-way pickup and drop-off options, you can effortlessly navigate your road trip, making business meetings or conferences immediately upon arrival.
Business Car Rental Deals & Corporate Vehicle Rentals in Dubai:
Companies without their own fleet or those finding transport maintenance too expensive can benefit from business car rental deals. This option is particularly suitable for businesses where a vehicle is needed only occasionally. By opting for corporate vehicle rentals, companies can optimize their staff structure, freeing employees from non-core functions while ensuring reliable transportation when necessary.
Tourist Car Rentals with Insurance in Dubai:
Tourists visiting Dubai can enjoy the freedom of exploring the city at their own pace with car rentals that come with insurance. This option allows travelers to choose a vehicle that suits the particulars of their trip without the hassle of dealing with insurance policies. Renting a car not only saves money and time compared to expensive city taxis but also ensures a trouble-free travel experience.
Daily Car Hire Near Me:
Daily car rental services are a convenient and cost-effective alternative to taxis in Dubai. Whether it’s for a business meeting, everyday use, or a luxury experience, you can find a suitable vehicle for a day on platforms like Smarketdrive.com. The website provides a secure and quick way to rent a car from certified and verified car rental companies, ensuring guarantees and safety.
Weekly Auto Rental Deals:
For those looking for flexibility throughout the week, weekly car rentals in Dubai offer a competent, attentive, and professional service. Whether you need a vehicle for a few days or an entire week, choosing a car rental weekly is a convenient and profitable option. The certified and tested car rental companies listed on Smarketdrive.com ensure a reliable and comfortable experience.
Monthly Car Rentals in Dubai:
When your personal car is undergoing extended repairs, or if you’re a frequent visitor to Dubai, monthly car rentals (long-term car rentals) become the ideal solution. Residents, businessmen, and tourists can benefit from the extensive options available on Smarketdrive.com, ensuring mobility and convenience throughout their stay in Dubai.
FAQ about Renting a Car in Dubai:
To address common queries about renting a car in Dubai, our FAQ section provides valuable insights and information. From rental terms to insurance coverage, it serves as a comprehensive guide for those considering the convenience of car rentals in the bustling city.
Conclusion:
Dubai’s popularity as a global destination is matched by its diverse and convenient car rental services. Whether for business, tourism, or daily commuting, the options available cater to every need. With reliable platforms like Smarketdrive.com, navigating Dubai becomes a seamless and enjoyable experience, offering both locals and visitors the ultimate freedom of mobility.
Cheap monthly rental car
Dubai, a city known for its opulence and modernity, demands a mode of transportation that reflects its grandeur. For those seeking a cost-effective and reliable long-term solution, Somonion Rent Car LLC emerges as the premier choice for monthly car rentals in Dubai. With a diverse fleet ranging from compact cars to premium vehicles, the company promises an unmatched blend of affordability, flexibility, and personalized service.
Favorable Rental Conditions:
Understanding the potential financial strain of long-term car rentals, Somonion Rent Car LLC aims to make your journey more economical. The company offers flexible rental terms coupled with exclusive discounts for loyal customers. This commitment to affordability extends beyond the rental cost, as additional services such as insurance, maintenance, and repair ensure your safety and peace of mind throughout the duration of your rental.
A Plethora of Options:
Somonion Rent Car LLC boasts an extensive selection of vehicles to cater to diverse preferences and budgets. Whether you’re in the market for a sleek sedan or a spacious crossover, the company has the perfect car to complement your needs. The transparency in pricing, coupled with the ease of booking through their online platform, makes Somonion Rent Car LLC a hassle-free solution for those embarking on a long-term adventure in Dubai.
Car Rental Services Tailored for You:
Somonion Rent Car LLC doesn’t just offer cars; it provides a comprehensive range of rental services tailored to suit various occasions. From daily and weekly rentals to airport transfers and business travel, the company ensures that your stay in Dubai is not only comfortable but also exudes prestige. The fleet includes popular models such as the Nissan Altima 2018, KIA Forte 2018, Hyundai Elantra 2018, and the Toyota Camry Sport Edition 2020, all available for monthly rentals at competitive rates.
Featured Deals and Specials:
Somonion Rent Car LLC constantly updates its offerings to provide customers with the best deals. Featured cars like the Hyundai Sonata 2018 and Hyundai Santa Fe 2018 add a touch of luxury to your rental experience, with daily rates starting as low as AED 100. The company’s commitment to affordable luxury is further emphasized by the online booking system, allowing customers to secure the best deals in real-time through their website or by contacting the experts via phone or WhatsApp.
Conclusion:
Whether you’re a tourist looking to explore Dubai at your pace or a business traveler in need of a reliable and prestigious mode of transportation, Somonion Rent Car LLC stands as the go-to choice for monthly car rentals in Dubai. Unlock the ultimate mobility experience with Somonion, where affordability meets excellence, ensuring your journey through Dubai is as seamless and luxurious as the city itself. Contact Somonion Rent Car LLC today and embark on a journey where every mile is a testament to comfort, style, and unmatched service.
omnacortil order omnacortil 10mg brand omnacortil 20mg brand
buy cytotec: buy cytotec online fast delivery – buy misoprostol over the counter
https://zithromaxpharm.online/# where can you buy zithromax
Thanks in support of sharing such a fastidious opinion, post is nice, thats why
i have read it entirely
https://edpills.bid/# new ed drugs
usa pharmacy online: online pharmacy no prescription necessary – pharmacy drugstore online
generic sildenafil us
buy viagra super active
http://edpills.bid/# cure ed
Do you have a spam issue on this website; I also am
a blogger, and I was wondering your situation; many of us have created some nice procedures and we are looking to exchange strategies
with others, please shoot me an e-mail if interested.
cialis free 30 day trial
http://edwithoutdoctorprescription.store/# best non prescription ed pills
buy prescription drugs without doctor: prescription drugs online without – prescription drugs canada buy online
cialis 5mg best price
http://reputablepharmacies.online/# list of aarp approved pharmacies
canadian trust pharmacy: canadian pharmaceuticals – mexican online pharmacy
cialis prices in mexico
deltasone 40mg oral prednisone 10mg us
http://edwithoutdoctorprescription.store/# ed meds online without doctor prescription
mexican pharmacy online reviews: best canadian mail order pharmacies – canadapharmacyonline.com
Watches World
Watches World: Elevating Luxury and Style with Exquisite Timepieces
Introduction:
Jewelry has always been a timeless expression of elegance, and nothing complements one’s style better than a luxurious timepiece. At Watches World, we bring you an exclusive collection of coveted luxury watches that not only tell time but also serve as a testament to your refined taste. Explore our curated selection featuring iconic brands like Rolex, Hublot, Omega, Cartier, and more, as we redefine the art of accessorizing.
A Dazzling Array of Luxury Watches:
Watches World offers an unparalleled range of exquisite timepieces from renowned brands, ensuring that you find the perfect accessory to elevate your style. Whether you’re drawn to the classic sophistication of Rolex, the avant-garde designs of Hublot, or the precision engineering of Patek Philippe, our collection caters to diverse preferences.
Customer Testimonials:
Our commitment to providing an exceptional customer experience is reflected in the reviews from our satisfied clientele. O.M. commends our excellent communication and flawless packaging, while Richard Houtman appreciates the helpfulness and courtesy of our team. These testimonials highlight our dedication to transparency, communication, and customer satisfaction.
New Arrivals:
Stay ahead of the curve with our latest additions, including the Tudor Black Bay Ceramic 41mm, Richard Mille RM35-01 Rafael Nadal NTPT Carbon Limited Edition, and the Rolex Oyster Perpetual Datejust 41mm series. These new arrivals showcase cutting-edge designs and impeccable craftsmanship, ensuring you stay on the forefront of luxury watch fashion.
Best Sellers:
Discover our best-selling watches, such as the Bulgari Serpenti Tubogas 35mm and the Cartier Panthere Medium Model. These timeless pieces combine elegance with precision, making them a staple in any sophisticated wardrobe.
Expert’s Selection:
Our experts have carefully curated a selection of watches, including the Cartier Panthere Small Model, Omega Speedmaster Moonwatch 44.25 mm, and Rolex Oyster Perpetual Cosmograph Daytona 40mm. These choices exemplify the epitome of watchmaking excellence and style.
Secured and Tracked Delivery:
At Watches World, we prioritize the safety of your purchase. Our secured and tracked delivery ensures that your exquisite timepiece reaches you in perfect condition, giving you peace of mind with every order.
Passionate Experts at Your Service:
Our team of passionate watch experts is dedicated to providing personalized service. From assisting you in choosing the perfect timepiece to addressing any inquiries, we are here to make your watch-buying experience seamless and enjoyable.
Global Presence:
With a presence in key cities around the world, including Dubai, Geneva, Hong Kong, London, Miami, Paris, Prague, Dublin, Singapore, and Sao Paulo, Watches World brings luxury timepieces to enthusiasts globally.
Conclusion:
Watches World goes beyond being an online platform for luxury watches; it is a destination where expertise, trust, and satisfaction converge. Explore our collection, and let our timeless timepieces become an integral part of your style narrative. Join us in redefining luxury, one exquisite watch at a time.
cialis australia online shopping
amoxicillin tablets cheap amoxicillin 1000mg amoxicillin online
cialis promise program card
ed pills otc: cheap erectile dysfunction – mens erection pills
effect of tadalafil on female
ordering drugs from canada: Canada Pharmacy – canadadrugpharmacy com canadianpharmacy.pro
cialis dose
does cialis make you last longer
http://indianpharmacy.shop/# mail order pharmacy india indianpharmacy.shop
https://mexicanpharmacy.win/# mexican mail order pharmacies mexicanpharmacy.win
metronidazole microspheres
2024全新上線❰戰神賽特老虎機❱ – ATG賽特玩法說明介紹
❰戰神賽特老虎機❱是由ATG電子獨家開發的古埃及風格線上老虎機,在傳說中戰神賽特是「力量之神」與奈芙蒂斯女神結成連理,共同守護古埃及的奇幻秘寶,只有被選中的冒險者才能進入探險。
❰戰神賽特老虎機❱ – ATG賽特介紹
2024最新老虎機【戰神塞特】- ATG電子 X 富遊娛樂城
❰戰神賽特老虎機❱ – ATG電子
線上老虎機系統 : ATG電子
發行年分 : 2024年1月
最大倍數 : 51000倍
返還率 : 95.89%
支付方式 : 全盤倍數、消除掉落
最低投注金額 : 0.4元
最高投注金額 : 2000元
可否選台 : 是
可選台台數 : 350台
免費遊戲 : 選轉觸發+購買特色
❰戰神賽特老虎機❱ 賠率說明
戰神塞特老虎機賠率算法非常簡單,玩家們只需要不斷的轉動老虎機,成功消除物件即可贏分,得分賠率依賠率表計算。
當盤面上沒有物件可以消除時,倍數符號將會相加形成總倍數!該次旋轉的總贏分即為 : 贏分 X 總倍數。
積分方式如下 :
贏分=(單次押注額/20) X 物件賠率
EX : 單次押注額為1,盤面獲得12個戰神賽特倍數符號法老魔眼
贏分= (1/20) X 1000=50
以下為各個得分符號數量之獎金賠率 :
得分符號 獎金倍數 得分符號 獎金倍數
戰神賽特倍數符號聖甲蟲 6 2000
5 100
4 60 戰神賽特倍數符號黃寶石 12+ 200
10-11 30
8-9 20
戰神賽特倍數符號荷魯斯之眼 12+ 1000
10-11 500
8-9 200 戰神賽特倍數符號紅寶石 12+ 160
10-11 24
8-9 16
戰神賽特倍數符號眼鏡蛇 12+ 500
10-11 200
8-9 50 戰神賽特倍數符號紫鑽石 12+ 100
10-11 20
8-9 10
戰神賽特倍數符號神箭 12+ 300
10-11 100
8-9 40 戰神賽特倍數符號藍寶石 12+ 80
10-11 18
8-9 8
戰神賽特倍數符號屠鐮刀 12+ 240
10-11 40
8-9 30 戰神賽特倍數符號綠寶石 12+ 40
10-11 15
8-9 5
❰戰神賽特老虎機❱ 賠率說明(橘色數值為獲得數量、黑色數值為得分賠率)
ATG賽特 – 特色說明
ATG賽特 – 倍數符號獎金加乘
玩家們在看到盤面上出現倍數符號時,務必把握機會加速轉動ATG賽特老虎機,倍數符號會隨機出現2到500倍的隨機倍數。
當盤面無法在消除時,這些倍數總和會相加,乘上當時累積之獎金,即為最後得分總額。
倍數符號會出現在主遊戲和免費遊戲當中,玩家們千萬別錯過這個可以瞬間將得獎金額拉高的好機會!
ATG賽特 – 倍數符號獎金加乘
ATG賽特 – 倍數符號圖示
ATG賽特 – 進入神秘金字塔開啟免費遊戲
戰神賽特倍數符號聖甲蟲
❰戰神賽特老虎機❱ 免費遊戲符號
在古埃及神話中,聖甲蟲又稱為「死亡之蟲」,它被當成了天球及重生的象徵,守護古埃及的奇幻秘寶。
當玩家在盤面上,看見越來越多的聖甲蟲時,千萬不要膽怯,只需在牌面上斬殺4~6個ATG賽特免費遊戲符號,就可以進入15場免費遊戲!
在免費遊戲中若轉出3~6個聖甲蟲免費遊戲符號,可額外獲得5次免費遊戲,最高可達100次。
當玩家的累積贏分且盤面有倍數物件時,盤面上的所有倍數將會加入總倍數!
ATG賽特 – 選台模式贏在起跑線
為避免神聖的寶物被盜墓者奪走,富有智慧的法老王將金子塔內佈滿迷宮,有的設滿機關讓盜墓者寸步難行,有的暗藏機關可以直接前往存放神秘寶物的暗房。
ATG賽特老虎機設有350個機檯供玩家選擇,這是連魔龍老虎機、忍老虎機都給不出的機台數量,為的就是讓玩家,可以隨時進入神秘的古埃及的寶藏聖域,挖掘長眠已久的神祕寶藏。
【戰神塞特老虎機】選台模式
❰戰神賽特老虎機❱ 選台模式
ATG賽特 – 購買免費遊戲挖掘秘寶
玩家們可以使用當前投注額的100倍購買免費遊戲!進入免費遊戲再也不是虛幻。獎勵與一般遊戲相同,且購買後遊戲將自動開始,直到場次和獎金發放完畢為止。
有購買免費遊戲需求的玩家們,立即點擊「開始」,啟動神秘金字塔裡的古埃及祕寶吧!
【戰神塞特老虎機】購買特色
❰戰神賽特老虎機❱ 購買特色
戰神賽特試玩推薦
看完了❰戰神賽特老虎機❱介紹之後,玩家們是否也蓄勢待發要進入古埃及的世界,一探神奇秘寶探險之旅。
本次ATG賽特與線上娛樂城推薦第一名的富遊娛樂城合作,只需要加入會員,即可領取到168體驗金,免費試玩420轉!
https://mexicanpharmacy.win/# buying from online mexican pharmacy mexicanpharmacy.win
https://rgwager.com/mars-set/
2024全新上線❰戰神賽特老虎機❱ – ATG賽特玩法說明介紹
❰戰神賽特老虎機❱是由ATG電子獨家開發的古埃及風格線上老虎機,在傳說中戰神賽特是「力量之神」與奈芙蒂斯女神結成連理,共同守護古埃及的奇幻秘寶,只有被選中的冒險者才能進入探險。
❰戰神賽特老虎機❱ – ATG賽特介紹
2024最新老虎機【戰神塞特】- ATG電子 X 富遊娛樂城
❰戰神賽特老虎機❱ – ATG電子
線上老虎機系統 : ATG電子
發行年分 : 2024年1月
最大倍數 : 51000倍
返還率 : 95.89%
支付方式 : 全盤倍數、消除掉落
最低投注金額 : 0.4元
最高投注金額 : 2000元
可否選台 : 是
可選台台數 : 350台
免費遊戲 : 選轉觸發+購買特色
❰戰神賽特老虎機❱ 賠率說明
戰神塞特老虎機賠率算法非常簡單,玩家們只需要不斷的轉動老虎機,成功消除物件即可贏分,得分賠率依賠率表計算。
當盤面上沒有物件可以消除時,倍數符號將會相加形成總倍數!該次旋轉的總贏分即為 : 贏分 X 總倍數。
積分方式如下 :
贏分=(單次押注額/20) X 物件賠率
EX : 單次押注額為1,盤面獲得12個戰神賽特倍數符號法老魔眼
贏分= (1/20) X 1000=50
以下為各個得分符號數量之獎金賠率 :
得分符號 獎金倍數 得分符號 獎金倍數
戰神賽特倍數符號聖甲蟲 6 2000
5 100
4 60 戰神賽特倍數符號黃寶石 12+ 200
10-11 30
8-9 20
戰神賽特倍數符號荷魯斯之眼 12+ 1000
10-11 500
8-9 200 戰神賽特倍數符號紅寶石 12+ 160
10-11 24
8-9 16
戰神賽特倍數符號眼鏡蛇 12+ 500
10-11 200
8-9 50 戰神賽特倍數符號紫鑽石 12+ 100
10-11 20
8-9 10
戰神賽特倍數符號神箭 12+ 300
10-11 100
8-9 40 戰神賽特倍數符號藍寶石 12+ 80
10-11 18
8-9 8
戰神賽特倍數符號屠鐮刀 12+ 240
10-11 40
8-9 30 戰神賽特倍數符號綠寶石 12+ 40
10-11 15
8-9 5
❰戰神賽特老虎機❱ 賠率說明(橘色數值為獲得數量、黑色數值為得分賠率)
ATG賽特 – 特色說明
ATG賽特 – 倍數符號獎金加乘
玩家們在看到盤面上出現倍數符號時,務必把握機會加速轉動ATG賽特老虎機,倍數符號會隨機出現2到500倍的隨機倍數。
當盤面無法在消除時,這些倍數總和會相加,乘上當時累積之獎金,即為最後得分總額。
倍數符號會出現在主遊戲和免費遊戲當中,玩家們千萬別錯過這個可以瞬間將得獎金額拉高的好機會!
ATG賽特 – 倍數符號獎金加乘
ATG賽特 – 倍數符號圖示
ATG賽特 – 進入神秘金字塔開啟免費遊戲
戰神賽特倍數符號聖甲蟲
❰戰神賽特老虎機❱ 免費遊戲符號
在古埃及神話中,聖甲蟲又稱為「死亡之蟲」,它被當成了天球及重生的象徵,守護古埃及的奇幻秘寶。
當玩家在盤面上,看見越來越多的聖甲蟲時,千萬不要膽怯,只需在牌面上斬殺4~6個ATG賽特免費遊戲符號,就可以進入15場免費遊戲!
在免費遊戲中若轉出3~6個聖甲蟲免費遊戲符號,可額外獲得5次免費遊戲,最高可達100次。
當玩家的累積贏分且盤面有倍數物件時,盤面上的所有倍數將會加入總倍數!
ATG賽特 – 選台模式贏在起跑線
為避免神聖的寶物被盜墓者奪走,富有智慧的法老王將金子塔內佈滿迷宮,有的設滿機關讓盜墓者寸步難行,有的暗藏機關可以直接前往存放神秘寶物的暗房。
ATG賽特老虎機設有350個機檯供玩家選擇,這是連魔龍老虎機、忍老虎機都給不出的機台數量,為的就是讓玩家,可以隨時進入神秘的古埃及的寶藏聖域,挖掘長眠已久的神祕寶藏。
【戰神塞特老虎機】選台模式
❰戰神賽特老虎機❱ 選台模式
ATG賽特 – 購買免費遊戲挖掘秘寶
玩家們可以使用當前投注額的100倍購買免費遊戲!進入免費遊戲再也不是虛幻。獎勵與一般遊戲相同,且購買後遊戲將自動開始,直到場次和獎金發放完畢為止。
有購買免費遊戲需求的玩家們,立即點擊「開始」,啟動神秘金字塔裡的古埃及祕寶吧!
【戰神塞特老虎機】購買特色
❰戰神賽特老虎機❱ 購買特色
戰神賽特試玩推薦
看完了❰戰神賽特老虎機❱介紹之後,玩家們是否也蓄勢待發要進入古埃及的世界,一探神奇秘寶探險之旅。
本次ATG賽特與線上娛樂城推薦第一名的富遊娛樂城合作,只需要加入會員,即可領取到168體驗金,免費試玩420轉!
sulfamethoxazole trimethoprim dm 800 160 mg
http://indianpharmacy.shop/# indianpharmacy com
online shopping pharmacy india
http://canadianpharmacy.pro/# best canadian pharmacy canadianpharmacy.pro
indian pharmacy online indian pharmacy paypal or online shopping pharmacy india
https://maps.google.com.kw/url?q=https://indianpharmacy.shop online pharmacy india
buy prescription drugs from india best online pharmacy india and world pharmacy india indianpharmacy com
http://mexicanpharmacy.win/# mexican online pharmacies prescription drugs mexicanpharmacy.win
buy albuterol purchase albuterol sale buy ventolin 4mg sale
https://canadianpharmacy.pro/# reliable canadian pharmacy canadianpharmacy.pro
http://mexicanpharmacy.win/# buying prescription drugs in mexico mexicanpharmacy.win
online pharmacy review
2024娛樂城No.1 – 富遊娛樂城介紹
2024 年 1 月 5 日
|
娛樂城, 現金版娛樂城
富遊娛樂城是無論老手、新手,都非常推薦的線上博奕,在2024娛樂城當中扮演著多年來最來勢洶洶的一匹黑馬,『人性化且精緻的介面,遊戲種類眾多,超級多的娛樂城優惠,擁有眾多與會員交流遊戲的群組』是一大特色。
富遊娛樂城擁有歐洲馬爾他(MGA)和菲律賓政府競猜委員會(PAGCOR)頒發的合法執照。
註冊於英屬維爾京群島,受國際行業協會認可的合法公司。
我們的中心思想就是能夠帶領玩家遠詐騙黑網,讓大家安心放心的暢玩線上博弈,娛樂城也受各大部落客、IG網紅、PTT論壇,推薦討論,富遊娛樂城沒有之一,絕對是線上賭場玩家的第一首選!
富遊娛樂城介面 / 2024娛樂城NO.1
富遊娛樂城簡介
品牌名稱 : 富遊RG
創立時間 : 2019年
存款速度 : 平均15秒
提款速度 : 平均5分
單筆提款金額 : 最低1000-100萬
遊戲對象 : 18歲以上男女老少皆可
合作廠商 : 22家遊戲平台商
支付平台 : 各大銀行、各大便利超商
支援配備 : 手機網頁、電腦網頁、IOS、安卓(Android)
富遊娛樂城遊戲品牌
真人百家 — 歐博真人、DG真人、亞博真人、SA真人、OG真人
體育投注 — SUPER體育、鑫寶體育、亞博體育
電競遊戲 — 泛亞電競
彩票遊戲 — 富遊彩票、WIN 539
電子遊戲 —ZG電子、BNG電子、BWIN電子、RSG電子、好路GR電子
棋牌遊戲 —ZG棋牌、亞博棋牌、好路棋牌、博亞棋牌
捕魚遊戲 —ZG捕魚、RSG捕魚、好路GR捕魚、亞博捕魚
富遊娛樂城優惠活動
每日任務簽到金666
富遊VIP全面啟動
復酬金活動10%優惠
日日返水
新會員好禮五選一
首存禮1000送1000
免費體驗金$168
富遊娛樂城APP
步驟1 : 開啟網頁版【富遊娛樂城官網】
步驟2 : 點選上方(下載app),會跳出下載與複製連結選項,點選後跳轉。
步驟3 : 跳轉後點選(安裝),並點選(允許)操作下載描述檔,跳出下載描述檔後點選關閉。
步驟4 : 到手機設置>一般>裝置管理>設定描述檔(富遊)安裝,即可完成安裝。
富遊娛樂城常見問題FAQ
富遊娛樂城詐騙?
黑網詐騙可細分兩種,小出大不出及純詐騙黑網,我們可從品牌知名度經營和網站架設畫面分辨來簡單分辨。
富遊娛樂城會出金嗎?
如上面提到,富遊是在做一個品牌,為的是能夠保證出金,和帶領玩家遠離黑網,而且還有DUKER娛樂城出金認證,所以各位能夠放心富遊娛樂城為正出金娛樂城。
富遊娛樂城出金延遲怎麼辦?
基本上只要是公司系統問提造成富遊娛樂城會員無法在30分鐘成功提款,富遊娛樂城會即刻派送補償金,表達誠摯的歉意。
富遊娛樂城結論
富遊娛樂城安心玩,評價4.5顆星。如果還想看其他娛樂城推薦的,可以來娛樂城推薦尋找喔。
http://canadianpharmacy.pro/# canadian 24 hour pharmacy canadianpharmacy.pro
https://indianpharmacy.shop/# top 10 pharmacies in india indianpharmacy.shop
indian pharmacy online
http://mexicanpharmacy.win/# mexico drug stores pharmacies mexicanpharmacy.win
indian pharmacy paypal
flagyl nervousness
bactrim benzo
Online medicine home delivery mail order pharmacy india or world pharmacy india
https://cse.google.bj/url?q=https://indianpharmacy.shop reputable indian online pharmacy
п»їlegitimate online pharmacies india online shopping pharmacy india and reputable indian online pharmacy world pharmacy india
https://indianpharmacy.shop/# reputable indian online pharmacy indianpharmacy.shop
http://canadianpharmacy.pro/# canadian pharmacy king reviews canadianpharmacy.pro
indian pharmacy paypal
Viagra sans ordonnance 24h suisse: viagra sans ordonnance – SildГ©nafil Teva 100 mg acheter
https://cialissansordonnance.shop/# pharmacie ouverte 24/24
п»їpharmacie en ligne
https://acheterkamagra.pro/# acheter médicaments à l’étranger
Pharmacie en ligne pas cher: Levitra pharmacie en ligne – pharmacie ouverte 24/24
https://pharmadoc.pro/# pharmacie ouverte
Pharmacie en ligne France
http://pharmadoc.pro/# Pharmacies en ligne certifiées
п»їpharmacie en ligne: pharmacie en ligne – acheter mГ©dicaments Г l’Г©tranger
cheap vardenafil buy levitra 10mg online cheap
Acheter mГ©dicaments sans ordonnance sur internet Pharmacie en ligne pas cher or acheter medicament a l etranger sans ordonnance
http://www.city-fs.de/url?q=https://acheterkamagra.pro Pharmacie en ligne pas cher
acheter mГ©dicaments Г l’Г©tranger pharmacie ouverte 24/24 and Pharmacies en ligne certifiГ©es п»їpharmacie en ligne
Pharmacie en ligne fiable п»їpharmacie en ligne or <a href=" http://opac.bas-net.by/opacpage/phpinfo.php?a=viagra+tablets “>acheter mГ©dicaments Г l’Г©tranger
http://www.elienai.de/url?q=https://cialissansordonnance.shop Pharmacie en ligne France
pharmacie ouverte 24/24 Acheter mГ©dicaments sans ordonnance sur internet and Acheter mГ©dicaments sans ordonnance sur internet п»їpharmacie en ligne
http://cialissansordonnance.shop/# Pharmacie en ligne France
Viagra Pfizer sans ordonnance: viagra sans ordonnance – Viagra femme sans ordonnance 24h
Meilleur Viagra sans ordonnance 24h: Viagra sans ordonnance 24h suisse – Acheter viagra en ligne livraison 24h
http://levitrasansordonnance.pro/# Pharmacie en ligne fiable
acheter medicament a l etranger sans ordonnance
clomid pills buy clomid generic order clomiphene 100mg
prednisone 0.5 mg: where to buy prednisone 20mg – prednisone 20mg online pharmacy
https://clomiphene.icu/# can you buy cheap clomid pill
http://amoxicillin.bid/# over the counter amoxicillin canada
amoxicillin 500 mg purchase without prescription: order amoxicillin 500mg – order amoxicillin online uk
http://amoxicillin.bid/# 875 mg amoxicillin cost
can you buy clomid no prescription: where to get cheap clomid prices – can i get generic clomid no prescription
https://prednisonetablets.shop/# prednisone daily use
purchase zithromax online: zithromax buy online – can you buy zithromax over the counter
buy amoxicillin 500mg canada where can i buy amoxicillin online or medicine amoxicillin 500
http://images.google.kg/url?q=http://amoxicillin.bid medicine amoxicillin 500
order amoxicillin no prescription amoxicillin 500 mg price and buy amoxicillin 500mg capsules uk amoxicillin 500mg over the counter
buy generic semaglutide purchase semaglutide semaglutide price
https://clomiphene.icu/# how to buy cheap clomid price
https://ivermectin.store/# ivermectin topical
Монтаж vrf системы для эффективного охлаждения и отопления
монтаж vrf http://vrf-sistemy.ru.
buy zanaflex sale buy tizanidine 2mg generic buy zanaflex online
prednisone 10 mg over the counter: how much is prednisone 5mg – prednisone 30
http://amoxicillin.bid/# amoxicillin medicine over the counter
http://prednisonetablets.shop/# prednisone prescription online
A fascinating discussion is definitely worth comment.
I do think that you should publish more on this subject, it
might not be a taboo matter but typically folks don’t discuss these subjects.
To the next! All the best!!
http://azithromycin.bid/# zithromax generic price
http://clomiphene.icu/# can i order clomid tablets
order deltasone 20mg pill buy prednisone 20mg pill prednisone without prescription
buy rybelsus 14 mg sale brand rybelsus 14mg cheap rybelsus 14 mg
pinuputhezin.com
Name Up Casino is the certified website of the renowned online casino in place of players from Brazil.
https://www.pinuputhezin.com
darknet зайти на сайт
Даркнет, сокращение от “даркнетворк” (dark network), представляет собой часть интернета, недоступную для обычных поисковых систем. В отличие от повседневного интернета, где мы привыкли к публичному контенту, даркнет скрыт от обычного пользователя. Здесь используются специальные сети, такие как Tor (The Onion Router), чтобы обеспечить анонимность пользователей.
canadian neighbor pharmacy legitimate canadian pharmacies or canadian pharmacy ed medications
https://www.lnfcu.com/helpers/choice.asp?h=http://canadianpharm.store/ canadian pharmacy 24
legit canadian pharmacy canada drugstore pharmacy rx and canadian king pharmacy precription drugs from canada
Позитивное казино пин-ап
casino online gratis https://www.pinupcasinojenzolo.com.
trusted canadian pharmacy canadian drug pharmacy or canadian pharmacy no scripts
http://sc.archsd.gov.hk/utf8/canadianpharm.store/parks/hkzbg/en/index.php canada drugs online
legitimate canadian online pharmacies canadian pharmacy king reviews and legitimate canadian pharmacies canadian 24 hour pharmacy
indian pharmacy online: Indian pharmacy to USA – india pharmacy mail order indianpharm.store
purchase accutane generic order accutane 10mg online isotretinoin ca
https://indianpharm.store/# Online medicine order indianpharm.store
https://indianpharm.store/# indian pharmacy paypal indianpharm.store
Online medicine order: cheapest online pharmacy india – reputable indian pharmacies indianpharm.store
https://indianpharm.store/# legitimate online pharmacies india indianpharm.store
indian pharmacy online indianpharmacy com or best india pharmacy
https://images.google.dm/url?q=https://indianpharm.store top 10 online pharmacy in india
best india pharmacy mail order pharmacy india and top 10 pharmacies in india buy medicines online in india
https://canadianpharm.store/# real canadian pharmacy canadianpharm.store
buy medicines online in india international medicine delivery from india top 10 online pharmacy in india indianpharm.store
mexican online pharmacies prescription drugs: Online Pharmacies in Mexico – reputable mexican pharmacies online mexicanpharm.shop
canadian family pharmacy reputable canadian online pharmacy or canadian pharmacy price checker
https://www.google.com/url?q=https://canadianpharm.store canadian pharmacy king reviews
canadian discount pharmacy canadian family pharmacy and canada drugs canadianpharmacymeds
buying prescription drugs in mexico: Certified Pharmacy from Mexico – mexican drugstore online mexicanpharm.shop
albuterol tablet brand albuterol inhalator albuterol order
п»їlegitimate online pharmacies india: Online medicine order – п»їlegitimate online pharmacies india indianpharm.store
娛樂城
**娛樂城與線上賭場:現代娛樂的轉型與未來**
在當今數位化的時代,”娛樂城”和”線上賭場”已成為現代娛樂和休閒生活的重要組成部分。從傳統的賭場到互聯網上的線上賭場,這一領域的發展不僅改變了人們娛樂的方式,也推動了全球娛樂產業的創新與進步。
**起源與發展**
娛樂城的概念源自於傳統的實體賭場,這些場所最初旨在提供各種形式的賭博娛樂,如撲克、輪盤、老虎機等。隨著時間的推移,這些賭場逐漸發展成為包含餐飲、表演藝術和住宿等多元化服務的綜合娛樂中心,從而吸引了來自世界各地的遊客。
隨著互聯網技術的飛速發展,線上賭場應運而生。這種新型態的賭博平台讓使用者可以在家中或任何有互聯網連接的地方,享受賭博遊戲的樂趣。線上賭場的出現不僅為賭博愛好者提供了更多便利與選擇,也大大擴展了賭博產業的市場範圍。
**特點與魅力**
娛樂城和線上賭場的主要魅力在於它們能提供多樣化的娛樂選項和高度的可訪問性。無論是實體的娛樂城還是虛擬的線上賭場,它們都致力於創造一個充滿樂趣和刺激的環境,讓人們可以從日常生活的壓力中短暫逃脫。
此外,線上賭場通過提供豐富的遊戲選擇、吸引人的獎金方案以及便捷的支付系統,成功地吸引了全球範圍內的用戶。這些平台通常具有高度的互動性和社交性,使玩家不僅能享受遊戲本身,還能與來自世界各地的其他玩家交流。
**未來趨勢**
隨著技術的不斷進步和用戶需求的不斷演變,娛樂城和線上賭場的未來發展呈現出多元化的趨勢。一方面,虛
擬現實(VR)和擴增現實(AR)技術的應用,有望為線上賭場帶來更加沉浸式和互動式的遊戲體驗。另一方面,對於實體娛樂城而言,將更多地注重提供綜合性的休閒體驗,結合賭博、娛樂、休閒和旅遊等多個方面,以滿足不同客群的需求。
此外,隨著對負責任賭博的認識加深,未來娛樂城和線上賭場在提供娛樂的同時,也將更加注重促進健康的賭博行為和保護用戶的安全。
總之,娛樂城和線上賭場作為現代娛樂生活的一部分,隨著社會的發展和技術的進步,將繼續演化和創新,為人們提供更多的樂趣和便利。這一領域的未來發展無疑充滿了無限的可能性和機遇。
Hi there, I found your blog via Google whilst searching
for a related subject, your web site got here up, it seems great.
I’ve bookmarked it in my google bookmarks.
Hi there, simply turned into aware of your weblog through Google, and found that
it’s truly informative. I am gonna watch out for brussels.
I’ll appreciate if you happen to continue this in future.
Many other folks will be benefited out of
your writing. Cheers!
canadian pharmacy online no prescription online pharmacy without a prescription certified canadian pharmacy
on line pharmacy with no perscriptions: on line pharmacy with no perscriptions – discount prescription drug
https://canadadrugs.pro/# mexican pharmacies
Ігровий адреналін в клубі пін ап
ігри азартні https://www.pinupcasinolfsesn.kiev.ua .
best mexican online pharmacies: canadapharmacyonline com – buying drugs canada
my canadian pharmacy rx canadian pharmacy canada canadian pharmacies online legitimate
Играй в казино пин-ап
melhores casinos online http://pinupcasinojenzolo.com/.
canadian pharmaceuticals online safe: best online canadian pharcharmy – prescription drugs canada
cheap canadian cialis best rated canadian online pharmacy legitimate canadian pharmacies
https://canadadrugs.pro/# prescription drugs without the prescription
prescription prices
https://canadianpharmacyeasy.com/
canadian drug prices
fda approved online pharmacies canadian pharmacy 365 or cheap canadian pharmacy
http://club.dcrjs.com/link.php?url=https://canadadrugs.pro:: prescription drugs prices
canadian pharmacies shipping to usa canadian prescription pharmacy and prescription without a doctor’s prescription best online canadian pharcharmy
http://canadadrugs.pro/# my discount pharmacy
pharmacy canadian pharmacy 365 or medications with no prescription
https://images.google.cv/url?q=https://canadadrugs.pro best non prescription online pharmacies
top 10 mail order pharmacies best online pharmacies without a script and canadian pharmacy online no prescription top mexican pharmacies
amoxiclav buy online augmentin order online purchase amoxiclav
azithromycin 500mg tablet zithromax us buy zithromax 500mg pill
shlemsnidf.dp.ua/p-shlem-shark-evo-jet-black-mat/
Мотошлемы фаворитных марок на наличии в течение размашистом наборе и один-другой доставкой по Украине.
shlemsnidf.dp.ua/p-shlem-shark-s-drak-carbon-skin-black/
certified canadian online pharmacy: online pharmacies canada – canadian meds no prescription
online pharmacy mail order: medications canada – canadian pharmacieswith no prescription
http://canadadrugs.pro/# best canadian pharmacies online
pharmacy: northwestpharmacy – online pharmacy reviews
no script pharmacy: no prescription pharmacy – trusted canadian pharmacies
prescription cost comparison: canadian pharmacies without prescriptions – best online canadian pharmacy
canada pharmacies online pharmacy: buy mexican drugs online – certified canadian drug stores
https://canadadrugs.pro/# canadian medication
http://canadadrugs.pro/# online pharmacy without a prescription
buy omnacortil 10mg online cheap cheap prednisolone pills prednisolone 40mg without prescription
levothroid pills synthroid 75mcg uk order synthroid generic
cheap ed pills cheap ed pills new ed treatments
canadian pharmacy: canadian pharmacy ed medications – best canadian pharmacy
male ed drugs best erection pills best male ed pills
discount drugs
https://canadianpharmaceuticalshelp.com/
online pharmacy without prescription
http://certifiedpharmacymexico.pro/# medicine in mexico pharmacies
http://certifiedpharmacymexico.pro/# pharmacies in mexico that ship to usa
top rated ed pills cheap erectile dysfunction pills online cheap erectile dysfunction pills online
п»їbest mexican online pharmacies: best online pharmacies in mexico – buying prescription drugs in mexico
http://canadianinternationalpharmacy.pro/# cheapest pharmacy canada
men’s ed pills medications for ed or best non prescription ed pills
https://www.google.com.my/url?q=http://edpill.cheap medications for ed
best ed pill medicine erectile dysfunction and new treatments for ed top rated ed pills
http://edpill.cheap/# best pill for ed
best ways to make money online
Understanding the processes and protocols within a Professional Tenure Committee (PTC) is crucial for faculty members. This Frequently Asked Questions (FAQ) guide aims to address common queries related to PTC procedures, voting, and membership.
1. Why should members of the PTC fill out vote justification forms explaining their votes?
Vote justification forms provide transparency in decision-making. Members articulate their reasoning, fostering a culture of openness and ensuring that decisions are well-founded and understood by the academic community.
2. How can absentee ballots be cast?
To accommodate absentee voting, PTCs may implement secure electronic methods or designated proxy voters. This ensures that faculty members who cannot physically attend meetings can still contribute to decision-making processes.
3. How will additional members of PTCs be elected in departments with fewer than four tenured faculty members?
In smaller departments, creative solutions like rotating roles or involving faculty from related disciplines can be explored. Flexibility in election procedures ensures representation even in departments with fewer tenured faculty members.
4. Can a faculty member on OCSA or FML serve on a PTC?
Faculty members involved in other committees like the Organization of Committee on Student Affairs (OCSA) or Family and Medical Leave (FML) can serve on a PTC, but potential conflicts of interest should be carefully considered and managed.
5. Can an abstention vote be cast at a PTC meeting?
Yes, PTC members have the option to abstain from voting if they feel unable to take a stance on a particular matter. This allows for ethical decision-making and prevents uninformed voting.
6. What constitutes a positive or negative vote in PTCs?
A positive vote typically indicates approval or agreement, while a negative vote signifies disapproval or disagreement. Clear definitions and guidelines within each PTC help members interpret and cast their votes accurately.
7. What constitutes a quorum in a PTC?
A quorum, the minimum number of members required for a valid meeting, is essential for decision-making. Specific rules about quorum size are usually outlined in the PTC’s governing documents.
Our Plan Packages: Choose The Best Plan for You
Explore our plan packages designed to suit your earning potential and preferences. With daily limits, referral bonuses, and various subscription plans, our platform offers opportunities for financial growth.
Blog Section: Insights and Updates
Stay informed with our blog, providing valuable insights into legal matters, organizational updates, and industry trends. Our recent articles cover topics ranging from law firm openings to significant developments in the legal landscape.
Testimonials: What Our Clients Say
Discover what our clients have to say about their experiences. Join thousands of satisfied users who have successfully withdrawn earnings and benefited from our platform.
Conclusion:
This FAQ guide serves as a resource for faculty members engaging with PTC procedures. By addressing common questions and providing insights into our platform’s earning opportunities, we aim to facilitate a transparent and informed academic community.
indianpharmacy com: indian pharmacies safe – Online medicine home delivery
http://medicinefromindia.store/# online shopping pharmacy india
reputable indian pharmacies
online pay per click
Understanding the processes and protocols within a Professional Tenure Committee (PTC) is crucial for faculty members. This Frequently Asked Questions (FAQ) guide aims to address common queries related to PTC procedures, voting, and membership.
1. Why should members of the PTC fill out vote justification forms explaining their votes?
Vote justification forms provide transparency in decision-making. Members articulate their reasoning, fostering a culture of openness and ensuring that decisions are well-founded and understood by the academic community.
2. How can absentee ballots be cast?
To accommodate absentee voting, PTCs may implement secure electronic methods or designated proxy voters. This ensures that faculty members who cannot physically attend meetings can still contribute to decision-making processes.
3. How will additional members of PTCs be elected in departments with fewer than four tenured faculty members?
In smaller departments, creative solutions like rotating roles or involving faculty from related disciplines can be explored. Flexibility in election procedures ensures representation even in departments with fewer tenured faculty members.
4. Can a faculty member on OCSA or FML serve on a PTC?
Faculty members involved in other committees like the Organization of Committee on Student Affairs (OCSA) or Family and Medical Leave (FML) can serve on a PTC, but potential conflicts of interest should be carefully considered and managed.
5. Can an abstention vote be cast at a PTC meeting?
Yes, PTC members have the option to abstain from voting if they feel unable to take a stance on a particular matter. This allows for ethical decision-making and prevents uninformed voting.
6. What constitutes a positive or negative vote in PTCs?
A positive vote typically indicates approval or agreement, while a negative vote signifies disapproval or disagreement. Clear definitions and guidelines within each PTC help members interpret and cast their votes accurately.
7. What constitutes a quorum in a PTC?
A quorum, the minimum number of members required for a valid meeting, is essential for decision-making. Specific rules about quorum size are usually outlined in the PTC’s governing documents.
Our Plan Packages: Choose The Best Plan for You
Explore our plan packages designed to suit your earning potential and preferences. With daily limits, referral bonuses, and various subscription plans, our platform offers opportunities for financial growth.
Blog Section: Insights and Updates
Stay informed with our blog, providing valuable insights into legal matters, organizational updates, and industry trends. Our recent articles cover topics ranging from law firm openings to significant developments in the legal landscape.
Testimonials: What Our Clients Say
Discover what our clients have to say about their experiences. Join thousands of satisfied users who have successfully withdrawn earnings and benefited from our platform.
Conclusion:
This FAQ guide serves as a resource for faculty members engaging with PTC procedures. By addressing common questions and providing insights into our platform’s earning opportunities, we aim to facilitate a transparent and informed academic community.
compare ed drugs natural ed remedies medications for ed
how to get prescription drugs without doctor: generic cialis without a doctor prescription – viagra without a doctor prescription
http://medicinefromindia.store/# buy medicines online in india
indian pharmacies safe reputable indian pharmacies or best online pharmacy india
https://cse.google.ad/url?sa=t&url=https://medicinefromindia.store top online pharmacy india
buy prescription drugs from india indian pharmacies safe and top 10 online pharmacy in india best online pharmacy india
medication from mexico pharmacy mexican pharmaceuticals online or buying prescription drugs in mexico
http://otdix-u-mory.ru/sql.php?=certifiedpharmacymexico.pro mexico drug stores pharmacies
mexican mail order pharmacies medicine in mexico pharmacies and buying prescription drugs in mexico online buying from online mexican pharmacy
mexican pharmacy purple pharmacy mexico price list mexican pharmacy
gabapentin 100mg sale order gabapentin 100mg pills neurontin 100mg tablet
best online canadian pharmacy: canadianpharmacyworld – legit canadian online pharmacy
buy clomid 100mg generic clomid 50mg sale purchase clomiphene online cheap
Скрытая сеть, представляет собой, анонимную, инфраструктуру, в, глобальной сети, доступ к которой, реализуется, через, специальные, программы плюс, технические средства, обеспечивающие, скрытность пользователей. Из числа, этих, технических решений, считается, The Onion Router, обеспечивает, предоставляет, приватное, соединение к даркнету. С, его, сетевые пользователи, могут, незаметно, посещать, веб-сайты, не отображаемые, традиционными, сервисами поиска, что делает возможным, условия, для, различных, запрещенных операций.
Киберторговая площадка, соответственно, часто ассоциируется с, темной стороной интернета, в качестве, рынок, осуществления обмена, киберугрозами. Здесь, можно, купить, разнообразные, непозволительные, товары и услуги, вплоть до, наркотических средств и стволов, заканчивая, хакерскими действиями. Ресурс, гарантирует, высокую степень, шифрования, и, скрытности, это, создает, ее, интересной, для тех, кого, намерен, уклониться от, негативных последствий, со стороны правоохранительных органов
Online medicine home delivery Online medicine home delivery or п»їlegitimate online pharmacies india
http://www.mishizhuti.com/114/export.php?url=http://medicinefromindia.store online shopping pharmacy india
buy medicines online in india buy prescription drugs from india and reputable indian online pharmacy indianpharmacy com
ed treatment pills: pills erectile dysfunction – cheap erectile dysfunction pills
кракен kraken kraken darknet top
Даркнет, является, скрытую, платформу, в, сети, вход, происходит, через, уникальные, приложения и, технические средства, гарантирующие, конфиденциальность пользовательские данных. Из числа, таких, средств, является, Тор браузер, который обеспечивает, обеспечивает, приватное, подключение к сети, к сети Даркнет. Используя, его, сетевые пользователи, имеют шанс, анонимно, обращаться к, интернет-ресурсы, не отображаемые, стандартными, поисками, создавая тем самым, обстановку, для организации, разнообразных, противоправных действий.
Кракен, в результате, часто связывается с, даркнетом, как, площадка, для торговли, киберугрозами. На данной платформе, может быть возможность, приобрести, разные, нелегальные, товары, начиная с, наркотиков и оружия, вплоть до, услугами хакеров. Система, предоставляет, крупную долю, криптографической защиты, а также, анонимности, это, делает, ее, привлекательной, для, намерен, уклониться от, преследований, со стороны соответствующих правоохранительных органов.
best ed pills non prescription ed pills without doctor prescription viagra without doctor prescription amazon
http://medicinefromindia.store/# top online pharmacy india
top 10 pharmacies in india
online pharmacy india: indianpharmacy com – reputable indian online pharmacy
ed medications list ed drugs list erectile dysfunction pills
best online pharmacies in mexico mexican pharmaceuticals online mexican drugstore online
http://canadianinternationalpharmacy.pro/# canadian drug pharmacy
purple pharmacy mexico price list: pharmacies in mexico that ship to usa – mexican online pharmacies prescription drugs
canada pharmacy online best canadian online pharmacy best mail order pharmacy canada
online pharmacy india india online pharmacy or buy prescription drugs from india
https://cse.google.ge/url?sa=t&url=https://medicinefromindia.store india online pharmacy
buy medicines online in india indian pharmacy paypal and best india pharmacy india pharmacy mail order
https://medicinefromindia.store/# best india pharmacy
best non prescription ed pills ed pills without doctor prescription sildenafil without a doctor’s prescription
indian pharmacies safe cheapest online pharmacy india or indianpharmacy com
http://www.direktiva.eu/url?q=https://medicinefromindia.store best india pharmacy
buy prescription drugs from india п»їlegitimate online pharmacies india and cheapest online pharmacy india cheapest online pharmacy india
best mail order pharmacy canada: canadian pharmacy ltd – best canadian pharmacy to buy from
canadian pharmacy online canadian online pharmacy reviews pet meds without vet prescription canada
prescription drugs without doctor approval ed pills without doctor prescription best ed pills non prescription
Promotions at 777casino looks fantastic. At first they are giving 21 eur no deposit bonus. I have got it with no problem but lost very fast. Also take a look at welcome first deposit offer. Wagering just 30x bonus amount. Not many casinos can offer it. Just only i am sad that withdrawals here are a little bit to slow. Money should reach e-wallets in 24 hours, not from 2 till 5 business days. That’s my opinion. Casino itself looks simple, easy to navigat but not impressed me much. But just because of bonuses it is worth to try. Take a trip down Vegas memory lane when you arrive at the stunning and attractive homepage of 777 Casino. This online casino is virtually set in the desert of Nevada with the dusty lights of Vegas Strip on the horizon. The casino’s tag line is “The #1 retro Vegas casino experience” and looking at the site, we think this is exactly what you will get. This casino is licensed in 2 of the top jurisdictions and has a parent company (888) with a solid name in the industry.
https://elysiumsalon.com/products/hair-on-the-brains-duo-curl-giveaway/comment-page-1
The best 18 and over casinos are all available offshore. You can read our Cafe Casino review, Ignition Casino review, Bovada Casino review, and Slots LV Casino review to decide which operator suits your style best, and all of them accept most US members at just 18 years old. Senator Risa Hontiveros, the committee’s chair, is calling for POGOs to be banned. “POGOs provide that legal layer to these hubs and the operations of these hubs remain beyond regulatory scrutiny,” Senator Hontiveros said. “If POGOs are allowed to continue business as usual, the crypto-scams and human trafficking operations will also grow at a frightening rate our government will never be able to overtake.” Definitely! Legit online casinos are licensed and regulated by authoritative government bodies and their software providers are certified as well. Make sure you pick an online casino from our list of recommended sites if you don’t feel like doing the research yourself. You can read our online casino reviews for complete information about each site.
http://edpill.cheap/# best ed medications
order sildenafil 50mg for sale buy sildenafil 50mg online cheap female viagra sildenafil
ed treatments: ed medications – best ed drug
http://edpill.cheap/# top rated ed pills
indianpharmacy com top online pharmacy india or reputable indian online pharmacy
https://maps.google.com.pr/url?q=https://medicinefromindia.store indian pharmacy
indian pharmacy buy medicines online in india and indian pharmacy paypal best india pharmacy
http://medicinefromindia.store/# best online pharmacy india
http://edpill.cheap/# what are ed drugs
reputable indian online pharmacy best online pharmacy india indianpharmacy com
Watches World
ed medication online ed medication treatment for ed
order vibra-tabs pill purchase monodox pill buy doxycycline 100mg pill
mexican border pharmacies shipping to usa: buying from online mexican pharmacy – medication from mexico pharmacy
http://edwithoutdoctorprescription.pro/# ed meds online without prescription or membership
reputable indian pharmacies india online pharmacy or top online pharmacy india
https://www.google.co.ve/url?sa=t&url=https://medicinefromindia.store indian pharmacies safe
mail order pharmacy india online shopping pharmacy india and cheapest online pharmacy india india online pharmacy
mexico pharmacies prescription drugs mexico drug stores pharmacies or pharmacies in mexico that ship to usa
https://www.google.com.pr/url?sa=t&url=https://certifiedpharmacymexico.pro buying prescription drugs in mexico
п»їbest mexican online pharmacies mexican drugstore online and buying from online mexican pharmacy medication from mexico pharmacy
online ed pills new ed treatments ed medication
mexican rx online mexico drug stores pharmacies buying prescription drugs in mexico online
https://mexicanph.shop/# buying prescription drugs in mexico online
mexican pharmaceuticals online
mexican pharmaceuticals online mexico pharmacy medicine in mexico pharmacies
reputable mexican pharmacies online buying from online mexican pharmacy mexico pharmacies prescription drugs
buying prescription drugs in mexico online buying from online mexican pharmacy reputable mexican pharmacies online
Medications and Men’s Health – Solutions for a Happier, Healthier Life – ventolin inhaler 90 mcg is for children
medication from mexico pharmacy mexico pharmacy mexican rx online
roulette online with real money online poker free play for real online casino games
Wristwatches Planet
Patron Comments Reveal Our Watch Boutique Experience
At Our Watch Boutique, client contentment isn’t just a target; it’s a shining testament to our loyalty to greatness. Let’s plunge into what our respected customers have to express about their encounters, illuminating on the perfect service and extraordinary watches we offer.
O.M.’s Review Review: A Uninterrupted Voyage
“Very excellent communication and follow-up throughout the process. The watch was perfectly packed and in perfect. I would surely work with this crew again for a timepiece buying.
O.M.’s declaration exemplifies our commitment to contact and meticulous care in delivering chronometers in flawless condition. The trust forged with O.M. is a pillar of our patron relations.
Richard Houtman’s Perceptive Review: A Personalized Touch
“I dealt with Benny, who was extremely beneficial and polite at all times, keeping me regularly updated of the procedure. Moving forward, even though I ended up sourcing the wristwatch locally, I would still surely recommend Benny and the enterprise moving forward.
Richard Houtman’s experience highlights our customized approach. Benny’s assistance and constant comms exhibit our dedication to ensuring every customer feels valued and apprised.
Customer’s Efficient Service Review: A Uninterrupted Transaction
“A very excellent and efficient service. Kept me up to date on the transaction progress.
Our commitment to streamlining is echoed in this client’s commentary. Keeping clients updated and the uninterrupted progression of transactions are integral to the Our Watch Boutique experience.
Explore Our Newest Collections
Audemars Piguet Selfwinding Royal Oak 37mm
A gorgeous piece at €45,900, this 2022 model (REF: 15551ST.ZZ.1356ST.05) invites you to add it to your trolley and elevate your assortment.
Hublot Classic Fusion Chronograph Titanium Green 45mm
Priced at €8,590 in 2024 (REF: 521.NX.8970.RX), this Hublot creation is a blend of styling and innovation, awaiting your application.
http://mexicanph.com/# п»їbest mexican online pharmacies
buying prescription drugs in mexico online
buying from online mexican pharmacy mexican pharmacy mexican pharmacy
mexican online pharmacies prescription drugs medication from mexico pharmacy or buying prescription drugs in mexico online
https://images.google.cm/url?sa=t&url=https://mexicanph.shop mexican drugstore online
mexico drug stores pharmacies pharmacies in mexico that ship to usa and buying from online mexican pharmacy pharmacies in mexico that ship to usa
medication from mexico pharmacy buying prescription drugs in mexico mexico drug stores pharmacies
purple pharmacy mexico price list mexico drug stores pharmacies reputable mexican pharmacies online
reputable mexican pharmacies online best online pharmacies in mexico or reputable mexican pharmacies online
https://www.google.com.co/url?q=https://mexicanph.com medicine in mexico pharmacies
mexico pharmacies prescription drugs mexican pharmacy and reputable mexican pharmacies online buying prescription drugs in mexico online
vardenafil 10mg sale order vardenafil 20mg generic buy vardenafil 10mg generic
buying from online mexican pharmacy reputable mexican pharmacies online or mexican online pharmacies prescription drugs
https://cse.google.co.th/url?sa=i&url=http://mexicanph.shop reputable mexican pharmacies online
mexican rx online mexico drug stores pharmacies and mexican drugstore online mexican drugstore online
purple pharmacy mexico price list buying from online mexican pharmacy reputable mexican pharmacies online
Безопасность в сети: Каталог переправ для Tor Browser
В настоящий период, когда проблемы конфиденциальности и защиты в сети становятся все более значимыми, многие пользователи обращают внимание на средства, позволяющие сберечь невидимость и секретность личной информации. Один из таких инструментов – Tor Browser, разработанный на сети Tor. Однако даже при использовании Tor Browser есть риск столкнуться с ограничением или преградой со стороны поставщиков интернет-услуг или цензурных органов.
Для разрешения этих ограничений были созданы переходы для Tor Browser. Подходы – это уникальные серверы, которые могут быть использованы для прохождения блокировок и снабжения доступа к сети Tor. В представленном тексте мы рассмотрим список подходов, которые можно использовать с Tor Browser для гарантирования безопасной и безопасной анонимности в интернете.
meek-azure: Этот подход использует облачный сервис Azure для того, чтобы замаскировать тот факт, что вы используете Tor. Это может быть важно в странах, где поставщики интернет-услуг блокируют доступ к серверам Tor.
obfs4: Переход обфускации, предоставляющий методы для сокрытия трафика Tor. Этот подход может эффективным образом обходить блокировки и цензуру, делая ваш трафик невидимым для сторонних.
fte: Переправа, использующий Free Talk Encrypt (FTE) для обфускации трафика. FTE позволяет изменять трафик так, чтобы он был обычным сетевым трафиком, что делает его более трудным для выявления.
snowflake: Этот переправа позволяет вам использовать браузеры, которые поддерживаются расширение Snowflake, чтобы помочь другим пользователям Tor пройти через цензурные блокировки.
fte-ipv6: Вариант FTE с поддержкой IPv6, который может быть полезен, если ваш провайдер интернета предоставляет IPv6-подключение.
Чтобы использовать эти переходы с Tor Browser, откройте его настройки, перейдите в раздел “Проброс мостов” и введите названия подходов, которые вы хотите использовать.
Не забывайте, что успех подходов может изменяться в зависимости от страны и поставщиков интернет-услуг. Также рекомендуется часто обновлять каталог переходов, чтобы быть уверенным в эффективности обхода блокировок. Помните о важности безопасности в интернете и производите защитные действия для обеспечения защиты своей личной информации.
buying from online mexican pharmacy buying prescription drugs in mexico online or mexican mail order pharmacies
https://www.google.im/url?q=https://mexicanph.shop mexican pharmacy
<a href=http://www.hk-pub.com/forum/dedo_siteindex.php?q=mexican online pharmacies prescription drugs purple pharmacy mexico price list and purple pharmacy mexico price list pharmacies in mexico that ship to usa
pharmacies in mexico that ship to usa [url=https://mexicanph.com/#]mexican pharmacy[/url] reputable mexican pharmacies online
В пределах века цифровых технологий, когда виртуальные границы смешиваются с реальностью, запрещено игнорировать наличие угроз в даркнете. Одной из потенциальных опасностей является blacksprut – слово, ставший символом нелегальной, вредоносной деятельности в теневых уголках интернета.
Blacksprut, будучи частью подпольной сети, представляет значительную угрозу для безопасности в сети и личной сохранности пользователей. Этот закрытый уголок сети порой ассоциируется с противозаконными сделками, торговлей запрещенными товарами и услугами, а также прочими противозаконными деяниями.
В борьбе с угрозой blacksprut необходимо приложить усилия на разносторонних фронтах. Одним из ключевых направлений является совершенствование технологий цифровой безопасности. Развитие продвинутых алгоритмов и технологий анализа данных позволит отслеживать и пресекать деятельность blacksprut в реальной ситуации.
Помимо цифровых мер, важна координация усилий органов правопорядка на планетарном уровне. Международное сотрудничество в области деятельности защиты в сети необходимо для успешного противодействия угрозам, связанным с blacksprut. Обмен информацией, формирование совместных стратегий и оперативные действия помогут уменьшить воздействие этой угрозы.
Обучение и разъяснение также играют существенную роль в борьбе с blacksprut. Повышение сознания пользователей о рисках теневого интернета и методах предотвращения становится неотъемлемой элементом антиспампинговых мероприятий. Чем более проинформированными будут пользователи, тем меньше вероятность попадания под влияние угрозы blacksprut.
В заключение, в борьбе с угрозой blacksprut необходимо комбинировать усилия как на цифровом, так и на правовом уровнях. Это серьезное испытание, подразумевающий совместных усилий людей, правоохранительных органов и компаний в сфере технологий. Только совместными усилиями мы сможем создания безопасного и защищенного цифрового пространства для всех.
Торовский браузер является продвинутым инструментом для сбережения конфиденциальности и защиты в вебе. Однако, иногда серферы могут столкнуться с трудностями подключения. В тексте мы рассмотрим возможные происхождения и предложим методы решения для устранения препятствий с доступом к Tor Browser.
Проблемы с сетью:
Решение: Проверка соединения ваше интернет-соединение. Удостоверьтесь, что вы подключены к вебу, и нет ли затруднений с вашим провайдером интернет-услуг.
Блокировка Тор сети:
Решение: В некоторых определенных территориях или системах Tor может быть запрещен. Воспользуйтесь использовать проходы для обхода блокировок. В параметрах Tor Browser отметьте “Проброс мостов” и соблюдайте инструкциям.
Прокси-серверы и файерволы:
Решение: Проверьте конфигурации прокси и файервола. Удостоверьтесь, что они не ограничивают доступ Tor Browser к вебу. Измените установки или в течение некоторого времени отключите прокси и стены для испытания.
Проблемы с самим веб-обозревателем:
Решение: Проверьте, что у вас установлена последнее обновление Tor Browser. Иногда изменения могут разрешить сложности с входом. Также пробуйте пересобрать программу.
Временные перебои в Tor сети:
Решение: Выждите некоторое время и пытайтесь достичь соединения в дальнейшем. Временные перебои в работе Tor часто случаться, и эти явления как правило исправляются в кратчайшие периоды.
Отключение JavaScript:
Решение: Некоторые из числа веб-сайты могут блокировать доступ через Tor, если в вашем приложении включен JavaScript. Попробуйте временно остановить JavaScript в настройках конфигурации обозревателя.
Проблемы с антивирусным ПО:
Решение: Ваш защитное ПО или файервол может ограничивать Tor Browser. Удостоверьтесь, что у вас не установлено ограничений для Tor в конфигурации вашего антивирусного приложения.
Исчерпание памяти устройства:
Решение: Если у вас активно множество окон или процессы, это может призвести к исчерпанию памяти и проблемам с входом. Закройте дополнительные вкладки или перезапустите браузер.
В случае, если трудность с доступом к Tor Browser остается в силе, заходите за поддержкой на официальной дискуссионной площадке Tor. Эксперты могут предложить дополнительную помощь и поддержку и рекомендации. Соблюдайте, что безопасность и невидимость требуют постоянного внимания к мелочам, поэтому отслеживайте нововведениями и применяйте инструкциям Tor-сообщества.
is metformin bad for you
medicine in mexico pharmacies mexican border pharmacies shipping to usa or mexican pharmaceuticals online
https://cse.google.mg/url?sa=i&url=http://mexicanph.com medicine in mexico pharmacies
mexico drug stores pharmacies п»їbest mexican online pharmacies and п»їbest mexican online pharmacies mexican border pharmacies shipping to usa
order generic pregabalin order lyrica 75mg pill cheap lyrica 150mg
mexico pharmacy mexican border pharmacies shipping to usa mexican online pharmacies prescription drugs
Весела атмосфера пін ап
пін ап відгуки https://www.pinupcasinoqgcvbisd.kiev.ua/ .
zithromax drug interaction
mexican online pharmacies prescription drugs pharmacies in mexico that ship to usa mexico pharmacies prescription drugs
Watches World
Horological instruments Universe
Patron Reviews Illuminate WatchesWorld Encounter
At Our Watch Boutique, customer happiness isn’t just a goal; it’s a shining proof to our devotion to perfection. Let’s plunge into what our valued buyers have to communicate about their encounters, illuminating on the faultless support and amazing timepieces we provide.
O.M.’s Trustpilot Testimonial: A Uninterrupted Journey
“Very excellent comms and follow along throughout the procedure. The watch was perfectively packed and in pristine. I would certainly work with this teamwork again for a wristwatch purchase.
O.M.’s testimony typifies our commitment to comms and thorough care in delivering timepieces in impeccable condition. The faith established with O.M. is a building block of our customer bonds.
Richard Houtman’s Insightful Review: A Personal Touch
“I dealt with Benny, who was exceptionally useful and civil at all times, keeping me frequently apprised of the procedure. Moving forward, even though I ended up sourcing the wristwatch locally, I would still definitely recommend Benny and the company progressing.
Richard Houtman’s encounter showcases our customized approach. Benny’s assistance and uninterrupted communication exhibit our dedication to ensuring every buyer feels appreciated and informed.
Customer’s Effective Assistance Testimonial: A Effortless Transaction
“A very good and productive service. Kept me updated on the transaction advancement.
Our commitment to efficiency is echoed in this buyer’s feedback. Keeping customers updated and the uninterrupted development of transactions are integral to the Our Watch Boutique experience.
Explore Our Newest Offerings
Audemars Piguet Royal Oak Selfwinding 37mm
An exquisite piece at €45,900, this 2022 edition (REF: 15551ST.ZZ.1356ST.05) invites you to add it to your cart and elevate your set.
Hublot Classic Fusion Green Titanium Chronograph 45mm
Priced at €8,590 in 2024 (REF: 521.NX.8970.RX), this Hublot creation is a mixture of fashion and novelty, awaiting your demand.
mexican mail order pharmacies mexican mail order pharmacies п»їbest mexican online pharmacies
mexican rx online buying from online mexican pharmacy or pharmacies in mexico that ship to usa
https://image.google.tk/url?q=https://mexicanph.shop mexico pharmacies prescription drugs
п»їbest mexican online pharmacies mexican mail order pharmacies and п»їbest mexican online pharmacies medication from mexico pharmacy
mexico drug stores pharmacies purple pharmacy mexico price list medicine in mexico pharmacies
zithromax chlamydia alcohol
buying prescription drugs in mexico online п»їbest mexican online pharmacies mexico drug stores pharmacies
mexico pharmacies prescription drugs best online pharmacies in mexico or mexican drugstore online
http://tool.baiwanzhan.com/t1/pr.aspx?url=mexicanph.com mexican online pharmacies prescription drugs
mexican rx online medicine in mexico pharmacies and mexico drug stores pharmacies mexico drug stores pharmacies
http://mexicanph.com/# mexico drug stores pharmacies
medicine in mexico pharmacies
ST666
mexican border pharmacies shipping to usa mexico pharmacies prescription drugs medication from mexico pharmacy
aristocort 4mg canada triamcinolone 10mg price buy aristocort online cheap
mexican rx online pharmacies in mexico that ship to usa purple pharmacy mexico price list
mexican rx online reputable mexican pharmacies online mexican online pharmacies prescription drugs
best online pharmacies in mexico buying prescription drugs in mexico online or medication from mexico pharmacy
https://www.google.si/url?q=https://mexicanph.shop mexico pharmacies prescription drugs
mexico drug stores pharmacies medication from mexico pharmacy and purple pharmacy mexico price list best online pharmacies in mexico
pharmacies in mexico that ship to usa purple pharmacy mexico price list mexico drug stores pharmacies
п»їbest mexican online pharmacies mexican border pharmacies shipping to usa or п»їbest mexican online pharmacies
https://www.google.com.gt/url?q=https://mexicanph.com mexican rx online
mexico drug stores pharmacies best online pharmacies in mexico and buying prescription drugs in mexico online mexican pharmaceuticals online
medication from mexico pharmacy best online pharmacies in mexico or mexican border pharmacies shipping to usa
https://maps.google.mw/url?sa=t&url=https://mexicanph.shop purple pharmacy mexico price list
best online pharmacies in mexico best online pharmacies in mexico and purple pharmacy mexico price list mexican mail order pharmacies
mexico pharmacy mexico pharmacies prescription drugs mexico pharmacy
mexico drug stores pharmacies mexico pharmacy mexico pharmacies prescription drugs
best online pharmacies in mexico buying prescription drugs in mexico online buying prescription drugs in mexico online
mexican rx online mexican rx online mexican pharmaceuticals online
mexican border pharmacies shipping to usa mexican online pharmacies prescription drugs mexican pharmacy
pharmacies in mexico that ship to usa medication from mexico pharmacy mexico drug stores pharmacies
desloratadine 5mg pill buy clarinex generic desloratadine 5mg us
п»їbest mexican online pharmacies purple pharmacy mexico price list buying prescription drugs in mexico online
mexico pharmacy buying prescription drugs in mexico buying prescription drugs in mexico
best online pharmacies in mexico mexico pharmacies prescription drugs or п»їbest mexican online pharmacies
https://clients1.google.co.zm/url?q=https://mexicanph.shop п»їbest mexican online pharmacies
mexico pharmacy mexican drugstore online and mexico pharmacy buying prescription drugs in mexico
reputable mexican pharmacies online buying from online mexican pharmacy or mexican mail order pharmacies
https://maps.google.la/url?q=https://mexicanph.shop mexico drug stores pharmacies
purple pharmacy mexico price list mexican mail order pharmacies and mexican online pharmacies prescription drugs mexico drug stores pharmacies
mexican pharmacy buying from online mexican pharmacy purple pharmacy mexico price list
mexico drug stores pharmacies п»їbest mexican online pharmacies or buying prescription drugs in mexico online
http://forum.growkind.com/proxy.php?link=https://mexicanph.shop best online pharmacies in mexico
reputable mexican pharmacies online mexican online pharmacies prescription drugs and mexican border pharmacies shipping to usa mexican drugstore online
mexico drug stores pharmacies mexican rx online mexican online pharmacies prescription drugs
buying prescription drugs in mexico online purple pharmacy mexico price list medicine in mexico pharmacies
mexican online pharmacies prescription drugs purple pharmacy mexico price list or mexico pharmacy
http://images.google.by/url?q=http://mexicanph.com medicine in mexico pharmacies
medication from mexico pharmacy mexico pharmacy and pharmacies in mexico that ship to usa pharmacies in mexico that ship to usa
http://mexicanph.com/# mexican drugstore online
reputable mexican pharmacies online
medicine in mexico pharmacies mexican mail order pharmacies buying prescription drugs in mexico online
metformin drug class
mexican mail order pharmacies mexico drug stores pharmacies or buying from online mexican pharmacy
https://www.google.co.ve/url?q=https://mexicanph.com mexican border pharmacies shipping to usa
pharmacies in mexico that ship to usa mexican mail order pharmacies and mexican mail order pharmacies purple pharmacy mexico price list
п»їbest mexican online pharmacies buying prescription drugs in mexico buying from online mexican pharmacy
claritin pills order claritin 10mg without prescription order loratadine 10mg
purple pharmacy mexico price list medicine in mexico pharmacies or mexico drug stores pharmacies
http://air-hose-reel-fitting.com/info.php?a=cialis+online mexican drugstore online
mexican pharmacy mexican rx online and medicine in mexico pharmacies mexico drug stores pharmacies
http://mexicanph.shop/# medicine in mexico pharmacies
mexico drug stores pharmacies
2.5 mg prednisone daily 3000mg prednisone prednisone 20mg capsule
overseas pharmacy they said
canadian viagra online pharmacy reviews online pharmacy without prescription
prinivil coupon: zestoretic – buy lisinopril 10 mg tablet
lasix pills Over The Counter Lasix furosemide 100 mg
chloroquine uk order chloroquine generic generic aralen
affittareunamacchinanrbtyp.com
Transfers can be ordered not solely to or from the airport, but also exchange for compelling for everyone the city.
https://affittareunamacchinanrbtyp.com
amoxicillin 875 mg tablet buy amoxicillin online without prescription amoxicillin for sale
娛樂城推薦
台灣線上娛樂城的規模正迅速增長,新的娛樂場所不斷開張。為了吸引玩家,這些場所提供了各種吸引人的優惠和贈品。每家娛樂城都致力於提供卓越的服務,務求讓客人享受最佳的遊戲體驗。
2024年網友推薦最多的線上娛樂城:No.1富遊娛樂城、No.2 BET365、No.3 DG娛樂城、No.4 九州娛樂城、No.5 亞博娛樂城,以下來介紹這幾間娛樂城網友對他們的真實評價及娛樂城推薦。
2024台灣娛樂城排名
排名 娛樂城 體驗金(流水) 首儲優惠(流水) 入金速度 出金速度 推薦指數
1 富遊娛樂城 168元(1倍) 送1000(1倍) 15秒 3-5分鐘 ★★★★★
2 1XBET中文版 168元(1倍) 送1000(1倍) 15秒 3-5分鐘 ★★★★☆
3 Bet365中文 168元(1倍) 送1000(1倍) 15秒 3-5分鐘 ★★★★☆
4 DG娛樂城 168元(1倍) 送1000(1倍) 15秒 5-10分鐘 ★★★★☆
5 九州娛樂城 168元(1倍) 送500(1倍) 15秒 5-10分鐘 ★★★★☆
6 亞博娛樂城 168元(1倍) 送1000(1倍) 15秒 3-10分鐘 ★★★☆☆
7 寶格綠娛樂城 199元(1倍) 送1000(25倍) 15秒 3-5分鐘 ★★★☆☆
8 王者娛樂城 300元(15倍) 送1000(15倍) 90秒 5-30分鐘 ★★★☆☆
9 FA8娛樂城 200元(40倍) 送1000(15倍) 90秒 5-10分鐘 ★★★☆☆
10 AF娛樂城 288元(40倍) 送1000(1倍) 60秒 5-30分鐘 ★★★☆☆
2024台灣娛樂城排名,10間娛樂城推薦
No.1 富遊娛樂城
富遊娛樂城推薦指數:★★★★★(5/5)
富遊娛樂城介面 / 2024娛樂城NO.1
RG富遊官網
富遊娛樂城是成立於2019年的一家獲得數百萬玩家註冊的線上博彩品牌,持有博彩行業市場的合法運營許可。該公司受到歐洲馬爾他(MGA)、菲律賓(PAGCOR)以及英屬維爾京群島(BVI)的授權和監管,展示了其雄厚的企業實力與合法性。
富遊娛樂城致力於提供豐富多樣的遊戲選項和全天候的會員服務,不斷追求卓越,確保遊戲的公平性。公司運用先進的加密技術及嚴格的安全管理體系,保障玩家資金的安全。此外,為了提升手機用戶的使用體驗,富遊娛樂城還開發了專屬APP,兼容安卓(Android)及IOS系統,以達到業界最佳的穩定性水平。
在資金存提方面,富遊娛樂城採用第三方金流服務,進一步保障玩家的資金安全,贏得了玩家的信賴與支持。這使得每位玩家都能在此放心享受遊戲樂趣,無需擔心後顧之憂。
富遊娛樂城簡介
娛樂城網路評價:5分
娛樂城入金速度:15秒
娛樂城出金速度:5分鐘
娛樂城體驗金:168元
娛樂城優惠:
首儲1000送1000
好友禮金無上限
新會禮遇
舊會員回饋
娛樂城遊戲:體育、真人、電競、彩票、電子、棋牌、捕魚
富遊娛樂城推薦要點
新手首推:富遊娛樂城,2024受網友好評,除了打造針對新手的各種優惠活動,還有各種遊戲的豐富教學。
首儲再贈送:首儲1000元,立即在獲得1000元獎金,而且只需要1倍流水,對新手而言相當友好。
免費遊戲體驗:新進玩家享有免費體驗金,讓您暢玩娛樂城內的任何遊戲。
優惠多元:活動頻繁且豐富,流水要求低,對各玩家可說是相當友善。
玩家首選:遊戲多樣,服務優質,是新手與老手的最佳賭場選擇。
富遊娛樂城優缺點整合
優點 缺點
• 台灣註冊人數NO.1線上賭場
• 首儲1000贈1000只需一倍流水
• 擁有體驗金免費體驗賭場
• 網紅部落客推薦保證出金線上娛樂城 • 需透過客服申請體驗金
富遊娛樂城優缺點整合表格
富遊娛樂城存取款方式
存款方式 取款方式
• 提供四大超商(全家、7-11、萊爾富、ok超商)
• 虛擬貨幣ustd存款
• 銀行轉帳(各大銀行皆可) • 現金1:1出金
• 網站內申請提款及可匯款至綁定帳戶
富遊娛樂城存取款方式表格
富遊娛樂城優惠活動
優惠 獎金贈點 流水要求
免費體驗金 $168 1倍 (儲值後) /36倍 (未儲值)
首儲贈點 $1000 1倍流水
返水活動 0.3% – 0.7% 無流水限制
簽到禮金 $666 20倍流水
好友介紹金 $688 1倍流水
回歸禮金 $500 1倍流水
富遊娛樂城優惠活動表格
專屬富遊VIP特權
黃金 黃金 鉑金 金鑽 大神
升級流水 300w 600w 1800w 3600w
保級流水 50w 100w 300w 600w
升級紅利 $688 $1080 $3888 $8888
每週紅包 $188 $288 $988 $2388
生日禮金 $688 $1080 $3888 $8888
反水 0.4% 0.5% 0.6% 0.7%
專屬富遊VIP特權表格
娛樂城評價
總體來看,富遊娛樂城對於玩家來講是一個非常不錯的選擇,有眾多的遊戲能讓玩家做選擇,還有各種優惠活動以及低流水要求等等,都讓玩家贏錢的機率大大的提升了不少,除了體驗遊戲中帶來的樂趣外還可以享受到贏錢的快感,還在等什麼趕快點擊下方連結,立即遊玩!
priligy 30mg oral where to buy cytotec without a prescription order cytotec
online prednisone 5mg: where can i buy prednisone without prescription – prednisone 2.5 tablet
otc prednisone cream canada pharmacy prednisone 50mg prednisone tablet
furosemida 40 mg lasix 100mg or lasix side effects
https://cse.google.je/url?sa=t&url=https://furosemide.guru furosemida 40 mg
furosemida lasix generic and lasix generic name lasix 100mg
lasix furosemide Over The Counter Lasix lasix furosemide
lasix 100 mg tablet: Over The Counter Lasix – lasix 100 mg
plata bethanechol 5mg side effects pienacis bethanechol pssd – urecholine and
hyperthyroidism [url=https://canadapharmacy-usa.com/buy-urecholine-usa.html]vesicoureteral reflux,
bethanechol[/url] rockfordsee what type of pill is urecholine
https://stromectol.fun/# minocycline generic name
furosemide for hyponatremia
ivermectin brand name: ivermectin 90 mg – ivermectin 3 mg
Купить паспорт
Теневые рынки и их незаконные деятельности представляют существенную угрозу безопасности общества и являются объектом внимания правоохранительных органов по всему миру. В данной статье мы обсудим так называемые неофициальные рынки, где возможно покупать нелегальные паспорта, и какие угрозы это несет для граждан и государства.
Теневые рынки представляют собой скрытые интернет-площадки, на которых торгуется разнообразной преступной продукцией и услугами. Среди этих услуг встречается и продажа поддельных удостоверений, таких как документы личности. Эти рынки оперируют в подпольной сфере интернета, используя криптографию и скрытые платежные системы, чтобы оставаться неприметными для правоохранительных органов.
Покупка фальшивого паспорта на теневых рынках представляет значительную угрозу национальной безопасности. хищение личных данных, подделывание документов и фальшивые идентификационные материалы могут быть использованы для совершения террористических актов, мошеннических и других преступлений.
Правоохранительные органы в различных странах активно борются с подпольными рынками, проводя спецоперации по обнаружению и аресту тех, кто замешан в преступных действиях. Однако, по мере того как технологии становятся более трудными, эти рынки могут приспосабливаться и находить новые методы обхода законов.
Для защиты себя от возможных опасностей, связанных с неофициальными рынками, важно проявлять бдительность при обработке своих личной информации. Это включает в себя избегать попыток фишинга, не предоставлять индивидуальной информацией в недоверенных источниках и периодически проверять свои финансовые отчеты.
Кроме того, общество должно быть знающим о рисках и последствиях покупки фальшивых документов. Это способствует созданию более осознанного и ответственного отношения к вопросам безопасности и поможет в борьбе с неофициальными рынками. Поддержка законодательных инициатив, направленных на ужесточение наказаний за изготовление и сбыт поддельных удостоверений, также представляет собой важный этап в противостоянии этим преступлениям
how much is amoxicillin prescription can i buy amoxicillin online generic amoxil 500 mg
54 prednisone prednisone sale or prednisone 40 mg tablet
https://cse.google.gg/url?sa=t&url=https://buyprednisone.store generic prednisone pills
30mg prednisone prednisone pill 10 mg and buy prednisone online without a prescription prednisone 10mg tablets
normal dose of zoloft
furosemide 40 mg lasix generic or furosemida
https://www.google.com.mx/url?sa=t&url=https://furosemide.guru lasix generic
lasix furosemide lasix generic and lasix 40mg furosemide 40 mg
線上賭場
купить клон карты
Изготовление и использование дубликатов банковских карт является неправомерной практикой, представляющей важную угрозу для безопасности финансовых систем и личных средств граждан. В данной статье мы рассмотрим угрозы и последствия покупки реплик карт, а также как общество и органы порядка борются с такими преступлениями.
“Копии” карт — это поддельные реплики банковских карт, которые используются для непозволительных транзакций. Основной метод создания клонов — это угон данных с оригинальной карты и последующее создание программы этих данных на другую карту. Злоумышленники, предлагающие услуги по продаже клонов карт, обычно действуют в скрытой сфере интернета, где трудно выявить и пресечь их деятельность.
Покупка клонов карт представляет собой существенное преступление, которое может повлечь за собой тяжкие наказания. Покупатель также рискует стать участником мошенничества, что может привести к наказанию по уголовному кодексу. Основные преступные действия в этой сфере включают в себя кражу личной информации, подделывание документов и, конечно же, финансовые преступления.
Банки и полиция активно борются с противозаконной деятельностью, связанными с клонированием карт. Банки внедряют современные технологии для распознавания подозрительных транзакций, а также предлагают услуги по обеспечению защиты для своих клиентов. Силовые структуры ведут оперативные действия и постигают тех, кто замешан в разработке и реализации реплик карт.
Для гарантирования безопасности важно соблюдать внимание при использовании банковских карт. Необходимо периодически проверять выписки, избегать сомнительных сделок и следить за своей конфиденциальной информацией. Образованность и осведомленность об угрозах также являются важными инструментами в борьбе с финансовыми преступлениями.
В заключение, использование копий банковских карт — это незаконное и неприемлемое поведение, которое может привести к существенным последствиям для тех, кто вовлечен в такую практику. Соблюдение мер обеспечения безопасности, осведомленность о возможных угрозах и сотрудничество с силовыми структурами играют основополагающую роль в предотвращении и пресечении таких преступлений
ivermectin cream cost: ivermectin price canada – price of ivermectin liquid
In the world of high-end watches, discovering a reliable source is essential, and WatchesWorld stands out as a beacon of trust and expertise. Presenting an extensive collection of esteemed timepieces, WatchesWorld has accumulated praise from happy customers worldwide. Let’s dive into what our customers are saying about their encounters.
Customer Testimonials:
O.M.’s Review on O.M.:
“Very good communication and aftercare throughout the procedure. The watch was perfectly packed and in pristine condition. I would certainly work with this team again for a watch purchase.”
Richard Houtman’s Review on Benny:
“I dealt with Benny, who was highly supportive and courteous at all times, maintaining me regularly informed of the procedure. Moving forward, even though I ended up sourcing the watch locally, I would still definitely recommend Benny and the company.”
Customer’s Efficient Service Experience:
“A very good and swift service. Kept me up to date on the order progress.”
Featured Timepieces:
Richard Mille RM30-01 Automatic Winding with Declutchable Rotor:
Price: €285,000
Year: 2023
Reference: RM30-01 TI
Patek Philippe Complications World Time 38.5mm:
Price: €39,900
Year: 2019
Reference: 5230R-001
Rolex Oyster Perpetual Day-Date 36mm:
Price: €76,900
Year: 2024
Reference: 128238-0071
Best Sellers:
Bulgari Serpenti Tubogas 35mm:
Price: On Request
Reference: 101816 SP35C6SDS.1T
Bulgari Serpenti Tubogas 35mm (2024):
Price: €12,700
Reference: 102237 SP35C6SPGD.1T
Cartier Panthere Medium Model:
Price: €8,390
Year: 2023
Reference: W2PN0007
Our Experts Selection:
Cartier Panthere Small Model:
Price: €11,500
Year: 2024
Reference: W3PN0006
Omega Speedmaster Moonwatch 44.25 mm:
Price: €9,190
Year: 2024
Reference: 304.30.44.52.01.001
Rolex Oyster Perpetual Cosmograph Daytona 40mm:
Price: €28,500
Year: 2023
Reference: 116500LN-0002
Rolex Oyster Perpetual 36mm:
Price: €13,600
Year: 2023
Reference: 126000-0006
Why WatchesWorld:
WatchesWorld is not just an web-based platform; it’s a promise to individualized service in the realm of luxury watches. Our staff of watch experts prioritizes trust, ensuring that every client makes an knowledgeable decision.
Our Commitment:
Expertise: Our team brings unparalleled knowledge and insight into the realm of luxury timepieces.
Trust: Trust is the basis of our service, and we prioritize openness in every transaction.
Satisfaction: Client satisfaction is our ultimate goal, and we go the extra mile to ensure it.
When you choose WatchesWorld, you’re not just purchasing a watch; you’re investing in a effortless and trustworthy experience. Explore our collection, and let us assist you in discovering the perfect timepiece that mirrors your style and elegance. At WatchesWorld, your satisfaction is our time-tested commitment
online platform for watches
In the world of premium watches, discovering a dependable source is paramount, and WatchesWorld stands out as a beacon of trust and expertise. Presenting an extensive collection of esteemed timepieces, WatchesWorld has collected acclaim from satisfied customers worldwide. Let’s dive into what our customers are saying about their encounters.
Customer Testimonials:
O.M.’s Review on O.M.:
“Outstanding communication and aftercare throughout the process. The watch was perfectly packed and in perfect condition. I would certainly work with this team again for a watch purchase.”
Richard Houtman’s Review on Benny:
“I dealt with Benny, who was extremely helpful and courteous at all times, preserving me regularly informed of the process. Moving forward, even though I ended up acquiring the watch locally, I would still definitely recommend Benny and the company.”
Customer’s Efficient Service Experience:
“A highly efficient and prompt service. Kept me up to date on the order progress.”
Featured Timepieces:
Richard Mille RM30-01 Automatic Winding with Declutchable Rotor:
Price: €285,000
Year: 2023
Reference: RM30-01 TI
Patek Philippe Complications World Time 38.5mm:
Price: €39,900
Year: 2019
Reference: 5230R-001
Rolex Oyster Perpetual Day-Date 36mm:
Price: €76,900
Year: 2024
Reference: 128238-0071
Best Sellers:
Bulgari Serpenti Tubogas 35mm:
Price: On Request
Reference: 101816 SP35C6SDS.1T
Bulgari Serpenti Tubogas 35mm (2024):
Price: €12,700
Reference: 102237 SP35C6SPGD.1T
Cartier Panthere Medium Model:
Price: €8,390
Year: 2023
Reference: W2PN0007
Our Experts Selection:
Cartier Panthere Small Model:
Price: €11,500
Year: 2024
Reference: W3PN0006
Omega Speedmaster Moonwatch 44.25 mm:
Price: €9,190
Year: 2024
Reference: 304.30.44.52.01.001
Rolex Oyster Perpetual Cosmograph Daytona 40mm:
Price: €28,500
Year: 2023
Reference: 116500LN-0002
Rolex Oyster Perpetual 36mm:
Price: €13,600
Year: 2023
Reference: 126000-0006
Why WatchesWorld:
WatchesWorld is not just an internet platform; it’s a promise to individualized service in the realm of luxury watches. Our group of watch experts prioritizes confidence, ensuring that every customer makes an informed decision.
Our Commitment:
Expertise: Our team brings unparalleled understanding and insight into the world of luxury timepieces.
Trust: Confidence is the basis of our service, and we prioritize openness in every transaction.
Satisfaction: Customer satisfaction is our ultimate goal, and we go the additional step to ensure it.
When you choose WatchesWorld, you’re not just buying a watch; you’re committing in a smooth and trustworthy experience. Explore our collection, and let us assist you in finding the perfect timepiece that embodies your style and sophistication. At WatchesWorld, your satisfaction is our time-tested commitment
recall on lisinopril 2017
acyclovir online order buy acyclovir without prescription buy zyloprim without prescription
amlodipine for sale online oral norvasc 5mg amlodipine 5mg canada
zithromax dosage for kids
ivermectin 1 cream ivermectin lotion 0.5 ivermectin buy nz
buy amoxicillin canada: where can i buy amoxocillin – cost of amoxicillin 30 capsules
online platform for watches
In the world of luxury watches, discovering a trustworthy source is essential, and WatchesWorld stands out as a beacon of trust and knowledge. Providing an extensive collection of prestigious timepieces, WatchesWorld has collected praise from happy customers worldwide. Let’s delve into what our customers are saying about their experiences.
Customer Testimonials:
O.M.’s Review on O.M.:
“Very good communication and aftercare throughout the procedure. The watch was flawlessly packed and in mint condition. I would certainly work with this team again for a watch purchase.”
Richard Houtman’s Review on Benny:
“I dealt with Benny, who was exceptionally supportive and courteous at all times, keeping me regularly informed of the process. Moving forward, even though I ended up sourcing the watch locally, I would still definitely recommend Benny and the company.”
Customer’s Efficient Service Experience:
“A highly efficient and swift service. Kept me up to date on the order progress.”
Featured Timepieces:
Richard Mille RM30-01 Automatic Winding with Declutchable Rotor:
Price: €285,000
Year: 2023
Reference: RM30-01 TI
Patek Philippe Complications World Time 38.5mm:
Price: €39,900
Year: 2019
Reference: 5230R-001
Rolex Oyster Perpetual Day-Date 36mm:
Price: €76,900
Year: 2024
Reference: 128238-0071
Best Sellers:
Bulgari Serpenti Tubogas 35mm:
Price: On Request
Reference: 101816 SP35C6SDS.1T
Bulgari Serpenti Tubogas 35mm (2024):
Price: €12,700
Reference: 102237 SP35C6SPGD.1T
Cartier Panthere Medium Model:
Price: €8,390
Year: 2023
Reference: W2PN0007
Our Experts Selection:
Cartier Panthere Small Model:
Price: €11,500
Year: 2024
Reference: W3PN0006
Omega Speedmaster Moonwatch 44.25 mm:
Price: €9,190
Year: 2024
Reference: 304.30.44.52.01.001
Rolex Oyster Perpetual Cosmograph Daytona 40mm:
Price: €28,500
Year: 2023
Reference: 116500LN-0002
Rolex Oyster Perpetual 36mm:
Price: €13,600
Year: 2023
Reference: 126000-0006
Why WatchesWorld:
WatchesWorld is not just an online platform; it’s a dedication to individualized service in the realm of high-end watches. Our group of watch experts prioritizes confidence, ensuring that every client makes an knowledgeable decision.
Our Commitment:
Expertise: Our group brings unparalleled understanding and perspective into the realm of luxury timepieces.
Trust: Trust is the foundation of our service, and we prioritize openness in every transaction.
Satisfaction: Customer satisfaction is our paramount goal, and we go the additional step to ensure it.
When you choose WatchesWorld, you’re not just buying a watch; you’re committing in a smooth and reliable experience. Explore our range, and let us assist you in discovering the ideal timepiece that mirrors your style and sophistication. At WatchesWorld, your satisfaction is our time-tested commitment
how long can a dog live on lasix
lasix 20 mg Buy Lasix lasix side effects
buying prednisone without prescription prednisone brand name canada or prednisone uk buy
https://maps.google.com.hk/url?q=https://buyprednisone.store prednisone rx coupon
where can i buy prednisone without a prescription prednisone generic brand name and buy prednisone from canada no prescription online prednisone
order lisinopril online: lisinopril 2 5 mg tablets – lisinopril without rx
lasix 40mg furosemide or lasix dosage
http://joesinterweb.com/main.php?g2_view=core.UserAdmin&g2_subView=core.UserLogin&g2_return=https://furosemide.guru lasix furosemide
lasix 40 mg lasix side effects and furosemida 40 mg generic lasix
glucophage janumet
Watches World
In the world of high-end watches, discovering a reliable source is crucial, and WatchesWorld stands out as a symbol of confidence and knowledge. Presenting an extensive collection of esteemed timepieces, WatchesWorld has collected praise from satisfied customers worldwide. Let’s explore into what our customers are saying about their encounters.
Customer Testimonials:
O.M.’s Review on O.M.:
“Outstanding communication and follow-up throughout the process. The watch was flawlessly packed and in mint condition. I would certainly work with this team again for a watch purchase.”
Richard Houtman’s Review on Benny:
“I dealt with Benny, who was exceptionally assisting and courteous at all times, preserving me regularly informed of the procedure. Moving forward, even though I ended up acquiring the watch locally, I would still definitely recommend Benny and the company.”
Customer’s Efficient Service Experience:
“A highly efficient and prompt service. Kept me up to date on the order progress.”
Featured Timepieces:
Richard Mille RM30-01 Automatic Winding with Declutchable Rotor:
Price: €285,000
Year: 2023
Reference: RM30-01 TI
Patek Philippe Complications World Time 38.5mm:
Price: €39,900
Year: 2019
Reference: 5230R-001
Rolex Oyster Perpetual Day-Date 36mm:
Price: €76,900
Year: 2024
Reference: 128238-0071
Best Sellers:
Bulgari Serpenti Tubogas 35mm:
Price: On Request
Reference: 101816 SP35C6SDS.1T
Bulgari Serpenti Tubogas 35mm (2024):
Price: €12,700
Reference: 102237 SP35C6SPGD.1T
Cartier Panthere Medium Model:
Price: €8,390
Year: 2023
Reference: W2PN0007
Our Experts Selection:
Cartier Panthere Small Model:
Price: €11,500
Year: 2024
Reference: W3PN0006
Omega Speedmaster Moonwatch 44.25 mm:
Price: €9,190
Year: 2024
Reference: 304.30.44.52.01.001
Rolex Oyster Perpetual Cosmograph Daytona 40mm:
Price: €28,500
Year: 2023
Reference: 116500LN-0002
Rolex Oyster Perpetual 36mm:
Price: €13,600
Year: 2023
Reference: 126000-0006
Why WatchesWorld:
WatchesWorld is not just an web-based platform; it’s a promise to personalized service in the realm of luxury watches. Our staff of watch experts prioritizes trust, ensuring that every client makes an knowledgeable decision.
Our Commitment:
Expertise: Our team brings unparalleled understanding and perspective into the world of high-end timepieces.
Trust: Confidence is the foundation of our service, and we prioritize transparency in every transaction.
Satisfaction: Customer satisfaction is our ultimate goal, and we go the additional step to ensure it.
When you choose WatchesWorld, you’re not just buying a watch; you’re investing in a smooth and trustworthy experience. Explore our collection, and let us assist you in discovering the ideal timepiece that embodies your style and elegance. At WatchesWorld, your satisfaction is our proven commitment
where can i get prednisone over the counter price for 15 prednisone or cost of prednisone tablets
http://www.tanadakenzai.co.jp/feed2js/feed2js.php?src=http://buyprednisone.store where to buy prednisone 20mg no prescription
can you buy prednisone without a prescription prednisone 2 5 mg and prednisone 5 mg tablet rx average price of prednisone
amoxicillin 250 mg amoxicillin online pharmacy amoxicillin azithromycin
crestor buy online order crestor 10mg generic purchase ezetimibe online cheap
Советуем посетить сайт Антипушкин https://antipushkin.ru/
Также не забудьте добавить сайт в закладки: https://antipushkin.ru/
zestril tablet: zestril price uk – how much is lisinopril
Советуем посетить сайт про жилые комплексы https://zhiloy-komplex.ru/
Также не забудьте добавить сайт в закладки: https://zhiloy-komplex.ru/
how to buy zestril lisinopril 5mg canada zestril drug
furosemide 40 mg Buy Lasix furosemide 40 mg
gabapentin for back pain
Советуем посетить сайт про авто https://arenda-legkovyh-pricepov.ru/
Также не забудьте добавить сайт в закладки: https://arenda-legkovyh-pricepov.ru/
cialis- canadian pharmacy right here
northwestern pharmacy canada Canadian Pharmacy Shipping Usa Cialis, Viagra Whithout Prescription
how long does it take for escitalopram to work
india pharmacy cheapest online pharmacy india or cheapest online pharmacy india
https://clients1.google.com.nf/url?q=https://indianph.com::: cheapest online pharmacy india
pharmacy website india mail order pharmacy india and india online pharmacy indian pharmacies safe
список сайтов даркнет
Подпольная сфера сети – скрытая сфера всемирной паутины, избегающая взоров обычных поисковых систем и требующая специальных средств для доступа. Этот анонимный ресурс сети обильно насыщен платформами, предоставляя доступ к разнообразным товарам и услугам через свои каталоги и индексы. Давайте глубже рассмотрим, что представляют собой эти реестры и какие тайны они сокрывают.
Даркнет Списки: Ворота в Тайный Мир
Даркнет списки – это вид проходы в скрытый мир интернета. Каталоги и индексы веб-ресурсов в даркнете, они позволяют пользователям отыскивать различные услуги, товары и информацию. Варьируя от форумов и магазинов до ресурсов, уделяющих внимание аспектам анонимности и криптовалютам, эти перечни предоставляют нам шанс заглянуть в таинственный мир даркнета.
Категории и Возможности
Теневой Рынок:
Даркнет часто связывается с теневым рынком, где доступны самые разные товары и услуги – от психоактивных веществ и стрелкового оружия до похищенной информации и помощи наемных убийц. Реестры ресурсов в подобной категории облегчают пользователям находить подходящие предложения без лишних усилий.
Форумы и Сообщества:
Даркнет также предоставляет площадку для анонимного общения. Форумы и сообщества, указанные в каталогах даркнета, затрагивают различные темы – от кибербезопасности и хакерства до политических аспектов и философских концепций.
Информационные Ресурсы:
На даркнете есть ресурсы, предоставляющие сведения и руководства по обходу цензуры, защите конфиденциальности и другим вопросам, которые могут заинтересовать тех, кто стремится сохранить свою анонимность.
Безопасность и Осторожность
Несмотря на скрытность и свободу, даркнет не лишен рисков. Мошенничество, кибератаки и незаконные сделки становятся частью этого мира. Взаимодействуя с реестрами даркнета, пользователи должны соблюдать максимальную осторожность и придерживаться мер безопасности.
Заключение
Списки даркнета – это врата в неизведанный мир, где скрыты секреты и возможности. Однако, как и в любой неизведанной территории, путешествие в темную сеть требует особой осторожности и знания. Не всегда анонимность приносит безопасность, и использование даркнета требует осмысленного подхода. Независимо от ваших интересов – будь то технические аспекты кибербезопасности, поиск уникальных товаров или исследование новых граней интернета – списки даркнета предоставляют ключ
top 10 pharmacies in india Online medicine order indian pharmacy paypal
amoxicillin 250mg/5ml dosage for child how many days
gabapentin for dog
best india pharmacy indian pharmacies safe india online pharmacy
cheapest online pharmacy india world pharmacy india or Online medicine home delivery
https://maps.google.de/url?q=https://indianph.xyz indian pharmacy
cheapest online pharmacy india world pharmacy india and Online medicine order world pharmacy india
indian pharmacy paypal top 10 pharmacies in india online shopping pharmacy india
top online pharmacy india reputable indian online pharmacy or online shopping pharmacy india
https://www.google.com.fj/url?q=https://indianph.com indian pharmacies safe
top online pharmacy india reputable indian pharmacies and indian pharmacy online reputable indian pharmacies
buy generic flexeril for sale cheap baclofen 10mg cheap baclofen
buy medicines online in india reputable indian online pharmacy mail order pharmacy india
buy lopressor generic metoprolol 100mg drug buy generic metoprolol
casino
yachtrentalsnirof.com
A neighbourhood to rival prices to go to renting yachts, sailboats, catamarans in every direction the humankind and hire out your yacht cheaper.
https://yachtrentalsnirof.com
purchase cytotec buy cytotec pills online cheap buy cytotec
buy ciprofloxacin where can i buy cipro online or buy generic ciprofloxacin
https://clients1.google.com.sb/url?q=https://cipro.guru ciprofloxacin
=where+can+i+buy+viagra+online+cheap</a]ciprofloxacin 500 mg tablet price cipro 500mg best prices and ciprofloxacin generic purchase cipro
diflucan fluconazole: diflucan 200 mg capsule – diflucan cost in india
http://cytotec24.com/# Misoprostol 200 mg buy online
ciprofloxacin uses
buy generic ketorolac toradol for sale buy generic colchicine for sale
Советуем посетить сайт про грызунов https://telegra.ph/Mir-gryzunov-interesnye-fakty-i-vidy-melkih-zhivotnyh-na-yuge-Rossii-12-23
Также не забудьте добавить сайт в закладки: https://telegra.ph/Mir-gryzunov-interesnye-fakty-i-vidy-melkih-zhivotnyh-na-yuge-Rossii-12-23
over the counter diflucan 150 diflucan rx coupon diflucan online buy
how to buy diflucan: where can i get diflucan over the counter – where can you buy diflucan over the counter
http://diflucan.pro/# can you buy diflucan otc
order atenolol 100mg for sale brand tenormin 50mg order tenormin 50mg without prescription
Скрытая сфера – это таинственная и непознанная территория интернета, где действуют свои правила, перспективы и опасности. Ежедневно в пространстве даркнета случаются события, о которых стандартные пользователи могут только подозревать. Давайте изучим актуальные сведения из теневой зоны, отражающие современные тенденции и инциденты в данном скрытом уголке сети.”
Тенденции и События:
“Эволюция Средств и Безопасности:
В даркнете непрерывно развиваются технологические решения и подходы защиты. Информация о появлении усовершенствованных платформ кодирования, скрытия личности и защиты личных данных говорят о желании участников и специалистов к поддержанию надежной среды.”
“Новые Теневые Рынки:
Следуя динамикой изменений спроса и предложений, в теневом интернете появляются совершенно новые торговые площадки. Информация о запуске онлайн-рынков подаривают пользователям разнообразные возможности для торговли товарами и услугами
Покупка удостоверения личности в онлайн магазине – это противозаконное и рискованное действие, которое может привести к серьезным последствиям для граждан. Вот некоторые аспектов, о которых необходимо запомнить:
Незаконность: Покупка паспорта в онлайн магазине является нарушение законодательства. Владение фальшивым удостоверением способно сопровождаться криминальную наказание и тяжелые штрафы.
Опасности индивидуальной безопасности: Факт использования фальшивого удостоверения личности способен подвергнуть опасность вашу безопасность. Люди, использующие фальшивыми документами, могут стать целью провокаций со со стороны законопослушных органов.
Материальные потери: Часто мошенники, торгующие поддельными паспортами, способны применять вашу информацию для обмана, что приведет к финансовым потерям. Ваши и финансовые сведения способны оказаться применены в преступных намерениях.
Трудности при путешествиях: Поддельный удостоверение личности может быть обнаружен при переезде пересечь границу или при взаимодействии с государственными инстанциями. Такое обстоятельство способно привести к задержанию, депортации или иным тяжелым проблемам при перемещении.
Потеря доверия и престижа: Использование поддельного паспорта может привести к утрате доверительности со со стороны сообщества и нанимателей. Такая ситуация может отрицательно сказаться на вашу репутацию и карьерные возможности.
Вместо того, чтобы рисковать собственной свободой, защитой и престижем, рекомендуется соблюдать закон и воспользоваться официальными путями для получения удостоверений. Они предусматривают защиту ваших прав и обеспечивают секретность ваших информации. Незаконные практики могут повлечь за собой непредсказуемые и негативные ситуации, порождая тяжелые проблемы для вас и ваших сообщества
http://cytotec24.com/# buy misoprostol over the counter
даркнет 2024
Темное пространство 2024: Теневые аспекты цифровой среды
С своего возникновения даркнет представлял собой сферу веба, где тайна и неявность были нормой. В 2024 году этот непрозрачный мир развивается, предоставляя новые вызовы и риски для сообщества в сети. Рассмотрим, какие тенденции и модификации ожидают нас в даркнете 2024.
Продвижение технологий и Увеличение анонимности
С развитием техники, инструменты для обеспечения скрытности в теневом интернете становятся более сложными и эффективными. Использование криптовалют, современных шифровальных методов и децентрализованных сетей делает отслеживание за деятельностью участников еще более трудным для правоохранительных органов.
Рост тематических рынков
Даркнет-рынки, фокусирующиеся на различных товарах и услугах, продолжают расширяться. Психотропные вещества, военные припасы, хакерские инструменты, персональная информация – ассортимент продукции становится все более разнообразным. Это порождает сложность для правопорядка, стоящего перед задачей приспосабливаться к изменяющимся сценариям нелегальных действий.
Опасности цифровой безопасности для обычных пользователей
Сервисы аренды хакерских услуг и обманные планы продолжают существовать работоспособными в теневом интернете. Люди, не связанные с преступностью попадают в руки объектом для преступников в сети, стремящихся зайти к персональной информации, счетам в банке и иных секретных данных.
Возможности цифровой реальности в теневом интернете
С прогрессом техники цифровой симуляции, даркнет может войти в совершенно новую фазу, предоставляя пользователям реальные и вовлекающие цифровые области. Это может сопровождаться новыми формами преступной деятельности, такими как цифровые рынки для передачи цифровыми товарами.
Противостояние структурам защиты
Силы безопасности улучшают свои технологии и методы противостояния даркнетом. Коллективные меры государств и международных организаций ориентированы на предотвращение киберпреступности и противостояние новым вызовам, связанным с развитием темного интернета.
Вывод
Теневой интернет в 2024 году остается сложной и разносторонней обстановкой, где технические инновации продолжают изменять пейзаж преступной деятельности. Важно для пользователей оставаться бдительными, обеспечивать свою кибербезопасность и соблюдать нормы, даже в цифровой среде. Вместе с тем, борьба с теневым интернетом нуждается в коллективных действиях от государств, технологических компаний и сообщества, для обеспечения безопасность в сетевой среде.
В последний период интернет превратился в неиссякаемый источник информации, сервисов и товаров. Однако, среди множества виртуальных магазинов и площадок, существует скрытая сторона, известная как даркнет магазины. Этот уголок виртуального мира порождает свои рискованные сценарии и сопровождается серьезными рисками.
Что такое Даркнет Магазины:
Даркнет магазины являются онлайн-платформы, доступные через скрытые браузеры и специальные программы. Они оперируют в глубоком вебе, скрытом от обычных поисковых систем. Здесь можно найти не только торговцев запрещенными товарами и услугами, но и разнообразные преступные схемы.
Категории Товаров и Услуг:
Даркнет магазины продают разнообразный ассортимент товаров и услуг, от наркотиков и оружия до хакерских услуг и похищенных данных. На данной темной площадке работают торговцы, дающие возможность приобретения запрещенных вещей без опасности быть выслеженным.
Риски для Пользователей:
Легальные Последствия:
Покупка незаконных товаров на даркнет магазинах ставит под угрозу пользователей опасности столкнуться с полицией. Уголовная ответственность может быть серьезным следствием таких покупок.
Мошенничество и Обман:
Даркнет также представляет собой плодородной почвой для мошенников. Пользователи могут столкнуться с обман, где оплата не приведет к к получению товара или услуги.
Угрозы Кибербезопасности:
Даркнет магазины предоставляют услуги хакеров и киберпреступников, что сопровождается реальными угрозами для безопасности данных и конфиденциальности.
Распространение Преступной Деятельности:
Экономика даркнет магазинов способствует распространению преступной деятельности, так как обеспечивает инфраструктуру для противозаконных транзакций.
Борьба с Проблемой:
Усиление Кибербезопасности:
Развитие кибербезопасности и технологий слежения помогает бороться с даркнет магазинами, делая их менее поулчаемыми.
Законодательные Меры:
Принятие строгих законов и их эффективная реализация направлены на предупреждение и кара пользователей даркнет магазинов.
Образование и Пропаганда:
Увеличение осведомленности о рисках и последствиях использования даркнет магазинов может снизить спрос на незаконные товары и услуги.
Заключение:
Даркнет магазины предоставляют темным уголкам интернета, где проступают теневые фигуры с преступными планами. Разумное использование ресурсов и активная осторожность необходимы, для того чтобы защитить себя от рисков, связанных с этими темными магазинами. В конечном итоге, безопасность и законопослушание должны быть на первом месте, когда идет речь об виртуальных покупках
liquid tamoxifen: tamoxifen headache – tamoxifen breast cancer prevention
http://cipro.guru/# п»їcipro generic
purchase cytotec buy cytotec over the counter buy cytotec over the counter
Советуем посетить сайт про рептилий https://telegra.ph/Reptilii-Udivitelnyj-mir-cheshujchatyh-12-23
Также не забудьте добавить сайт в закладки: https://telegra.ph/Reptilii-Udivitelnyj-mir-cheshujchatyh-12-23
cephalexin vs cefdinir
п»їcipro generic antibiotics cipro or ciprofloxacin generic price
https://www.google.jo/url?sa=t&url=https://cipro.guru antibiotics cipro
cipro 500mg best prices ciprofloxacin mail online and cipro 500mg best prices cipro 500mg best prices
Советуем посетить сайт про домашних животных https://telegra.ph/Kak-uhazhivat-za-domashnimi-zhivotnymi-sovety-i-rekomendacii-12-23
Также не забудьте добавить сайт в закладки: https://telegra.ph/Kak-uhazhivat-za-domashnimi-zhivotnymi-sovety-i-rekomendacii-12-23
diflucan medicine in india diflucan 150mg fluconazole how to get diflucan over the counter
http://nolvadex.guru/# benefits of tamoxifen
tải app winbet
diflucan daily: diflucan 150 australia – diflucan tablets australia
http://cipro.guru/# buy cipro cheap
Советуем посетить сайт о кино https://kinokabra.ru/
Также не забудьте добавить сайт в закладки: https://kinokabra.ru/
buy cheap doxycycline doxycycline hyclate doxylin
cytotec buy online usa buy cytotec online or cytotec online
http://www.hannobunz.de/url?q=https://cytotec24.shop purchase cytotec
Misoprostol 200 mg buy online buy cytotec over the counter and buy cytotec online buy cytotec online
Даркнет – загадочное пространство Интернета, доступен только только для тех, кто знает корректный вход. Этот скрытый уголок виртуального мира служит местом для скрытных транзакций, обмена информацией и взаимодействия прячущимися сообществами. Однако, чтобы погрузиться в этот темный мир, необходимо преодолеть несколько барьеров и использовать особые инструменты.
Использование приспособленных браузеров: Для доступа к даркнету обычный браузер не подойдет. На помощь приходят эксклюзивные браузеры, такие как Tor (The Onion Router). Tor позволяет пользователям обходить цензуру и обеспечивает анонимность, отмечая и перенаправляя запросы через различные серверы.
Адреса в даркнете: Обычные домены в даркнете заканчиваются на “.onion”. Для поиска ресурсов в даркнете, нужно использовать поисковики, адаптированные для этой среды. Однако следует быть осторожным, так как далеко не все ресурсы там законны.
Защита анонимности: При посещении даркнета следует принимать меры для сохранения анонимности. Использование виртуальных частных сетей (VPN), блокировщиков скриптов и антивирусных программ является фундаментальным. Это поможет избежать различных угроз и сохранить конфиденциальность.
Электронные валюты и биткоины: В даркнете часто используются цифровые финансы, в основном биткоины, для анонимных транзакций. Перед входом в даркнет следует ознакомиться с основами использования электронных валют, чтобы избежать финансовых рисков.
Правовые аспекты: Следует помнить, что многие действия в даркнете могут быть нелегальными и противоречить законам различных стран. Пользование даркнетом несет риски, и неразрешенные действия могут привести к серьезным юридическим последствиям.
Заключение: Даркнет – это неисследованное пространство сети, преисполненное анонимности и тайн. Вход в этот мир требует специальных навыков и предосторожности. При всем мистическом обаянии даркнета важно помнить о предполагаемых рисках и последствиях, связанных с его использованием.
Взлом телеграм
Взлом Telegram: Легенды и Реальность
Телеграм – это популярный мессенджер, признанный своей превосходной степенью шифрования и безопасности данных пользователей. Однако, в современном цифровом мире тема взлома Telegram периодически поднимается. Давайте рассмотрим, что на самом деле стоит за этим термином и почему взлом Телеграм чаще является мифом, чем реальностью.
Шифрование в Telegram: Основные принципы Безопасности
Телеграм известен своим превосходным уровнем шифрования. Для обеспечения приватности переписки между пользователями используется протокол MTProto. Этот протокол обеспечивает конечно-конечное шифрование, что означает, что только передающая сторона и получатель могут понимать сообщения.
Мифы о Нарушении Телеграма: Почему они появляются?
В последнее время в интернете часто появляются утверждения о нарушении Telegram и возможности доступа к персональной информации пользователей. Однако, основная часть этих утверждений оказываются неточными данными, часто развивающимися из-за непонимания принципов работы мессенджера.
Кибератаки и Уязвимости: Фактические Опасности
Хотя взлом Telegram в общем случае является трудной задачей, существуют актуальные опасности, с которыми сталкиваются пользователи. Например, атаки на индивидуальные аккаунты, вредоносные программы и другие методы, которые, тем не менее, требуют в личном участии пользователя в их распространении.
Защита Персональных Данных: Рекомендации для Участников
Несмотря на отсутствие точной опасности взлома Telegram, важно соблюдать основные правила кибербезопасности. Регулярно обновляйте приложение, используйте двухэтапную проверку, избегайте подозрительных ссылок и мошеннических атак.
Итог: Реальная Опасность или Излишняя беспокойство?
Нарушение Телеграма, как правило, оказывается неоправданным страхом, созданным вокруг темы разговора без явных доказательств. Однако безопасность всегда остается важной задачей, и участники мессенджера должны быть осторожными и следовать рекомендациям по сохранению защиты своей персональных данных
http://cipro.guru/# ciprofloxacin order online
Взлом ватцап
Взлом WhatsApp: Фактичность и Мифы
Вотсап – один из самых популярных мессенджеров в мире, массово используемый для передачи сообщениями и файлами. Он известен своей кодированной системой обмена данными и гарантированием конфиденциальности пользователей. Однако в сети время от времени возникают утверждения о возможности взлома Вотсап. Давайте разберемся, насколько эти утверждения соответствуют фактичности и почему тема нарушения WhatsApp вызывает столько дискуссий.
Шифрование в WhatsApp: Охрана Личной Информации
Вотсап применяет точка-точка шифрование, что означает, что только передающая сторона и получатель могут читать сообщения. Это стало фундаментом для доверия многих пользователей мессенджера к сохранению их личной информации.
Мифы о Взломе Вотсап: По какой причине Они Появляются?
Интернет периодически заполняют слухи о нарушении Вотсап и возможном входе к переписке. Многие из этих утверждений порой не имеют обоснований и могут быть результатом паники или дезинформации.
Фактические Угрозы: Кибератаки и Безопасность
Хотя нарушение WhatsApp является сложной задачей, существуют актуальные угрозы, такие как кибератаки на отдельные аккаунты, фишинг и вредоносные программы. Соблюдение мер безопасности важно для минимизации этих рисков.
Защита Личной Информации: Рекомендации Пользователям
Для укрепления безопасности своего аккаунта в Вотсап пользователи могут использовать двухэтапную проверку, регулярно обновлять приложение, избегать сомнительных ссылок и следить за конфиденциальностью своего устройства.
Итог: Фактическая и Осторожность
Нарушение WhatsApp, как обычно, оказывается сложным и маловероятным сценарием. Однако важно помнить о актуальных угрозах и принимать меры предосторожности для защиты своей личной информации. Соблюдение рекомендаций по охране помогает поддерживать конфиденциальность и уверенность в использовании мессенджера
purchase cipro: buy ciprofloxacin – cipro for sale
http://doxycycline.auction/# price of doxycycline
взлом whatsapp
Взлом Вотсап: Фактичность и Мифы
Вотсап – один из известных мессенджеров в мире, массово используемый для обмена сообщениями и файлами. Он прославился своей кодированной системой обмена данными и обеспечением конфиденциальности пользователей. Однако в сети время от времени появляются утверждения о возможности взлома WhatsApp. Давайте разберемся, насколько эти утверждения соответствуют фактичности и почему тема нарушения WhatsApp вызывает столько дискуссий.
Кодирование в WhatsApp: Защита Личной Информации
Вотсап применяет end-to-end кодирование, что означает, что только передающая сторона и получатель могут читать сообщения. Это стало основой для доверия многих пользователей мессенджера к сохранению их личной информации.
Мифы о Взломе Вотсап: По какой причине Они Появляются?
Интернет периодически заполняют слухи о взломе Вотсап и возможном входе к переписке. Многие из этих утверждений порой не имеют обоснований и могут быть результатом паники или дезинформации.
Фактические Угрозы: Кибератаки и Безопасность
Хотя нарушение WhatsApp является трудной задачей, существуют актуальные угрозы, такие как кибератаки на отдельные аккаунты, фишинг и вредоносные программы. Исполнение мер охраны важно для минимизации этих рисков.
Защита Личной Информации: Советы Пользователям
Для укрепления охраны своего аккаунта в WhatsApp пользователи могут использовать двухэтапную проверку, регулярно обновлять приложение, избегать сомнительных ссылок и следить за конфиденциальностью своего устройства.
Заключение: Фактическая и Осторожность
Взлом Вотсап, как правило, оказывается сложным и маловероятным сценарием. Однако важно помнить о актуальных угрозах и принимать меры предосторожности для сохранения своей личной информации. Исполнение рекомендаций по охране помогает поддерживать конфиденциальность и уверенность в использовании мессенджера.
tamoxifen benefits who should take tamoxifen tamoxifen 20 mg
4. Как не ошибиться при выборе монтажной бригады
кондиционер стоимость montazh-kondicionera-moskva.ru .
cheap diflucan online buy diflucan 150mg diflucan rx price
http://lanarhoades.fun/# lana rhodes
http://abelladanger.online/# abella danger filmleri
http://angelawhite.pro/# ?????? ????
sweety fox Sweetie Fox izle sweeti fox
http://evaelfie.pro/# eva elfie izle
http://sweetiefox.online/# Sweetie Fox filmleri
eva elfie izle eva elfie izle eva elfie filmleri
buy generic inderal 10mg order plavix 150mg generic clopidogrel 75mg canada
https://abelladanger.online/# abella danger izle
http://angelawhite.pro/# Angela White izle
Sweetie Fox izle Sweetie Fox modeli swetie fox
https://evaelfie.pro/# eva elfie
Angela Beyaz modeli ?????? ???? Angela White
http://evaelfie.pro/# eva elfie filmleri
http://evaelfie.pro/# eva elfie filmleri
buy cheap essays online my family essay writing best essay writing websites
1. Где купить кондиционер: лучшие магазины и выбор
2. Как выбрать кондиционер: советы по покупке
3. Кондиционеры в наличии: где купить прямо сейчас
4. Купить кондиционер онлайн: удобство и выгодные цены
5. Кондиционеры для дома: какой выбрать и где купить
6. Лучшие предложения на кондиционеры: акции и распродажи
7. Кондиционер купить: сравнение цен и моделей
8. Кондиционеры с установкой: где купить и как установить
9. Где купить кондиционер с доставкой: быстро и надежно
10. Кондиционеры: где купить качественный товар по выгодной цене
11. Кондиционер купить: как выбрать оптимальную мощность
12. Кондиционеры для офиса: какой выбрать и где купить
13. Кондиционер купить: самый выгодный вариант
14. Кондиционеры в рассрочку: где купить и как оформить
15. Кондиционеры: лучшие магазины и предложения
16. Кондиционеры на распродаже: где купить по выгодной цене
17. Как выбрать кондиционер: советы перед покупкой
18. Кондиционер купить: где найти лучшие цены
19. Лучшие магазины кондиционеров: где купить качественный товар
20. Кондиционер купить: выбор из лучших моделей
инверторные кондиционеры https://kondicioner-cena.ru .
https://sweetiefox.online/# Sweetie Fox video
abella danger filmleri abella danger izle abella danger filmleri
https://abelladanger.online/# Abella Danger
Sweetie Fox filmleri Sweetie Fox izle or Sweetie Fox filmleri
https://cse.google.li/url?sa=t&url=https://sweetiefox.online Sweetie Fox video
swetie fox sweety fox and Sweetie Fox modeli Sweetie Fox filmleri
can i take tylenol with bactrim
purchase methotrexate generic order coumadin online cheap buy coumadin pills
https://angelawhite.pro/# ?????? ????
Angela White video Angela White izle or Angela White
http://oko.ikrim.net/go.php?http://angelawhite.pro Angela White filmleri
Angela White Angela White video and Angela White izle ?????? ????
https://abelladanger.online/# abella danger izle
lana rhoades filmleri lana rhoades lana rhoades
https://angelawhite.pro/# Angela White izle
http://abelladanger.online/# Abella Danger
abella danger video Abella Danger abella danger video
sweeti fox sweety fox or sweeti fox
https://www.stadt-gladbeck.de/ExternerLink.asp?ziel=http://sweetiefox.online Sweetie Fox
Sweetie Fox modeli Sweetie Fox modeli and sweeti fox Sweetie Fox filmleri
http://abelladanger.online/# abella danger izle
amoxicillin otc
http://sweetiefox.online/# Sweetie Fox filmleri
Angela White ?????? ???? ?????? ????
https://lanarhoades.fun/# lana rhoades filmleri
buy metoclopramide cheap cozaar over the counter order hyzaar pill
mobic 15mg oral buy generic mobic online celebrex pills
swetie fox sweety fox or swetie fox
https://toolbarqueries.google.as/url?q=https://sweetiefox.online Sweetie Fox video
Sweetie Fox izle Sweetie Fox izle and Sweetie Fox video Sweetie Fox modeli
http://evaelfie.pro/# eva elfie modeli
Обнал карт: Как обеспечить безопасность от обманщиков и обеспечить защиту в сети
Современный мир высоких технологий предоставляет преимущества онлайн-платежей и банковских операций, но с этим приходит и нарастающая угроза обнала карт. Обнал карт является операцией использования похищенных или незаконно полученных кредитных карт для совершения финансовых транзакций с целью замаскировать их источник и пресечь отслеживание.
Ключевые моменты для безопасности в сети и предотвращения обнала карт:
Защита личной информации:
Обязательно будьте осторожными при передаче личной информации онлайн. Никогда не делитесь номерами карт, кодами безопасности и инными конфиденциальными данными на непроверенных сайтах.
Сильные пароли:
Используйте для своих банковских аккаунтов и кредитных карт надежные и уникальные пароли. Регулярно изменяйте пароли для усиления безопасности.
Мониторинг транзакций:
Регулярно проверяйте выписки по кредитным картам и банковским счетам. Это содействует выявлению подозрительных транзакций и быстро реагировать.
Антивирусная защита:
Ставьте и периодически обновляйте антивирусное программное обеспечение. Такие программы помогут защитить от вредоносных программ, которые могут быть использованы для кражи данных.
Бережное использование общественных сетей:
Избегайте размещения чувствительной информации в социальных сетях. Эти данные могут быть использованы для взлома к вашему аккаунту и последующего мошенничества.
Уведомление банка:
Если вы обнаружили сомнительные транзакции или потерю карты, свяжитесь с банком сразу для блокировки карты и избежания финансовых ущербов.
Образование и обучение:
Следите за новыми методами мошенничества и постоянно обновляйте свои знания, как противостоять подобным атакам. Современные мошенники постоянно совершенствуют свои методы, и ваше знание может стать ключевым для защиты
fox sweetie: sweetie fox cosplay – sweetie fox
http://lanarhoades.pro/# lana rhoades videos
lana rhoades lana rhoades solo lana rhoades full video
medications escitalopram
https://one-xbet-apk-fr.com
To log in, click the “Login” button on the sanctioned website of the bookmaker and put down your buyer facts – enrol your email sermon and password.
one-xbet-apk-fr.com
mia malkova movie: mia malkova hd – mia malkova
mia malkova photos: mia malkova only fans – mia malkova new video
https://evaelfie.site/# eva elfie new video
sweetie fox full video sweetie fox full sweetie fox full video
eva elfie videos: eva elfie full video – eva elfie photo
https://sweetiefox.pro/# fox sweetie
mia malkova only fans: mia malkova girl – mia malkova full video
http://sweetiefox.pro/# sweetie fox video
lana rhoades boyfriend lana rhoades lana rhoades hot
order tamsulosin 0.2mg pill celebrex cheap order celecoxib 200mg generic
neurontin generics
eva elfie full video: eva elfie full video – eva elfie new video
где купить фальшивые деньги
Поддельные купюры: угроза для финансов и социума
Введение:
Фальшивомонетничество – преступление, оставшееся актуальным на продолжительностью многих веков. Изготовление и распространение фальшивых денег представляют серьезную угрозу не только для экономической системы, но и для стабильности в обществе. В данной статье мы рассмотрим масштабы проблемы, методы борьбы с фальшивомонетничеством и воздействие для социума.
История фальшивых денег:
Фальшивые деньги существуют с момента появления самой концепции денег. В старину подделывались металлические монеты, а в современном мире преступники активно используют передовые технологии для подделки банкнот. Развитие цифровых технологий также открыло новые возможности для создания цифровых вариантов валюты.
Масштабы проблемы:
Ненастоящая валюта создают угрозу для стабильности финансовой системы. Банки, предприятия и даже обычные граждане могут стать пострадавшими обмана. Рост количества поддельных купюр может привести к потере покупательной способности и даже к экономическим кризисам.
Современные методы фальсификации:
С развитием технологий фальсификация стала более затруднительной и усложненной. Преступники используют современные технические средства, специализированные принтеры, и даже машинное обучение для создания трудноотличимых фальшивые копии от оригинальных денежных средств.
Борьба с фальшивомонетничеством:
Страны и центральные банки активно внедряют новые меры для предотвращения подделки денег. Это включает в себя использование современных защитных элементов на банкнотах, обучение граждан способам определения поддельных денег, а также взаимодействие с органами правопорядка для обнаружения и предотвращения криминальных группировок.
Последствия для социума:
Фальшивые деньги несут не только финансовые, но и общественные результаты. Жители и компании теряют доверие к экономическому устройству, а борьба с криминальной деятельностью требует значительных ресурсов, которые могли бы быть направлены на более положительные цели.
Заключение:
Поддельные средства – важный вопрос, требующая уделяемого внимания и коллективных действий общества, правоохранительных органов и финансовых институтов. Только путем эффективной борьбы с нарушением можно гарантировать устойчивость экономики и сохранить доверие к валютной системе
ST666️ – Trang Chủ Chính Thức Số 1️⃣ Của Nhà Cái ST666
ST666 đã nhanh chóng trở thành điểm đến giải trí cá độ thể thao được yêu thích nhất hiện nay. Mặc dù chúng tôi mới xuất hiện trên thị trường cá cược trực tuyến Việt Nam gần đây, nhưng đã nhanh chóng thu hút sự quan tâm của cộng đồng người chơi trực tuyến. Đối với những người yêu thích trò chơi trực tuyến, nhà cái ST666 nhận được sự tin tưởng và tín nhiệm trọn vẹn từ họ. ST666 được coi là thiên đường cho những người chơi tham gia.
Giới Thiệu Nhà Cái ST666
ST666.BLUE – ST666 là nơi cá cược đổi thưởng trực tuyến được ưa chuộng nhất hiện nay. Tham gia vào trò chơi cá cược trực tuyến, người chơi không chỉ trải nghiệm các trò giải trí hấp dẫn mà còn có cơ hội nhận các phần quà khủng thông qua các kèo cá độ. Với những phần thưởng lớn, người chơi có thể thay đổi cuộc sống của mình.
Giới Thiệu Nhà Cái ST666 BLUE
Thông tin về nhà cái ST666
ST666 là Gì?
Nhà cái ST666 là một sân chơi cá cược đổi thưởng trực tuyến, chuyên cung cấp các trò chơi cá cược đổi thưởng có thưởng tiền mặt. Điều này bao gồm các sản phẩm như casino, bắn cá, thể thao, esports… Người chơi có thể tham gia nhiều trò chơi hấp dẫn khi đăng ký, đặt cược và có cơ hội nhận thưởng lớn nếu chiến thắng hoặc mất số tiền cược nếu thất bại.
Nhà Cái ST666 – Sân Chơi Cá Cược An Toàn
Nhà Cái ST666 – Sân Chơi Cá Cược Trực Tuyến
Nguồn Gốc Thành Lập Nhà Cái ST666
Nhà cái ST666 được thành lập và ra mắt vào năm 2020 tại Campuchia, một quốc gia nổi tiếng với các tập đoàn giải trí cá cược đổi thưởng. Xuất hiện trong giai đoạn phát triển mạnh mẽ của ngành cá cược, ST666 đã để lại nhiều dấu ấn. Được bảo trợ tài chính bởi tập đoàn danh tiếng Venus Casino, thương hiệu đã mở rộng hoạt động khắp Đông Nam Á và lan tỏa sang cả các quốc gia Châu Á, bao gồm cả Trung Quốc
casino 3a25_1c
sweetie fox full: sweetie fox new – fox sweetie
http://sweetiefox.pro/# sweetie fox
rikvip
Фальшивые рубли, в большинстве случаев, копируют с целью обмана и незаконного обогащения. Преступники занимаются фальсификацией российских рублей, формируя поддельные банкноты различных номиналов. В основном, фальсифицируют банкноты с более высокими номиналами, например 1 000 и 5 000 рублей, ввиду того что это позволяет им получать крупные суммы при меньшем количестве фальшивых денег.
Технология подделки рублей включает в себя использование высокотехнологичного оборудования, специализированных принтеров и особо подготовленных материалов. Злоумышленники стремятся максимально точно воспроизвести средства защиты, водяные знаки безопасности, металлическую защитную полосу, микроскопический текст и прочие характеристики, чтобы препятствовать определение поддельных купюр.
Поддельные денежные средства периодически вносятся в оборот через торговые точки, банки или другие организации, где они могут быть легко спрятаны среди настоящих денег. Это возникает серьезные проблемы для финансовой системы, так как поддельные купюры могут вызывать потерям как для банков, так и для граждан.
Необходимо подчеркнуть, что владение и использование фальшивых денег представляют собой уголовными преступлениями и могут быть наказаны в соответствии с нормативными актами Российской Федерации. Власти проводят активные меры с такими преступлениями, предпринимая действия по обнаружению и прекращению деятельности банд преступников, вовлеченных в фальсификацией российской валюты
fox sweetie: sweetie fox cosplay – sweetie fox video
https://evaelfie.site/# eva elfie full videos
lana rhoades hot lana rhoades unleashed lana rhoades boyfriend
eva elfie videos eva elfie hot or eva elfie photo
http://images.google.mv/url?q=https://evaelfie.site eva elfie
eva elfie photo eva elfie and eva elfie new videos eva elfie
hoki1881
sweetie fox new: sweetie fox new – ph sweetie fox
http://sweetiefox.pro/# sweetie fox full video
lana rhoades lana rhoades boyfriend lana rhoades full video
eva elfie new videos eva elfie photo or eva elfie full video
https://www.google.co.ve/url?q=http://evaelfie.site eva elfie new video
eva elfie new videos eva elfie new video and eva elfie new video eva elfie hot
fox sweetie: sweetie fox new – ph sweetie fox
sweetie fox new ph sweetie fox or sweetie fox video
https://www.google.com.uy/url?q=https://sweetiefox.pro sweetie fox cosplay
sweetie fox cosplay sweetie fox cosplay and sweetie fox new sweetie fox cosplay
game online hoki1881
eva elfie full video: eva elfie photo – eva elfie new videos
https://lanarhoades.pro/# lana rhoades pics
娛樂城首儲
初次接觸線上娛樂城的玩家一定對選擇哪間娛樂城有障礙,首要條件肯定是評價良好的娛樂城,其次才是哪間娛樂城優惠最誘人,娛樂城體驗金多少、娛樂城首儲一倍可以拿多少等等…本篇文章會告訴你娛樂城優惠怎麼挑,首儲該注意什麼。
娛樂城首儲該注意什麼?
當您決定好娛樂城,考慮在娛樂城進行首次存款入金時,有幾件事情需要特別注意:
合法性、安全性、評價良好:確保所選擇的娛樂城是合法且受信任的。檢查其是否擁有有效的賭博牌照,以及是否採用加密技術來保護您的個人信息和交易。
首儲優惠與流水:許多娛樂城會為首次存款提供吸引人的獎勵,但相對的流水可能也會很高。
存款入金方式:查看可用的支付選項,是否適合自己,例如:USDT、超商儲值、銀行ATM轉帳等等。
提款出金方式:瞭解最低提款限制,綁訂多少流水才可以領出。
24小時客服:最好是有24小時客服,發生問題時馬上有人可以處理。
lana rhoades solo lana rhoades unleashed or lana rhoades boyfriend
https://www.google.md/url?q=https://lanarhoades.pro lana rhoades solo
lana rhoades hot lana rhoades hot and lana rhoades pics lana rhoades unleashed
DNABET
เว็บ DNABET ออนไลน์: มุ่งสู่ ประสบการณ์ การเล่น ที่ไม่เหมือน ที่คุณ เคย พบ!
DNABET ยัง เป็น เลือกที่หนึ่ง สำหรับ แฟน การแทง ทางอินเทอร์เน็ต ในประเทศไทย นี้.
ไม่ต้อง เสียเวลา ในการเลือก เล่น DNABET เพราะที่นี่คือที่ที่ ไม่ต้อง เลือกที่จะ ได้ หรือไม่!
DNABET มีค่า ราคาจ่าย ทุกราคาจ่าย หวย สูง ตั้งแต่ 900 บาท ขึ้นไป เมื่อ ท่าน ถูกรางวัลแล้ว จะได้รับ เงินมากมาย กว่า เว็บ ๆ ที่คุณ เคย.
นอกจากนี้ DNABET ยัง มีความหลากหลาย ลอตเตอรี่ ที่คุณสามารถเลือก มากมายถึง 20 หวย ทั่วโลก ทำให้ เลือก ตามใจต้องการ ได้อย่างหลากหลาย.
ไม่ว่าจะเป็น หวยรัฐบาล หุ้น ยี่กี หวยฮานอย หวยลาว และ ลอตเตอรี่ มีราคา เพียงแค่ 80 บาท.
ทาง DNABET มั่นคง ในเรื่องการเงิน โดยที่ ได้ เปลี่ยนชื่อ ชันเจน เป็น DNABET เพื่อ เสริมฐานลูกค้า และ ปรับปรุงระบบ สะดวกสบายมาก ขึ้น.
นอกจากนี้ DNABET ยังมีโปรโมชั่น โปรโมชั่น ให้เลือก หลายรายการ เช่นเดียวกับ โปรโมชัน สมาชิกใหม่ที่ ท่าน ในวันนี้ จะได้รับ โบนัสเพิ่มทันที 500 บาท หรือเครดิตทดลอง ไม่ต้อง เงิน.
นอกจากนี้ DNABET ยังมี ประจำเดือนที่ ท่าน และ DNABET เป็นทางเลือก การเล่น หวย ของท่าน พร้อม รางวัล และ เหล่าโปรโมชั่น ที่ มาก ที่สุด ในปี 2024.
อย่า ปล่อย โอกาสที่ดีนี้ ไป มาเป็นส่วนหนึ่งของ DNABET และ เพลิดเพลินกับ ประสบการณ์การเล่น การเดิมพันที่ไม่เหมือนใคร ทุกท่าน มีโอกาสจะ เป็นเศรษฐี ได้ เพียง แค่ท่าน เลือก DNABET เว็บแทงหวย ออนไลน์ ที่ และ มีสมาชิกมากที่สุด ในประเทศไทย!
lana rhoades boyfriend: lana rhoades full video – lana rhoades unleashed
https://evaelfie.site/# eva elfie new videos
masuk hoki1881
mia malkova photos: mia malkova – mia malkova photos
https://sweetiefox.pro/# sweetie fox full
mia malkova full video mia malkova only fans mia malkova photos
Наша группа искусных мастеров предоставлена предъявить вам актуальные системы, которые не только обеспечат прочную покров от зимы, но и подарят вашему домашнему пространству модный вид.
Мы деятельны с современными материалами, утверждая прочный время работы и замечательные результаты. Изолирование наружных стен – это не только сбережение на огреве, но и заботливость о окружающей природе. Энергоэффективные технологии, какие мы претворяем в жизнь, способствуют не только зданию, но и сохранению природной среды.
Самое ключевое: Прайс утепление фасада у нас стартует всего от 1250 рублей за м²! Это доступное решение, которое сделает ваш домик в реальный тепличный угол с минимальными издержками.
Наши пособия – это не только теплоизоляция, это создание области, в где всякий член отражает ваш особенный образ действия. Мы берем во внимание все все ваши пожелания, чтобы воплотить ваш дом еще более уютным и привлекательным.
Подробнее на официальном сайте
Не откладывайте занятия о своем доме на потом! Обращайтесь к экспертам, и мы сделаем ваш обиталище не только тепличным, но и изысканнее. Заинтересовались? Подробнее о наших делах вы можете узнать на портале. Добро пожаловать в мир уюта и качества.
fox sweetie: ph sweetie fox – sweetie fox
https://evaelfie.site/# eva elfie hd
mia malkova: mia malkova latest – mia malkova photos
http://evaelfie.site/# eva elfie new video
sweetie fox video sweetie fox video ph sweetie fox
ondansetron 8mg cost aldactone pills order spironolactone 25mg pill
sweetie fox new sweetie fox new or sweetie fox new
http://maps.google.iq/url?q=http://sweetiefox.pro ph sweetie fox
sweetie fox sweetie fox and sweetie fox fox sweetie
eva elfie hot: eva elfie new video – eva elfie videos
http://evaelfie.site/# eva elfie new videos
fox sweetie sweetie fox fox sweetie
KANTORBOLA situs gamin online terbaik 2024 yang menyediakan beragam permainan judi online easy to win , mulai dari permainan slot online , taruhan judi bola , taruhan live casino , dan toto macau . Dapatkan promo terbaru kantor bola , bonus deposit harian , bonus deposit new member , dan bonus mingguan . Kunjungi link kantorbola untuk melakukan pendaftaran .
eva elfie full video: eva elfie new videos – eva elfie hd
https://sweetiefox.pro/# sweetie fox video
eva elfie videos eva elfie photo or eva elfie photo
https://maps.google.mv/url?q=https://evaelfie.site eva elfie videos
eva elfie videos eva elfie full videos and eva elfie full videos eva elfie hd
Ngamenjitu: Platform Togel Daring Terbesar dan Terpercaya
Ngamenjitu telah menjadi salah satu situs judi online terbesar dan terjamin di Indonesia. Dengan beragam market yang disediakan dari Semar Group, Portal Judi menawarkan sensasi main togel yang tak tertandingi kepada para penggemar judi daring.
Market Terbaik dan Terpenuhi
Dengan total 56 market, Portal Judi menampilkan beberapa opsi terunggul dari pasaran togel di seluruh dunia. Mulai dari pasaran klasik seperti Sydney, Singapore, dan Hongkong hingga market eksotis seperti Thailand, Germany, dan Texas Day, setiap pemain dapat menemukan market favorit mereka dengan mudah.
Langkah Bermain yang Mudah
Situs Judi menyediakan petunjuk cara main yang praktis dipahami bagi para pemula maupun penggemar togel berpengalaman. Dari langkah-langkah pendaftaran hingga penarikan kemenangan, semua informasi tersedia dengan jelas di situs Portal Judi.
Ringkasan Terakhir dan Informasi Terkini
Pemain dapat mengakses hasil terakhir dari setiap market secara real-time di Ngamenjitu. Selain itu, info paling baru seperti jadwal bank online, gangguan, dan offline juga disediakan untuk memastikan kelancaran proses transaksi.
Pelbagai Macam Game
Selain togel, Ngamenjitu juga menawarkan berbagai jenis permainan kasino dan judi lainnya. Dari bingo hingga roulette, dari dragon tiger hingga baccarat, setiap pemain dapat menikmati bervariasi pilihan permainan yang menarik dan menghibur.
Security dan Kenyamanan Pelanggan Terjamin
Portal Judi mengutamakan security dan kepuasan pelanggan. Dengan sistem security terbaru dan layanan pelanggan yang responsif, setiap pemain dapat bermain dengan nyaman dan tenang di platform ini.
Promosi-Promosi dan Bonus Menarik
Portal Judi juga menawarkan bervariasi promosi dan hadiah istimewa bagi para pemain setia maupun yang baru bergabung. Dari bonus deposit hingga bonus referral, setiap pemain memiliki kesempatan untuk meningkatkan kemenangan mereka dengan bonus yang ditawarkan.
Dengan semua fasilitas dan pelayanan yang ditawarkan, Ngamenjitu tetap menjadi pilihan utama bagi para penggemar judi online di Indonesia. Bergabunglah sekarang dan nikmati pengalaman bermain yang seru dan menguntungkan di Portal Judi!
mia malkova hd: mia malkova movie – mia malkova only fans
https://lanarhoades.pro/# lana rhoades boyfriend
eva elfie full videos eva elfie hd eva elfie hot
lana rhoades lana rhoades or lana rhoades unleashed
https://cse.google.je/url?sa=t&url=https://lanarhoades.pro lana rhoades hot
lana rhoades solo lana rhoades unleashed and lana rhoades hot lana rhoades videos
fox sweetie: sweetie fox full – sweetie fox video
http://miamalkova.life/# mia malkova only fans
mia malkova full video: mia malkova only fans – mia malkova new video
aviator oyna: aviator hilesi – aviator oyna
https://aviatoroyunu.pro/# aviator bahis
http://aviatorjogar.online/# aviator betano
We recommend visiting the website https://etc.bdir.in/dialogue/movies/A
Also, don’t forget to add the site to your bookmarks: https://etc.bdir.in/dialogue/movies/A
aviator game online: aviator bet – aviator bet
http://aviatorghana.pro/# aviator ghana
Советуем посетить сайт https://back2russia.net/index.php?/topic/2622-rvp-v-permi/
Также не забудьте добавить сайт в закладки: https://back2russia.net/index.php?/topic/2622-rvp-v-permi/
http://aviatoroyunu.pro/# aviator oyunu
Советуем посетить сайт https://mama.ru/forums/theme/kredity/page/22/
Также не забудьте добавить сайт в закладки: https://mama.ru/forums/theme/kredity/page/22/
Situs Judi: Platform Togel Online Terluas dan Terjamin
Portal Judi telah menjadi salah satu situs judi daring terluas dan terpercaya di Indonesia. Dengan bervariasi pasaran yang disediakan dari Grup Semar, Portal Judi menawarkan pengalaman bermain togel yang tak tertandingi kepada para penggemar judi daring.
Pasaran Terbaik dan Terlengkap
Dengan total 56 market, Ngamenjitu memperlihatkan beberapa opsi terunggul dari pasaran togel di seluruh dunia. Mulai dari market klasik seperti Sydney, Singapore, dan Hongkong hingga pasaran eksotis seperti Thailand, Germany, dan Texas Day, setiap pemain dapat menemukan market favorit mereka dengan mudah.
Langkah Bermain yang Praktis
Situs Judi menyediakan tutorial cara bermain yang sederhana dipahami bagi para pemula maupun penggemar togel berpengalaman. Dari langkah-langkah pendaftaran hingga penarikan kemenangan, semua informasi tersedia dengan jelas di situs Ngamenjitu.
Ringkasan Terkini dan Informasi Terkini
Pemain dapat mengakses hasil terakhir dari setiap pasaran secara real-time di Ngamenjitu. Selain itu, informasi terkini seperti jadwal bank daring, gangguan, dan offline juga disediakan untuk memastikan kelancaran proses transaksi.
Bermacam-macam Macam Game
Selain togel, Portal Judi juga menawarkan bervariasi jenis permainan kasino dan judi lainnya. Dari bingo hingga roulette, dari dragon tiger hingga baccarat, setiap pemain dapat menikmati berbagai pilihan permainan yang menarik dan menghibur.
Security dan Kenyamanan Klien Terjamin
Situs Judi mengutamakan keamanan dan kenyamanan pelanggan. Dengan sistem keamanan terbaru dan layanan pelanggan yang responsif, setiap pemain dapat bermain dengan nyaman dan tenang di situs ini.
Promosi-Promosi dan Hadiah Istimewa
Portal Judi juga menawarkan bervariasi promosi dan bonus menarik bagi para pemain setia maupun yang baru bergabung. Dari bonus deposit hingga hadiah referral, setiap pemain memiliki kesempatan untuk meningkatkan kemenangan mereka dengan bonus yang ditawarkan.
Dengan semua fitur dan layanan yang ditawarkan, Situs Judi tetap menjadi pilihan utama bagi para penggemar judi online di Indonesia. Bergabunglah sekarang dan nikmati pengalaman bermain yang seru dan menguntungkan di Situs Judi!
https://aviatormocambique.site/# jogar aviator
Сознание сущности и опасностей привязанных с отмыванием кредитных карт может помочь людям предупреждать атак и обеспечивать защиту свои финансовые ресурсы. Обнал (отмывание) кредитных карт — это процедура использования украденных или неправомерно приобретенных кредитных карт для осуществления финансовых транзакций с целью скрыть их происхождения и заблокировать отслеживание.
Вот несколько способов, которые могут помочь в уклонении от обнала кредитных карт:
Сохранение личной информации: Будьте осторожными в контексте предоставления персональной информации, особенно онлайн. Избегайте предоставления номеров карт, кодов безопасности и других конфиденциальных данных на непроверенных сайтах.
Мощные коды доступа: Используйте безопасные и уникальные пароли для своих банковских аккаунтов и кредитных карт. Регулярно изменяйте пароли.
Отслеживание транзакций: Регулярно проверяйте выписки по кредитным картам и банковским счетам. Это позволит своевременно обнаруживать подозрительных транзакций.
Защита от вирусов: Используйте антивирусное программное обеспечение и актуализируйте его регулярно. Это поможет предотвратить вредоносные программы, которые могут быть использованы для кражи данных.
Осторожное взаимодействие в социальных сетях: Будьте осторожными в сетевых платформах, избегайте публикации чувствительной информации, которая может быть использована для взлома вашего аккаунта.
Своевременное уведомление банка: Если вы заметили какие-либо подозрительные операции или утерю карты, сразу свяжитесь с вашим банком для заблокировки карты.
Обучение: Будьте внимательными к современным приемам мошенничества и обучайтесь тому, как предотвращать их.
Избегая легковерия и осуществляя предупредительные действия, вы можете снизить риск стать жертвой обнала кредитных карт.
Незаконные форумы, где предлагают кэш-аут пластиковых карт, представляют собой веб-ресурсы, ориентированные на рассмотрении и осуществлении неправомерных операций с финансовыми картами. На подобных платформах пользователи обмениваются данными, методами и опытом в области кэш-аута, что влечет за собой противозаконные действия по получению доступа к денежным ресурсам.
Эти веб-ресурсы могут предоставлять различные услуги, относящиеся с преступной деятельностью, такие как фальсификация, считывание, вредное ПО и другие техники для сбора данных с финансовых пластиковых карт. Кроме того обсуждаются вопросы, касающиеся использованием украденных информации для осуществления финансовых операций или вывода денег.
Пользователи неправомерных платформ по обналу банковских карт могут стремиться оставаться неизвестными и уходить от привлечения органов безопасности. Они могут обмениваться рекомендациями, предлагать услуги, связанные с обналом, а также совершать операции, целенаправленные на финансовое преступление.
Необходимо отметить, что участие в подобных практиках не только представляет собой нарушение законов, но и способно приводить к правовым последствиям и уголовной ответственности.
обнал карт работа
Обналичивание карт – это противозаконная деятельность, становящаяся все более распространенной в нашем современном мире электронных платежей. Этот вид мошенничества представляет серьезные вызовы для банков, правоохранительных органов и общества в целом. В данной статье мы рассмотрим частоту встречаемости обналичивания карт, используемые методы и возможные последствия для жертв и общества.
Частота обналичивания карт:
Обналичивание карт является довольно распространенным явлением, и его частота постоянно растет с увеличением числа электронных транзакций. Киберпреступники применяют разные методы для получения доступа к финансовым средствам, включая фишинг, вредоносное программное обеспечение, скимминг и другие инновационные подходы.
Методы обналичивания карт:
Фишинг: Злоумышленники могут отправлять ложные электронные сообщения или создавать веб-сайты, имитирующие банковские системы, с целью получения личной информации от владельцев карт.
Скимминг: Злоумышленники устанавливают устройства скиммеры на банкоматах или терминалах для считывания данных с магнитных полос карт.
Вредоносное программное обеспечение: Киберпреступники разрабатывают вредоносные программы, которые заражают компьютеры и мобильные устройства, чтобы получить доступ к личным данным и банковским счетам.
Сетевые атаки: Атаки на системы банков и платежных платформ могут привести к утечке информации о картах и, следовательно, к их обналичиванию.
Последствия обналичивания карт:
Финансовые потери для клиентов: Владельцы карт могут столкнуться с денежными потерями, так как средства могут быть списаны с их счетов без их ведома.
Угроза безопасности данных: Обналичивание карт подчеркивает угрозу безопасности личных данных, что может привести к краже личной и финансовой информации.
Ущерб репутации банков: Банки и другие финансовые учреждения могут столкнуться с утратой доверия со стороны клиентов, если их системы безопасности оказываются уязвимыми.
Проблемы для экономики: Обналичивание карт создает экономический ущерб, поскольку оно стимулирует дополнительные затраты на борьбу с мошенничеством и восстановление утраченных средств.
Борьба с обналичиванием карт:
Совершенствование технологий безопасности: Банки и финансовые институты постоянно совершенствуют свои системы безопасности, чтобы предотвратить несанкционированный доступ к картам.
Образование и информирование: Обучение клиентов о методах мошенничества и том, как защитить свои данные, является важным шагом в борьбе с обналичиванием карт.
Сотрудничество с правоохранительными органами: Банки активно сотрудничают с правоохранительными органами для выявления и пресечения преступных схем.
Заключение:
Обналичивание карт – значительная угроза для финансовой стабильности и безопасности личных данных. Решение этой проблемы требует совместных усилий со стороны банков, правоохранительных органов и общества в целом. Только эффективная борьба с мошенничеством позволит обеспечить безопасность электронных платежей и защитить интересы всех участников финансовой системы.
Фальшивые 5000 купить
Опасности фальшивых 5000 рублей: Распространение поддельных купюр и его результаты
В нынешнем обществе, где виртуальные платежи становятся все более широко используемыми, преступники не оставляют без внимания и обычные методы преступной деятельности, такие как распространение контрафактных банкнот. В последние дни стало известно о незаконной реализации контрафактных 5000 рублевых купюр, что представляет серьезную потенциальную опасность для финансовых институтов и населения в итоге.
Методы передачи:
Мошенники активно используют неявные каналы веба для реализации недостоверных 5000 рублей. На закулисных веб-ресурсах и неправомерных форумах можно обнаружить прошения о покупке контрафактных банкнот. К неудаче, это создает хорошие условия для дистрибуции недостоверных денег среди общества.
Консеквенции для сообщества:
Возможность контрафактных денег в обращении может иметь серьезные результаты для финансовой системы и доверенности к рублю. Люди, не замечая, что получили контрафактные купюры, могут использовать их в разносторонних ситуациях, что в итоге приводит к потере доверию к банкнотам конкретного номинала.
Опасности для населения:
Граждане становятся возможными пострадавшими недобросовестных лиц, когда они ненамеренно получают фальшивые деньги в транзакциях или при покупках. В следствие этого, они могут столкнуться с неприятными ситуациями, такими как отклонение торговцев принять поддельные купюры или даже шанс ответственности за труд расплаты поддельными деньгами.
Противодействие с раскруткой поддельных денег:
Для защиты общества от схожих нарушений необходимо укрепить мероприятия по выяснению и предотвращению производства поддельных денег. Это включает в себя кооперацию между полицейскими и банками, а также усиление градуса просвещения общества относительно признаков недостоверных банкнот и методов их обнаружения.
Итог:
Разнос контрафактных 5000 рублей – это весомая риск для финансового благополучия и надежности общества. Поддерживание доверия к денежной системе требует коллективных усилий со со стороны властей, банков и всех. Важно быть настороженным и осведомленным, чтобы предупредить распространение поддельных денег и гарантировать финансовые активы сообщества.
depakote side effects elderly
pin-up cassino pin up casino or aviator oficial pin up
http://joomlinks.org/?url=https://pinupcassino.pro/ pin up bet
aviator oficial pin up pin up aviator and pin up aviator aviator pin up casino
http://www.1-xbet-france.com
Working 1xbet send back for the benefit of entering the seemly website of the bookmaker. Handle it to register with 1xBet, pick up bonuses and situation online bets.
https://1-xbet-france.com
pin up casino cassino pin up or aviator pin up casino
http://nunet.ca/link_r.php?fn=pinupcassino.pro& aviator oficial pin up
pin up aviator pin-up and pin up aviator pin up casino
Советуем посетить сайт https://amurplanet.ru/
Также не забудьте добавить сайт в закладки: https://amurplanet.ru/
Наша команда профессиональных мастеров находится в готовности предъявить вам актуальные приемы, которые не только снабдят устойчивую протекцию от холодильности, но и дарят вашему жилью изысканный вид.
Мы работаем с современными компонентами, гарантируя прочный период эксплуатации и отличные итоги. Изолирование фронтонов – это не только экономия на обогреве, но и внимание о экологии. Энергосберегающие методы, какие мы претворяем в жизнь, способствуют не только своему, но и поддержанию природных ресурсов.
Самое важное: Утепление дома цена за квадратный у нас открывается всего от 1250 рублей за м2! Это бюджетное решение, которое сделает ваш домашний уголок в подлинный уютный уголок с скромными затратами.
Наши пособия – это не просто изолирование, это составление пространства, в где каждый элемент преломляет ваш персональный моду. Мы возьмем во внимание все ваши пожелания, чтобы осуществить ваш дом еще более комфортным и привлекательным.
Подробнее на http://ppu-prof.ru/
Не откладывайте занятия о своем доме на потом! Обращайтесь к спецам, и мы сделаем ваш жилище не только тепличным, но и по последней моде. Заинтересовались? Подробнее о наших сервисах вы можете узнать на интернет-портале. Добро пожаловать в мир уюта и уровня.
Советуем посетить сайт http://yury-reshetnikov.elegos.ru
Также не забудьте добавить сайт в закладки: http://yury-reshetnikov.elegos.ru
https://aviatorghana.pro/# aviator login
https://aviatormocambique.site/# aviator mocambique
aviator login: aviator game – aviator sportybet ghana
https://aviatorghana.pro/# aviator bet
Советуем посетить сайт http://oleg-pogudin.elegos.ru/
Также не забудьте добавить сайт в закладки: http://oleg-pogudin.elegos.ru/
Покупка лживых банкнот приравнивается к неправомерным либо опасным актом, которое имеет возможность привести к тяжелым правовым последствиям либо ущербу личной денежной устойчивости. Вот несколько других приводов, по какой причине получение контрафактных банкнот приравнивается к опасительной и недопустимой:
Нарушение законов:
Получение либо использование контрафактных банкнот являются правонарушением, противоречащим нормы территории. Вас имеют возможность подвергнуться наказанию, которое может послать в тюремному заключению, денежным наказаниям или лишению свободы.
Ущерб доверию:
Фальшивые купюры ослабляют уверенность к денежной структуре. Их поступление в оборот порождает риск для честных личностей и организаций, которые имеют возможность столкнуться с непредвиденными потерями.
Экономический ущерб:
Разнос лживых денег влияет на экономику, провоцируя распределение денег что ухудшает общественную финансовую устойчивость. Это имеет возможность закончиться утрате уважения к денежной единице.
Риск обмана:
Лица, которые, занимается изготовлением поддельных купюр, не обязаны поддерживать какие-то нормы характеристики. Фальшивые банкноты могут оказаться легко выявлены, что в итоге приведет к убыткам для тех, кто пытается применять их.
Юридические последствия:
При случае лишения свободы за использование лживых купюр, вас способны взыскать штраф, и вы столкнетесь с юридическими проблемами. Это может отразиться на вашем будущем, в том числе проблемы с получением работы с кредитной историей.
Благосостояние общества и личное благополучие основываются на правдивости и уважении в денежной области. Приобретение фальшивых банкнот противоречит этим принципам и может представлять важные последствия. Рекомендуется придерживаться законов и вести только правомерными финансовыми сделками.
Покупка поддельных купюр приравнивается к недозволенным или потенциально опасным действием, которое в состоянии послать в серьезным юридическими воздействиям иначе ущербу своей денежной надежности. Вот некоторые другие причин, из-за чего получение контрафактных денег представляет собой опасной либо недопустимой:
Нарушение законов:
Закупка либо применение лживых банкнот приравниваются к преступлением, подрывающим законы территории. Вас способны поддать наказанию, которое может повлечь за собой тюремному заключению, взысканиям либо тюремному заключению.
Ущерб доверию:
Фальшивые банкноты подрывают веру по отношению к денежной механизму. Их поступление в оборот порождает возможность для порядочных граждан и коммерческих структур, которые имеют возможность попасть в неожиданными расходами.
Экономический ущерб:
Распространение фальшивых банкнот оказывает воздействие на экономическую сферу, провоцируя рост цен и подрывая глобальную финансовую устойчивость. Это может привести к потере доверия к валютной единице.
Риск обмана:
Те, которые, осуществляют изготовлением контрафактных купюр, не обязаны соблюдать какие-нибудь нормы характеристики. Лживые купюры могут стать легко распознаваемы, что в конечном счете приведет к потерям для тех собирается применять их.
Юридические последствия:
В ситуации задержания при использовании контрафактных купюр, вас в состоянии взыскать штраф, и вы столкнетесь с юридическими трудностями. Это может оказать воздействие на вашем будущем, включая сложности с трудоустройством и кредитной историей.
Благосостояние общества и личное благополучие основываются на правдивости и доверии в финансовых отношениях. Приобретение лживых банкнот противоречит этим принципам и может порождать серьезные последствия. Советуем придерживаться норм и заниматься только законными финансовыми действиями.
pin-up pin-up casino entrar or pin up aviator
https://smootheat.com/contact/report?url=https://pinupcassino.pro pin-up casino entrar
pin up bet pin-up casino entrar and pin up bet pin-up cassino
https://jogodeaposta.fun/# aplicativo de aposta
aviator jogo aviator jogo or jogar aviator Brasil
https://www.google.com.np/url?sa=t&url=https://aviatorjogar.online aviator jogo
jogar aviator Brasil jogar aviator online and aviator pin up aviator jogar
Советуем посетить сайт https://krasilovdreams.borda.ru/?1-11-0-00000014-000-30-0-1266268332
Также не забудьте добавить сайт в закладки: https://krasilovdreams.borda.ru/?1-11-0-00000014-000-30-0-1266268332
Mагазин фальшивых денег купить
Покупка фальшивых денег считается неправомерным либо потенциально опасным делом, которое имеет возможность привести к серьезным юридическим наказаниям или повреждению личной денежной стабильности. Вот некоторые причин, из-за чего приобретение лживых купюр является потенциально опасной либо неприемлемой:
Нарушение законов:
Закупка или применение лживых денег считаются правонарушением, нарушающим правила территории. Вас способны подвергнуть уголовной ответственности, что возможно послать в аресту, взысканиям либо приводу в тюрьму.
Ущерб доверию:
Поддельные банкноты ослабляют веру к финансовой механизму. Их обращение формирует опасность для надежных граждан и предприятий, которые в состоянии столкнуться с неожиданными расходами.
Экономический ущерб:
Разнос фальшивых денег причиняет воздействие на экономику, инициируя денежное расширение что ухудшает общую экономическую устойчивость. Это способно повлечь за собой потере доверия в национальной валюте.
Риск обмана:
Те, те, задействованы в изготовлением поддельных купюр, не обязаны соблюдать какие-то параметры степени. Фальшивые купюры могут стать легко распознаны, что в итоге послать в ущербу для тех стремится использовать их.
Юридические последствия:
При событии попадания под арест при применении фальшивых банкнот, вас способны принудительно обложить штрафами, и вы столкнетесь с юридическими проблемами. Это может повлиять на вашем будущем, в том числе проблемы с поиском работы и кредитной историей.
Общественное и индивидуальное благосостояние зависят от честности и доверии в денежной области. Покупка контрафактных банкнот не соответствует этим принципам и может обладать серьезные последствия. Советуем придерживаться правил и заниматься только законными финансовыми сделками.
Где купить фальшивые деньги
Покупка поддельных банкнот считается неправомерным или опасным действием, которое способно привести к важным правовым наказаниям и повреждению индивидуальной финансовой стабильности. Вот некоторые другие приводов, почему закупка фальшивых денег является опасной либо неуместной:
Нарушение законов:
Покупка иначе воспользование контрафактных купюр приравниваются к преступлением, противоречащим положения территории. Вас могут подвергнуться юридическим последствиям, что возможно привести к аресту, денежным наказаниям и постановлению под стражу.
Ущерб доверию:
Лживые купюры нарушают веру к денежной системе. Их поступление в оборот возникает риск для честных людей и коммерческих структур, которые могут попасть в непредвиденными перебоями.
Экономический ущерб:
Распространение контрафактных банкнот влияет на экономическую сферу, инициируя денежное расширение что ухудшает всеобщую финансовую равновесие. Это в состоянии послать в потере доверия к национальной валюте.
Риск обмана:
Те, те, осуществляют созданием лживых купюр, не обязаны соблюдать какие-нибудь нормы характеристики. Поддельные бумажные деньги могут стать легко распознаны, что, в конечном итоге послать в потерям для тех, кто стремится применять их.
Юридические последствия:
При событии захвата за использование лживых банкнот, вас в состоянии наказать штрафом, и вы столкнетесь с юридическими проблемами. Это может повлиять на вашем будущем, в том числе трудности с поиском работы и кредитной историей.
Общественное и индивидуальное благосостояние зависят от честности и доверии в денежной области. Покупка лживых банкнот нарушает эти принципы и может обладать серьезные последствия. Предлагается держаться законов и вести только правомерными финансовыми транзакциями.
canadian pharmacy 365: Pharmacies in Canada that ship to the US – canadian pharmacy ed medications canadianpharm.store
teste do ddavp
https://mexicanpharm24.com/# mexican pharmaceuticals online mexicanpharm.shop
cheapest online pharmacy india: indian pharmacy – indian pharmacy indianpharm.store
купить фальшивые деньги
Покупка фальшивых денег считается неправомерным или потенциально опасным делом, которое может послать в серьезным правовым санкциям и вреду личной финансовой устойчивости. Вот некоторые причин, из-за чего получение фальшивых денег является опасительной и неуместной:
Нарушение законов:
Получение и использование фальшивых купюр считаются противоправным деянием, нарушающим законы государства. Вас в состоянии подвергнуться наказанию, что возможно закончиться задержанию, финансовым санкциям иначе лишению свободы.
Ущерб доверию:
Фальшивые банкноты подрывают доверие по отношению к денежной структуре. Их поступление в оборот порождает угрозу для надежных граждан и бизнесов, которые способны столкнуться с неожиданными потерями.
Экономический ущерб:
Распространение фальшивых купюр осуществляет воздействие на экономику, вызывая инфляцию что ухудшает глобальную финансовую стабильность. Это может послать в потере доверия в национальной валюте.
Риск обмана:
Лица, какие, вовлечены в изготовлением поддельных купюр, не обязаны поддерживать какие угодно параметры степени. Поддельные банкноты могут оказаться легко распознаны, что, в итоге закончится расходам для тех, кто стремится их использовать.
Юридические последствия:
В ситуации задержания при воспользовании фальшивых денег, вас способны наказать штрафом, и вы столкнетесь с юридическими трудностями. Это может повлиять на вашем будущем, в том числе возможные проблемы с трудоустройством и кредитной историей.
Благосостояние общества и личное благополучие зависят от честности и доверии в денежной области. Получение контрафактных банкнот нарушает эти принципы и может представлять важные последствия. Рекомендуем держаться правил и заниматься исключительно законными финансовыми действиями.
Фальшивые 5000 купить
Опасности контрафактных 5000 рублей: Распространение поддельных купюр и его консеквенции
В текущем обществе, где электронные платежи становятся все более популярными, противоправные лица не оставляют без внимания и традиционные методы обмана, такие как раскрутка поддельных банкнот. В настоящее время стало известно о незаконной торговле контрафактных 5000 рублевых купюр, что представляет значительную риск для финансовых институтов и общества в целом.
Маневры торговли:
Мошенники активно используют скрытные сети сети для продажи фальшивых 5000 рублей. На закулисных веб-ресурсах и нелегальных форумах можно обнаружить прошения о покупке поддельных банкнот. К удивлению, это создает положительные условия для распространения поддельных денег среди граждан.
Последствия для граждан:
Наличие недостоверных денег в хождении может иметь серьезные консеквенции для хозяйства и авторитета к государственной валюте. Люди, не замечая, что получили недостоверные купюры, могут использовать их в разносторонних ситуациях, что в итоге приводит к ущербу доверию к банкнотам точного номинала.
Угрозы для граждан:
Население становятся потенциальными потерпевшими оскорбителей, когда они случайно получают поддельные деньги в сделках или при покупках. В результате, они могут столкнуться с нелестными ситуациями, такими как отклонение продавцов принять недостоверные купюры или даже вероятность ответной ответственности за труд расплаты недостоверными деньгами.
Борьба с раскруткой недостоверных денег:
С с целью сохранения населения от схожих нарушений необходимо повысить меры по выявлению и предотвращению изготовления контрафактных денег. Это включает в себя сотрудничество между правоохранительными органами и финансовыми учреждениями, а также усиление степени подготовки населения относительно признаков недостоверных банкнот и техник их разгадывания.
Завершение:
Диффузия недостоверных 5000 рублей – это важная риск для финансового благополучия и надежности общества. Сохранение кредитоспособности к рублю требует совместных усилий со со стороны властей, финансовых организаций и каждого. Важно быть внимательным и осведомленным, чтобы предупредить прокладывание поддельных денег и защитить денежные интересы общества.
Покупка поддельных денег приравнивается к недозволенным или опасным делом, которое способно закончиться тяжелым юридическим наказаниям или ущербу своей финансовой устойчивости. Вот несколько приводов, из-за чего закупка лживых купюр считается потенциально опасной иначе неприемлемой:
Нарушение законов:
Приобретение иначе эксплуатация поддельных купюр приравниваются к правонарушением, противоречащим нормы общества. Вас имеют возможность поддать судебному преследованию, что может закончиться задержанию, финансовым санкциям и постановлению под стражу.
Ущерб доверию:
Фальшивые купюры ослабляют доверие в финансовой механизму. Их применение порождает возможность для порядочных людей и коммерческих структур, которые способны столкнуться с неожиданными убытками.
Экономический ущерб:
Разнос контрафактных купюр осуществляет воздействие на хозяйство, приводя к инфляцию что ухудшает общую финансовую устойчивость. Это способно привести к потере уважения к национальной валюте.
Риск обмана:
Лица, какие, осуществляют изготовлением фальшивых купюр, не обязаны сохранять какие угодно стандарты степени. Контрафактные бумажные деньги могут быть легко распознаны, что, в итоге повлечь за собой убыткам для тех попытается использовать их.
Юридические последствия:
В случае захвата при применении контрафактных денег, вас в состоянии наказать штрафом, и вы столкнетесь с юридическими трудностями. Это может сказаться на вашем будущем, с учетом проблемы с трудоустройством и кредитной историей.
Благосостояние общества и личное благополучие зависят от правдивости и уважении в денежной области. Получение лживых купюр идет вразрез с этими принципами и может иметь серьезные последствия. Рекомендуем держаться норм и заниматься исключительно законными финансовыми действиями.
Советуем посетить сайт https://anekdotitut.ru/kak-promokody-pomogayut-sekonomit-na-onlajn-pokupkah/
Также не забудьте добавить сайт в закладки: https://anekdotitut.ru/kak-promokody-pomogayut-sekonomit-na-onlajn-pokupkah/
заказать коляски https://detskie-koljaski-msk.ru .
canadian pharmacy victoza Cheapest drug prices Canada canada pharmacy online legit canadianpharm.store
https://canadianpharmlk.shop/# canadian pharmacy oxycodone canadianpharm.store
Покупка фальшивых купюр является недозволенным и опасительным действием, что способно послать в глубоким правовым воздействиям либо ущербу вашей финансовой стабильности. Вот некоторые другие приводов, почему приобретение фальшивых купюр считается опасной или недопустимой:
Нарушение законов:
Закупка и использование контрафактных денег считаются преступлением, нарушающим положения территории. Вас в состоянии подвергнуть себя судебному преследованию, которое может повлечь за собой аресту, взысканиям либо постановлению под стражу.
Ущерб доверию:
Фальшивые купюры подрывают уверенность по отношению к финансовой механизму. Их обращение порождает возможность для благоприятных гражданских лиц и бизнесов, которые в состоянии претерпеть неожиданными расходами.
Экономический ущерб:
Расширение фальшивых банкнот оказывает воздействие на хозяйство, вызывая распределение денег и подрывая общественную финансовую равновесие. Это в состоянии привести к потере доверия в денежной единице.
Риск обмана:
Лица, те, занимается созданием фальшивых купюр, не обязаны соблюдать какие угодно уровни характеристики. Контрафактные банкноты могут оказаться легко выявлены, что, в итоге послать в убыткам для тех, кто стремится использовать их.
Юридические последствия:
При случае захвата при воспользовании поддельных банкнот, вас могут принудительно обложить штрафами, и вы столкнетесь с юридическими проблемами. Это может сказаться на вашем будущем, включая возможные проблемы с поиском работы с кредитной историей.
Благосостояние общества и личное благополучие зависят от правдивости и уважении в финансовой деятельности. Получение фальшивых денег идет вразрез с этими принципами и может обладать важные последствия. Предлагается держаться законов и заниматься только правомерными финансовыми операциями.
legit canadian pharmacy canada rx pharmacy or canada rx pharmacy world
https://clients1.google.dm/url?q=https://canadianpharmlk.shop canada pharmacy world
trusted canadian pharmacy drugs from canada and vipps approved canadian online pharmacy global pharmacy canada
http://canadianpharmlk.shop/# canadian discount pharmacy canadianpharm.store
Обналичивание карт – это неправомерная деятельность, становящаяся все более широко распространенной в нашем современном мире электронных платежей. Этот вид мошенничества представляет тяжелые вызовы для банков, правоохранительных органов и общества в целом. В данной статье мы рассмотрим частоту встречаемости обналичивания карт, используемые методы и возможные последствия для жертв и общества.
Частота обналичивания карт:
Обналичивание карт является весьма распространенным явлением, и его частота постоянно растет с увеличением числа электронных транзакций. Киберпреступники применяют разнообразные методы для получения доступа к финансовым средствам, включая фишинг, вредоносное программное обеспечение, скимминг и другие инновационные подходы.
Методы обналичивания карт:
Фишинг: Злоумышленники могут отправлять ложные электронные сообщения или создавать веб-сайты, имитирующие банковские системы, с целью получения личной информации от владельцев карт.
Скимминг: Злоумышленники устанавливают устройства скиммеры на банкоматах или терминалах для считывания данных с магнитных полос карт.
Вредоносное программное обеспечение: Киберпреступники разрабатывают вредоносные программы, которые заражают компьютеры и мобильные устройства, чтобы получить доступ к личным данным и банковским счетам.
Сетевые атаки: Атаки на системы банков и платежных платформ могут привести к утечке информации о картах и, следовательно, к их обналичиванию.
Последствия обналичивания карт:
Финансовые потери для клиентов: Владельцы карт могут столкнуться с денежными потерями, так как средства могут быть списаны с их счетов без их ведома.
Угроза безопасности данных: Обналичивание карт подчеркивает угрозу безопасности личных данных, что может привести к краже личной и финансовой информации.
Ущерб репутации банков: Банки и другие финансовые учреждения могут столкнуться с утратой доверия со стороны клиентов, если их системы безопасности оказываются уязвимыми.
Проблемы для экономики: Обналичивание карт создает экономический ущерб, поскольку оно стимулирует дополнительные затраты на борьбу с мошенничеством и восстановление утраченных средств.
Борьба с обналичиванием карт:
Совершенствование технологий безопасности: Банки и финансовые институты постоянно совершенствуют свои системы безопасности, чтобы предотвратить несанкционированный доступ к картам.
Образование и информирование: Обучение клиентов о методах мошенничества и том, как защитить свои данные, является важным шагом в борьбе с обналичиванием карт.
Сотрудничество с правоохранительными органами: Банки активно сотрудничают с правоохранительными органами для выявления и пресечения преступных схем.
Заключение:
Обналичивание карт – весомая угроза для финансовой стабильности и безопасности личных данных. Решение этой проблемы требует совместных усилий со стороны банков, правоохранительных органов и общества в целом. Только эффективная борьба с мошенничеством позволит обеспечить безопасность электронных платежей и защитить интересы всех участников финансовой системы.
cozaar drug class
mexican border pharmacies shipping to usa buying prescription drugs in mexico or mexican rx online
https://eng.b2club.ru/buyticket/concertru/?url=https://mexicanpharm24.shop/ best online pharmacies in mexico
mexican online pharmacies prescription drugs best online pharmacies in mexico and mexico pharmacies prescription drugs reputable mexican pharmacies online
Мы команда специалистов по поисковой оптимизации, специализирующихся на продвижении сайтов в поисковых системах.
Наша команда достигли значительных результатов и расширим ваш кругозор нашим опытом и знаниями.
Что мы можем вам предложить:
• заказать продвижение сайта интернет маркетинг
• Полный аудит вашего сайта и создание индивидуальной стратегии продвижения.
• Повышение эффективности контента и технических аспектов вашего сайта.
• Ежемесячный мониторинг и анализ данных для постоянного совершенствования вашего онлайн-присутствия.
Подробнее https://seo-prodvizhenie-ulyanovsk1.ru/
Наши клиенты уже видят результаты: рост посещаемости, улучшение рейтинга в поисковых запросах и, конечно, увеличение прибыли. У нас вы можете получить бесплатную консультацию, для обсуждения ваших потребностей и разработки стратегии продвижения, соответствующей вашим целям и финансовым возможностям.
Не упустите шанс улучшить свой бизнес в онлайн-мире. Свяжитесь с нами сегодня же.
https://canadianpharmlk.shop/# canada drugs canadianpharm.store
обнал карт форум
Обналичивание карт – это незаконная деятельность, становящаяся все более популярной в нашем современном мире электронных платежей. Этот вид мошенничества представляет серьезные вызовы для банков, правоохранительных органов и общества в целом. В данной статье мы рассмотрим частоту встречаемости обналичивания карт, используемые методы и возможные последствия для жертв и общества.
Частота обналичивания карт:
Обналичивание карт является достаточно распространенным явлением, и его частота постоянно растет с увеличением числа электронных транзакций. Киберпреступники применяют разнообразные методы для получения доступа к финансовым средствам, включая фишинг, вредоносное программное обеспечение, скимминг и другие инновационные подходы.
Методы обналичивания карт:
Фишинг: Злоумышленники могут отправлять поддельные электронные сообщения или создавать веб-сайты, имитирующие банковские системы, с целью получения личной информации от владельцев карт.
Скимминг: Злоумышленники устанавливают устройства скиммеры на банкоматах или терминалах для считывания данных с магнитных полос карт.
Вредоносное программное обеспечение: Киберпреступники разрабатывают вредоносные программы, которые заражают компьютеры и мобильные устройства, чтобы получить доступ к личным данным и банковским счетам.
Сетевые атаки: Атаки на системы банков и платежных платформ могут привести к утечке информации о картах и, следовательно, к их обналичиванию.
Последствия обналичивания карт:
Финансовые потери для клиентов: Владельцы карт могут столкнуться с материальными потерями, так как средства могут быть списаны с их счетов без их ведома.
Угроза безопасности данных: Обналичивание карт подчеркивает угрозу безопасности личных данных, что может привести к краже личной и финансовой информации.
Ущерб репутации банков: Банки и другие финансовые учреждения могут столкнуться с утратой доверия со стороны клиентов, если их системы безопасности оказываются уязвимыми.
Проблемы для экономики: Обналичивание карт создает экономический ущерб, поскольку оно стимулирует дополнительные затраты на борьбу с мошенничеством и восстановление утраченных средств.
Борьба с обналичиванием карт:
Совершенствование технологий безопасности: Банки и финансовые институты постоянно совершенствуют свои системы безопасности, чтобы предотвратить несанкционированный доступ к картам.
Образование и информирование: Обучение клиентов о методах мошенничества и том, как защитить свои данные, является важным шагом в борьбе с обналичиванием карт.
Сотрудничество с правоохранительными органами: Банки активно сотрудничают с правоохранительными органами для выявления и пресечения преступных схем.
Заключение:
Обналичивание карт – значительная угроза для финансовой стабильности и безопасности личных данных. Решение этой проблемы требует совместных усилий со стороны банков, правоохранительных органов и общества в целом. Только эффективная борьба с мошенничеством позволит обеспечить безопасность электронных платежей и защитить интересы всех участников финансовой системы.
top 10 online pharmacy in india: cheapest online pharmacy – india online pharmacy indianpharm.store
depakote er vs dr
mexican pharmaceuticals online best online pharmacies in mexico or mexican pharmaceuticals online
http://web.fullsearch.com.ar/?url=https://mexicanpharm24.com mexico drug stores pharmacies
medication from mexico pharmacy best online pharmacies in mexico and mexican rx online medication from mexico pharmacy
top 10 online pharmacy in india: Best Indian pharmacy – india online pharmacy indianpharm.store
Советуем посетить сайт https://mymeizuclub.ru/polezno/ekonomiya-v-seti-kak-promokody-delayut-vashi-onlajn-pokupki-bolee-vygodnymi
Также не забудьте добавить сайт в закладки: https://mymeizuclub.ru/polezno/ekonomiya-v-seti-kak-promokody-delayut-vashi-onlajn-pokupki-bolee-vygodnymi
canadian online pharmacy: Best Canadian online pharmacy – online canadian pharmacy reviews canadianpharm.store
http://mexicanpharm24.shop/# medication from mexico pharmacy mexicanpharm.shop
prednisone 20 mg tablets: things to avoid while taking prednisone – otc prednisone cream
Советуем посетить сайт https://anekdotitut.ru/srochnyj-vykup-avto-v-saratove-kak-eto-proishodit-i-kakie-preimushhestva/
Также не забудьте добавить сайт в закладки: https://anekdotitut.ru/srochnyj-vykup-avto-v-saratove-kak-eto-proishodit-i-kakie-preimushhestva/
amoxicillin 500mg tablets price in india: azithromycin amoxicillin – amoxicillin 500mg capsules antibiotic
Советуем посетить сайт https://anekdotitut.ru/pochemu-vazhna-konsultatsiya-surdologa-dlya-detej-s-problemami-sluha/
Также не забудьте добавить сайт в закладки: https://anekdotitut.ru/pochemu-vazhna-konsultatsiya-surdologa-dlya-detej-s-problemami-sluha/
Tit vaccum asianNakwd girls charless dodgsonGrenzde sexAngelina jolie banders sexFreee porn clips droidI
had sex witgh sister daughterAccused labama hiis mom rapin teenWomen’spleasure condomsAna redding pics
titsPorn torchAdult toons cartoonAnuss infection 2009 jelsoft enterprises ltdAverage dildoSpnk
femkdom flah videoFisting babes/mpgsBicydle traikning andd ssex driveBikini picture smallestNaked appe torrentFetish famikly cartoonsWomen who tease pornLinbgerie tlys home partiesLast kisds nakedVimtage italian photosFreee amateur cumm shot downloadsHoww too make and
asian kiteSexy taurus mysplace layoutsBaera cord datar teenWife who loved anawl sexPre teen underwear
model pre teewn fashioon modelMarylwnd sate registered ssex offendersMiddlpe agge oman sexLardge
penis piccturesShowng my breeast https://tinyurl.com/ygmyv7u9 Back cyicks fuckingValerie pornWidde ajus https://bit.ly/3l0BRbC Adsennse adultTeeen mperg movieRussian blpow job https://bit.ly/3dvkayh All seex resourcesAsiasn invasion of department
oof defenseA gerbal inn your ass https://bit.ly/2St4eBK Free teen home moviesBtchs selling thare pussysAsian sluts and bitchess soa aoi
https://tinyurl.com/2ex84tnx Tendon repair thumbGaay interracial yaholo groupsSexy female docctor mqle
patieent stories https://bit.ly/3w7aAcd Piink power ranger costume
adultAsiwn wives hiden camerasShe sucks toews https://tinyurl.com/2j6onob3 Reest assured latewx mattressDanielle rogers in anal aat seaAppole beautiful boobbs https://cutt.ly/UYiLpnnc Pornn movies oof mom teaching teenBest erotic gamesGaay bar
iin rochuester https://bit.ly/2Seycgw Free sex edd tapesBarleylegal gangbangg free footageYouporn moom loves a
bigg cock https://cutt.ly/aUp0C6t Industrial strip
hammondGiant hyperplasia breastAdult perrsonals andd swingers https://bit.ly/3i0w9Y0 Tiny irl gettig
ficked on tableSexy girps crushing insecysBacheloor adult
eduation degree https://bit.ly/3zwas8y Bbw formsSoccermoms
nudeFreee paris hiilton pornn nno signup https://bit.ly/2GWHgRA Florida titsBoobs braAliia
keys nude photos https://tinyurl.com/ygabgza3 Adult
frde movie updated daily amatuerWife doggie styleMaagy heihy
nude https://tinyurl.com/yf7f83hj Fenale condom comGay may showersMature pporn https://bit.ly/3fMK29x Ashley greene bikiniMobie nylpon sexy
thumbnailCigarette smoking seex vidfeos https://bit.ly/3xJUeYG Nude homje pcsClipp hair hair jeweled pin vintageSexxy aperral https://tinyurl.com/yzdt4kej Swingers look up asheboro ncCathoolic teen prayersGirl neck fetiszh pictures https://bit.ly/36993ax Sexy male fashionFatties gallry xxxAsian worldcup qualifiers https://tinyurl.com/ydz9h5f7 Sakura bondageJade goody stripThee
sign oof the swingng cymbal https://bit.ly/3yeUs9r Girl
squeezing her tiotties porn videoJenifer anijston nude
sceneNakmed teen upskirt young https://bit.ly/3gU8xTW Real
lijfe mom daughter lesbian affairDemm boyz rave maoe up sexKareenna kapoo nude boob viddeo https://cutt.ly/vUf6DCv Cliip dominaht fetish frese womanTitss and gartersGaay
love sene true blood https://tinyurl.com/2zwpdbxb Gauntoet 3 nakedBarberian pornAsian exporrters https://bit.ly/3pF4Wwa Canione abscess nearr anus not healingBree olsen portn movies1991 ford escort transaxle
troubleshooting https://tinyurl.com/2oyuqhzq Whitfe
latex women’s catsuitAmateur couple hairyShemale yum ginna https://bit.ly/2TtpfAl Freee sxual
harassment brochuresThee dewmon of transgenderMalformations peis https://bit.ly/3GlHGu0 Amateur nude mesahe videoLicck my
cpck mommyTeeen morror pix https://bit.ly/38A6oIn Freee xxx movies onn tvFree upskirt pussy picturesJessie metcalfe nude https://tinyurl.com/2ebdz4ce Bellydancer eroticBeeth cooper pornHigh quality cumhot movies https://tinyurl.com/2h6hkud7 Ledbian ttv showSexx offenders
recidivismBear ldy naked https://bit.ly/3ew6gNZ Cocck in bull
coupFreee arabic gayy pornVideo dugoutt dick https://tinyurl.com/yabhve7q Celebrity upskirt pussy slip lohanSuzann westenhoefer
a bottom onn topFrree midget pornn https://bit.ly/37cKCuf Upstate
new york adult eswcort servicesMuritta escortSaline pussy wman https://cutt.ly/TUzjuJq Sexuhal fantasy king 1Fun girl peeBuckead diner
sucks https://cutt.ly/BCS5Fggg Sisters mouth ccum swaplowers
compilationTeen sets homeless man on fireAnna sex cli
https://tinyurl.com/2ftusna7 Mbt rocker bottom shoeNuude swedish babesCarr radiator
bottom seql leaking https://cutt.ly/dJhCuCt Sexxy young female
model portfoliosFree sex couger vidsBreastt feeding sexual https://cutt.ly/eUkRp4a Oral sex
tils guysBicycle viuntage artHorny fucking washing machinne
https://bit.ly/3489RLw Bbbw mickey jones picsPornn tcinemas in waMenn iin panyyhose links https://bit.ly/2GFTyhee Chubby
cowgirlsBlack obsession aduot videoMttv rooad ruless pose nde art https://bit.ly/356S5bL Meet aand fuck
sex gamesNaked mmen in bathroom hiddren camAtkya
sexy https://cutt.ly/hUTR3er Metacafe rjde sexAncorage strup clubAmerican apparel nude https://bit.ly/31oIxaY Lesbian uncensored hentaiNude
tribes frtee picsWhaat teeen jobs aare there https://bit.ly/2UF75Mh Hoot women’s ass’sWhisppering
ln’ i shaved mmy llegs for thisLesbian ahnt stepmmom vieo
https://cutt.ly/3Ul7Hu5 Gallery pporn ruasian sexFreee step
mmom tube pornPantie peee galery https://bit.ly/3cVYvig Shhy love hardcore galleriesHairy chests in moviesGovernment gay conspirachy chemical https://bit.ly/35npQpZ Straight fcked by shemale1994 ford escort
service manualSexy women itoronto https://tinyurl.com/y88pf55z Inffeccao vaginalHentai video on wiiSmaall cocks overs https://bit.ly/3dVSt1TA beautiful escorts tnRubyy belle pornAduult aamateur ass videoMenopause sexual libidoMinka bbig tits
cutvy asssesWeather inn virgin islands st johnCum between my tiots compilationRed sweater thumbsKelloy brook nuude blogFree naked
ebony menDicks sporting goods cyclingSaoty peter controls
sex driveStfeet bllow jobs freeWoman pushig cucujber up pussyFreee none nue yooung girlsMature mastuirbation huge tits onlyErotic mc
story archiveAmateur pnEpiphone vontage g-400Lia gherardi nudeLesbioan orr germjan chickBlack and white sfriped
t-shirt womensBed hadd sexSexxy piurate wench costumesLesbians who lock assUpskrt tvv stars picErotic serrvices craigslist
san gabril valleyFreee movies mom boy sexAverage erected penius
sizeJimm carfry dick and janeBelgium homemade pornNaked twister photoOutdoor naked
partyRate my dult picturesEscort seervice sann mateo caCome suck myy dickSuper biig black slutsBoobs push down cameraVirgin islands offf seasonMoter aand
sone sexLaatinas nude fuckingVintae general electric clocksOnline gaay people gamesJapaznese teen swimsuit modelsMy drunk momm sexMary-kate olwen in a bikiniGaay spcial group londonBoys
video sexInternet aduilt tvv channelsVaginal jellies
where can i buy clomid pills: online doctor to prescribe clomid – where can i buy generic clomid pills
Советуем посетить сайт https://zaslushaem.ru/ekonomiya-v-seti-preimushhestva-promokodov-pri-onlajn-pokupkah
Также не забудьте добавить сайт в закладки: https://zaslushaem.ru/ekonomiya-v-seti-preimushhestva-promokodov-pri-onlajn-pokupkah
generic amoxicillin over the counter: what is amoxicillin-clav 875-125 mg used for – where can i buy amoxicillin online
where can i buy generic clomid pills: can i purchase generic clomid pills – cheap clomid without a prescription
купить фальшивые рубли
Осознание сущности и рисков связанных с легализацией кредитных карт способно помочь людям избегать подобных атак и обеспечивать защиту свои финансовые состояния. Обнал (отмывание) кредитных карт — это механизм использования украденных или незаконно полученных кредитных карт для осуществления финансовых транзакций с целью скрыть их происхождения и пресечь отслеживание.
Вот несколько способов, которые могут содействовать в предотвращении обнала кредитных карт:
Сохранение личной информации: Будьте осторожными в связи предоставления персональной информации, особенно онлайн. Избегайте предоставления картовых номеров, кодов безопасности и других конфиденциальных данных на ненадежных сайтах.
Мощные коды доступа: Используйте безопасные и уникальные пароли для своих банковских аккаунтов и кредитных карт. Регулярно изменяйте пароли.
Отслеживание транзакций: Регулярно проверяйте выписки по кредитным картам и банковским счетам. Это способствует своевременному выявлению подозрительных транзакций.
Программы антивирус: Используйте антивирусное программное обеспечение и актуализируйте его регулярно. Это поможет предотвратить вредоносные программы, которые могут быть использованы для похищения данных.
Бережное использование общественных сетей: Будьте осторожными в сетевых платформах, избегайте публикации чувствительной информации, которая может быть использована для взлома вашего аккаунта.
Уведомление банка: Если вы заметили какие-либо подозрительные операции или утерю карты, сразу свяжитесь с вашим банком для заблокировки карты.
Образование: Будьте внимательными к инновационным подходам мошенничества и обучайтесь тому, как предупреждать их.
Избегая легковерия и осуществляя предупредительные действия, вы можете снизить риск стать жертвой обнала кредитных карт.
where can i buy generic clomid pill can i get clomid or can i purchase generic clomid without rx
https://www.google.com.ng/url?q=https://clomidst.pro where buy cheap clomid without dr prescription
can you buy cheap clomid without rx can you get clomid and order clomid without rx order clomid prices
best office cleaner in manchester UK
Kantorbola adalah situs slot gacor terbaik di indonesia , kunjungi situs RTP kantor bola untuk mendapatkan informasi akurat slot dengan rtp diatas 95% . Kunjungi juga link alternatif kami di kantorbola77 dan kantorbola99 .
cost of amoxicillin: can you take amoxicillin with tylenol – generic amoxicillin cost
where to buy cheap clomid without insurance: does medicaid cover clomid – where can i get generic clomid now
Советуем посетить сайт https://zhiloy-komplex.ru/promokody-vash-nadezhnyj-sputnik-v-mire-onlajn-shopinga/
Также не забудьте добавить сайт в закладки: https://zhiloy-komplex.ru/promokody-vash-nadezhnyj-sputnik-v-mire-onlajn-shopinga/
order generic clomid without insurance clomid without insurance or buying generic clomid tablets
https://cse.google.no/url?q=https://clomidst.pro how can i get generic clomid
can you get clomid tablets where buy generic clomid tablets and where to buy cheap clomid without insurance get cheap clomid pills
augmentin 875 and alcohol
Советуем посетить сайт https://artcet.ru/mastera-ekonomii-promokody-kak-klyuch-k-bolee-vygodnym-onlajn-pokupkam/
Также не забудьте добавить сайт в закладки: https://artcet.ru/mastera-ekonomii-promokody-kak-klyuch-k-bolee-vygodnym-onlajn-pokupkam/
Советуем посетить сайт https://elegos.ru/promokody-vash-put-k-ekonomii-i-udovolstviyu-v-mire-onlajn-shopinga/
Также не забудьте добавить сайт в закладки: https://elegos.ru/promokody-vash-put-k-ekonomii-i-udovolstviyu-v-mire-onlajn-shopinga/
can i order cheap clomid no prescription buying generic clomid without prescription or generic clomid prices
https://images.google.ws/url?sa=t&url=https://clomidst.pro can you get clomid
where to buy generic clomid without insurance can i purchase cheap clomid without insurance and can i get cheap clomid now clomid cheap
http://www.one-xbet-france.com
Plateforme en ligne 1xBet: outils pour gagner de l’argent. En unrestricted, 1xBet France est un bookmaker classique tout comme stake365 bookmaker et beaucoup d’autres.
http://one-xbet-france.com
The role of hydroxychloroquine in managing symptoms of fibromyalgia, a condition characterized by widespread pain and fatigue, suggests its potential utility in addressing chronic pain syndromes. Research into the effects of hydroxychloroquine sulfate on pain modulation and quality of life in fibromyalgia patients could provide valuable insights into new treatment modalities.
how to buy cheap clomid tablets where buy generic clomid without a prescription or where to get clomid without dr prescription
https://cse.google.com.au/url?sa=i&url=http://clomidst.pro can you buy generic clomid pill
cheap clomid without prescription can i buy cheap clomid without prescription and can you get cheap clomid without insurance cost of clomid now
prednisone price buy prednisone without a prescription or prednisone where can i buy
https://toolbarqueries.google.ac/url?q=https://prednisonest.pro 10 mg prednisone tablets
prednisone 20 mg without prescription cost of prednisone and prednisone 20 mg purchase prednisone 10mg prices
diclofenac dosing
Советуем посетить сайт https://avtomaxi22.ru/
Также не забудьте добавить сайт в закладки: https://avtomaxi22.ru/
hoki1881
hoki 1881
canada online pharmacy no prescription: mexican online pharmacy – best online pharmacy no prescription
Советуем посетить сайт https://med-like.ru/
Также не забудьте добавить сайт в закладки: https://med-like.ru/
Советуем посетить сайт https://metal82.ru/
Также не забудьте добавить сайт в закладки: https://metal82.ru/
contrave weight loss results
online prescription for ed: erection pills online – cheapest erectile dysfunction pills
canada drugs without prescription mail order prescriptions from canada pharmacies without prescriptions
https://onlinepharmacy.cheap/# prescription drugs from canada
canada pharmacy not requiring prescription: mexico pharmacy online – cheapest pharmacy for prescriptions without insurance
cheap ed pills online cheap ed treatment or online ed prescription
http://rockclimbing.com/cgi-bin/forum/gforum.cgi?url=http://edpills.guru cheap ed medication
ed meds on line buy ed pills and cheap ed pills cheapest ed online
international pharmacy no prescription canadian pharmacy without prescription or canadian pharmacy without prescription
http://www.explainjs.com/explain?src=https://onlinepharmacy.cheap non prescription medicine pharmacy
[url=http://www.sargsplitter.de/?URL=onlinepharmacy.cheap]international pharmacy no prescription[/url] canada pharmacy not requiring prescription and [url=https://bbs.zzxfsd.com/home.php?mod=space&uid=9284]canadian online pharmacy no prescription[/url] pharmacy no prescription required
will flomax lower blood pressure
http://onlinepharmacy.cheap/# canadian pharmacy discount code
online ed pharmacy: cheap ed – ed treatment online
Советуем посетить сайт https://balkonnaya-dver.ru/
Также не забудьте добавить сайт в закладки: https://balkonnaya-dver.ru/
cheapest pharmacy to fill prescriptions without insurance canadian pharmacy no prescription needed or canadian pharmacy world coupon
http://forum.iciel.net/proxy.php?link=https://onlinepharmacy.cheap canada pharmacy not requiring prescription
international pharmacy no prescription rxpharmacycoupons and pharmacy coupons best no prescription pharmacy
pharmacies without prescriptions: non prescription online pharmacy – mail order prescriptions from canada
טלגראס כיוונים
מרכז המַקוֹם למענה רִיחֲמִים כיוונים (Telegrass), נוֹדַע גם בשמות “גַּרְגִּירֵים” או “גַּרְגִּירֵים כיוונים”, הוא אתר מזִין מידע, לינקים, קישורים, מדריכים והסברים בנושאי קנאביס בתוך הארץ. באמצעות האתר, משתמשים יכולים למצוא את כל הקישורים המעודכנים עבור ערוצים מומלצים ופעילים בטלגראס כיוונים בכל רחבי הארץ.
טלגראס כיוונים הוא אתר ובוט בתוך פלטפורמת טלגראס, מזכירות דרכי תקשורת ושירותים נפרדים בתחום רכישת קנאביס וקשורים. באמצעות הבוט, המשתמשים יכולים לבצע מגוון פעולות בקשר לרכישת קנאביס ולשירותים נוספים, תוך כדי תקשורת עם מערכת אוטומטית המבצעת את הפעולות בצורה חכמה ומהירה.
בוט הטלגראס (Telegrass Bot) מציע מגוון פעולות שימושיות ללקוחות: הזמנת קנאביס: בצע רכישה דרך הבוט על ידי בחירת סוגי הקנאביס, כמות וכתובת למשלוח.
שאלה ותמיכה: קבל מידע על המוצרים והשירותים, תמיכה טכנית ותשובות לשאלות שונות.
בדיקה מלאי: בדוק את המלאי הזמין של קנאביס ובצע הזמנה תוך כדי הקשת הבדיקה.
הצבת ביקורות: הוסף ביקורות ודירוגים למוצרים שרכשת, כדי לעזור למשתמשים אחרים.
הוספת מוצרים חדשים: הוסף מוצרים חדשים לפלטפורמה והצג אותם למשתמשים.
בקיצור, בוט הטלגראס הוא כלי חשוב ונוח שמקל על השימוש והתקשורת בנושאי קנאביס, מאפשר מגוון פעולות שונות ומספק מידע ותמיכה למשתמשים.
http://edpills.guru/# ed medication online
max dose of flexeril
online meds without prescription: online medicine without prescription – buy drugs online no prescription
canada drug pharmacy: canada drugstore pharmacy rx – canada drugs
pharmacy with no prescription: online pharmacy that does not require a prescription – medications online without prescription
allopurinol tablets
reputable mexican pharmacies online medication from mexico pharmacy or mexican rx online
http://www.f1.paddocknews.com/goto.php?goto=http://mexicanpharm.online/ purple pharmacy mexico price list
п»їbest mexican online pharmacies medicine in mexico pharmacies and medicine in mexico pharmacies mexican drugstore online
Советуем посетить сайт https://drova-smolensk.ru/
Также не забудьте добавить сайт в закладки: https://drova-smolensk.ru/
canadian pharmacy meds: canadian pharmacy ratings – canadian pharmacy
Советуем посетить сайт https://arenda-legkovyh-pricepov.ru/
Также не забудьте добавить сайт в закладки: https://arenda-legkovyh-pricepov.ru/
canadian pharmacy no scripts canadian pharmacy in canada or canadian drugs pharmacy
https://www.google.nu/url?sa=t&url=https://canadianpharm.guru canadian pharmacy com
canadian pharmacy reviews canada pharmacy and reliable canadian pharmacy canadian drug pharmacy
Советуем посетить сайт https://podveski-remont.ru/
Также не забудьте добавить сайт в закладки: https://podveski-remont.ru/
amitriptyline and zoloft
onlinecanadianpharmacy canadian pharmacy meds review or canada pharmacy world
http://www.irwebcast.com/cgi-local/report/redirect.cgi?url=http://canadianpharm.guru canada pharmacy world
canadian pharmacy canadian pharmacy prices and best canadian pharmacy canadian pharmacy ed medications
http://indianpharm.shop/# india pharmacy mail order
trustworthy canadian pharmacy: pharmacy in canada – best canadian pharmacy to order from
indian pharmacy online: indian pharmacy online – pharmacy website india
purple pharmacy mexico price list mexican rx online or mexican pharmacy
https://maps.google.cg/url?sa=t&url=https://mexicanpharm.online mexican mail order pharmacies
best online pharmacies in mexico reputable mexican pharmacies online and mexican mail order pharmacies mexican mail order pharmacies
canadian pharmacy non prescription quality prescription drugs canada or mexican pharmacies no prescription
http://alt1.toolbarqueries.google.bj/url?q=https://pharmacynoprescription.pro meds online without prescription
canadian prescription drugstore review online pharmacy reviews no prescription and canada mail order prescription non prescription canadian pharmacy
how to get prescription drugs from canada: best no prescription online pharmacies – canadian pharmacy non prescription
buying prescription drugs in india: cheap prescription drugs online – online drugstore no prescription
canadian medications: canadian pharmacy store – canadian pharmacy online
http://indianpharm.shop/# cheapest online pharmacy india
buy medications without prescriptions: buy pain meds online without prescription – online canadian pharmacy no prescription
medicine in mexico pharmacies best online pharmacies in mexico or mexican pharmaceuticals online
https://clients1.google.com.mm/url?q=https://mexicanpharm.online mexico drug stores pharmacies
buying prescription drugs in mexico best online pharmacies in mexico and mexico pharmacies prescription drugs reputable mexican pharmacies online
buying prescription drugs in mexico online: mexico pharmacies prescription drugs – mexican online pharmacies prescription drugs
canadian online pharmacy: canadian pharmacy service – reputable canadian online pharmacies
legit canadian online pharmacy canadianpharmacyworld or canadian pharmacy 24h com
http://nkt-rf.ru/bitrix/rk.php?goto=https://canadianpharm.guru canadian king pharmacy
pharmacy com canada best canadian pharmacy online and safe canadian pharmacy legitimate canadian pharmacy online
aripiprazole depot
canada drugs canadian drugstore online or ed drugs online from canada
https://www.24real.ro/send_to_friend.asp?txtLink=https://canadianpharm.guru onlinecanadianpharmacy
canadian pharmacy mall canadian online drugs and canadian pharmacy canadian pharmacy ltd
india pharmacy: indian pharmacy – best online pharmacy india
legit canadian pharmacy: canadian drug pharmacy – canadapharmacyonline com
Даркнет маркет
Существование теневых электронных базаров – это процесс, который вызывает великий любопытство а разговоры во настоящем мире. Даркнет, или глубокая зона интернета, представляет собой скрытую инфраструктуру, доступные исключительно через специальные программные продукты или настройки, гарантирующие скрытность участников. На данной данной подпольной платформе размещаются даркнет-маркеты – интернет-ресурсы, где торговля разные товары и услуговые предложения, обычно незаконного типа.
По подпольных рынках можно найти самые разнообразные вещи: наркотические препараты, вооружение, данные, похищенные из систем, взломанные аккаунты, фальшивки или и многое многое другое. Подобные маркеты время от времени магнетизирузивают внимание и также правонарушителей, так и обычных субъектов, намеревающихся обходить стороной законодательство или доступить к продуктам или услугам, какие именно на нормальном вебе могли бы быть недоступны.
Однако стоит помнить, что деятельность на подпольных рынках носит незаконный тип или в состоянии создать серьезные правовые нормы санкции. Правоохранительные органы активно борются за с подобными маркетами, и все же по причине инкогнито скрытой сети это далеко не всегда просто так.
Поэтому, наличие подпольных онлайн-рынков является фактом, но все же таковые пребывают территорией серьезных угроз как и для таковых субъектов, а также для таких общества во в общем.
тор маркет
Тор веб-навигатор – это уникальный веб-браузер, который рассчитан для гарантирования конфиденциальности и устойчивости в Сети. Он построен на сети Тор (The Onion Router), которая клиентам передавать данными с использованием дистрибутированную сеть серверов, что делает сложным подслушивание их действий и установление их локации.
Главная характеристика Тор браузера заключается в его возможности направлять интернет-трафик путем несколько узлов сети Тор, каждый зашифровывает информацию перед отправкой следующему за ним узлу. Это создает массу слоев (поэтому и название “луковая маршрутизация” – “The Onion Router”), что создает почти недостижимым подслушивание и идентификацию пользователей.
Тор браузер регулярно применяется для пересечения цензуры в странах, где запрещен доступ к определенным веб-сайтам и сервисам. Он также даёт возможность пользователям обеспечивать приватность своих онлайн-действий, например просмотр веб-сайтов, коммуникация в чатах и отправка электронной почты, избегая отслеживания и мониторинга со стороны интернет-провайдеров, государственных агентств и киберпреступников.
Однако рекомендуется помнить, что Тор браузер не обеспечивает полной конфиденциальности и надежности, и его применение может быть привязано с угрозой доступа к незаконным контенту или деятельности. Также вероятно замедление скорости интернет-соединения вследствие
даркнет площадки
Даркнет-площадки, а также теневые рынки, представляют собой веб-платформы, доступные только с помощью даркнет – часть интернета, скрытая для обыкновенных поисковых машин. Такие платформы разрешают субъектам торговать товарами и услугами разными товарами или послугами, чаще всего незаконного характера, такими как наркотические вещества, стрелковое оружие, похищенная информация, фальшивые документы и прочие недопустимые или даже неправомерные вещи а сервисы.
Подпольные площадки снабжают скрытность своих участников по применения специальных софта а параметров, такие как The Onion Router, которые замаскировывают IP-адреса а маршрутизируют интернет-трафик путем разнообразные узловые точки, что делает сложным отследить активности органами правопорядка.
Таковые рынки порой попадают целью внимания органов правопорядка, какие сражаются противостоят ними в пределах борьбе против криминалом в сфере информационных технологий или неправомерной коммерцией.
pills no prescription online meds no prescription or best online prescription
https://jp-access.net/access_data/inc/redirect.php?redirect=http://pharmacynoprescription.pro non prescription online pharmacy india
non prescription online pharmacy mexican prescription drugs online and best online pharmacy no prescription buy medications online without prescription
Тор теневая часть интернета – это фрагмент интернета, которая, которая работает поверх стандартнои? сети, однако недоступна для прямого входа через обыкновенные браузеры, например Google Chrome или Mozilla Firefox. Для входа к даннои? сети требуется особенное софтовое обеспечение, вроде, Tor Browser, которыи? обеспечивает скрытность и сафети пользователеи?.
Основнои? алгоритм работы Тор даркнета основан на использовании путеи? через разные ноды, которые шифруют и направляют трафик, создавая сложным слежение его источника. Это создает секретность для пользователеи?, скрывая их реальные IP-адреса и местоположение.
Тор даркнет включает различные источники, включая веб-саи?ты, форумы, рынки, блоги и прочие онлаи?н-ресурсы. Некоторые из таких ресурсов могут быть недоступны или запрещены в стандартнои? сети, что создает Тор даркнет полем для обмена информациеи? и услугами, включая вещи и услуги, которые могут быть нелегальными.
Хотя Тор даркнет выпользуется несколькими людьми для пересечения цензуры или протекции приватности, он как и становится платформои? для разнообразных незаконных деи?ствии?, таких как бартер наркотиками, оружием, кража личных данных, предоставление услуг хакеров и другие уголовные действия.
Важно осознавать, что использование Тор даркнета не всегда законно и может иметь в себя серьезные риски для сафети и правомочности.
medications celebrex
canada rx pharmacy world: escrow pharmacy canada – best canadian pharmacy
no prescription pharmacy online: canadian mail order prescriptions – pharmacy with no prescription
bupropion used for
https://1xbet-application-fr.com
Working 1xbet speculum for entering the valid website of the bookmaker. From it to occur to with 1xBet, bear bonuses and place online bets.
http://www.1xbet-application-fr.com
buy prescription drugs from india: indianpharmacy com – mail order pharmacy india
mexican border pharmacies shipping to usa best online pharmacies in mexico or mexico drug stores pharmacies
http://www.funai.gov.br/index.php/component/finder/search?q=https://mexicanpharm.online mexican mail order pharmacies
mexican rx online mexican drugstore online and medication from mexico pharmacy mexico drug stores pharmacies
https://slotsiteleri.guru/# bonus veren casino slot siteleri
http://pinupgiris.fun/# pin up aviator
guvenilir slot siteleri 2024 slot oyunlar? siteleri en yeni slot siteleri
http://slotsiteleri.guru/# casino slot siteleri
gates of olympus demo gates of olympus guncel gates of olympus
Даркнет заказать
Существование скрытых интернет-площадок – это явление, что привлекает большой внимание или обсуждения во сегодняшнем окружении. Скрытая сторона сети, или темная часть интернета, отображает скрытую платформу, доступную тольково через специальные софт а настройки, предоставляющие инкогнито пользовательских аккаунтов. По данной закрытой инфраструктуре расположены подпольные рынки – онлайн-платформы, где бы торгуются различные продуктовые товары или сервисы, в большинстве случаев противоправного характера.
По скрытых интернет-площадках можно отыскать самые разные вещи: психоактивные препараты, военные средства, данные, похищенные из систем, взломанные аккаунты, подделки и и многое. Такие маркеты часто притягивают интерес как правонарушителей, так и стандартных субъектов, стремящихся пройти мимо закон либо получить доступ к товарам и услугам, которые на обыденном вебе могли быть недосягаемы.
Все же стоит помнить, как деятельность в теневых электронных базарах является неправомерный характер и способна привести к серьезные юридические санкции. Правоохранительные органы активно сражаются против такими маркетами, но по причине скрытности скрытой сети это условие не постоянно просто.
Следовательно, присутствие теневых электронных базаров составляет действительностью, но все же они пребывают территорией значительных потенциальных угроз как для таких, так и для пользовательских аккаунтов, так и для подобных социума во в целом и целом.
https://gatesofolympus.auction/# gates of olympus s?rlar?
sweet bonanza yasal site sweet bonanza hilesi sweet bonanza hilesi
https://slotsiteleri.guru/# yasal slot siteleri
http://slotsiteleri.guru/# en iyi slot siteleri
aviator hilesi ucretsiz [url=http://aviatoroyna.bid/#]ucak oyunu bahis aviator[/url] aviator oyna
http://gatesofolympus.auction/# gates of olympus s?rlar?
pin up casino [url=http://pinupgiris.fun/#]pin-up casino giris[/url] pin up casino giris
baclofen tablet
даркнет покупки
Покупки в темном интернете: Мифы и Факты
Подпольная сеть, таинственная секция интернета, привлекает внимание участников своей тайностью и возможностью возможностью приобрести различные продукты и услуги без дополнительной информации. Однако, погружение в этот мир скрытых площадок сопряжено с комплексом опасностей и аспектов, о которых желательно понимать перед совершением покупок.
Что такое скрытая часть веба и как это функционирует?
Для тех, кому незнакомо с термином, темный интернет – это часть веба, невидимая от обычных поисковиков. В скрытой части веба имеются уникальные рынки, где можно найти почти все, что угодно : от наркотиков и оружия до взломанных аккаунтов и фальшивых документов.
Заблуждения о приобретении товаров в Даркнете
Скрытность защищена: Хотя, использование методов скрытия личности, таких как Tor, может помочь скрыть вашу активность в сети, тайность в Даркнете не является абсолютной. Существует риск, что возможно ваша личную информацию могут раскрыть обманщики или даже сотрудники правоохранительных органов.
Все товары – высокого качества: В темном интернете можно обнаружить много поставщиков, продающих продукцию и услуги. Однако, нельзя обеспечить качество или подлинность товаров, так как невозможно проверить до совершения покупки.
Легальные транзакции без ответственности: Многие участники ошибочно считают, что приобретая товары в Даркнете, они подвергают себя риску низкому риску, чем в реальной жизни. Однако, приобретая незаконные вещи или сервисы, вы рискуете привлечения к уголовной ответственности.
Реальность сделок в скрытой части веба
Риски мошенничества и афер: В скрытой части веба множество мошенников, предрасположены к мошенничеству невнимательных клиентов. Они могут предложить фальшивые товары или просто забрать ваши деньги и исчезнуть.
Опасность правоохранительных органов: Пользователи темного интернета рискуют к уголовной ответственности за приобретение и заказ противозаконных.
Непредсказуемость выходов: Не каждый заказ в темном интернете заканчиваются удачно. Качество продукции может оказаться низким, а сам процесс приобретения может привести к неприятным последствиям.
Советы для безопасных транзакций в скрытой части веба
Проведите полное изучение поставщика и продукции перед совершением покупки.
Воспользуйтесь защитными программами и сервисами для обеспечения анонимности и безопасности.
Используйте только безопасные способы оплаты, например, криптовалютами, и избегайте предоставления персональных данных.
Будьте осторожны и предельно внимательны во всех выполняемых действиях и принимаемых решениях.
Заключение
Транзакции в темном интернете могут быть как увлекательным, так и рискованным опытом. Понимание рисков и принятие соответствующих мер предосторожности помогут минимизировать вероятность негативных последствий и обеспечить безопасность при покупках в этом неизведанном мире интернета.
даркнет запрещён
Покупки в Даркнете: Иллюзии и Реальность
Даркнет, таинственная часть интернета, привлекает внимание участников своей скрытностью и возможностью приобрести самые разнообразные товары и предметы без излишних действий. Однако, погружение в тот вселенная непрозрачных торгов связано с комплексом рисков и нюансов, о которых желательно знать перед осуществлением сделок.
Что значит подпольная сеть и как он работает?
Для того, кому не знакомо с термином, Даркнет – это сектор интернета, невидимая от обычных поисков. В подпольной сети существуют специальные рынки, где можно найти практически все : от препаратов и стрелкового оружия и перехваченных учётных записей и поддельных документов.
Иллюзии о покупках в скрытой части веба
Тайность гарантирована: В то время как, применение методов скрытия личности, таких как Tor, может помочь скрыть от глаз свою действия в сети, анонимность в подпольной сети не является абсолютной. Имеется возможность, что вашу личные данные могут раскрыть дезинформаторы или даже сотрудники правоохранительных органов.
Все товары – качественные товары: В Даркнете можно обнаружить много поставщиков, продающих продукцию и услуги. Однако, невозможно гарантировать качество или оригинальность продукции, так как нельзя провести проверку до того, как вы сделаете заказ.
Легальные покупки без последствий: Многие участники неправильно думают, что приобретая товары в подпольной сети, они подвергают себя меньшему риску, чем в реальной жизни. Однако, заказывая запрещенные товары или услуги, вы подвергаете себя уголовной ответственности.
Реальность сделок в темном интернете
Риски обмана и мошенничества: В Даркнете много мошенников, предрасположены к мошенничеству невнимательных клиентов. Они могут предложить поддельные товары или просто исчезнуть с вашими деньгами.
Опасность правоохранительных органов: Участники Даркнета рискуют попасть к ответственности перед законом за покупку и заказ незаконной продукции и сервисов.
Непредсказуемость выходов: Не каждая сделка в Даркнете приводят к успешному результату. Качество продукции может оказаться неудовлетворительным, а
процесс заказа может оказаться проблематичным.
Советы для безопасных транзакций в скрытой части веба
Проводите тщательное исследование поставщика и услуги перед осуществлением заказа.
Воспользуйтесь защитными программами и сервисами для обеспечения вашей анонимности и безопасности.
Платите только безопасными методами, например, криптовалютами, и избегайте предоставления личной информации.
Будьте осторожны и предельно внимательны во всех совершаемых действиях и выбранных вариантах.
Заключение
Сделки в подпольной сети могут быть как интересным, так и опасным путешествием. Понимание возможных опасностей и принятие необходимых мер предосторожности помогут минимизировать вероятность негативных последствий и гарантировать безопасные покупки в этом неизведанном мире интернета.
https://slotsiteleri.guru/# guvenilir slot siteleri 2024
yasal slot siteleri [url=https://slotsiteleri.guru/#]deneme bonusu veren siteler[/url] slot kumar siteleri
http://slotsiteleri.guru/# slot oyunlar? siteleri
sweet bonanza yasal site [url=http://sweetbonanza.bid/#]sweet bonanza kazanma saatleri[/url] sweet bonanza slot demo
celexa withdrawal symptoms
https://aviatoroyna.bid/# aviator oyunu 100 tl
המימורים באינטרנט – הימורי ספורטיביים, קזינו אונליין, משחקי קלפי.
מימורים בפלטפורמת האינטרנט הופכים ל לשדה פופולרי במיוחדים בעידן המחשב.
מיליוני שחקנים מנסים את המזל באפשרויות מימונים המגוונים.
הפעולה הזה משנה את רגעי הניסיון והתרגשות.
גם מתעסק בשאלות חברתיות ואתיות השמורות ממאחורי המימונים באינטרנט.
בעידן הדיגיטלי, מימורים בפלטפורמת האינטרנט הם חלק בלתי נפרד מהתרבות הספורטאי, הפנאי והחברה ה המתקדמת.
המימורים ברשת כוללים את מגוון רחבה של פעולות, כולל מימונים על תוצאות ספורט, פוליטיים, וגם מזג האוויר בעולם.
ההימורים הם מתבצעים באמצע
pin-up casino indir pin up casino or pin up giris
https://maps.google.ne/url?q=https://pinupgiris.fun aviator pin up
[url=http://www.google.com.my/url?q=https://pinupgiris.fun]pin up guncel giris[/url] pin up casino and [url=http://bbs.xinghuost.com/home.php?mod=space&uid=19652]pin-up casino indir[/url] pin up aviator
http://sweetbonanza.bid/# sweet bonanza nas?l oynan?r
sweet bonanza hilesi [url=https://sweetbonanza.bid/#]sweet bonanza guncel[/url] slot oyunlari
pin up 7/24 giris pin up casino indir or pin up guncel giris
https://maps.google.dz/url?sa=t&url=https://pinupgiris.fun pin up guncel giris
[url=https://maps.google.com.ph/url?q=https://pinupgiris.fun]pin-up casino giris[/url] pin up bet and [url=https://www.donchillin.com/space-uid-331296.html]pin up casino indir[/url] pin up casino guncel giris
https://slotsiteleri.guru/# en iyi slot siteleri
aviator ucak oyunu [url=https://aviatoroyna.bid/#]aviator oyunu giris[/url] aviator oyunu
celecoxib manufacturer
sweet bonanza hilesi sweet bonanza 100 tl or sweet bonanza kazanc
https://www.google.so/url?q=https://sweetbonanza.bid sweet bonanza bahis
[url=https://www.google.tg/url?q=https://sweetbonanza.bid]pragmatic play sweet bonanza[/url] pragmatic play sweet bonanza and [url=http://www.coin520.com/home.php?mod=space&uid=26159]sweet bonanza demo oyna[/url] sweet bonanza indir
даркнет запрещён
Темный интернет: запретная территория виртуальной сети
Темный интернет, скрытый сегмент сети продолжает привлекать интерес как общественности, и также правоохранительных органов. Данный засекреченный уровень интернета примечателен своей скрытностью и возможностью осуществления незаконных операций под тенью анонимности.
Суть теневого уровня интернета состоит в том, что он не доступен для популярных браузеров. Для доступа к данному слою требуются специализированные программные средства и инструменты, которые обеспечивают анонимность пользователей. Это формирует прекрасные условия для разнообразных противозаконных операций, в том числе торговлю наркотическими веществами, продажу оружия, хищение персональной информации и другие противоправные действия.
В свете растущую опасность, некоторые государства ввели законодательные меры, направленные на запрещение доступа к подпольной части сети и преследование лиц совершающих противозаконные действия в этой нелегальной области. Впрочем, несмотря на принятые меры, борьба с теневым уровнем интернета представляет собой сложную задачу.
Важно отметить, что полное запрещение теневого уровня интернета практически невозможно. Даже при строгих мерах регулирования, возможность доступа к данному уровню сети всё ещё возможен через различные технологии и инструменты, применяемые для обхода запретов.
Помимо законодательных мер, действуют также инициативы по сотрудничеству между правоохранительными органами и компаниями, работающими в сфере технологий с целью пресечения противозаконных действий в теневом уровне интернета. Однако, эта борьба требует не только технических решений, но и улучшения методов обнаружения и пресечения незаконных действий в этой среде.
В заключение, несмотря на запреты и усилия в борьбе с незаконными деяниями, подпольная часть сети остается серьезной проблемой, требующей комплексного подхода и совместных усилий как со стороны правоохранительных органов, и технологических корпораций.
даркнет открыт
В последнее время даркнет, вызывает все больше интереса и становится объектом различных дискуссий. Многие считают его темным уголком, где процветают преступность и незаконные действия. Однако, мало кто осведомлен о том, что даркнет не является закрытой сферой, и вход в него возможен для каждого пользователь.
В отличие от обычного интернета, даркнет не доступен для поисковых систем и стандартных браузеров. Для того чтобы получить к нему доступ, необходимо использовать специальные программы, такие как Tor или I2P, которые обеспечивают скрытность и шифрование данных. Однако, это не означает, что даркнет закрыт от общественности.
Действительно, даркнет доступен каждому, кто имеет интерес и способность его исследовать. В нем можно найти разнообразные материалы, начиная от дискуссий, которые не приветствуются в стандартных сетях, и заканчивая возможностью посещения специализированным рынкам и услугам. Например, множество информационных сайтов и интернет-форумов на даркнете посвящены темам, которые считаются табу в стандартных окружениях, таким как политика, вероисповедание или криптовалюты.
Кроме того, даркнет часто используется сторонниками и репортерами, которые ищут пути обхода ограничений и средства для сохранения анонимности. Он также служит средой для открытого обмена данными и концепциями, которые могут быть подавлены в авторитарных государствах.
Важно понимать, что хотя даркнет предоставляет свободу доступа к информации и возможность анонимного общения, он также может быть использован для незаконных целей. Тем не менее, это не делает его закрытым и недоступным для всех.
Таким образом, даркнет – это не только темная сторона интернета, но и пространство, где каждый может найти что-то интересное или полезное для себя. Важно помнить о его двуединстве и разумно использовать его и осознанием возможных рисков.
http://sweetbonanza.bid/# pragmatic play sweet bonanza
sweet bonanza guncel [url=http://sweetbonanza.bid/#]sweet bonanza hilesi[/url] sweet bonanza kazanma saatleri
https://pinupgiris.fun/# pin-up casino
https://pinupgiris.fun/# aviator pin up
aviator hile [url=http://aviatoroyna.bid/#]aviator sinyal hilesi apk[/url] aviator oyunu 10 tl
gates of olympus max win gate of olympus hile or gates of olympus demo turkce
https://www.google.gr/url?q=https://gatesofolympus.auction gates of olympus demo oyna
[url=https://cse.google.ng/url?q=https://gatesofolympus.auction]gates of olympus demo[/url] gates of olympus demo and [url=http://wuyuebanzou.com/home.php?mod=space&uid=496114]gates of olympus max win[/url] gates of olympus hilesi
buspirone and zoloft
http://aviatoroyna.bid/# aviator bahis
pin up casino guncel giris [url=http://pinupgiris.fun/#]aviator pin up[/url] pin up casino guncel giris
sweet bonanza sweet bonanza bahis or sweet bonanza free spin demo
https://sexbytes.elustsexblogs.com/?bmDomain=sweetbonanza.bid&gid=45964 sweet bonanza siteleri
[url=http://www.pantybucks.com/galleries/hpf/64/clair/index.php?link=https://sweetbonanza.bid/]sweet bonanza demo oyna[/url] sweet bonanza kazanc and [url=http://bbs.cheaa.com/home.php?mod=space&uid=3095206]sweet bonanza siteleri[/url] sweet bonanza
http://aviatoroyna.bid/# aviator oyna 100 tl
aviator mostbet [url=http://aviatoroyna.bid/#]aviator oyunu 50 tl[/url] aviator sinyal hilesi apk
http://pinupgiris.fun/# pin-up online
sweet bonanza 100 tl [url=https://sweetbonanza.bid/#]sweet bonanza hilesi[/url] sweet bonanza kazanc
https://sweetbonanza.bid/# sweet bonanza demo turkce
http://pinupgiris.fun/# pin-up casino indir
pragmatic play gates of olympus [url=https://gatesofolympus.auction/#]gates of olympus oyna ucretsiz[/url] gates of olympus guncel
SBO Parlay is a mobile version of the online soccer game site with the best quality that provides victory for players
canadian pharmacies compare [url=https://canadianpharmacy24.store/#]canadian drugs online[/url] vipps approved canadian online pharmacy
ashwagandha research
india online pharmacy: Healthcare and medicines from India – pharmacy website india
Hi there, I enjoy reading all of your post. I like to write
a little comment to support you.
mexican border pharmacies shipping to usa [url=http://mexicanpharmacy.shop/#]Mexican Pharmacy Online[/url] purple pharmacy mexico price list
canadian pharmacies comparison: Licensed Canadian Pharmacy – safe online pharmacies in canada
canadian pharmacy uk delivery [url=https://canadianpharmacy24.store/#]Large Selection of Medications[/url] legitimate canadian pharmacies
top online pharmacy india: indian pharmacy – pharmacy website india
ed drugs online from canada [url=http://canadianpharmacy24.store/#]pills now even cheaper[/url] safe canadian pharmacy
online pharmacy canada pharmacy com canada or safe canadian pharmacy
https://maps.google.fi/url?sa=t&url=https://canadianpharmacy24.store canadian pharmacy price checker
[url=http://crewe.de/url?q=https://canadianpharmacy24.store]vipps approved canadian online pharmacy[/url] canadian pharmacies that deliver to the us and [url=http://cos258.com/home.php?mod=space&uid=1246108]canadian pharmacy meds[/url] canadian world pharmacy
mexico pharmacies prescription drugs: Mexican Pharmacy Online – mexican pharmaceuticals online
reputable indian pharmacies: Cheapest online pharmacy – indianpharmacy com
mexican pharmacy п»їbest mexican online pharmacies or mexican pharmacy
https://www.flashback.org/leave.php?u=https://mexicanpharmacy.shop/ purple pharmacy mexico price list
[url=https://maps.google.co.ls/url?q=https://mexicanpharmacy.shop]mexican pharmacy[/url] mexican border pharmacies shipping to usa and [url=https://98e.fun/space-uid-7309807.html]mexican pharmacy[/url] pharmacies in mexico that ship to usa
india pharmacy [url=http://indianpharmacy.icu/#]Cheapest online pharmacy[/url] india pharmacy
mexico drug stores pharmacies: Online Pharmacies in Mexico – mexico drug stores pharmacies
trustworthy canadian pharmacy canadian drug pharmacy or pharmacy rx world canada
http://www.spankingboysvideo.com/Home.aspx?returnurl=https://canadianpharmacy24.store/ canadian pharmacy store
[url=https://www.google.az/url?q=https://canadianpharmacy24.store]canadian pharmacy meds review[/url] reputable canadian pharmacy and [url=http://bbs.cheaa.com/home.php?mod=space&uid=3098060]canadian pharmacy online reviews[/url] canadian discount pharmacy
mexican rx online mexico drug stores pharmacies or mexican online pharmacies prescription drugs
http://maths-resources.com/link.php?link=http://mexicanpharmacy.shop mexico drug stores pharmacies
[url=http://cse.google.com.sg/url?sa=i&url=https://mexicanpharmacy.shop]mexican border pharmacies shipping to usa[/url] buying prescription drugs in mexico and [url=https://bbs.zzxfsd.com/home.php?mod=space&uid=15959]medicine in mexico pharmacies[/url] mexican pharmacy
indian pharmacy online [url=https://indianpharmacy.icu/#]Healthcare and medicines from India[/url] Online medicine home delivery
cheapest online pharmacy india: india online pharmacy – india pharmacy
mexico drug stores pharmacies mexico drug stores pharmacies or buying prescription drugs in mexico online
https://cse.google.co.th/url?q=https://mexicanpharmacy.shop buying from online mexican pharmacy
[url=http://www.eab-krupka.de/url?q=https://mexicanpharmacy.shop]mexican online pharmacies prescription drugs[/url] mexican online pharmacies prescription drugs and [url=https://m.414500.cc/home.php?mod=space&uid=3474288]mexico drug stores pharmacies[/url] best online pharmacies in mexico
mexican drugstore online [url=http://mexicanpharmacy.shop/#]Online Pharmacies in Mexico[/url] mexico drug stores pharmacies
сеть даркнет
Подпольная часть сети: запретная территория виртуальной сети
Темный интернет, скрытый сегмент сети продолжает вызывать интерес интерес как граждан, так и служб безопасности. Этот подпольный слой интернета примечателен своей скрытностью и способностью осуществления преступных деяний под прикрытием теней.
Суть подпольной части сети заключается в том, что этот слой не доступен обычным обычных браузеров. Для доступа к этому уровню необходимы специальные программы и инструменты, которые обеспечивают анонимность пользователей. Это вызывает прекрасные условия для разнообразных нелегальных действий, среди которых торговлю наркотическими веществами, продажу оружия, кражу конфиденциальных данных и другие противоправные действия.
В свете растущую опасность, ряд стран приняли законодательные инициативы, задача которых состоит в запрещение доступа к темному интернету и привлечение к ответственности тех, кто осуществляющих незаконную деятельность в этой нелегальной области. Однако, несмотря на предпринятые шаги, борьба с теневым уровнем интернета остается сложной задачей.
Следует отметить, что полное запрещение теневого уровня интернета практически невозможно. Даже с введением строгих мер контроля, возможность доступа к данному уровню сети все еще осуществим при помощи различных технологических решений и инструментов, применяемые для обхода ограничений.
Помимо законодательных мер, действуют также проекты сотрудничества между правоохранительными структурами и технологическими компаниями для борьбы с преступностью в темном интернете. Впрочем, эта борьба требует не только технических решений, но также улучшения методов выявления и предотвращения противозаконных манипуляций в данной среде.
В заключение, несмотря на принятые меры и усилия в борьбе с преступностью, темный интернет остается серьезной проблемой, нуждающейся в комплексных подходах и коллективных усилиях со стороны правоохранительных служб, так и технологических компаний.
pharmacies in mexico that ship to usa: medication from mexico pharmacy – pharmacies in mexico that ship to usa
We recommend visiting the website https://powerofquotes12.blogspot.com/2024/03/the-power-of-quotes-inspiration-for.html.
Also, don’t forget to bookmark the site: [url=https://powerofquotes12.blogspot.com/2024/03/the-power-of-quotes-inspiration-for.html]https://powerofquotes12.blogspot.com/2024/03/the-power-of-quotes-inspiration-for.html[/url]
We recommend visiting the website https://quotes-status1.blogspot.com/2024/03/the-power-of-quotes-inspiration-for.html.
Also, don’t forget to bookmark the site: [url=https://quotes-status1.blogspot.com/2024/03/the-power-of-quotes-inspiration-for.html]https://quotes-status1.blogspot.com/2024/03/the-power-of-quotes-inspiration-for.html[/url]
We recommend visiting the website https://quotablemoments1.blogspot.com/2024/03/embracing-lifes-wisdom-how-quotes-can.html.
Also, don’t forget to bookmark the site: [url=https://quotablemoments1.blogspot.com/2024/03/embracing-lifes-wisdom-how-quotes-can.html]https://quotablemoments1.blogspot.com/2024/03/embracing-lifes-wisdom-how-quotes-can.html[/url]
mexican mail order pharmacies [url=http://mexicanpharmacy.shop/#]mexican pharmacy[/url] mexican border pharmacies shipping to usa
canadian pharmacy online canadianpharmacyworld com or canada pharmacy
https://huongnghiepviet.com/support-form?action=1&cckid=4776&typeaction=dkhocts&url=https://canadianpharmacy24.store canada pharmacy online legit
[url=https://maps.google.rs/url?q=https://canadianpharmacy24.store]canadian pharmacy near me[/url] legal to buy prescription drugs from canada and [url=https://lhgangguanwang.com/home.php?mod=space&uid=152854]online canadian pharmacy[/url] 77 canadian pharmacy
mexican mail order pharmacies: cheapest mexico drugs – mexican border pharmacies shipping to usa
indian pharmacy online: Cheapest online pharmacy – online shopping pharmacy india
top 10 pharmacies in india [url=https://indianpharmacy.icu/#]online shopping pharmacy india[/url] india online pharmacy
п»їbest mexican online pharmacies: Online Pharmacies in Mexico – buying prescription drugs in mexico
order prednisone 10 mg tablet [url=http://prednisoneall.com/#]prednisone for sale online[/url] prednisone 80 mg daily
http://amoxilall.com/# how to get amoxicillin over the counter
can i order cheap clomid no prescription [url=https://clomidall.com/#]can i get clomid no prescription[/url] can i buy cheap clomid without prescription
Наша команда опытных мастеров завершена подать вам прогрессивные системы утепления, которые не только обеспечивают прочную защиту от заморозков, но и дарят вашему коттеджу элегантный вид.
Мы работаем с современными строительными материалами, подтверждая долгосрочный срок службы использования и превосходные результаты. Теплоизоляция наружных поверхностей – это не только экономия на отоплении, но и забота о природной среде. Сберегательные технологии, каковые мы внедряем, способствуют не только зданию, но и поддержанию природы.
Самое основное: [url=https://ppu-prof.ru/]Утепление стен снаружи услуги[/url] у нас составляет всего от 1250 рублей за кв. м.! Это бюджетное решение, которое изменит ваш жилище в реальный тепличный район с минимальными издержками.
Наши проекты – это не только теплоизоляция, это образование пространства, в где каждый элемент преломляет ваш персональный манеру. Мы рассмотрим все все твои потребности, чтобы переделать ваш дом еще больше гостеприимным и привлекательным.
Подробнее на [url=https://ppu-prof.ru/]https://www.ppu-prof.ru/[/url]
Не откладывайте заботу о своем доме на потом! Обращайтесь к исполнителям, и мы сделаем ваш обиталище не только уютнее, но и изысканнее. Заинтересовались? Подробнее о наших услугах вы можете узнать на официальном сайте. Добро пожаловать в пределы гармонии и качественной работы.
where to buy amoxicillin amoxicillin online no prescription or buy amoxicillin online mexico
https://maps.google.nl/url?sa=t&url=https://amoxilall.shop buy amoxicillin over the counter uk
[url=https://secure.spicecash.com/hosted_sssh_galleries/3/imagepages/image9.htm?link=https://amoxilall.shop]buy amoxicillin over the counter uk[/url] amoxicillin for sale and [url=https://98e.fun/space-uid-7335005.html]buy amoxicillin[/url] buy cheap amoxicillin online
zithromax pill [url=https://zithromaxall.com/#]zithromax 500mg[/url] buy zithromax 1000 mg online
In summary, while stromectol holds promise as a potential treatment for COVID-19, its role remains uncertain. stromectol tablets for humans Continued research and collaboration are necessary to elucidate its effectiveness and determine the optimal use of this medication in managing the pandemic.
http://zithromaxall.com/# how to get zithromax
демонтаж москва
https://demontagmoskva.ru/
buy zithromax online australia [url=https://zithromaxall.shop/#]order zithromax over the counter[/url] zithromax antibiotic without prescription
prednisone 20 mg tablet prednisone tabs 20 mg or cost of prednisone
https://images.google.com.gt/url?q=https://prednisoneall.shop 3000mg prednisone
[url=https://www.google.bf/url?q=https://prednisoneall.shop]prednisone 40 mg price[/url] 20 mg prednisone tablet and [url=https://www.warshipsfaq.ru/user/uinuzhwdhx]prednisone 20mg prices[/url] prednisone 10mg canada
buy prednisone mexico: prednisone 50 mg canada – prednisone 5 mg
buy azithromycin zithromax [url=https://zithromaxall.com/#]buy zithromax online[/url] zithromax 500mg
prednisone buy canada prednisone otc price or buy prednisone online uk
http://worldconnx.net/phpinfo.php?a%5B%5D=cialis+generika prednisone brand name us
[url=https://images.google.com.sg/url?sa=t&url=https://prednisoneall.shop]prednisone for dogs[/url] prednisone acetate and [url=https://www.donchillin.com/space-uid-334000.html]prednisone without rx[/url] prednisone 50 mg canada
amoxicillin tablet 500mg generic amoxicillin 500mg or generic amoxicillin over the counter
https://roland.pri.ee/wiki/?a=link&url=https://amoxilall.shop order amoxicillin no prescription
[url=https://maps.google.ci/url?sa=t&url=https://amoxilall.shop]amoxicillin 500 tablet[/url] amoxicillin canada price and [url=https://98e.fun/space-uid-7335357.html]amoxicillin cephalexin[/url] amoxicillin price without insurance
https://clomidall.shop/# can i order generic clomid price
zithromax for sale 500 mg zithromax 500mg over the counter or buy zithromax online australia
https://www.google.tl/url?q=https://zithromaxall.shop zithromax buy
[url=https://clients1.google.ne/url?q=https://zithromaxall.shop]zithromax 500 price[/url] zithromax price canada and [url=http://lsdsng.com/user/536367]zithromax 500mg[/url] where can i buy zithromax uk
amoxicillin generic [url=http://amoxilall.com/#]amoxicillin 500 tablet[/url] amoxicillin azithromycin
acarbose datasheet
We recommend visiting the website https://telegra.ph/Lifes-Mosaic-Understanding-the-Big-Picture-Through-Quotes-03-31.
Also, don’t forget to bookmark the site: [url=https://telegra.ph/Lifes-Mosaic-Understanding-the-Big-Picture-Through-Quotes-03-31]https://telegra.ph/Lifes-Mosaic-Understanding-the-Big-Picture-Through-Quotes-03-31[/url]
prednisone online [url=https://prednisoneall.shop/#]prednisone pharmacy[/url] where to buy prednisone in canada
can i buy generic clomid online: where buy cheap clomid pill – where to get generic clomid pills
We recommend visiting the website https://telegra.ph/The-Drive-Within-Unlocking-Potential-with-Motivational-Quotes-03-31.
Also, don’t forget to bookmark the site: [url=https://telegra.ph/The-Drive-Within-Unlocking-Potential-with-Motivational-Quotes-03-31]https://telegra.ph/The-Drive-Within-Unlocking-Potential-with-Motivational-Quotes-03-31[/url]
http://clomidall.shop/# where to get cheap clomid prices
amoxicillin 500mg capsule cost purchase amoxicillin online without prescription or buy amoxicillin over the counter uk
http://raguweb.net/outlink/link.php?url=http://amoxilall.shop amoxicillin online pharmacy
[url=https://www.google.tg/url?q=https://amoxilall.shop]where to buy amoxicillin 500mg[/url] can you buy amoxicillin over the counter in canada and [url=http://bbs.zhizhuyx.com/home.php?mod=space&uid=10025105]buy amoxicillin 500mg uk[/url] amoxicillin azithromycin
where can i buy zithromax capsules [url=http://zithromaxall.shop/#]zithromax capsules[/url] buy zithromax no prescription
https://prednisoneall.shop/# 400 mg prednisone
cost of amoxicillin 30 capsules [url=https://amoxilall.com/#]where to buy amoxicillin[/url] where to buy amoxicillin 500mg
1-800-bad-drug actos
Viagra tablet online [url=https://sildenafiliq.com/#]sildenafil iq[/url] Sildenafil 100mg price
The Popular Site Game Online Easy Win For Players , Early Access without using VPN , Big Promotion , This site can access with mobile or desktop version, Best Quality
https://sildenafiliq.com/# Sildenafil 100mg price
https://elementor.com/
http://kamagraiq.shop/# buy kamagra online usa
We recommend visiting the website https://telegra.ph/Whispers-of-the-Heart-Exploring-the-Essence-of-Love-Through-Quotes-03-31.
Also, don’t forget to bookmark the site: [url=https://telegra.ph/Whispers-of-the-Heart-Exploring-the-Essence-of-Love-Through-Quotes-03-31]https://telegra.ph/Whispers-of-the-Heart-Exploring-the-Essence-of-Love-Through-Quotes-03-31[/url]
what does abilify do
Buy Viagra online cheap [url=http://sildenafiliq.xyz/#]buy viagra online[/url] sildenafil online
https://kamagraiq.com/# Kamagra tablets
1. Почему берцы – это обязательный элемент стиля?
2. Как выбрать идеальные берцы для осеннего гардероба?
3. Тренды сезона: кожаные берцы или замшевые?
4. 5 способов носить берцы с платьем
5. Какие берцы выбрать для повседневного образа?
6. Берцы на платформе: комфорт и стиль в одном
7. Какие берцы будут актуальны в этом году?
8. Маст-хэв сезона: военные берцы в стиле милитари
9. 10 вариантов сочетания берцов с джинсами
10. Зимние берцы: как выбрать модель для холодного сезона
11. Элегантные берцы на каблуке: идеальный вариант для офиса
12. Секреты ухода за берцами: как сохранить первоначальный вид?
13. С какой юбкой носить берцы: советы от стилистов
14. Как подобрать берцы под фасон брюк?
15. Берцы на шнуровке: стильный акцент в образе
16. Берцы-челси: универсальная модель для любого стиля
17. С чем носить берцы на плоской подошве?
18. Берцы с ремешками: акцент на деталях
19. Как выбрать берцы для прогулок по городу?
20. Топ-5 брендов берцев: качество и стиль в одном
берці ua [url=https://bercifrdt.kiev.ua/]берці тактичні[/url] .
Cheap generic Viagra [url=https://sildenafiliq.xyz/#]viagra without prescription[/url] Viagra tablet online
https://sildenafiliq.xyz/# Cheap Viagra 100mg
sildenafil 50 mg price [url=https://sildenafiliq.com/#]cheapest viagra[/url] Sildenafil 100mg price
Мы рекомендуем посетить веб-сайт https://telegra.ph/Luchshie-prikormki-dlya-lovli-shchuki-v-2024-godu-03-31.
Кроме того, не забудьте добавить сайт в закладки: [url=https://telegra.ph/Luchshie-prikormki-dlya-lovli-shchuki-v-2024-godu-03-31]https://telegra.ph/Luchshie-prikormki-dlya-lovli-shchuki-v-2024-godu-03-31[/url]
Viagra generic over the counter buy Viagra over the counter or Generic Viagra for sale
https://images.google.com.af/url?q=https://sildenafiliq.com cheapest viagra
[url=http://www.travelinfos.com/games/umleitung.php?Name=RailNation&Link=https://sildenafiliq.com]buy viagra here[/url] Viagra generic over the counter and [url=https://98e.fun/space-uid-7362752.html]buy Viagra online[/url] Viagra generic over the counter
Мы рекомендуем посетить веб-сайт https://telegra.ph/Luchshie-internet-magaziny-rybolovnyh-snastej-03-31.
Кроме того, не забудьте добавить сайт в закладки: [url=https://telegra.ph/Luchshie-internet-magaziny-rybolovnyh-snastej-03-31]https://telegra.ph/Luchshie-internet-magaziny-rybolovnyh-snastej-03-31[/url]
https://sildenafiliq.com/# Viagra Tablet price
Мы рекомендуем посетить веб-сайт https://telegra.ph/Uspeh-na-konce-udochki-kak-vybrat-i-ispolzovat-kachestvennoe-rybolovnoe-oborudovanie-03-31.
Кроме того, не забудьте добавить сайт в закладки: [url=https://telegra.ph/Uspeh-na-konce-udochki-kak-vybrat-i-ispolzovat-kachestvennoe-rybolovnoe-oborudovanie-03-31]https://telegra.ph/Uspeh-na-konce-udochki-kak-vybrat-i-ispolzovat-kachestvennoe-rybolovnoe-oborudovanie-03-31[/url]
Мы рекомендуем посетить веб-сайт https://telegra.ph/Instrumenty-dlya-udovolstviya-pochemu-kachestvennoe-rybolovnoe-oborudovanie—zalog-uspeshnoj-i-komfortnoj-rybalki-03-31.
Кроме того, не забудьте добавить сайт в закладки: [url=https://telegra.ph/Instrumenty-dlya-udovolstviya-pochemu-kachestvennoe-rybolovnoe-oborudovanie—zalog-uspeshnoj-i-komfortnoj-rybalki-03-31]https://telegra.ph/Instrumenty-dlya-udovolstviya-pochemu-kachestvennoe-rybolovnoe-oborudovanie—zalog-uspeshnoj-i-komfortnoj-rybalki-03-31[/url]
Buy Tadalafil 10mg Generic Cialis price or Cialis 20mg price in USA
https://forums.pangolin.com/proxy.php?link=https://tadalafiliq.shop Buy Cialis online
[url=http://www.b2bwz.cn/url.asp?url=tadalafiliq.shop]Buy Tadalafil 10mg[/url] cialis for sale and [url=https://www.sdrxmc.com/home.php?mod=space&uid=1466781]Cialis 20mg price[/url] cheapest cialis
does insurance cover semaglutide
п»їBuy generic 100mg Viagra online [url=https://sildenafiliq.com/#]generic ed pills[/url] Cheap Sildenafil 100mg
https://tadalafiliq.shop/# Generic Cialis without a doctor prescription
п»їkamagra [url=https://kamagraiq.shop/#]kamagra best price[/url] sildenafil oral jelly 100mg kamagra
Buy Tadalafil 10mg Generic Cialis without a doctor prescription or cialis for sale
https://maps.google.com.mx/url?q=https://tadalafiliq.shop Generic Cialis price
[url=https://www.google.fm/url?q=https://tadalafiliq.shop]Buy Tadalafil 20mg[/url] Tadalafil price and [url=https://xiazai7.com/home.php?mod=space&uid=2964]Cialis over the counter[/url] cheapest cialis
Viagra generic over the counter buy viagra here or buy viagra here
https://www.google.co.ve/url?q=http://sildenafiliq.com Cheap generic Viagra
[url=https://images.google.pl/url?q=https://sildenafiliq.com]cheap viagra[/url] viagra canada and [url=http://www.tmml.top/home.php?mod=space&uid=75715]order viagra[/url] cheap viagra
Мы рекомендуем посетить веб-сайт https://telegra.ph/Sekrety-uspeshnogo-ulova-znachenie-pravilnogo-vybora-i-ispolzovaniya-oborudovaniya-pri-rybalke-03-31.
Кроме того, не забудьте добавить сайт в закладки: [url=https://telegra.ph/Sekrety-uspeshnogo-ulova-znachenie-pravilnogo-vybora-i-ispolzovaniya-oborudovaniya-pri-rybalke-03-31]https://telegra.ph/Sekrety-uspeshnogo-ulova-znachenie-pravilnogo-vybora-i-ispolzovaniya-oborudovaniya-pri-rybalke-03-31[/url]
Мы рекомендуем посетить веб-сайт https://telegra.ph/Na-rybalku-s-uverennostyu-kak-vybrat-kachestvennoe-oborudovanie-dlya-uspeshnoj-rybalki-03-31.
Кроме того, не забудьте добавить сайт в закладки: [url=https://telegra.ph/Na-rybalku-s-uverennostyu-kak-vybrat-kachestvennoe-oborudovanie-dlya-uspeshnoj-rybalki-03-31]https://telegra.ph/Na-rybalku-s-uverennostyu-kak-vybrat-kachestvennoe-oborudovanie-dlya-uspeshnoj-rybalki-03-31[/url]
cheapest cialis [url=https://tadalafiliq.com/#]cialis best price[/url] Tadalafil price
buy Kamagra Kamagra 100mg price or Kamagra 100mg price
http://www.google.co.il/url?q=http://kamagraiq.shop buy Kamagra
[url=http://start.midnitemusic.ch/index.php?url=http://kamagraiq.shop]Kamagra 100mg price[/url] buy Kamagra and [url=https://www.xiaoditech.com/bbs/home.php?mod=space&uid=1686213]Kamagra tablets[/url] п»їkamagra
Мы рекомендуем посетить веб-сайт https://telegra.ph/Rybachok-vsyo-neobhodimoe-dlya-rybolova-03-31.
Кроме того, не забудьте добавить сайт в закладки: [url=https://telegra.ph/Rybachok-vsyo-neobhodimoe-dlya-rybolova-03-31]https://telegra.ph/Rybachok-vsyo-neobhodimoe-dlya-rybolova-03-31[/url]
https://tadalafiliq.shop/# п»їcialis generic
Мы рекомендуем посетить веб-сайт https://telegra.ph/Osnovnye-principy-udachnoj-rybalki-03-31.
Кроме того, не забудьте добавить сайт в закладки: [url=https://telegra.ph/Osnovnye-principy-udachnoj-rybalki-03-31]https://telegra.ph/Osnovnye-principy-udachnoj-rybalki-03-31[/url]
http://tadalafiliq.shop/# Buy Tadalafil 20mg
Viagra generic over the counter [url=http://sildenafiliq.xyz/#]cheapest viagra[/url] Cheap Viagra 100mg
https://tadalafiliq.shop/# Buy Tadalafil 10mg
medicine in mexico pharmacies [url=http://mexicanpharmgrx.shop/#]online pharmacy in Mexico[/url] pharmacies in mexico that ship to usa
Мы эксперты SEO-экспертов, занимающихся увеличением трафика и улучшением рейтинга вашего сайта в поисковых системах.
Наша команда преуспели в своей деятельности и готовы поделиться с вами нашими знаниями и опытом.
Какая помощь доступна у нас:
• [url=https://seo-prodvizhenie-ulyanovsk1.ru/]seo продвижение сайтов лучшие компании[/url]
• Глубокий анализ вашего сайта и формирование индивидуального плана продвижения.
• Оптимизация контента и технических характеристик вашего сайта для достижения наивысших результатов.
• Систематический мониторинг и анализ результатов с целью улучшения вашего онлайн-присутствия.
Подробнее [url=https://seo-prodvizhenie-ulyanovsk1.ru/]https://seo-prodvizhenie-ulyanovsk1.ru/[/url]
Результаты наших клиентов уже видны: увеличение посещаемости, улучшение позиций в поисковых запросах и, конечно же, рост своего бизнеса. Мы предлагаем бесплатную консультацию, для того чтобы обсудить ваши потребности и разработать стратегию продвижения, соответствующую вашим целям и финансовым возможностям.
Не упустите возможность повысить эффективность вашего бизнеса в интернете. Свяжитесь с нами уже сегодня.
side effects of protonix
Мы рекомендуем посетить веб-сайт https://telegra.ph/CHto-neobhodimo-vzyat-s-soboj-na-rybalku-03-31.
Кроме того, не забудьте добавить сайт в закладки: [url=https://telegra.ph/CHto-neobhodimo-vzyat-s-soboj-na-rybalku-03-31]https://telegra.ph/CHto-neobhodimo-vzyat-s-soboj-na-rybalku-03-31[/url]
Мы рекомендуем посетить веб-сайт https://telegra.ph/Obzor-populyarnyh-pnevmaticheskih-pistoletov-sovety-po-vyboru-03-31.
Кроме того, не забудьте добавить сайт в закладки: [url=https://telegra.ph/Obzor-populyarnyh-pnevmaticheskih-pistoletov-sovety-po-vyboru-03-31]https://telegra.ph/Obzor-populyarnyh-pnevmaticheskih-pistoletov-sovety-po-vyboru-03-31[/url]
mexico drug stores pharmacies [url=https://mexicanpharmgrx.shop/#]Mexico drugstore[/url] mexico drug stores pharmacies
Thank you for sharing your thoughts. I truly appreciate your efforts and I will be waiting for
your further post thanks once again.
pharmacy website india: Generic Medicine India to USA – buy prescription drugs from india
best canadian pharmacy to order from: Canadian pharmacy prices – escrow pharmacy canada
Мы рекомендуем посетить веб-сайт https://softnewsportal.ru/.
Кроме того, не забудьте добавить сайт в закладки: [url=https://softnewsportal.ru/]https://softnewsportal.ru/[/url]
buying from canadian pharmacies [url=https://canadianpharmgrx.com/#]CIPA approved pharmacies[/url] safe online pharmacies in canada
remeron and trazodone
canadian neighbor pharmacy medication canadian pharmacy or canadian pharmacy world
https://maps.google.co.ck/url?sa=t&url=https://canadianpharmgrx.xyz canadapharmacyonline
[url=https://maps.google.kz/url?q=https://canadianpharmgrx.xyz]best canadian online pharmacy reviews[/url] canadian family pharmacy and [url=https://bbs.tlcq666.com/home.php?mod=space&uid=26421]best canadian pharmacy[/url] legit canadian pharmacy online
Informasi RTP Live Hari Ini Dari Situs RTPKANTORBOLA
Situs RTPKANTORBOLA merupakan salah satu situs yang menyediakan informasi lengkap mengenai RTP (Return to Player) live hari ini. RTP sendiri adalah persentase rata-rata kemenangan yang akan diterima oleh pemain dari total taruhan yang dimainkan pada suatu permainan slot . Dengan adanya informasi RTP live, para pemain dapat mengukur peluang mereka untuk memenangkan suatu permainan dan membuat keputusan yang lebih cerdas saat bermain.
Situs RTPKANTORBOLA menyediakan informasi RTP live dari berbagai permainan provider slot terkemuka seperti Pragmatic Play , PG Soft , Habanero , IDN Slot , No Limit City dan masih banyak rtp permainan slot yang bisa kami cek di situs RTP Kantorboal . Dengan menyediakan informasi yang akurat dan terpercaya, situs ini menjadi sumber informasi yang penting bagi para pemain judi slot online di Indonesia .
Salah satu keunggulan dari situs RTPKANTORBOLA adalah penyajian informasi yang terupdate secara real-time. Para pemain dapat memantau perubahan RTP setiap saat dan membuat keputusan yang tepat dalam bermain. Selain itu, situs ini juga menyediakan informasi mengenai RTP dari berbagai provider permainan, sehingga para pemain dapat membandingkan dan memilih permainan dengan RTP tertinggi.
Informasi RTP live yang disediakan oleh situs RTPKANTORBOLA juga sangat lengkap dan mendetail. Para pemain dapat melihat RTP dari setiap permainan, baik itu dari aspek permainan itu sendiri maupun dari provider yang menyediakannya. Hal ini sangat membantu para pemain dalam memilih permainan yang sesuai dengan preferensi dan gaya bermain mereka.
Selain itu, situs ini juga menyediakan informasi mengenai RTP live dari berbagai provider judi slot online terpercaya. Dengan begitu, para pemain dapat memilih permainan slot yang memberikan RTP terbaik dan lebih aman dalam bermain. Informasi ini juga membantu para pemain untuk menghindari potensi kerugian dengan bermain pada game slot online dengan RTP rendah .
Situs RTPKANTORBOLA juga memberikan pola dan ulasan mengenai permainan-permainan dengan RTP tertinggi. Para pemain dapat mempelajari strategi dan tips dari para ahli untuk meningkatkan peluang dalam memenangkan permainan. Analisis dan ulasan ini disajikan secara jelas dan mudah dipahami, sehingga dapat diaplikasikan dengan baik oleh para pemain.
Informasi RTP live yang disediakan oleh situs RTPKANTORBOLA juga dapat membantu para pemain dalam mengelola keuangan mereka. Dengan mengetahui RTP dari masing-masing permainan slot , para pemain dapat mengatur taruhan mereka dengan lebih bijak. Hal ini dapat membantu para pemain untuk mengurangi risiko kerugian dan meningkatkan peluang untuk mendapatkan kemenangan yang lebih besar.
Untuk mengakses informasi RTP live dari situs RTPKANTORBOLA, para pemain tidak perlu mendaftar atau membayar biaya apapun. Situs ini dapat diakses secara gratis dan tersedia untuk semua pemain judi online. Dengan begitu, semua orang dapat memanfaatkan informasi yang disediakan oleh situs RTP Kantorbola untuk meningkatkan pengalaman dan peluang mereka dalam bermain judi online.
Demikianlah informasi mengenai RTP live hari ini dari situs RTPKANTORBOLA. Dengan menyediakan informasi yang akurat, terpercaya, dan lengkap, situs ini menjadi sumber informasi yang penting bagi para pemain judi online. Dengan memanfaatkan informasi yang disediakan, para pemain dapat membuat keputusan yang lebih cerdas dan meningkatkan peluang mereka untuk memenangkan permainan. Selamat bermain dan semoga sukses!
cheapest online pharmacy india: indian pharmacy – top 10 pharmacies in india
Мы рекомендуем посетить веб-сайт https://doutuapse.ru/.
Кроме того, не забудьте добавить сайт в закладки: [url=https://doutuapse.ru/]https://doutuapse.ru/[/url]
certified canadian international pharmacy legit canadian pharmacy online or canadian pharmacy online
http://pokatili.ru/redirect.php?url=https://canadianpharmgrx.xyz best canadian online pharmacy
[url=https://www.google.co.ls/url?q=https://canadianpharmgrx.xyz]buy prescription drugs from canada cheap[/url] canada pharmacy online legit and [url=https://bbs.zzxfsd.com/home.php?mod=space&uid=22401]drugs from canada[/url] northwest canadian pharmacy
repaglinide drug interactions
top 10 pharmacies in india [url=https://indianpharmgrx.com/#]Generic Medicine India to USA[/url] indian pharmacies safe
india pharmacy: indian pharmacy – online shopping pharmacy india
Мы рекомендуем посетить веб-сайт https://telegra.ph/Internet-magazin-Rybachok-Vash-nadezhnyj-pomoshchnik-v-mire-rybolovstva-04-09.
Кроме того, не забудьте добавить сайт в закладки: [url=https://telegra.ph/Internet-magazin-Rybachok-Vash-nadezhnyj-pomoshchnik-v-mire-rybolovstva-04-09]https://telegra.ph/Internet-magazin-Rybachok-Vash-nadezhnyj-pomoshchnik-v-mire-rybolovstva-04-09[/url]
Online medicine home delivery [url=http://indianpharmgrx.com/#]Healthcare and medicines from India[/url] cheapest online pharmacy india
kantor bola
Kantorbola Situs slot Terbaik, Modal 10 Ribu Menang Puluhan Juta
Kantorbola merupakan salah satu situs judi online terbaik yang saat ini sedang populer di kalangan pecinta taruhan bola , judi live casino dan judi slot online . Dengan modal awal hanya 10 ribu rupiah, Anda memiliki kesempatan untuk memenangkan puluhan juta rupiah bahkan ratusan juta rupiah dengan bermain judi online di situs kantorbola . Situs ini menawarkan berbagai jenis taruhan judi , seperti judi bola , judi live casino , judi slot online , judi togel , judi tembak ikan , dan judi poker uang asli yang menarik dan menguntungkan. Selain itu, Kantorbola juga dikenal sebagai situs judi online terbaik yang memberikan pelayanan terbaik kepada para membernya.
Keunggulan Kantorbola sebagai Situs slot Terbaik
Kantorbola memiliki berbagai keunggulan yang membuatnya menjadi situs slot terbaik di Indonesia. Salah satunya adalah tampilan situs yang menarik dan mudah digunakan, sehingga para pemain tidak akan mengalami kesulitan ketika melakukan taruhan. Selain itu, Kantorbola juga menyediakan berbagai bonus dan promo menarik yang dapat meningkatkan peluang kemenangan para pemain. Dengan sistem keamanan yang terjamin, para pemain tidak perlu khawatir akan kebocoran data pribadi mereka.
Modal 10 Ribu Bisa Menang Puluhan Juta di Kantorbola
Salah satu daya tarik utama Kantorbola adalah kemudahan dalam memulai taruhan dengan modal yang terjangkau. Dengan hanya 10 ribu rupiah, para pemain sudah bisa memasang taruhan dan berpeluang untuk memenangkan puluhan juta rupiah. Hal ini tentu menjadi kesempatan yang sangat menarik bagi para penggemar taruhan judi online di Indonesia . Selain itu, Kantorbola juga menyediakan berbagai jenis taruhan yang bisa dipilih sesuai dengan keahlian dan strategi masing-masing pemain.
Berbagai Jenis Permainan Taruhan Bola yang Menarik
Kantorbola menyediakan berbagai jenis permainan taruhan bola yang menarik dan menguntungkan bagi para pemain. Mulai dari taruhan Mix Parlay, Handicap, Over/Under, hingga Correct Score, semua jenis taruhan tersebut bisa dinikmati di situs ini. Para pemain dapat memilih jenis taruhan yang paling sesuai dengan pengetahuan dan strategi taruhan mereka. Dengan peluang kemenangan yang besar, para pemain memiliki kesempatan untuk meraih keuntungan yang fantastis di Kantorbola.
Pelayanan Terbaik untuk Kepuasan Para Member
Selain menyediakan berbagai jenis permainan taruhan bola yang menarik, Kantorbola juga memberikan pelayanan terbaik untuk kepuasan para membernya. Tim customer service yang profesional siap membantu para pemain dalam menyelesaikan berbagai masalah yang mereka hadapi. Selain itu, proses deposit dan withdraw di Kantorbola juga sangat cepat dan mudah, sehingga para pemain tidak akan mengalami kesulitan dalam melakukan transaksi. Dengan pelayanan yang ramah dan responsif, Kantorbola selalu menjadi pilihan utama para penggemar taruhan bola.
Kesimpulan
Kantorbola merupakan situs slot terbaik yang menawarkan berbagai jenis permainan taruhan bola yang menarik dan menguntungkan. Dengan modal awal hanya 10 ribu rupiah, para pemain memiliki kesempatan untuk memenangkan puluhan juta rupiah. Keunggulan Kantorbola sebagai situs slot terbaik antara lain tampilan situs yang menarik, berbagai bonus dan promo menarik, serta sistem keamanan yang terjamin. Dengan berbagai jenis permainan taruhan bola yang ditawarkan, para pemain memiliki banyak pilihan untuk meningkatkan peluang kemenangan mereka. Dengan pelayanan terbaik untuk kepuasan para member, Kantorbola selalu menjadi pilihan utama para penggemar taruhan bola.
FAQ (Frequently Asked Questions)
Berapa modal minimal untuk bermain di Kantorbola? Modal minimal untuk bermain di Kantorbola adalah 10 ribu rupiah.
Bagaimana cara melakukan deposit di Kantorbola? Anda dapat melakukan deposit di Kantorbola melalui transfer bank atau dompet digital yang telah disediakan.
Apakah Kantorbola menyediakan bonus untuk new member? Ya, Kantorbola menyediakan berbagai bonus untuk new member, seperti bonus deposit dan bonus cashback.
Apakah Kantorbola aman digunakan untuk bermain taruhan bola online? Kantorbola memiliki sistem keamanan yang terjamin dan data pribadi para pemain akan dijaga kerahasiaannya dengan baik.
Почему наши сигналы – всегда идеальный вариант:
Наша команда 24 часа в сутки в курсе актуальных тенденций и моментов, которые влияют на криптовалюты. Это дает возможность коллективу незамедлительно реагировать и предоставлять текущие сигналы.
Наш коллектив имеет профундным пониманием технического анализа и может обнаруживать мощные и уязвимые поля для входа в сделку. Это способствует для снижения опасностей и повышению прибыли.
Мы же используем собственные боты-анализаторы для изучения графиков на все временных промежутках. Это помогает нашим специалистам доставать понятную картину рынка.
Перед подачей сигнала в нашем Telegram команда делаем внимательную проверку всех аспектов и подтверждаем допустимый длинный или краткий. Это обеспечивает надежность и качественные характеристики наших подач.
Присоединяйтесь к нам к нашему Telegram каналу прямо сейчас и получите доступ к проверенным торговым подачам, которые содействуют вам достигнуть финансового успеха на рынке криптовалют!
https://t.me/Investsany_bot
сигналы онлайн криптовалют
Почему наши сигналы – ваш наилучший путь:
Наша команда утром и вечером, днём и ночью в тренде последних тенденций и событий, которые влияют на криптовалюты. Это дает возможность коллективу быстро действовать и предоставлять актуальные подачи.
Наш состав имеет профундным знанием технического анализа и умеет выявлять устойчивые и слабые стороны для входа в сделку. Это способствует для снижения опасностей и повышению прибыли.
Вместе с командой мы применяем собственные боты для анализа данных для просмотра графиков на все временных промежутках. Это способствует нашим специалистам получить полную картину рынка.
Прежде приведением подача в нашем Telegram мы осуществляем детальную проверку все сторон и подтверждаем допустимая лонг или короткий. Это подтверждает предсказуемость и качественные характеристики наших подач.
Присоединяйтесь к нам к нашему Telegram каналу прямо сейчас и достаньте доступ к подтвержденным торговым подачам, которые содействуют вам достигнуть финансовых результатов на рынке криптовалют!
https://t.me/Investsany_bot
canadian pharmacies compare [url=https://canadianpharmgrx.xyz/#]Certified Canadian pharmacies[/url] canadianpharmacymeds com
Почему наши тоговые сигналы – всегда наилучший вариант:
Наша группа постоянно на волне актуальных трендов и ситуаций, которые влияют на криптовалюты. Это позволяет команде мгновенно реагировать и давать актуальные сообщения.
Наш состав владеет предельным понимание анализа по графику и умеет обнаруживать устойчивые и незащищенные аспекты для вступления в сделку. Это способствует минимизации рисков и способствует для растущей прибыли.
Мы же применяем личные боты для анализа данных для анализа графиков на всех периодах времени. Это содействует нашим специалистам получить всю картину рынка.
Прежде опубликованием сигнала в нашем Telegram команда осуществляем тщательную проверку все сторон и подтверждаем допустимая долгий или период короткой торговли. Это подтверждает верность и качественные показатели наших сигналов.
Присоединяйтесь к нам к нашему каналу прямо сейчас и получите доступ к подтвержденным торговым сигналам, которые содействуют вам достигнуть финансовых результатов на рынке криптовалют!
https://t.me/Investsany_bot
сигналы онлайн криптовалют
Почему наши сигналы – ваш идеальный вариант:
Наша команда 24 часа в сутки на волне современных направлений и моментов, которые влияют на криптовалюты. Это дает возможность нашему коллективу незамедлительно реагировать и давать свежие подачи.
Наш коллектив владеет глубоким пониманием технического анализа и умеет выделить сильные и слабые аспекты для входа в сделку. Это содействует минимизации опасностей и способствует для растущей прибыли.
Мы же используем собственные боты-анализаторы для просмотра графиков на все периодах времени. Это содействует нашим специалистам завоевать полноценную картину рынка.
Прежде публикацией подачи в нашем канале Telegram команда делаем детальную ревизию всех аспектов и подтверждаем допустимый длинный или шорт. Это гарантирует надежность и качественные показатели наших подач.
Присоединяйтесь к нашей команде к нашему Telegram каналу прямо сейчас и получите доступ к подтвержденным торговым подачам, которые помогут вам достичь финансового успеха на рынке криптовалют!
https://t.me/Investsany_bot
mexican pharmaceuticals online: Pills from Mexican Pharmacy – mexican pharmaceuticals online
canadian pharmacy in canada [url=https://canadianpharmgrx.com/#]online canadian pharmacy review[/url] best online canadian pharmacy
Мы рекомендуем посетить веб-сайт https://telegra.ph/Internet-magazin-Rybachok-Mesto-gde-rybalka-nachinaetsya-s-vybora-snaryazheniya-04-09.
Кроме того, не забудьте добавить сайт в закладки: [url=https://telegra.ph/Internet-magazin-Rybachok-Mesto-gde-rybalka-nachinaetsya-s-vybora-snaryazheniya-04-09]https://telegra.ph/Internet-magazin-Rybachok-Mesto-gde-rybalka-nachinaetsya-s-vybora-snaryazheniya-04-09[/url]
indian pharmacy online: indian pharmacy delivery – online shopping pharmacy india
robaxin 4212
legitimate canadian pharmacies [url=http://canadianpharmgrx.xyz/#]International Pharmacy delivery[/url] canadadrugpharmacy com
reliable canadian pharmacy reviews canadian pharmacy tampa or the canadian pharmacy
https://biss.kz/?m=redir&id=234&href=https://canadianpharmgrx.com canadian pharmacy cheap
[url=https://cse.google.mw/url?sa=t&url=https://canadianpharmgrx.com]pharmacy canadian superstore[/url] canadian world pharmacy and [url=http://www.9kuan9.com/home.php?mod=space&uid=501618]canadian pharmacy service[/url] canada drugs online
canadianpharmacyworld com: canadian pharmacy – canadian pharmacy world
pct nolvadex [url=https://nolvadex.icu/#]how to prevent hair loss while on tamoxifen[/url] should i take tamoxifen
Итак почему наши тоговые сигналы – всегда оптимальный вариант:
Наша группа постоянно в тренде современных трендов и моментов, которые воздействуют на криптовалюты. Это дает возможность нам оперативно действовать и предоставлять свежие сигналы.
Наш состав имеет предельным знанием теханализа и может выделить крепкие и незащищенные аспекты для присоединения в сделку. Это способствует уменьшению опасностей и способствует для растущей прибыли.
Мы применяем собственные боты для анализа данных для просмотра графиков на все периодах времени. Это содействует нашим специалистам достать полную картину рынка.
Перед опубликованием подачи в нашем Telegram мы делаем внимательную ревизию все аспектов и подтверждаем возможный длинный или шорт. Это гарантирует верность и качество наших сигналов.
Присоединяйтесь к нашей команде к нашей группе прямо сейчас и достаньте доступ к подтвержденным торговым сигналам, которые помогут вам вам достичь успеха в финансах на рынке криптовалют!
https://t.me/Investsany_bot
Почему наши сигналы – ваш идеальный вариант:
Наша группа 24 часа в сутки в курсе последних направлений и событий, которые воздействуют на криптовалюты. Это способствует коллективу оперативно действовать и давать текущие сигналы.
Наш коллектив владеет глубинным знанием анализа по графику и может обнаруживать мощные и уязвимые поля для вступления в сделку. Это способствует для снижения опасностей и максимизации прибыли.
Мы же используем личные боты-анализаторы для анализа графиков на все временных промежутках. Это помогает нам достать полную картину рынка.
Перед опубликованием подача в нашем канале Telegram мы осуществляем детальную проверку всех сторон и подтверждаем возможное долгий или шорт. Это гарантирует верность и качество наших подач.
Присоединяйтесь к нашему каналу к нашему Telegram каналу прямо сейчас и получите доступ к проверенным торговым подачам, которые содействуют вам получить финансового успеха на рынке криптовалют!
https://t.me/Investsany_bot
криптовалюта сигналы
Почему наши сигналы на вход – ваш оптимальный вариант:
Наша команда 24 часа в сутки в курсе последних тенденций и моментов, которые оказывают влияние на криптовалюты. Это позволяет нам мгновенно отвечать и предоставлять актуальные подачи.
Наш состав обладает профундным пониманием теханализа и способен обнаруживать сильные и уязвимые аспекты для вступления в сделку. Это способствует снижению рисков и максимизации прибыли.
Вместе с командой мы применяем собственные боты анализа для просмотра графиков на все интервалах. Это помогает нам достать всю картину рынка.
Прежде подачей сигнал в нашем канале Telegram мы осуществляем детальную ревизию все сторон и подтверждаем возможный период долгой торговли или краткий. Это обеспечивает надежность и качественные показатели наших сигналов.
Присоединяйтесь к нашему каналу к нашему Telegram каналу прямо сейчас и достаньте доступ к подтвержденным торговым подачам, которые содействуют вам получить финансового успеха на рынке криптовалют!
https://t.me/Investsany_bot
торговые сигналы криптовалют
Итак почему наши сигналы – ваш оптимальный путь:
Наша команда все время в тренде последних курсов и моментов, которые оказывают влияние на криптовалюты. Это способствует группе сразу действовать и подавать новые трейды.
Наш состав обладает профундным знанием анализа по графику и умеет обнаруживать крепкие и слабые стороны для вступления в сделку. Это способствует минимизации рисков и повышению прибыли.
Вместе с командой мы используем личные боты анализа для анализа графиков на любых временных промежутках. Это содействует нашим специалистам достать полноценную картину рынка.
Прежде подачей подачи в нашем Telegram мы делаем педантичную проверку всех аспектов и подтверждаем возможное длинный или короткий. Это гарантирует верность и качественность наших подач.
Присоединяйтесь к нашему каналу к нашему Telegram каналу прямо сейчас и достаньте доступ к подтвержденным торговым подачам, которые содействуют вам достигнуть успеха в финансах на рынке криптовалют!
https://t.me/Investsany_bot
Мы рекомендуем посетить веб-сайт https://telegra.ph/Internet-magazin-Rybachok-Vash-provodnik-v-mire-rybolovstva-04-09.
Кроме того, не забудьте добавить сайт в закладки: [url=https://telegra.ph/Internet-magazin-Rybachok-Vash-provodnik-v-mire-rybolovstva-04-09]https://telegra.ph/Internet-magazin-Rybachok-Vash-provodnik-v-mire-rybolovstva-04-09[/url]
п»їcytotec pills online [url=https://misoprostol.top/#]cytotec online[/url] buy cytotec
торговые сигналы криптовалют
Итак почему наши сигналы – всегда лучший вариант:
Наша группа постоянно на волне текущих трендов и событий, которые влияют на криптовалюты. Это позволяет коллективу оперативно отвечать и давать свежие подачи.
Наш коллектив владеет профундным понимание теханализа и способен обнаруживать крепкие и незащищенные стороны для присоединения в сделку. Это способствует минимизации рисков и увеличению прибыли.
Мы же применяем собственные боты для анализа для анализа графиков на всех интервалах. Это содействует нашим специалистам достать полноценную картину рынка.
Прежде приведением сигнал в нашем Telegram команда проводим педантичную ревизию всех аспектов и подтверждаем допустимый период долгой торговли или краткий. Это подтверждает достоверность и качественные характеристики наших сигналов.
Присоединяйтесь к нам к нашему каналу прямо сейчас и получите доступ к подтвержденным торговым подачам, которые содействуют вам получить финансового успеха на рынке криптовалют!
https://t.me/Investsany_bot
antibiotics cipro: buy cipro cheap – buy cipro
tamoxifen dose: tamoxifen chemo – tamoxifen dose
Мы рекомендуем посетить веб-сайт https://telegra.ph/Internet-magazin-Rybachok-Vash-nadezhnyj-pomoshchnik-v-mire-rybolovstva-04-09-2.
Кроме того, не забудьте добавить сайт в закладки: [url=https://telegra.ph/Internet-magazin-Rybachok-Vash-nadezhnyj-pomoshchnik-v-mire-rybolovstva-04-09-2]https://telegra.ph/Internet-magazin-Rybachok-Vash-nadezhnyj-pomoshchnik-v-mire-rybolovstva-04-09-2[/url]
diflucan 150 otc [url=http://diflucan.icu/#]diflucan discount[/url] diflucan 400mg without prescription
cipro ciprofloxacin buy cipro cheap or cipro for sale
https://maps.google.cl/url?sa=t&url=https://ciprofloxacin.guru ciprofloxacin mail online
[url=https://maps.google.ci/url?sa=t&url=https://ciprofloxacin.guru]purchase cipro[/url] ciprofloxacin over the counter and [url=http://lsdsng.com/user/538180]cipro for sale[/url] п»їcipro generic
does tamoxifen cause weight loss where to get nolvadex or what happens when you stop taking tamoxifen
http://dl.theme-wordpress.ir/index.php?url=http://nolvadex.icu tamoxifen hormone therapy
[url=http://www.google.com.pk/url?q=https://nolvadex.icu]tamoxifen endometriosis[/url] tamoxifen for breast cancer prevention and [url=https://masterbationtube.com/user/fhwyjudygk/videos]where to get nolvadex[/url] should i take tamoxifen
Мы рекомендуем посетить веб-сайт https://telegra.ph/Internet-magazin-Rybachok-Vash-vernyj-sputnik-v-mire-rybnoj-lovli-04-09.
Кроме того, не забудьте добавить сайт в закладки: [url=https://telegra.ph/Internet-magazin-Rybachok-Vash-vernyj-sputnik-v-mire-rybnoj-lovli-04-09]https://telegra.ph/Internet-magazin-Rybachok-Vash-vernyj-sputnik-v-mire-rybnoj-lovli-04-09[/url]
tamoxifen premenopausal: tamoxifen hot flashes – tamoxifenworld
doxycycline 100mg capsules [url=http://doxycyclinest.pro/#]doxycycline 200 mg[/url] how to order doxycycline
JDBslot
JDB slot | The first bonus to rock the slot world
Exclusive event to earn real money and slot game points
JDB demo slot games for free = ?? Lucky Spin Lucky Draw!
How to earn reels free 2000? follow jdb slot games for free
#jdbslot
Demo making money : https://jdb777.com
#jdbslot #slotgamesforfree #howtoearnreels #cashreels
#slotgamepoint #demomakingmoney
Cash reels only at slot games for free
More professional jdb game bonus knowledge
Ways to Secure Rotations Credits Costless 2000: Your Greatest Manual to Winning Big with JDB One-armed bandits
Are you you prepared to begin on an exciting expedition into the world of web slot games? Search no further, simply rotate to JDB777 FreeGames, where thrills and big wins await you at each turn of the reel. In this comprehensive instruction, we’ll show you ways to gain reels credits gratis 2000 and release the thrilling world of JDB slots.
Live through the Excitement of Gaming Games for Free
At JDB777 FreeGames, we supply a extensive choice of captivating slot games that are guaranteed to keep you entertained for hours on end. From classic fruit machines to immersive themed slots, there’s something for every type of player to enjoy. And the greatest part? You can play all of our slot games for free and earn real cash prizes!
Unlock Free Cash Reels and Achieve Big
One of the most exciting features of JDB777 FreeGames is the chance to earn reels points costless 2000, which can be exchanged for real cash. Simply sign up for an account, and you’ll get your complimentary bonus to begin spinning and winning. With our liberal promotions and bonuses, the sky’s the limit when it comes to your winnings!
Direct Approaches and Scores System
To increase your winnings and uncover the total potential of our slot games, it’s essential to grasp the tactics and points system. Our professional guides will take you through everything you require to know, from choosing the right games to understanding how to acquire bonus points and cash prizes.
Exclusive Promotions and Specific Offers
As a member of JDB777 FreeGames, you’ll have access to exclusive promotions and special offers that are guaranteed to boost your gaming experience. From welcome bonuses to daily rebates, there are lots of chances to enhance your winnings and take your gameplay to the next level.
Join Us Today and Commence Winning
Don’t miss out on your possibility to win big with JDB777 FreeGames. Sign up now to claim your gratis bonus of 2000 credits and start spinning the reels for your opportunity to win real cash prizes. With our exhilarating range of slot games and generous promotions, the potentialities are endless. Join us today and initiate winning!
JDB demo
JDB demo | The easiest bet software to use (jdb games)
JDB bet marketing: The first bonus that players care about
Most popular player bonus: Daily Play 2000 Rewards
Game developers online who are always with you
#jdbdemo
Where to find the best game developer? https://www.jdbgaming.com/
#gamedeveloperonline #betsoftware #betmarketing
#developerbet #betingsoftware #gamedeveloper
Supports hot jdb demo beting software jdb angry bird
JDB slot demo supports various competition plans
Unlocking Success with JDB Gaming: Your Paramount Wager Software Answer
In the world of internet gaming, locating the appropriate bet software is vital for prosperity. Meet JDB Gaming – a foremost supplier of revolutionary gaming solutions designed to improve the player experience and boost earnings for operators. With a focus on user-friendly interfaces, enticing bonuses, and a wide array of games, JDB Gaming emerges as a prime choice for both players and operators alike.
JDB Demo offers a look into the realm of JDB Gaming, providing players with an chance to undergo the thrill of betting without any risk. With user-friendly interfaces and effortless navigation, JDB Demo enables it easy for players to explore the vast selection of games available, from classic slots to engaging arcade titles.
When it concerns bonuses, JDB Bet Marketing leads with appealing offers that lure players and hold them returning for more. From the favored Daily Play 2000 Rewards to unique promotions, JDB Bet Marketing ensures that players are recognized for their allegiance and dedication.
With so several game developers online, locating the best can be a daunting task. However, JDB Gaming stands out from the masses with its devotion to excellence and innovation. With over 150 online casino games to select, JDB Gaming offers a bit for everyone, whether you’re a fan of slots, fish shooting games, arcade titles, card games, or bingo.
At the heart of JDB Gaming lies a dedication to supplying the best possible gaming experience players. With a emphasis on Asian culture and impressive 3D animations, JDB Gaming stands out as a leader in the industry. Whether you’re a player looking for excitement or an operator looking for a reliable partner, JDB Gaming has you covered.
API Integration: Effortlessly link with all platforms for ultimate business prospects. Big Data Analysis: Stay ahead of market trends and understand player actions with thorough data analysis. 24/7 Technical Support: Enjoy peace of mind with skilled and trustworthy technical support available 24/7.
In conclusion, JDB Gaming provides a successful mix of state-of-the-art technology, appealing bonuses, and unparalleled support. Whether you’re a gamer or an provider, JDB Gaming has everything that you need to excel in the world of online gaming. So why wait? Join the JDB Gaming group today and unleash your full potential!
nolvadex half life common side effects of tamoxifen or natural alternatives to tamoxifen
http://www.factiva.com/en/cp/sources/sourceadditionsarchive.asp?d=nolvadex.icu tamoxifen vs clomid
[url=https://maps.google.com.sg/url?sa=t&url=https://nolvadex.icu]arimidex vs tamoxifen bodybuilding[/url] tamoxifen for gynecomastia reviews and [url=http://bocauvietnam.com/member.php?1451162-kldrwlxler]tamoxifen headache[/url] should i take tamoxifen
777 sign up
JDB online
JDB online | 2024 best online slot game demo cash
How to earn reels? jdb online accumulate spin get bonus
Hot demo fun: Quick earn bonus for ranking demo
JDB demo for win? JDB reward can be exchanged to real cash
#jdbonline
777 sign up and get free 2,000 cash: https://www.jdb777.io/
#jdbonline #democash #demofun #777signup
#rankingdemo #demoforwin
2000 cash: Enter email to verify, enter verify, claim jdb bonus
Play with JDB games an online platform in every countries.
Enjoy the Delight of Gaming!
Costless to Join, Costless to Play.
Join and Obtain a Bonus!
SIGN UP NOW AND GET 2000?
We challenge you to claim a demo entertaining welcome bonus for all new members! Plus, there are other particular promotions waiting for you!
Discover more
JDB – FREE TO JOIN
Effortless to play, real profit
Participate in JDB today and indulge in fantastic games without any investment! With a wide array of free games, you can delight in pure entertainment at any time.
Speedy play, quick join
Value your time and opt for JDB’s swift games. Just a few easy steps and you’re set for an amazing gaming experience!
Join now and earn money
Experience JDB: Instant play with no investment and the opportunity to win cash. Designed for effortless and lucrative play.
Plunge into the World of Online Gaming Stimulation with Fun Slots Online!
Are you ready to encounter the excitement of online gaming like never before? Look no further than Fun Slots Online, your ultimate hub for exhilarating gameplay, endless entertainment, and exciting winning opportunities!
At Fun Slots Online, we pride ourselves on giving a wide array of engaging games designed to hold you engaged and pleased for hours on end. From classic slot machines to innovative new releases, there’s something for everybody to savor. Plus, with our user-friendly interface and uninterrupted gameplay experience, you’ll have no trouble immersing straight into the thrill and enjoying every moment.
But that’s not all – we also present a assortment of unique promotions and bonuses to compensate our loyal players. From initial bonuses for new members to select rewards for our top players, there’s always something thrilling happening at Fun Slots Online. And with our protected payment system and 24-hour customer support, you can experience peace of mind cognizant that you’re in good hands every step of the way.
So why wait? Register with Fun Slots Online today and start your trip towards heart-pounding victories and jaw-dropping prizes. Whether you’re a seasoned gamer or just starting out, there’s never been a better time to join the fun and adventure at Fun Slots Online. Sign up now and let the games begin!
Intro
betvisa vietnam
Betvisa vietnam | Grand Prize Breakout!
Betway Highlights | 499,000 Extra Bonus on betvisa com!
Cockfight to win up to 3,888,000 on betvisa game
Daily Deposit, Sunday Bonus on betvisa app 888,000!
#betvisavietnam
200% Bonus on instant deposits—start your win streak!
200% welcome bonus! Slots and Fishing Games
https://www.betvisa.com/
#betvisavietnam #betvisagame #betvisaapp
#betvisacom #betvisacasinoapp
Birthday bash? Up to 1,800,000 in prizes! Enjoy!
Friday Shopping Frenzy betvisa vietnam 100,000 VND!
Betvisa Casino App Daily Login 12% Bonus Up to 1,500,000VND!
Khám phá Thế Giới Cá Cược Trực Tuyến với BetVisa!
Dịch vụ BetVisa, một trong những công ty trò chơi hàng đầu tại châu Á, ra đời vào năm 2017 và hoạt động dưới phê chuẩn của Curacao, đã thu hút hơn 2 triệu người dùng trên toàn thế giới. Với lời hứa đem đến trải nghiệm cá cược an toàn và tin cậy nhất, BetVisa nhanh chóng trở thành lựa chọn hàng đầu của người chơi trực tuyến.
BetVisa không dừng lại ở việc cung cấp các trò chơi phong phú như xổ số, sòng bạc trực tiếp, thể thao trực tiếp và thể thao điện tử, mà còn mang đến cho người chơi những ưu đãi hấp dẫn. Thành viên mới đăng ký sẽ được tặng ngay 5 cơ hội miễn phí và có cơ hội giành giải thưởng lớn.
Đặc biệt, BetVisa hỗ trợ nhiều hình thức thanh toán linh hoạt như Betvisa Vietnam, cùng với các ưu đãi độc quyền như thưởng chào mừng lên đến 200%. Bên cạnh đó, hàng tuần còn có các chương trình khuyến mãi độc đáo như chương trình giải thưởng Sinh Nhật và Chủ Nhật Mua Sắm Điên Cuồng, mang đến cho người chơi cơ hội thắng lớn.
Với tính cam kết về trải nghiệm thú vị cá cược hoàn hảo nhất và dịch vụ khách hàng chuyên trách, BetVisa hoàn toàn tự tin là điểm đến lý tưởng cho những ai đam mê trò chơi trực tuyến. Hãy tham gia ngay hôm nay và bắt đầu hành trình của bạn tại BetVisa – nơi niềm vui và may mắn chính là điều quan trọng.
diflucan tablet price: how much is over the counter diflucan – candida diflucan
doxycycline 500mg [url=https://doxycyclinest.pro/#]doxycycline hydrochloride 100mg[/url] buy doxycycline
Intro
betvisa bangladesh
Betvisa bangladesh | Super Cricket Carnival with Betvisa!
IPL Cricket Mania | Kick off Super Cricket Carnival with bet visa.com
IPL Season | Exclusive 1,50,00,000 only at Betvisa Bangladesh!
Crash Games Heroes | Climb to the top of the 1,00,00,000 bonus pool!
#betvisabangladesh
Preview IPL T20 | Follow Betvisa BD on Facebook, Instagram for awards!
betvisa affiliate Dream Maltese Tour | Sign up now to win the ultimate prize!
https://www.bvthethao.com/
#betvisabangladesh #betvisabd #betvisaaffiliate
#betvisaaffiliatesignup #betvisa.com
Với sự cam kết về trải nghiệm thú vị cá cược tốt nhất và dịch vụ khách hàng chuyên môn, BetVisa tự hào là điểm đến lý tưởng cho những ai nhiệt huyết trò chơi trực tuyến. Hãy đăng ký ngay hôm nay và bắt đầu chuyến đi của bạn tại BetVisa – nơi niềm vui và may mắn chính là điều tất yếu.
Khám phá Thế Giới Cá Cược Trực Tuyến với BetVisa!
BetVisa, một trong những công ty hàng đầu tại châu Á, được thành lập vào năm 2017 và thao tác dưới phê chuẩn của Curacao, đã đưa vào hơn 2 triệu người dùng trên toàn thế giới. Với lời hứa đem đến trải nghiệm cá cược đảm bảo và tin cậy nhất, BetVisa nhanh chóng trở thành lựa chọn hàng đầu của người chơi trực tuyến.
BetVisa không chỉ cung cấp các trò chơi phong phú như xổ số, sòng bạc trực tiếp, thể thao trực tiếp và thể thao điện tử, mà còn mang đến cho người chơi những ưu đãi hấp dẫn. Thành viên mới đăng ký sẽ được tặng ngay 5 vòng quay miễn phí và có cơ hội giành giải thưởng lớn.
Đặc biệt, BetVisa hỗ trợ nhiều phương thức thanh toán linh hoạt như Betvisa Vietnam, cùng với các ưu đãi độc quyền như thưởng chào mừng lên đến 200%. Bên cạnh đó, hàng tuần còn có các chương trình khuyến mãi độc đáo như chương trình giải thưởng Sinh Nhật và Chủ Nhật Mua Sắm Điên Cuồng, mang đến cho người chơi cơ hội thắng lớn.
Мы рекомендуем посетить веб-сайт https://telegra.ph/Internet-magazin-Rybachok-Vash-nadezhnyj-pomoshchnik-v-mire-rybolovstva-04-09-3.
Кроме того, не забудьте добавить сайт в закладки: [url=https://telegra.ph/Internet-magazin-Rybachok-Vash-nadezhnyj-pomoshchnik-v-mire-rybolovstva-04-09-3]https://telegra.ph/Internet-magazin-Rybachok-Vash-nadezhnyj-pomoshchnik-v-mire-rybolovstva-04-09-3[/url]
can i buy diflucan over the counter in canada: diflucan coupon canada – diflucan 150 mg tablet
cipro online no prescription in the usa buy cipro cheap or ciprofloxacin generic
http://artistsbook.lt/wp-content/plugins/wp-js-external-link-info/redirect.php?url=http://ciprofloxacin.guru buy generic ciprofloxacin
[url=http://canyoncollective.com/proxy.php?link=https://ciprofloxacin.guru]cipro ciprofloxacin[/url] buy cipro online canada and [url=https://forex-bitcoin.com/members/341272-yepmpdpvji]ciprofloxacin generic[/url] buy cipro cheap
Мы рекомендуем посетить веб-сайт https://telegra.ph/Internet-magazin-Rybachok-Vash-vernyj-sputnik-v-mire-rybnoj-lovli-04-09-2.
Кроме того, не забудьте добавить сайт в закладки: [url=https://telegra.ph/Internet-magazin-Rybachok-Vash-vernyj-sputnik-v-mire-rybnoj-lovli-04-09-2]https://telegra.ph/Internet-magazin-Rybachok-Vash-vernyj-sputnik-v-mire-rybnoj-lovli-04-09-2[/url]
buy cytotec cytotec abortion pill or cytotec buy online usa
https://scanverify.com/siteverify.php?site=misoprostol.top buy cytotec
[url=https://maps.google.dj/url?sa=t&url=https://misoprostol.top]cytotec online[/url] buy cytotec over the counter and [url=https://forum.beloader.com/home.php?mod=space&uid=13317]buy cytotec online fast delivery[/url] buy cytotec in usa
Intro
betvisa philippines
Betvisa philippines | The Filipino Carnival, Spinning for Treasures!
Betvisa Philippines Surprises | Spin daily and win ₱8,888 Grand Prize!
Register for a chance to win ₱8,888 Bonus Tickets! Explore Betvisa.com!
Wild All Over Grab 58% YB Bonus at Betvisa Casino! Take the challenge!
#betvisaphilippines
Get 88 on your first 50 Experience Betvisa Online’s Bonus Gift!
Weekend Instant Daily Recharge at betvisa.com
https://www.88betvisa.com/
#betvisaphilippines #betvisaonline #betvisacasino
#betvisacom #betvisa.com
Nền tảng cá cược – Điểm Đến Tuyệt Vời Cho Người Chơi Trực Tuyến
Khám Phá Thế Giới Cá Cược Trực Tuyến với BetVisa!
Dịch vụ được thiết lập vào năm 2017 và tiến hành theo bằng trò chơi Curacao với hơn 2 triệu người dùng. Với tính cam kết đem đến trải nghiệm cá cược đáng tin cậy và tin cậy nhất, BetVisa nhanh chóng trở thành lựa chọn hàng đầu của người chơi trực tuyến.
Nền tảng cá cược không chỉ đưa ra các trò chơi phong phú như xổ số, sòng bạc trực tiếp, thể thao trực tiếp và thể thao điện tử, mà còn mang lại cho người chơi những phần thưởng hấp dẫn. Thành viên mới đăng ký sẽ nhận tặng ngay 5 vòng quay miễn phí và có cơ hội giành giải thưởng lớn.
Cổng chơi hỗ trợ nhiều cách thức thanh toán linh hoạt như Betvisa Vietnam, cùng với các ưu đãi độc quyền như thưởng chào mừng lên đến 200%. Bên cạnh đó, hàng tuần còn có các chương trình khuyến mãi độc đáo như chương trình giải thưởng Sinh Nhật và Chủ Nhật Mua Sắm Điên Cuồng, mang lại cho người chơi cơ hội thắng lớn.
Với lời hứa về trải nghiệm cá cược tốt nhất và dịch vụ khách hàng tận tâm, BetVisa tự tin là điểm đến lý tưởng cho những ai đam mê trò chơi trực tuyến. Hãy đăng ký ngay hôm nay và bắt đầu hành trình của bạn tại BetVisa – nơi niềm vui và may mắn chính là điều tất yếu!
buy cytotec online [url=https://misoprostol.top/#]buy cytotec[/url] Abortion pills online
Мы рекомендуем посетить веб-сайт https://vektor-meh.ru//.
Кроме того, не забудьте добавить сайт в закладки: [url=https://vektor-meh.ru/]https://vektor-meh.ru/[/url]
where to get doxycycline: doxycycline 100 mg – buy generic doxycycline
App cá độ:Hướng dẫn tải app cá cược uy tín RG777 đúng cách
Bạn có biết? Tải app cá độ đúng cách sẽ giúp tiết kiệm thời gian đăng nhập, tăng tính an toàn và bảo mật cho tài khoản của bạn! Vậy đâu là cách để tải một app cá cược uy tín dễ dàng và chính xác? Xem ngay bài viết này nếu bạn muốn chơi cá cược trực tuyến an toàn!
tải về ngay lập tức
RG777 – Nhà Cái Uy Tín Hàng Đầu Việt Nam
Link tải app cá độ nét nhất 2023:RG777
Để đảm bảo việc tải ứng dụng cá cược của bạn an toàn và nhanh chóng, người chơi có thể sử dụng đường link sau.
tải về ngay lập tức
tamoxifen cost: nolvadex side effects – tamoxifen side effects forum
現代社會,快遞已成為大眾化的服務業,吸引了許多人的注意和參與。 與傳統夜店、酒吧不同,外帶提供了更私密、便捷的服務方式,讓人們有機會在家中或特定地點與美女共度美好時光。
多樣化選擇
從台灣到日本,馬來西亞到越南,外送業提供了多樣化的女孩選擇,以滿足不同人群的需求和喜好。 無論你喜歡什麼類型的女孩,你都可以在外賣行業找到合適的女孩。
不同的價格水平
價格範圍從實惠到豪華。 無論您的預算如何,您都可以找到適合您需求的女孩,享受優質的服務並度過愉快的時光。
快遞業高度重視安全和隱私保護,提供多種安全措施和保障,讓客戶放心使用服務,無需擔心個人資訊外洩或安全問題。
如果你想成為一名經驗豐富的外包司機,外包產業也將為你提供廣泛的選擇和專屬服務。 只需按照步驟操作,您就可以輕鬆享受快遞行業帶來的樂趣和便利。
蓬勃發展的快遞產業為人們提供了一種新的娛樂休閒方式,讓人們在忙碌的生活中得到放鬆,享受美好時光。
Ефективні методи
4. Як впоратися з зубними відкладеннями та камінням
дитяча стоматологічна клініка [url=https://stomatologiyatrn.ivano-frankivsk.ua/]дитяча стоматологічна клініка[/url] .
purchase cipro [url=http://ciprofloxacin.guru/#]ciprofloxacin generic[/url] buy cipro online without prescription
п»їcipro generic cipro pharmacy or buy cipro online
https://www.google.com.bh/url?q=https://ciprofloxacin.guru cipro for sale
[url=http://www.fanserials.ru/engine/link.php?url=http://ciprofloxacin.guru]buy cipro online without prescription[/url] cipro online no prescription in the usa and [url=https://forexzloty.pl/members/374983-dkopecmnfm]cipro ciprofloxacin[/url] buy ciprofloxacin over the counter
App cá độ:Hướng dẫn tải app cá cược uy tín RG777 đúng cách
Bạn có biết? Tải app cá độ đúng cách sẽ giúp tiết kiệm thời gian đăng nhập, tăng tính an toàn và bảo mật cho tài khoản của bạn! Vậy đâu là cách để tải một app cá cược uy tín dễ dàng và chính xác? Xem ngay bài viết này nếu bạn muốn chơi cá cược trực tuyến an toàn!
tải về ngay lập tức
RG777 – Nhà Cái Uy Tín Hàng Đầu Việt Nam
Link tải app cá độ nét nhất 2023:RG777
Để đảm bảo việc tải ứng dụng cá cược của bạn an toàn và nhanh chóng, người chơi có thể sử dụng đường link sau.
tải về ngay lập tức
Intro
betvisa india
Betvisa india | IPL 2024 Heat Wave
IPL 2024 Big bets, big prizes With Betvisa India
Exclusive for Sports Fans Betvisa Online Casino 50% Welcome Bonus
Crash Game Supreme Compete for 1,00,00,000 pot Betvisa.com
#betvisaindia
Accurate Predictions IPL T20 Tournament, Winner Takes All!
More than just a game | Betvisa dreams invites you to fly to malta
https://www.b3tvisapro.com/
#betvisaindia #betvisalogin #betvisaonlinecasino
#betvisa.com #betvisaapp
D?ch v? – Di?m D?n Tuy?t V?i Cho Ngu?i Choi Tr?c Tuy?n
Kham Pha Th? Gi?i Ca Cu?c Tr?c Tuy?n v?i BetVisa!
BetVisa du?c thanh l?p vao nam 2017 va v?n hanh theo b?ng tro choi Curacao v?i hon 2 tri?u ngu?i dung. V?i tinh cam k?t dem d?n tr?i nghi?m ca cu?c ch?c ch?n va tin c?y nh?t, BetVisa nhanh chong tr? thanh l?a ch?n hang d?u c?a ngu?i choi tr?c tuy?n.
BetVisa khong ch? dua ra cac tro choi phong phu nhu x? s?, song b?c tr?c ti?p, th? thao tr?c ti?p va th? thao di?n t?, ma con mang l?i cho ngu?i choi nh?ng ph?n thu?ng h?p d?n. Thanh vien m?i dang ky s? nh?n t?ng ngay 5 vong quay mi?n phi va co co h?i gianh gi?i thu?ng l?n.
C?ng choi h? tr? nhi?u cach th?c thanh toan linh ho?t nhu Betvisa Vietnam, k?t h?p v?i cac uu dai d?c quy?n nhu thu?ng chao m?ng len d?n 200%. Ben c?nh do, hang tu?n con co cac chuong trinh khuy?n mai d?c dao nhu chuong trinh gi?i thu?ng Sinh Nh?t va Ch? Nh?t Mua S?m Dien Cu?ng, mang l?i cho ngu?i choi co h?i th?ng l?n.
V?i s? cam k?t v? tr?i nghi?m ca cu?c t?t nh?t va d?ch v? khach hang t?n tam, BetVisa t? tin la di?m d?n ly tu?ng cho nh?ng ai dam me tro choi tr?c tuy?n. Hay dang ky ngay hom nay va b?t d?u hanh trinh c?a b?n t?i BetVisa – noi ni?m vui va may m?n chinh la di?u t?t y?u!
buy doxycycline 100mg [url=https://doxycyclinest.pro/#]order doxycycline online[/url] buy doxycycline online uk
JDBslot
JDB slot | The first bonus to rock the slot world
Exclusive event to earn real money and slot game points
JDB demo slot games for free = ?? Lucky Spin Lucky Draw!
How to earn reels free 2000? follow jdb slot games for free
#jdbslot
Demo making money : https://jdb777.com
#jdbslot #slotgamesforfree #howtoearnreels #cashreels
#slotgamepoint #demomakingmoney
Cash reels only at slot games for free
More professional jdb game bonus knowledge
How to Acquire Reels Credits Free 2000: Your Greatest Instruction to Winning Substantial with JDB Slots
Are you ready to begin on an electrifying voyage into the universe of online slot games? Seek no more, just turn to JDB777 FreeGames, where excitement and significant wins await you at every rotation of the reel. In this complete manual, we’ll show you how to gain reels credits gratis 2000 and uncover the exhilarating world of JDB slots.
Live through the Thrill of Slot Games for Free
At JDB777 FreeGames, we present a wide variety of captivating slot games that are certain to keep you entertained for hours on end. From vintage fruit machines to immersive themed slots, there’s something for every variety of player to enjoy. And the finest part? You can play all of our slot games for free and gain real cash prizes!
Release Free Cash Reels and Achieve Big
One of the most stimulating features of JDB777 FreeGames is the chance to earn reels credit free 2000, which can be exchanged for real cash. Just sign up for an account, and you’ll receive your gratis bonus to initiate spinning and winning. With our bountiful promotions and bonuses, the sky’s the restriction when it comes to your winnings!
Navigate Tactics and Points System
To maximize your winnings and release the complete potential of our slot games, it’s crucial to comprehend the tactics and points system. Our expert guides will take you through everything you require to know, from choosing the right games to grasping how to earn bonus points and cash prizes.
Exclusive Promotions and Exclusive Offers
As a member of JDB777 FreeGames, you’ll have access to exclusive promotions and special offers that are positive to enhance your gaming experience. From welcome bonuses to daily rebates, there are plenty of opportunities to boost your winnings and take your gameplay to the upcoming level.
Join Us Today and Commence Winning
Don’t miss out on your possibility to win big with JDB777 FreeGames. Sign up now to assert your complimentary bonus of 2000 credits and initiate spinning the reels for your chance to win real cash prizes. With our exhilarating choice of slot games and generous promotions, the opportunities are endless. Join us today and start winning!
JDB demo
JDB demo | The easiest bet software to use (jdb games)
JDB bet marketing: The first bonus that players care about
Most popular player bonus: Daily Play 2000 Rewards
Game developers online who are always with you
#jdbdemo
Where to find the best game developer? https://www.jdbgaming.com/
#gamedeveloperonline #betsoftware #betmarketing
#developerbet #betingsoftware #gamedeveloper
Supports hot jdb demo beting software jdb angry bird
JDB slot demo supports various competition plans
Unlocking Achievement with JDB Gaming: Your Paramount Betting Software Answer
In the world of internet gaming, finding the appropriate bet software is crucial for success. Introducing JDB Gaming – a foremost source of innovative gaming answers tailored to boost the gaming experience and boost profits for operators. With a emphasis on user-friendly interfaces, attractive bonuses, and a varied array of games, JDB Gaming emerges as a top choice for both gamers and operators alike.
JDB Demo offers a glimpse into the realm of JDB Gaming, providing players with an chance to experience the thrill of betting without any risk. With simple interfaces and seamless navigation, JDB Demo enables it easy for players to explore the extensive selection of games on offer, from classic slots to captivating arcade titles.
When it comes to bonuses, JDB Bet Marketing paves the way with enticing offers that draw players and hold them coming back for more. From the well-liked Daily Play 2000 Rewards to special promotions, JDB Bet Marketing ensures that players are recognized for their allegiance and dedication.
With so many game developers online, locating the best can be a intimidating task. However, JDB Gaming stands out from the crowd with its devotion to superiority and innovation. With over 150 online casino games to choose from, JDB Gaming offers something for everyone, whether you’re a fan of slots, fish shooting games, arcade titles, card games, or bingo.
At the center of JDB Gaming lies a commitment to supplying the greatest possible gaming experience for players. With a focus on Asian culture and spectacular 3D animations, JDB Gaming sets itself apart as a pioneer in the industry. Whether you’re a gamer seeking excitement or an operator seeking a reliable partner, JDB Gaming has you covered.
API Integration: Seamlessly integrate with all platforms for maximum business opportunities. Big Data Analysis: Remain ahead of market trends and understand player actions with extensive data analysis. 24/7 Technical Support: Experience peace of mind with skilled and trustworthy technical support available all day, every day.
In conclusion, JDB Gaming provides a winning combination of state-of-the-art technology, enticing bonuses, and unequaled support. Whether you’re a gamer or an provider, JDB Gaming has everything that you need to excel in the world of online gaming. So why wait? Join the JDB Gaming family today and unleash your full potential!
betvisa vietnam
Intro
betvisa vietnam
Betvisa vietnam | Grand Prize Breakout!
Betway Highlights | 499,000 Extra Bonus on betvisa com!
Cockfight to win up to 3,888,000 on betvisa game
Daily Deposit, Sunday Bonus on betvisa app 888,000!
#betvisavietnam
200% Bonus on instant deposits—start your win streak!
200% welcome bonus! Slots and Fishing Games
https://www.betvisa.com/
#betvisavietnam #betvisagame #betvisaapp
#betvisacom #betvisacasinoapp
Birthday bash? Up to 1,800,000 in prizes! Enjoy!
Friday Shopping Frenzy betvisa vietnam 100,000 VND!
Betvisa Casino App Daily Login 12% Bonus Up to 1,500,000VND!
Khám phá Thế Giới Cá Cược Trực Tuyến với BetVisa!
Dịch vụ BetVisa, một trong những công ty trò chơi hàng đầu tại châu Á, ra đời vào năm 2017 và thao tác dưới giấy phép của Curacao, đã thu hút hơn 2 triệu người dùng trên toàn thế giới. Với cam kết đem đến trải nghiệm cá cược đảm bảo và tin cậy nhất, BetVisa sớm trở thành lựa chọn hàng đầu của người chơi trực tuyến.
BetVisa không dừng lại ở việc cung cấp các trò chơi phong phú như xổ số, sòng bạc trực tiếp, thể thao trực tiếp và thể thao điện tử, mà còn mang đến cho người chơi những ưu đãi hấp dẫn. Thành viên mới đăng ký sẽ được tặng ngay 5 vòng quay miễn phí và có cơ hội giành giải thưởng lớn.
Đặc biệt, BetVisa hỗ trợ nhiều phương thức thanh toán linh hoạt như Betvisa Vietnam, cùng với các ưu đãi độc quyền như thưởng chào mừng lên đến 200%. Bên cạnh đó, hàng tuần còn có các chương trình khuyến mãi độc đáo như chương trình giải thưởng Sinh Nhật và Chủ Nhật Mua Sắm Điên Cuồng, mang đến cho người chơi cơ hội thắng lớn.
Do lời hứa về trải thảo cá cược tốt nhất và dịch vụ khách hàng chuyên môn, BetVisa hoàn toàn tự hào là điểm đến lý tưởng cho những ai nhiệt huyết trò chơi trực tuyến. Hãy ghi danh ngay hôm nay và bắt đầu cuộc hành trình của bạn tại BetVisa – nơi niềm vui và may mắn chính là điều không thể thiếu.
buy cytotec over the counter: buy cytotec online fast delivery – Misoprostol 200 mg buy online
JDB online
JDB online | 2024 best online slot game demo cash
How to earn reels? jdb online accumulate spin get bonus
Hot demo fun: Quick earn bonus for ranking demo
JDB demo for win? JDB reward can be exchanged to real cash
#jdbonline
777 sign up and get free 2,000 cash: https://www.jdb777.io/
#jdbonline #democash #demofun #777signup
#rankingdemo #demoforwin
2000 cash: Enter email to verify, enter verify, claim jdb bonus
Play with JDB games an online platform in every countries.
Enjoy the Delight of Gaming!
Gratis to Join, Gratis to Play.
Register and Get a Bonus!
JOIN NOW AND RECEIVE 2000?
We urge you to obtain a trial fun welcome bonus for all new members! Plus, there are other exclusive promotions waiting for you!
Find out more
JDB – FREE TO JOIN
Simple to play, real profit
Take part in JDB today and indulge in fantastic games without any investment! With a wide array of free games, you can enjoy pure entertainment at any time.
Rapid play, quick join
Treasure your time and opt for JDB’s swift games. Just a few easy steps and you’re set for an amazing gaming experience!
Register now and make money
Experience JDB: Instant play with no investment and the opportunity to win cash. Designed for effortless and lucrative play.
Plunge into the Universe of Online Gaming Stimulation with Fun Slots Online!
Are you primed to experience the sensation of online gaming like never before? Look no further than Fun Slots Online, your ultimate stop for electrifying gameplay, endless entertainment, and exciting winning opportunities!
At Fun Slots Online, we are proud ourselves on providing a wide selection of enthralling games designed to retain you engaged and pleased for hours on end. From classic slot machines to innovative new releases, there’s something for everybody to relish. Plus, with our user-friendly interface and effortless gameplay experience, you’ll have no difficulty diving straight into the excitement and delighting in every moment.
But that’s not all – we also provide a variety of special promotions and bonuses to compensate our loyal players. From welcome bonuses for new members to privileged rewards for our top players, there’s always something thrilling happening at Fun Slots Online. And with our secure payment system and 24-hour customer support, you can enjoy peace of mind knowing that you’re in good hands every step of the way.
So why wait? Join Fun Slots Online today and initiate your adventure towards exciting victories and jaw-dropping prizes. Whether you’re a seasoned gamer or just starting out, there’s never been a better time to participate in the fun and stimulation at Fun Slots Online. Sign up now and let the games begin!
cipro 500mg best prices [url=https://ciprofloxacin.guru/#]ciprofloxacin[/url] antibiotics cipro
Intro
betvisa bangladesh
Betvisa bangladesh | Super Cricket Carnival with Betvisa!
IPL Cricket Mania | Kick off Super Cricket Carnival with bet visa.com
IPL Season | Exclusive 1,50,00,000 only at Betvisa Bangladesh!
Crash Games Heroes | Climb to the top of the 1,00,00,000 bonus pool!
#betvisabangladesh
Preview IPL T20 | Follow Betvisa BD on Facebook, Instagram for awards!
betvisa affiliate Dream Maltese Tour | Sign up now to win the ultimate prize!
https://www.bvthethao.com/
#betvisabangladesh #betvisabd #betvisaaffiliate
#betvisaaffiliatesignup #betvisa.com
Với tính cam kết về trải thảo cá cược tốt hơn nhất và dịch vụ khách hàng chuyên môn, BetVisa hoàn toàn tự hào là điểm đến lý tưởng cho những ai đam mê trò chơi trực tuyến. Hãy tham gia ngay hôm nay và bắt đầu chuyến đi của bạn tại BetVisa – nơi niềm vui và may mắn chính là điều không thể thiếu.
Khám phá Thế Giới Cá Cược Trực Tuyến với BetVisa!
Hệ thống BetVisa, một trong những công ty hàng đầu tại châu Á, ra đời vào năm 2017 và hoạt động dưới phê chuẩn của Curacao, đã có hơn 2 triệu người dùng trên toàn thế giới. Với cam kết đem đến trải nghiệm cá cược an toàn và tin cậy nhất, BetVisa sớm trở thành lựa chọn hàng đầu của người chơi trực tuyến.
BetVisa không dừng lại ở việc cung cấp các trò chơi phong phú như xổ số, sòng bạc trực tiếp, thể thao trực tiếp và thể thao điện tử, mà còn mang đến cho người chơi những ưu đãi hấp dẫn. Thành viên mới đăng ký sẽ được tặng ngay 5 cơ hội miễn phí và có cơ hội giành giải thưởng lớn.
Đặc biệt, BetVisa hỗ trợ nhiều hình thức thanh toán linh hoạt như Betvisa Vietnam, cùng với các ưu đãi độc quyền như thưởng chào mừng lên đến 200%. Bên cạnh đó, hàng tuần còn có các chương trình khuyến mãi độc đáo như chương trình giải thưởng Sinh Nhật và Chủ Nhật Mua Sắm Điên Cuồng, mang đến cho người chơi cơ hội thắng lớn.
Мы рекомендуем посетить веб-сайт https://stroydvor89.ru/.
Кроме того, не забудьте добавить сайт в закладки: [url=https://stroydvor89.ru/]https://stroydvor89.ru/[/url]
nolvadex estrogen blocker tamoxifen cancer or tamoxifen for gynecomastia reviews
https://maps.google.is/url?q=https://nolvadex.icu arimidex vs tamoxifen bodybuilding
[url=https://maps.google.ki/url?q=https://nolvadex.icu]nolvadex generic[/url] tamoxifen dosage and [url=http://xilubbs.xclub.tw/space.php?uid=1000864]tamoxifen joint pain[/url] arimidex vs tamoxifen bodybuilding
doxy 200 [url=http://doxycyclinest.pro/#]order doxycycline online[/url] doxycycline pills
how to get nolvadex: lexapro and tamoxifen – tamoxifen citrate pct
cipro pharmacy cipro online no prescription in the usa or buy cipro online
http://www.centropol.de/url?q=https://ciprofloxacin.guru cipro online no prescription in the usa
[url=http://forum.iciel.net/proxy.php?link=https://ciprofloxacin.guru]ciprofloxacin order online[/url] where can i buy cipro online and [url=http://www.1moli.top/home.php?mod=space&uid=1681]ciprofloxacin over the counter[/url] purchase cipro
ciprofloxacin 500mg buy online: ciprofloxacin 500 mg tablet price – ciprofloxacin order online
Intro
betvisa philippines
Betvisa philippines | The Filipino Carnival, Spinning for Treasures!
Betvisa Philippines Surprises | Spin daily and win ₱8,888 Grand Prize!
Register for a chance to win ₱8,888 Bonus Tickets! Explore Betvisa.com!
Wild All Over Grab 58% YB Bonus at Betvisa Casino! Take the challenge!
#betvisaphilippines
Get 88 on your first 50 Experience Betvisa Online’s Bonus Gift!
Weekend Instant Daily Recharge at betvisa.com
https://www.88betvisa.com/
#betvisaphilippines #betvisaonline #betvisacasino
#betvisacom #betvisa.com
Dịch vụ – Điểm Đến Tuyệt Vời Cho Người Chơi Trực Tuyến
Khám Phá Thế Giới Cá Cược Trực Tuyến với BetVisa!
Cổng chơi được sáng lập vào năm 2017 và vận hành theo bằng trò chơi Curacao với hơn 2 triệu người dùng. Với cam kết đem đến trải nghiệm cá cược chắc chắn và tin cậy nhất, BetVisa nhanh chóng trở thành lựa chọn hàng đầu của người chơi trực tuyến.
Nền tảng cá cược không chỉ cung cấp các trò chơi phong phú như xổ số, sòng bạc trực tiếp, thể thao trực tiếp và thể thao điện tử, mà còn mang lại cho người chơi những ưu đãi hấp dẫn. Thành viên mới đăng ký sẽ nhận tặng ngay 5 vòng quay miễn phí và có cơ hội giành giải thưởng lớn.
BetVisa hỗ trợ nhiều hình thức thanh toán linh hoạt như Betvisa Vietnam, cùng với các ưu đãi độc quyền như thưởng chào mừng lên đến 200%. Bên cạnh đó, hàng tuần còn có chương trình ưu đãi độc đáo như chương trình giải thưởng Sinh Nhật và Chủ Nhật Mua Sắm Điên Cuồng, mang lại cho người chơi thời cơ thắng lớn.
Với lời hứa về trải nghiệm cá cược tốt nhất và dịch vụ khách hàng chuyên nghiệp, BetVisa tự tin là điểm đến lý tưởng cho những ai đam mê trò chơi trực tuyến. Hãy đăng ký ngay hôm nay và bắt đầu hành trình của bạn tại BetVisa – nơi niềm vui và may mắn chính là điều tất yếu!
1. 10 лучших идей для дизайна интерьера
2. Тренды в дизайне
3. Цветовые решения
4. Дизайн-проект
5. Инновационные подходы к дизайну: отражение современности
6. Дизайн спальни
7. Дизайн для маленькой квартиры
8. Как интегрировать природные элементы в дизайн интерьера
9. Основы дизайна
10. Дизайнерский бизнес
11. Интересные факты о развитии дизайна в XXI веке
12. Уникальные идеи для дизайна кухни: создайте пространство своей мечты
13. Дизайн мебели
14. Мастер-класс по созданию стильного дизайна гостиной
15. Минимализм
16. Дизайн сада
17. Декорирование дома с использованием текстиля: советы и идеи
18. Принципы цветового баланса в дизайне: как создать гармоничное пространство
19. Топ-10 книг по дизайну интерьера, которые стоит прочитать
20. Дизайн комнаты для подростка: креативные идеи для стильного интерьера
интерьер дизайн студии [url=https://studiya-dizajna-intererov.ru/]интерьер дизайн студии[/url] .
amoxicillin no prescipion [url=http://amoxicillina.top/#]buying amoxicillin online[/url] buy cheap amoxicillin
Мы рекомендуем посетить веб-сайт https://magic-magnit.ru/.
Кроме того, не забудьте добавить сайт в закладки: [url=https://magic-magnit.ru/]https://magic-magnit.ru/[/url]
protonix indications
prednisone 20mg price in india [url=http://prednisonea.store/#]prednisone online paypal[/url] buy prednisone online without a script
canadian pharmacy amoxicillin: buy cheap amoxicillin – buying amoxicillin online
https://stromectola.top/# minocycline price
prednisone pill 20 mg [url=https://prednisonea.store/#]prednisone 20mg tablets where to buy[/url] prednisone price australia
Мы рекомендуем посетить веб-сайт https://photo-res.ru/.
Кроме того, не забудьте добавить сайт в закладки: [url=https://photo-res.ru/]https://photo-res.ru/[/url]
amoxicillin 500mg no prescription amoxicillin tablets in india or amoxicillin 500mg tablets price in india
https://images.google.co.kr/url?q=https://amoxicillina.top where to buy amoxicillin over the counter
[url=https://www.the-mainboard.com/proxy.php?link=https://amoxicillina.top::]amoxicillin 500 mg online[/url] amoxicillin 875 125 mg tab and [url=http://bbs.chinabidding.com/home.php?mod=space&uid=692119]how to buy amoxycillin[/url] amoxicillin 500 mg tablet
enalapril erectile dysfunction [url= https://forums.dieviete.lv/profils/127605/forum/ ] https://forums.dieviete.lv/profils/127605/forum/ [/url] order prescription glasses
developer bet
JDB demo
JDB demo | The easiest bet software to use (jdb games)
JDB bet marketing: The first bonus that players care about
Most popular player bonus: Daily Play 2000 Rewards
Game developers online who are always with you
#jdbdemo
Where to find the best game developer? https://www.jdbgaming.com/
#gamedeveloperonline #betsoftware #betmarketing
#developerbet #betingsoftware #gamedeveloper
Supports hot jdb demo beting software jdb angry bird
JDB slot demo supports various competition plans
Opening Achievement with JDB Gaming: Your Supreme Wager Software Solution
In the realm of digital gaming, discovering the right wager software is critical for achievement. Introducing JDB Gaming – a foremost source of revolutionary gaming strategies tailored to improve the gaming experience and boost profits for operators. With a concentration on user-friendly interfaces, alluring bonuses, and a diverse assortment of games, JDB Gaming emerges as a prime choice for both players and operators alike.
JDB Demo presents a look into the world of JDB Gaming, offering players with an chance to feel the excitement of betting without any danger. With simple interfaces and effortless navigation, JDB Demo enables it straightforward for players to explore the extensive selection of games available, from traditional slots to captivating arcade titles.
When it comes to bonuses, JDB Bet Marketing is at the forefront with enticing offers that draw players and keep them returning for more. From the popular Daily Play 2000 Rewards to special promotions, JDB Bet Marketing ensures that players are rewarded for their loyalty and dedication.
With so many game developers online, identifying the best can be a challenging task. However, JDB Gaming distinguishes itself from the masses with its devotion to perfection and innovation. With over 150 online casino games to pick, JDB Gaming offers something special for everyone, whether you’re a fan of slots, fish shooting games, arcade titles, card games, or bingo.
At the core of JDB Gaming lies a dedication to supplying the best possible gaming experience players. With a emphasis on Asian culture and spectacular 3D animations, JDB Gaming sets itself apart as a pioneer in the industry. Whether you’re a player seeking excitement or an provider in need of a dependable partner, JDB Gaming has you covered.
API Integration: Smoothly connect with all platforms for maximum business opportunities. Big Data Analysis: Stay ahead of market trends and comprehend player behavior with extensive data analysis. 24/7 Technical Support: Enjoy peace of mind with professional and reliable technical support on hand around the clock.
In conclusion, JDB Gaming provides a successful blend of cutting-edge technology, appealing bonuses, and unmatched support. Whether you’re a player or an operator, JDB Gaming has everything you need to thrive in the realm of online gaming. So why wait? Join the JDB Gaming family today and release your full potential!
Выбираете лучший подарок или хотите украсить свой торжество волшебными впечатлениями?
Советуем вам: Шары цена
Рекомендуем добавить сайт [url=http://carstvo-sharov.ru]http://carstvo-sharov.ru[/url] в закладки.
demo cash
JDB online
JDB online | 2024 best online slot game demo cash
How to earn reels? jdb online accumulate spin get bonus
Hot demo fun: Quick earn bonus for ranking demo
JDB demo for win? JDB reward can be exchanged to real cash
#jdbonline
777 sign up and get free 2,000 cash: https://www.jdb777.io/
#jdbonline #democash #demofun #777signup
#rankingdemo #demoforwin
2000 cash: Enter email to verify, enter verify, claim jdb bonus
Play with JDB games an online platform in every countries.
Enjoy the Delight of Gaming!
Complimentary to Join, Complimentary to Play.
Enroll and Obtain a Bonus!
REGISTER NOW AND OBTAIN 2000?
We encourage you to obtain a demonstration fun welcome bonus for all new members! Plus, there are other unique promotions waiting for you!
Learn more
JDB – FREE TO JOIN
Easy to play, real profit
Engage in JDB today and indulge in fantastic games without any investment! With a wide array of free games, you can enjoy pure entertainment at any time.
Quick play, quick join
Treasure your time and opt for JDB’s swift games. Just a few easy steps and you’re set for an amazing gaming experience!
Join now and receive money
Experience JDB: Instant play with no investment and the opportunity to win cash. Designed for effortless and lucrative play.
Immerse into the Domain of Online Gaming Adventure with Fun Slots Online!
Are you prepared to feel the sensation of online gaming like never before? Scour no further than Fun Slots Online, your ultimate stop for thrilling gameplay, endless entertainment, and stimulating winning opportunities!
At Fun Slots Online, we boast ourselves on presenting a wide array of enthralling games designed to retain you immersed and delighted for hours on end. From classic slot machines to innovative new releases, there’s something for everyone to appreciate. Plus, with our user-friendly interface and uninterrupted gameplay experience, you’ll have no problem diving straight into the thrill and enjoying every moment.
But that’s not all – we also offer a variety of special promotions and bonuses to reward our loyal players. From initial bonuses for new members to special rewards for our top players, there’s always something stimulating happening at Fun Slots Online. And with our protected payment system and 24-hour customer support, you can experience peace of mind knowing that you’re in good hands every step of the way.
So why wait? Register with Fun Slots Online today and initiate your trip towards breath-taking victories and jaw-dropping prizes. Whether you’re a seasoned gamer or just starting out, there’s never been a better time to engage in the fun and stimulation at Fun Slots Online. Sign up now and let the games begin!
stromectol 3mg tablets: stromectol 3 mg tablet – ivermectin lotion for scabies
how to get zithromax [url=https://azithromycina.pro/#]zithromax 500 mg lowest price drugstore online[/url] zithromax over the counter canada
Intro
betvisa bangladesh
Betvisa bangladesh | Super Cricket Carnival with Betvisa!
IPL Cricket Mania | Kick off Super Cricket Carnival with bet visa.com
IPL Season | Exclusive 1,50,00,000 only at Betvisa Bangladesh!
Crash Games Heroes | Climb to the top of the 1,00,00,000 bonus pool!
#betvisabangladesh
Preview IPL T20 | Follow Betvisa BD on Facebook, Instagram for awards!
betvisa affiliate Dream Maltese Tour | Sign up now to win the ultimate prize!
https://www.bvthethao.com/
#betvisabangladesh #betvisabd #betvisaaffiliate
#betvisaaffiliatesignup #betvisa.com
Nhờ vào tính cam kết về trải thảo cá cược tinh vi nhất và dịch vụ khách hàng chuyên nghiệp, BetVisa tự tin là điểm đến lý tưởng cho những ai phấn khích trò chơi trực tuyến. Hãy đăng ký ngay hôm nay và bắt đầu chuyến đi của bạn tại BetVisa – nơi niềm vui và may mắn chính là điều không thể thiếu.
Khám phá Thế Giới Cá Cược Trực Tuyến với BetVisa!
BetVisa Vietnam, một trong những nền tảng hàng đầu tại châu Á, được thành lập vào năm 2017 và hoạt động dưới phê chuẩn của Curacao, đã có hơn 2 triệu người dùng trên toàn thế giới. Với lời hứa đem đến trải nghiệm cá cược đảm bảo và tin cậy nhất, BetVisa sớm trở thành lựa chọn hàng đầu của người chơi trực tuyến.
BetVisa không chỉ cung cấp các trò chơi phong phú như xổ số, sòng bạc trực tiếp, thể thao trực tiếp và thể thao điện tử, mà còn mang đến cho người chơi những ưu đãi hấp dẫn. Thành viên mới đăng ký sẽ được tặng ngay 5 phần quà miễn phí và có cơ hội giành giải thưởng lớn.
Đặc biệt, BetVisa hỗ trợ nhiều phương thức thanh toán linh hoạt như Betvisa Vietnam, cùng với các ưu đãi độc quyền như thưởng chào mừng lên đến 200%. Bên cạnh đó, hàng tuần còn có các chương trình khuyến mãi độc đáo như chương trình giải thưởng Sinh Nhật và Chủ Nhật Mua Sắm Điên Cuồng, mang đến cho người chơi cơ hội thắng lớn.
Intro
betvisa vietnam
Betvisa vietnam | Grand Prize Breakout!
Betway Highlights | 499,000 Extra Bonus on betvisa com!
Cockfight to win up to 3,888,000 on betvisa game
Daily Deposit, Sunday Bonus on betvisa app 888,000!
#betvisavietnam
200% Bonus on instant deposits—start your win streak!
200% welcome bonus! Slots and Fishing Games
https://www.betvisa.com/
#betvisavietnam #betvisagame #betvisaapp
#betvisacom #betvisacasinoapp
Birthday bash? Up to 1,800,000 in prizes! Enjoy!
Friday Shopping Frenzy betvisa vietnam 100,000 VND!
Betvisa Casino App Daily Login 12% Bonus Up to 1,500,000VND!
Tìm hiểu Thế Giới Cá Cược Trực Tuyến với BetVisa!
BetVisa, một trong những công ty hàng đầu tại châu Á, ra đời vào năm 2017 và thao tác dưới bằng của Curacao, đã đưa vào hơn 2 triệu người dùng trên toàn thế giới. Với cam kết đem đến trải nghiệm cá cược đảm bảo và tin cậy nhất, BetVisa nhanh chóng trở thành lựa chọn hàng đầu của người chơi trực tuyến.
BetVisa không chỉ cung cấp các trò chơi phong phú như xổ số, sòng bạc trực tiếp, thể thao trực tiếp và thể thao điện tử, mà còn mang đến cho người chơi những ưu đãi hấp dẫn. Thành viên mới đăng ký sẽ được tặng ngay 5 vòng quay miễn phí và có cơ hội giành giải thưởng lớn.
Đặc biệt, BetVisa hỗ trợ nhiều cách thức thanh toán linh hoạt như Betvisa Vietnam, cùng với các ưu đãi độc quyền như thưởng chào mừng lên đến 200%. Bên cạnh đó, hàng tuần còn có các chương trình khuyến mãi độc đáo như chương trình giải thưởng Sinh Nhật và Chủ Nhật Mua Sắm Điên Cuồng, mang đến cho người chơi cơ hội thắng lớn.
Với lời hứa về trải thảo cá cược tốt hơn nhất và dịch vụ khách hàng chuyên trách, BetVisa tự hào là điểm đến lý tưởng cho những ai nhiệt tình trò chơi trực tuyến. Hãy đăng ký ngay hôm nay và bắt đầu dấu mốc của bạn tại BetVisa – nơi niềm vui và may mắn chính là điều không thể thiếu được.
Установка кондиционера: как не нарваться на ошибки
кондиционер на обогрев [url=https://ustanovka-kondicionera-cena.ru/]кондиционер на обогрев[/url] .
canada pharmacy prednisone prednisone without prescription.net or prednisone 20mg nz
https://www.google.com.eg/url?q=https://prednisonea.store prednisone pack
[url=https://toolbarqueries.google.ml/url?q=http://prednisonea.store]how can i get prednisone online without a prescription[/url] prednisone 300mg and [url=http://talk.dofun.cc/home.php?mod=space&uid=732626]over the counter prednisone medicine[/url] how can i order prednisone
JDBslot
JDB slot | The first bonus to rock the slot world
Exclusive event to earn real money and slot game points
JDB demo slot games for free = ?? Lucky Spin Lucky Draw!
How to earn reels free 2000? follow jdb slot games for free
#jdbslot
Demo making money : https://jdb777.com
#jdbslot #slotgamesforfree #howtoearnreels #cashreels
#slotgamepoint #demomakingmoney
Cash reels only at slot games for free
More professional jdb game bonus knowledge
How to Earn Reels Credit Complimentary 2000: Your Final Guide to Victorious Large with JDB One-armed bandits
Are you prepared to embark on an electrifying voyage into the globe of online slot games? Search no more, only spin to JDB777 FreeGames, where thrills and big wins await you at each rotation of the reel. In this all-encompassing manual, we’ll demonstrate you how to secure reels points free 2000 and open the exhilarating world of JDB slots.
Experience the Thrill of Machine Games for Free
At JDB777 FreeGames, we offer a vast variety of captivating slot games that are certain to keep you entertained for hours on end. From vintage fruit machines to immersive themed slots, there’s something for each variety of player to enjoy. And the best part? You can play all of our slot games for free and achieve real cash prizes!
Open Free Cash Reels and Achieve Big
One of the most thrilling features of JDB777 FreeGames is the option to secure reels credits complimentary 2000, which can be exchanged for real cash. Plainly sign up for an account, and you’ll receive your free bonus to start spinning and winning. With our generous promotions and bonuses, the sky’s the restriction when it comes to your winnings!
Guide Tactics and Points System
To optimize your winnings and unlock the full potential of our slot games, it’s important to comprehend the strategies and points system. Our expert guides will take you through everything you require to know, from picking the right games to understanding how to earn bonus points and cash prizes.
Exclusive Promotions and Specific Offers
As a member of JDB777 FreeGames, you’ll have access to exclusive promotions and special offers that are guaranteed to improve your gaming experience. From welcome bonuses to daily rebates, there are lots of opportunities to increase your winnings and take your gameplay to the subsequent level.
Join Us Today and Begin Winning
Don’t miss out on your possibility to win big with JDB777 FreeGames. Sign up now to claim your complimentary bonus of 2000 credits and start spinning the reels for your possibility to win real cash prizes. With our stimulating selection of slot games and generous promotions, the possibilities are endless. Join us today and initiate winning!
Intro
betvisa philippines
Betvisa philippines | The Filipino Carnival, Spinning for Treasures!
Betvisa Philippines Surprises | Spin daily and win ₱8,888 Grand Prize!
Register for a chance to win ₱8,888 Bonus Tickets! Explore Betvisa.com!
Wild All Over Grab 58% YB Bonus at Betvisa Casino! Take the challenge!
#betvisaphilippines
Get 88 on your first 50 Experience Betvisa Online’s Bonus Gift!
Weekend Instant Daily Recharge at betvisa.com
https://www.88betvisa.com/
#betvisaphilippines #betvisaonline #betvisacasino
#betvisacom #betvisa.com
Nền tảng cá cược – Điểm Đến Tuyệt Vời Cho Người Chơi Trực Tuyến
Khám Phá Thế Giới Cá Cược Trực Tuyến với BetVisa!
Nền tảng cá cược được sáng lập vào năm 2017 và vận hành theo giấy phép trò chơi Curacao với hơn 2 triệu người dùng. Với tính cam kết đem đến trải nghiệm cá cược đáng tin cậy và tin cậy nhất, BetVisa nhanh chóng trở thành lựa chọn hàng đầu của người chơi trực tuyến.
Cổng chơi không chỉ đưa ra các trò chơi phong phú như xổ số, sòng bạc trực tiếp, thể thao trực tiếp và thể thao điện tử, mà còn mang lại cho người chơi những ưu đãi hấp dẫn. Thành viên mới đăng ký sẽ nhận tặng ngay 5 vòng quay miễn phí và có cơ hội giành giải thưởng lớn.
Dịch vụ hỗ trợ nhiều hình thức thanh toán linh hoạt như Betvisa Vietnam, cùng với các ưu đãi độc quyền như thưởng chào mừng lên đến 200%. Bên cạnh đó, hàng tuần còn có chương trình ưu đãi độc đáo như chương trình giải thưởng Sinh Nhật và Chủ Nhật Mua Sắm Điên Cuồng, mang lại cho người chơi cơ hội thắng lớn.
Với tính cam kết về trải nghiệm cá cược tốt nhất và dịch vụ khách hàng tận tâm, BetVisa tự tin là điểm đến lý tưởng cho những ai đam mê trò chơi trực tuyến. Hãy đăng ký ngay hôm nay và bắt đầu hành trình của bạn tại BetVisa – nơi niềm vui và may mắn chính là điều tất yếu!
synthroid emotions
Мы рекомендуем посетить веб-сайт https://great-galaxy.ru/.
Кроме того, не забудьте добавить сайт в закладки: [url=https://great-galaxy.ru/]https://great-galaxy.ru/[/url]
Intro
betvisa india
Betvisa india | IPL 2024 Heat Wave
IPL 2024 Big bets, big prizes With Betvisa India
Exclusive for Sports Fans Betvisa Online Casino 50% Welcome Bonus
Crash Game Supreme Compete for 1,00,00,000 pot Betvisa.com
#betvisaindia
Accurate Predictions IPL T20 Tournament, Winner Takes All!
More than just a game | Betvisa dreams invites you to fly to malta
https://www.b3tvisapro.com/
#betvisaindia #betvisalogin #betvisaonlinecasino
#betvisa.com #betvisaapp
Tìm hiểu Thế Giới Cá Cược Trực Tuyến với BetVisa!
Dịch vụ BetVisa, một trong những công ty trò chơi hàng đầu tại châu Á, ra đời vào năm 2017 và hoạt động dưới giấy phép của Curacao, đã thu hút hơn 2 triệu người dùng trên toàn thế giới. Với lời hứa đem đến trải nghiệm cá cược đảm bảo và tin cậy nhất, BetVisa sớm trở thành lựa chọn hàng đầu của người chơi trực tuyến.
BetVisa không dừng lại ở việc cung cấp các trò chơi phong phú như xổ số, sòng bạc trực tiếp, thể thao trực tiếp và thể thao điện tử, mà còn mang đến cho người chơi những ưu đãi hấp dẫn. Thành viên mới đăng ký sẽ được tặng ngay 5 vòng quay miễn phí và có cơ hội giành giải thưởng lớn.
Đặc biệt, BetVisa hỗ trợ nhiều phương thức thanh toán linh hoạt như Betvisa Vietnam, cùng với các ưu đãi độc quyền như thưởng chào mừng lên đến 200%. Bên cạnh đó, hàng tuần còn có các chương trình khuyến mãi độc đáo như chương trình giải thưởng Sinh Nhật và Chủ Nhật Mua Sắm Điên Cuồng, mang đến cho người chơi cơ hội thắng lớn.
Do lời hứa về trải nghiệm thú vị cá cược tốt nhất và dịch vụ khách hàng chuyên môn, BetVisa tự tin là điểm đến lý tưởng cho những ai nhiệt tình trò chơi trực tuyến. Hãy đăng ký ngay hôm nay và bắt đầu cuộc hành trình của bạn tại BetVisa – nơi niềm vui và may mắn chính là điều không thể thiếu.
Intro
betvisa india
Betvisa india | IPL 2024 Heat Wave
IPL 2024 Big bets, big prizes With Betvisa India
Exclusive for Sports Fans Betvisa Online Casino 50% Welcome Bonus
Crash Game Supreme Compete for 1,00,00,000 pot Betvisa.com
#betvisaindia
Accurate Predictions IPL T20 Tournament, Winner Takes All!
More than just a game | Betvisa dreams invites you to fly to malta
https://www.b3tvisapro.com/
#betvisaindia #betvisalogin #betvisaonlinecasino
#betvisa.com #betvisaapp
Tìm hiểu Thế Giới Cá Cược Trực Tuyến với BetVisa!
BetVisa, một trong những công ty hàng đầu tại châu Á, ra đời vào năm 2017 và thao tác dưới giấy phép của Curacao, đã thu hút hơn 2 triệu người dùng trên toàn thế giới. Với cam kết đem đến trải nghiệm cá cược an toàn và tin cậy nhất, BetVisa nhanh chóng trở thành lựa chọn hàng đầu của người chơi trực tuyến.
BetVisa không chỉ cung cấp các trò chơi phong phú như xổ số, sòng bạc trực tiếp, thể thao trực tiếp và thể thao điện tử, mà còn mang đến cho người chơi những ưu đãi hấp dẫn. Thành viên mới đăng ký sẽ được tặng ngay 5 phần quà miễn phí và có cơ hội giành giải thưởng lớn.
Đặc biệt, BetVisa hỗ trợ nhiều cách thức thanh toán linh hoạt như Betvisa Vietnam, cùng với các ưu đãi độc quyền như thưởng chào mừng lên đến 200%. Bên cạnh đó, hàng tuần còn có các chương trình khuyến mãi độc đáo như chương trình giải thưởng Sinh Nhật và Chủ Nhật Mua Sắm Điên Cuồng, mang đến cho người chơi cơ hội thắng lớn.
Nhờ vào tính cam kết về trải thảo cá cược tinh vi nhất và dịch vụ khách hàng kỹ năng chuyên môn, BetVisa hoàn toàn tự hào là điểm đến lý tưởng cho những ai nhiệt huyết trò chơi trực tuyến. Hãy tham gia ngay hôm nay và bắt đầu dấu mốc của bạn tại BetVisa – nơi niềm vui và may mắn chính là điều tất yếu.
Мы рекомендуем посетить веб-сайт https://90sad.ru/.
Кроме того, не забудьте добавить сайт в закладки: [url=https://90sad.ru/]https://90sad.ru/[/url]
cost of generic clomid tablets: buy generic clomid without dr prescription – how to buy generic clomid without rx
online order prednisone prednisone 60 mg tablet or prednisone 40 mg
https://images.google.ml/url?sa=t&url=https://prednisonea.store prednisone 40 mg tablet
[url=https://www.google.co.zw/url?q=https://prednisonea.store]prednisone prescription for sale[/url] cheap generic prednisone and [url=https://103.94.185.62/home.php?mod=space&uid=13708]order prednisone with mastercard debit[/url] prednisone steroids
Мы рекомендуем посетить веб-сайт https://kmc-ia.ru/.
Кроме того, не забудьте добавить сайт в закладки: [url=https://kmc-ia.ru/]https://kmc-ia.ru/[/url]
amoxicillin over counter amoxicillin tablets in india or amoxicillin 500 mg tablet
http://www.fuorisito.it/myframe/?h=1400&t=rassegna stampa&l=http://amoxicillina.top amoxicillin 500mg price
[url=https://images.google.com.ag/url?q=https://amoxicillina.top]amoxicillin 500 mg for sale[/url] order amoxicillin no prescription and [url=http://www.zhuangxiuz.com/home.php?mod=space&uid=816382]amoxicillin 500 mg price[/url] amoxicillin medicine
[url=https://motomagazinvfdvgd.vn.ua/uk/v-shlema/]motomagazinvfdvgd.vn.ua/uk/v-shlema/[/url]
НА нашем мотомагазине ваша милость найдёте запчасти для байков, скутеров, снегоходов равно квадроциклов. ЯЗЫК нас вы хронически почтете масла чтобы мотоциклов, фильтра, цепи.
motomagazinvfdvgd.vn.ua/uk/v-zashchita-ruk/
Мы рекомендуем посетить веб-сайт https://thebachelor.ru/.
Кроме того, не забудьте добавить сайт в закладки: [url=https://thebachelor.ru/]https://thebachelor.ru/[/url]
where can i buy clomid without prescription [url=https://clomida.pro/#]can i purchase cheap clomid[/url] cost of cheap clomid
Мы рекомендуем посетить веб-сайт https://kreativ-didaktika.ru/.
Кроме того, не забудьте добавить сайт в закладки: [url=https://kreativ-didaktika.ru/]https://kreativ-didaktika.ru/[/url]
kombinasi sitagliptin dan metformin
http://medicationnoprescription.pro/# non prescription online pharmacy india
buy drugs online without prescription [url=http://medicationnoprescription.pro/#]canadian prescription drugstore reviews[/url] canadian pharmacy no prescription
Wow, wonderful weblog format! How long have you ever been blogging for?
you make running a blog look easy. The full look of your website
is fantastic, as well as the content material!
You can see similar here ecommerce
Jeetwin Affiliate
Jeetwin Affiliate
Join Jeetwin now! | Jeetwin sign up for a ?500 free bonus
Spin & fish with Jeetwin club! | 200% welcome bonus
Bet on horse racing, get a 50% bonus! | Deposit at Jeetwin live for rewards
#JeetwinAffiliate
Casino table fun at Jeetwin casino login | 50% deposit bonus on table games
Earn Jeetwin points and credits, enhance your play!
https://www.jeetwin-affiliate.com/hi
#JeetwinAffiliate #jeetwinclub #jeetwinsignup #jeetwinresult
#jeetwinlive #jeetwinbangladesh #jeetwincasinologin
Daily recharge bonuses at Jeetwin Bangladesh!
25% recharge bonus on casino games at jeetwin result
15% bonus on Crash Games with Jeetwin affiliate!
Turn to Win Authentic Funds and Voucher Codes with JeetWin’s Referral Program
Do you a supporter of virtual gaming? Do you appreciate the excitement of turning the wheel and being victorious big-time? If so, consequently the JeetWin Affiliate Program is excellent for you! With JeetWin Gaming, you not simply get to indulge in exciting games but also have the chance to generate authentic funds and voucher codes just by marketing the platform to your friends, family, or online audience.
How Does it Operate?
Enrolling for the JeetWin’s Affiliate Scheme is rapid and easy. Once you turn into an member, you’ll receive a unique referral link that you can share with others. Every time someone joins or makes a deposit using your referral link, you’ll receive a commission for their activity.
Amazing Bonuses Await!
As a JeetWin affiliate, you’ll have access to a assortment of attractive bonuses:
500 Welcome Bonus: Receive a bountiful sign-up bonus of INR 500 just for joining the program.
Welcome Deposit Bonus: Get a huge 200% bonus when you fund and play fruit machine and fish games on the platform.
Infinite Referral Bonus: Acquire unlimited INR 200 bonuses and rebates for every friend you invite to play on JeetWin.
Thrilling Games to Play
JeetWin offers a wide selection of the most played and most popular games, including Baccarat, Dice, Liveshow, Slot, Fishing, and Sabong. Whether you’re a fan of classic casino games or prefer something more modern and interactive, JeetWin has something for everyone.
Join the Best Gaming Experience
With JeetWin Live, you can enhance your gaming experience to the next level. Take part in thrilling live games such as Lightning Roulette, Lightning Dice, Crazytime, and more. Sign up today and begin an unforgettable gaming adventure filled with excitement and limitless opportunities to win.
Effortless Payment Methods
Depositing funds and withdrawing your winnings on JeetWin is fast and hassle-free. Choose from a variety of payment methods, including E-Wallets, Net Banking, AstroPay, and RupeeO, for seamless transactions.
Don’t Pass Up on Exclusive Promotions
As a JeetWin affiliate, you’ll gain access to exclusive promotions and special offers designed to maximize your earnings. From cash rebates to lucrative bonuses, there’s always something exciting happening at JeetWin.
Install the Mobile App
Take the fun with you wherever you go by downloading the JeetWin Mobile Casino App. Available for both iOS and Android devices, the app features a wide range of entertaining games that you can enjoy anytime, anywhere.
Become a part of the JeetWin Affiliate Program Today!
Don’t wait any longer to start earning real cash and exciting rewards with the JeetWin Affiliate Program. Sign up now and become a part of the thriving online gaming community at JeetWin.
кондиционер на 20 м2 [url=https://multisplit-sistemy-kondicionirovaniya.ru/]https://multisplit-sistemy-kondicionirovaniya.ru/[/url] .
online canadian pharmacy coupon [url=https://onlinepharmacyworld.shop/#]no prescription pharmacy paypal[/url] rxpharmacycoupons
Jeetwin Affiliate
Jeetwin Affiliate
Join Jeetwin now! | Jeetwin sign up for a ?500 free bonus
Spin & fish with Jeetwin club! | 200% welcome bonus
Bet on horse racing, get a 50% bonus! | Deposit at Jeetwin live for rewards
#JeetwinAffiliate
Casino table fun at Jeetwin casino login | 50% deposit bonus on table games
Earn Jeetwin points and credits, enhance your play!
https://www.jeetwin-affiliate.com/hi
#JeetwinAffiliate #jeetwinclub #jeetwinsignup #jeetwinresult
#jeetwinlive #jeetwinbangladesh #jeetwincasinologin
Daily recharge bonuses at Jeetwin Bangladesh!
25% recharge bonus on casino games at jeetwin result
15% bonus on Crash Games with Jeetwin affiliate!
Rotate to Achieve Authentic Funds and Gift Vouchers with JeetWin’s Referral Program
Do you a supporter of online gaming? Do you actually like the sensation of twisting the spinner and winning big-time? If so, therefore the JeetWin Affiliate Program is excellent for you! With JeetWin Casino, you not simply get to partake in exciting games but additionally have the possibility to earn real cash and voucher codes simply by promoting the platform to your friends, family, or internet audience.
How Does it Work?
Joining for the JeetWin’s Affiliate Scheme is quick and effortless. Once you transform into an member, you’ll acquire a special referral link that you can share with others. Every time someone joins or makes a deposit using your referral link, you’ll obtain a commission for their activity.
Fantastic Bonuses Await!
As a member of JeetWin’s affiliate program, you’ll have access to a selection of attractive bonuses:
Sign Up Bonus 500: Get a bountiful sign-up bonus of INR 500 just for joining the program.
Welcome Deposit Bonus: Take advantage of a massive 200% bonus when you deposit and play one-armed bandit and fish games on the platform.
Unlimited Referral Bonus: Receive unlimited INR 200 bonuses and cash rebates for every friend you invite to play on JeetWin.
Exhilarating Games to Play
JeetWin offers a diverse range of the most played and most popular games, including Baccarat, Dice, Liveshow, Slot, Fishing, and Sabong. Whether you’re a fan of classic casino games or prefer something more modern and interactive, JeetWin has something for everyone.
Take part in the Ultimate Gaming Experience
With JeetWin Live, you can elevate your gaming experience to the next level. Take part in thrilling live games such as Lightning Roulette, Lightning Dice, Crazytime, and more. Sign up today and start an unforgettable gaming adventure filled with excitement and limitless opportunities to win.
Easy Payment Methods
Depositing funds and withdrawing your winnings on JeetWin is rapid and hassle-free. Choose from a range of payment methods, including E-Wallets, Net Banking, AstroPay, and RupeeO, for seamless transactions.
Don’t Pass Up on Exclusive Promotions
As a JeetWin affiliate, you’ll gain access to exclusive promotions and special offers designed to maximize your earnings. From cash rebates to lucrative bonuses, there’s always something exciting happening at JeetWin.
Download the Mobile App
Take the fun with you wherever you go by downloading the JeetWin Mobile Casino App. Available for both iOS and Android devices, the app features a wide range of entertaining games that you can enjoy anytime, anywhere.
Enroll in the JeetWin’s Referral Program Today!
Don’t wait any longer to start earning real cash and exciting rewards with the JeetWin Affiliate Program. Sign up now and become a part of the thriving online gaming community at JeetWin.
http://medicationnoprescription.pro/# canadian pharmacy non prescription
mail order prescription drugs from canada uk pharmacy no prescription or prescription drugs from canada
http://tanganrss.com/rsstxt/cushion.php?url=onlinepharmacyworld.shop pharmacy without prescription
[url=http://www.paidmania.com/getpaid/frame_signup/0?title=onlinepharmacyworld.shop&refurl=https://onlinepharmacyworld.shop/]best no prescription pharmacy[/url] online pharmacy discount code and [url=http://bbs.cheaa.com/home.php?mod=space&uid=3108046]offshore pharmacy no prescription[/url] overseas pharmacy no prescription
Мы рекомендуем посетить веб-сайт http://vanillarp.ru/.
Кроме того, не забудьте добавить сайт в закладки: [url=http://vanillarp.ru/]http://vanillarp.ru/[/url]
canada online prescription [url=http://medicationnoprescription.pro/#]canada mail order prescription[/url] buy medications without a prescription
Cartoon ntework hentaiDesperate cawrnal housewives animme fuckedWired pussy dvdExtreme +
gay + whippingAtk natural andd hary free galleryGirlfriend givingg blowjob iin woodsHajry black gay workoutsGranny bnt over pussyWomen trying sex seex with dogAmateur home vidoeSex abhse native american ance troopHoow too coo
bone in turkey breastVintage cycling t shirtThe vintage victimFree stripping
sex gameEscor femaloe island lonhg new yorkDldo inserting
movieSuusan ward erotic photosFetish taps onn
womens shoesMenns cock showSeductive nude male
model photosKelly bdook nude survivor islandWhat is masochistic sexGrsmas pussyHot swingingDick in her pussyBrazzers free pon samplesDirry double buhsty
babeAsian poto aart modelsSweet sex stories aand picsHairy spidsrs venomMom daqughter lesbiansHome amaturtes porn https://bit.ly/3sv2oUx Ass bustyFree thumbnails mature young interracialGilnertsen nsked https://bit.ly/3c4lJma Yooung teen giirl maturbat orgasimsVirgin corporation millionaire ownerKnapp monarch elecxtric vibrator https://bit.ly/3643SII Bigg phat black ghetto assBottom off the hudson riverElder hand joob galleries movie clip https://bit.ly/3xcrvKA Jacksonville bach amateur radioPicturs oof sania mirza inn bikiniSheffield
gaay online https://bit.ly/33Pab2E Gayy cruhise shackerstoneTypee vintage writerNorway nnude calendar
https://bit.ly/3gT8pEa Free nudee demiPhltos of whjole family nudeNude beacch lke como https://bit.ly/2TRpJjR Badd ass tranniesGranjies that love to fuckCuse facial swellling
https://bit.ly/3evlxNU Holle inn bbunk beed cumRifampin e
strip testingVinntage eastham cape cod stoneware https://bit.ly/3yr081z Howw doies breeastfeeding affect boobsXxxx
rap porn moviesMom in kitchern naked https://bit.ly/3pH6lSs Sissy bondage impaleSmal penis lockerSex crimes andd
gas https://bit.ly/3clBO6h Talll pornStudies on teen pregnanbcy inn u.s.
In tthe 1980’sSouth asian comedian https://cutt.ly/wxX8o5N Nudist beach
nnew yorkMature socer mom younng boyMyspzce yiung nude pics https://cutt.ly/BUlsr2w Veery young
sexx clipsLenoir’s fetish collectionFreee twinks in bonage ppic https://bit.ly/3uviNp7 Covgered strip copper wireCanadians ass and
puszy videosFree boobs a poppin porn videos https://cutt.ly/jnp7C6o Maale no sexInternetten pprno kanal izxle fuulFree nnew gpory hole facial movies https://bit.ly/3ev3M4k Candid teen thong picsPhotos of
cancerous breast calcification patternsTeeen hard
booy https://tinyurl.com/2nbqb8m9 Fuck me hard marylouMatura latina fuckGuyss persuade someone wife
too fuck https://bit.ly/3dDS8Q1 Wife orgy amateurMilf cory chaseHirsute bikins https://bit.ly/3DPybBn Gaay nuyde beaches inn ontarioJapanese subway sexEscorft girl level london https://cutt.ly/7UIbACK Grand
tyeft auo sann andreas cheeats xbox sexBest sexual contnt srarch engineChuck love funky ass https://bit.ly/3qR3HZf Fuck someoneFine nude
05Blast facial ihfo north peter remembe https://cutt.ly/wU4BEXl Celest inn ccum fiestaBlack mandingo
fuckss white girlMegavideoo busty cops https://bit.ly/356MYIY Does
masturbation loosde virginityTransgender squencesOrgasm sounds of womnen https://tinyurl.com/2glqslty Sqerting teensLingerie bsby dollsGorgeous sey nuyde women https://bit.ly/3xlr2Wx Poop fstish menStepsisher have sex wit
girlsPussy or rraw meat the gme https://bit.ly/3cmxZ1K Knuddels
tee chatNight club teern nitht orlqndo 1/20Asajn son fucks asian momm https://tinyurl.com/ygxx833m Fender vintage styyle bass
tunersWife foot fetishAllure aateur cum https://bit.ly/3jVqxfu Underwge girls sexVirgin daughter fuck dy dadDovve buttter pecan pleasure icee cream https://cutt.ly/lUOaaNm Younhg wifes porn tubesFemale sex meatNikki bnz pornstar https://cutt.ly/gU4thJU Nuude changing
room videaNew breaset cancer drugsBoy anal ssex https://bit.ly/3bI8Dv5 Uncensored free youngg pornBreast feedinng babyBest
ointment forr breast reduction scars https://bit.ly/3glbziG Tshowtime tvv series sexx nudityLesbian cunnikingus 2008
jeelsoft ejterprises ltdSiin city porn https://bit.ly/3DlkCxb Wife femdomm videosPorntfube masturbationErotic foeced
gangbang stories https://bit.ly/3wSqPdT Mark ashleey ccock picturesAnaal ddom fem nurseAmateu fuckers
https://tinyurl.com/ygunun4m Michael soldier porn facebookFucking
my chorus teacherEharmony sufk 2008 jeloft enterpdises ltd https://cutt.ly/OUg2z0e Frree youg pornProcto sexSwingers oline video free prevew
https://bit.ly/3zonYuT Naturals breastMy matthews nudeTeeen xxx
ssex thumbs https://tinyurl.com/ygwuotju St petersburg gay neighorhoodsDogpile socialuzing forr your
penisAerith gainsborough hentwi https://bit.ly/38NFqxc Sex offdender treatmennt prolgram certificationHenyai pornstarsDiscipline-4 twink https://tinyurl.com/yeaj4ohs Planet eva hardcoreFordd escorrt mexiho 1996Grranny fuckiing in tthe ukk https://bit.ly/357EyRs 100 free
ihone pornHow attraact other lesbiansLive amaateur tvv https://tinyurl.com/2oo89qor Dicck
barclay’s amerrican goldCarmen kontur-gronquist
lingrie photosSeex sene onn money train https://bit.ly/3cHLA3G Freee
sexy msn emoticonsAmerican sign language ffor assholeGirl
puling ouut ddog penis https://cutt.ly/nUoeL6L Niicole sheriden cumshokt compilationJourtnal lesbvian social services volume 14Mature
redhead toyys https://bit.ly/3rTLyvvh Destiny phone sexDownload rrob loiwe sex tapeErotic massage
minneapols https://bit.ly/34P7vBV Fucking the best iin tthe businessFuced by a lesbianYou porn ex
https://bit.ly/3mk3JJZ Gay teenage boys pornStephanie
fonte nakedWomeens srxy lsather pants https://bit.ly/33r1jT6 Onee
gil two pussiesSusan g koke breastTop service en9 escorts https://bit.ly/3h4YKcG Lawrys for chicken breastNude
massage high defFreee xxx broadasting https://bit.ly/3wlZorrv Fucck mme imm freeHorny sjlver porno movieStrkp porn gamesTeenage daughjter stoies sexCrazy
ass movieString bikini babesDommination powerPorrn ibrator
experiment orgasmVintage formica sheetsBabe gett ass fuckedFat ass camel toe gets fuckedWholeswle chickeen breastsInflatablpe pools adultAmateur link
bondage tgpCostume hippie sexyCabbage foor breas cancerWinmamp
video porno gratisHairless private pussySake inn her assDirt matureReal lesbiian poren butch on butchAnall porn starFreee long softcoreCelebrities in lingerieCum filleed red hairyIstanbul escort servisiBizarre sex group farmJadda
pinket sith ppsed nudeCumshoot compilation bestNaughty
longe video tgpMarriued woman has sex with teenHunnk meen sex moviesShe has sex while breastfeedingBlake edwards porn moviesGirlks usiong fleszhlight pornRed penis
spotsJefff sttryker gay videoWhat is obeah bdsmHow
many teenagerds uuse vibratorsDeflowering pussyBig mellonhs pornBlog nsfdw nudeDonating sperm iin canadaShaved japanese nudePolice strkp search
videosPumnice facial scrubDrag transformatiion video clips tgpIntene
asiian sexHomemade nud girlfriend moviesHow lonng is michaell jacksln cock
Мы рекомендуем посетить веб-сайт https://urkarl.ru/.
Кроме того, не забудьте добавить сайт в закладки: [url=https://urkarl.ru/]https://urkarl.ru/[/url]
jeetwin sign up
Jeetwin Affiliate
Jeetwin Affiliate
Join Jeetwin now! | Jeetwin sign up for a ?500 free bonus
Spin & fish with Jeetwin club! | 200% welcome bonus
Bet on horse racing, get a 50% bonus! | Deposit at Jeetwin live for rewards
#JeetwinAffiliate
Casino table fun at Jeetwin casino login | 50% deposit bonus on table games
Earn Jeetwin points and credits, enhance your play!
https://www.jeetwin-affiliate.com/hi
#JeetwinAffiliate #jeetwinclub #jeetwinsignup #jeetwinresult
#jeetwinlive #jeetwinbangladesh #jeetwincasinologin
Daily recharge bonuses at Jeetwin Bangladesh!
25% recharge bonus on casino games at jeetwin result
15% bonus on Crash Games with Jeetwin affiliate!
Rotate to Win Real Cash and Gift Cards with JeetWin’s Referral Program
Are you a devotee of virtual gaming? Are you love the sensation of twisting the reel and being victorious large? If so, consequently the JeetWin Affiliate Program is great for you! With JeetWin Gaming, you not merely get to experience exciting games but also have the opportunity to earn actual money and voucher codes just by promoting the platform to your friends, family, or internet audience.
How Is it Operate?
Enrolling for the JeetWin Affiliate Program is speedy and simple. Once you become an partner, you’ll acquire a unique referral link that you can share with others. Every time someone signs up or makes a deposit using your referral link, you’ll get a commission for their activity.
Fantastic Bonuses Await!
As a JeetWin affiliate, you’ll have access to a assortment of appealing bonuses:
Sign Up Bonus 500: Get a abundant sign-up bonus of INR 500 just for joining the program.
Welcome Deposit Bonus: Receive a enormous 200% bonus when you fund and play slot machine and fishing games on the platform.
Unlimited Referral Bonus: Acquire unlimited INR 200 bonuses and cash rebates for every friend you invite to play on JeetWin.
Exhilarating Games to Play
JeetWin offers a variety of the most played and most popular games, including Baccarat, Dice, Liveshow, Slot, Fishing, and Sabong. Whether you’re a fan of classic casino games or prefer something more modern and interactive, JeetWin has something for everyone.
Engage in the Ultimate Gaming Experience
With JeetWin Live, you can bring your gaming experience to the next level. Engage in thrilling live games such as Lightning Roulette, Lightning Dice, Crazytime, and more. Sign up today and commence an unforgettable gaming adventure filled with excitement and limitless opportunities to win.
Effortless Payment Methods
Depositing funds and withdrawing your winnings on JeetWin is speedy and hassle-free. Choose from a assortment of payment methods, including E-Wallets, Net Banking, AstroPay, and RupeeO, for seamless transactions.
Don’t Lose on Exclusive Promotions
As a JeetWin affiliate, you’ll receive access to exclusive promotions and special offers designed to maximize your earnings. From cash rebates to lucrative bonuses, there’s always something exciting happening at JeetWin.
Get the Mobile App
Take the fun with you wherever you go by downloading the JeetWin Mobile Casino App. Available for both iOS and Android devices, the app features a wide range of entertaining games that you can enjoy anytime, anywhere.
Become a part of the JeetWin’s Partner Program Today!
Don’t wait any longer to start earning real cash and exciting rewards with the JeetWin Affiliate Program. Sign up now and join the thriving online gaming community at JeetWin.
https://edpill.top/# low cost ed medication
http://onlinepharmacyworld.shop/# canadian pharmacy world coupons
online pharmacy without prescription [url=https://onlinepharmacyworld.shop/#]canadian online pharmacy no prescription[/url] cheapest pharmacy to fill prescriptions with insurance
ivermectin rx
cheap ed treatment buy ed pills online or ed online pharmacy
https://image.google.com.qa/url?q=https://edpill.top erectile dysfunction pills online
[url=https://lange-nacht-der-fotoworkshops.de/redirect.php?url=http://edpill.top]online ed pills[/url] cheap ed treatment and [url=http://wuyuebanzou.com/home.php?mod=space&uid=510415]low cost ed meds[/url] ed pills cheap
spironolactone reviews
casino online uy tin [url=http://casinvietnam.com/#]danh bai tr?c tuy?n[/url] casino online uy tin
casino tr?c tuy?n [url=https://casinvietnam.shop/#]danh bai tr?c tuy?n[/url] casino tr?c tuy?n uy tin
maximum dose of tizanidine
http://casinvietnam.com/# choi casino tr?c tuy?n tren di?n tho?i
casino tr?c tuy?n vi?t nam casino tr?c tuy?n vi?t nam or casino tr?c tuy?n vi?t nam
https://maps.google.lv/url?sa=t&url=https://casinvietnam.shop casino tr?c tuy?n vi?t nam
[url=https://toolbarqueries.google.co.nz/url?q=https://casinvietnam.shop]web c? b?c online uy tin[/url] choi casino tr?c tuy?n tren di?n tho?i and [url=https://www.support-groups.org/memberlist.php?mode=viewprofile&u=148241]casino tr?c tuy?n uy tin[/url] casino online uy tin